Kali Linux

Kali Linux is a Debian-derived Linux distribution designed for digital forensics and penetration testing. It is maintained and funded by Offensive Security.

Most Secure Decentralized Cloud Drive on Linux

Nowadays can we imagine that we load a large file on our thumb drive and go to our friend’s home to give the file? No this is the era of cloud. We can easily store that file on our cloud storage and share it with our friend. Cloud storage solves a lot of problems.

internxt most secure cloud on linux

But every innovation had their own problems, many cloud storage services sell our data or various private information to show ads. They also know our behavior and much more about us, they sell our data to maintain their profit. If we need good service and privacy then we need to away from free services because “If you are not paying for it, you’re not the customer; you’re the product being sold.

It is very difficult to find a trusted and good cloud drive for us. We are Linux users we also need a well optimized Linux application to use cloud storage. Here we have Internxt.

Internxt and it’s Features

Internxt Drive is a zero-knowledge, decentralized & encrypted cloud storage service with Internxt, everything we store or transfer is encrypted before leaving our device. The price of using Internxt is very minimal. Even with a free account we can store 10 GB data with all the premium features.

The key features of Internxt is following:

  1. Fully encrypted cloud service.
  2. Safe and secure cloud service.
  3. Free private cloud storage.
  4. Best alternative to Google Drive, DropBox, and Microsoft One Drive.
  5. Best secure drive alternative.
  6. Best drive service for privacy and security.
  7. Zero-trust cloud service.
  8. World’s most secure cloud service.

How to Install Internxt on Linux

Internxt is cross platform. That means we can use it on every kind of operating system like, Windows, Mac, Linux, Android and iOS. But for being a Linux specific website we are just gonna show how to install Internxt on our Linux. Here we have used Kali Linux but the same process can be followed for other Debian based Linux distributions as Ubuntu, Elementary OS, Linux Mint etc.

First of all we need to go to the Internxt Drive web page, Then we need to click on Download for Linux, as shown in the following screenshot:

internxt download for linux

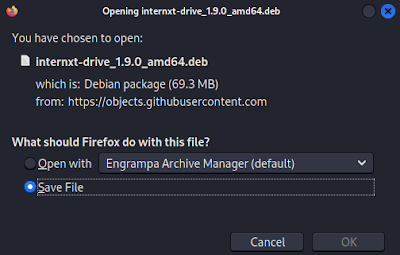
Now we need to save the .deb file of Internxt, as shown in the following screenshot:

saving Internxt deb fle for Linux

After the download is complete we can see the deb file is saved on our Downloads directory. So Here we need to open our terminal window and run following command to change our directory to Downloads:

cd Downlaods

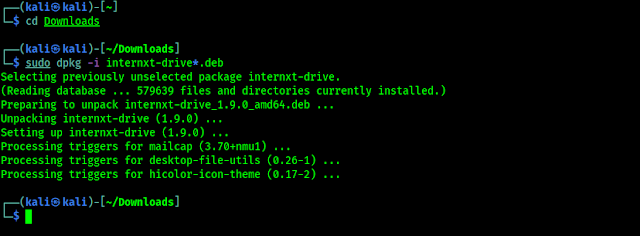
Then we need to run following command to install Internxt Linux Desktop application:

sudo dpkg -i internxt-drive*.deb

As we can see in the following screenshot:

Internxt Linux app installing

After the installation process s done we can see Internxt on our Application menu:

internxt drive on Linux

Now we can use Internxt directly from our Linux system by logging in to the application a new directory usually home/Internxt will be created on our system which will be synced with the Internxt Drive application.

Special Notes

Before buying the service we should try it using a free account which gives us 10GB space with all premium features. Internxt didn’t charges a lot. We can check the pricing here. It is worth every penny, but here we have an extra offer for our readers. Our readers can get extra 20% discount on all Internxt Annual plans by using our coupon code KALILINUXIN.

We are using Internxt personally, and loved it so much. Cloud is the future. We must be a part of this from now. Internxt is going for web3 for better anonymity.

clouds are made with linux servers
Image Credit: Twitter

Love our articles? Make sure to follow us on Twitter and GitHub, we post article updates there. To join our KaliLinuxIn family, join our Telegram Group. We are trying to build a community for Linux and Cybersecurity. For anything we always happy to help everyone on the comment section. As we know our comment section is always open to everyone. We read each and every comment and we always reply.

Basic Networking Part 4 — What is Port?

Introduction

In our many previous articles we had referred the word “port“. In our this Basic Networking Series, we are going to cover about port. Here without being much technical, we just learn the basics of port with a cybersecurity point of view. This will be understanding port for absolute beginners.

what is port

What is Port?

The theory behind port is hard to explain for beginners (excuse us), but we will try our best. In a computer network port is a end point of communication. For an example, we had installed IP camera on our driveway, which is connected on our network. Now it can be accessed from our computer, here IP address and network ports used. Our router is dependent on ports to route data and we can access our camera from our computer. To understand this better let’s jump on little bit technical shit.

In computer networking, a port is a virtual end point of communication. A port is a 16 bit number, i.e. it can go from 1 to 65535. A modern day device can do a lot of things at a particular time. For each type of service there will be a different port, for the same destination IP.

Mainly, there are two protocols in the networking that uses port numbers, they are, Transmission Control Protocol (TCP) and User Datagram Protocol (UDP).

TCP:- TCP handles transmissions. It sends information from one computer to another by a direct connection. Both computers stays connected during this process.

UDP:- With the help of UDP, the computer hardware are can create data packets and send them on the network. It didn’t make connection during transfer.

TCP is slower than UDP, but TCP can retransmit the lost data due to the connection between the devices.

What is Port Numbers ?

Well, as we discussed earlier, port number is a logical address assigned for each process that uses networking for communication.

Network based on TCP and UDP mostly use port numbers up to 65535. The application it self can change it’s port number, but generally it uses common global port numbers, like port number 80 is for HTTP, port 23 for telnet, port 25 for email, port number 3389 generally used for remote desktop protocol. There is a list for all port number and their uses.

What is Port Forwarding ?

When a remote system/computer wants to make a connection with our computer then we need to allow this by opening required port of that service, so the data packets can enter on our system. Remember that port is the end point! This is the very basic concept of port forwarding. We can manage our port forwarding from our router’s settings. Various routers have various type of settings so we need to check our router. We can easily learn how to forward our port by searching internet “How to port forward on router name“. We have discussed about SSH port forwarding, but that is different thing which uses SSH tunneling.

Summary

Cybersecurity learners must have a clear idea on port forwarding. Remote desktop, ssh, exploiting machines etc usually requires port forwarding. IP addresses and ports are very useful things of networking. These are the most basic things of ports.

Love our articles? Make sure to follow us on Twitter and GitHub, we post article updates there. To join our KaliLinuxIn family, join our Telegram Group. We are trying to build a community for Linux and Cybersecurity. For anything we always happy to help everyone on the comment section. As we know our comment section is always open to everyone. We read each and every comment and we always reply.

Basic Networking Part 3 — What is IP Address?

Introduction

A device on the internet or on a local network is identified by its IP address, which is a unique address on that particular network. The Internet Protocol (IP) is a set of rules that regulate the format of data transferred over the internet or a local/private network.

what is ip address

IP addresses, in essence, are the identifiers that allow data to be transmitted between devices over a network: they contain location information and make devices reachable for communication. The internet needs a method of distinguishing between various computers, routers & webpages. IP addresses are essential aspect of how the internet operates and provide a means of doing so.

What is an IP?

IP address/Internet Protocol address, is an identifying number which is related to a specific computer, when connected to other computers or a network. The IP address allows the computers/devices to send and receive information. The IP address allows the computers to send and receive information. IP addresses are made up of four numbers; for example, 192.168.1.251 is an example address. This set’s numbers can vary from 0 to 255. As a result, the entire IP addressing can be ranged from 0.0.0.0 to 255.255.255.255.

IP addresses are not generated randomly. The Internet Assigned Numbers Authority (IANA), a part of the Internet Corporation for Assigned Names and Numbers (ICANN), creates and assigns IP address mathematically. ICANN is a non-profit organization build in the United States, founded in 1998 to assist keep the internet secure and accessible to everyone. A domain name registrar is used every time someone registers a domain on the internet, and assign domain names a IP address.

How IP addresses work?

It helps to understand how IP addresses function if you want to figure out why a device isn’t connecting the way you want it to or if you want to troubleshoot why your network isn’t working.

Internet Protocol communicates in the same manner that any other language does, by following a set of rules to convey information. This protocol is used by all devices to find, send, and share information with other connected devices. Any computer in any area in the world can communicate with one another if they speak the same language.

IP addresses are most commonly used behind the scenes. The procedure is as follows:

  • Your device connects to the internet indirectly by first connecting to a network linked to the internet, which then allows your device internet access.
  • That network will most likely be your Internet Service Provider when you are at home (ISP). It will be your workplace network at work.
  • Your Internet service provider (ISP) assigns an public IP address to your device.
  • Your internet activity passes through your ISP, which uses your public IP address to deliver it back to you. It is their responsibility to issue an IP address to your device because they are providing you with an internet connection.
  • Your IP address, on the other hand, may change. Turning your modem or router on or off, for example, can make a difference. You can also contact your ISP and get it changed for you.
  • Your home IP address does not go with you while you are out and about – for example, when you travel – and you take your device with you. This is because you will be accessing the internet through a different network (Wi-Fi at a hotel, airport, or coffee shop, for example) and will be allocated a different (temporary) IP address by the hotel, airport, or coffee shop’s ISP.

As the name says, there are various types of IP addresses, which we are going to discuss further below.

There are various types of IP addresses, as well as distinct categories of IP addresses.

  1. Private IP Addresses
  2. Public IP Addresses
  3. Dynamic IP Addresses
  4. Static IP Addresses

Private IP Addresses

A private IP address is assigned to any device that connects to your home network. Computers, phones, and other IoT devices are included, as well as any Bluetooth-enabled devices such as speakers, printers, and smart TVs. The number of private IP addresses, you have at home is likely to increase as the number of internet of things grows. Your router must be able to detect each of these devices separately, and many of them must be able to recognize one another. As a result, your router generates private IP addresses for each device, which helps to identify a particular device on your home network.

Public IP Addresses

Public IP address is the primary address associated with your whole home network. While each connected device has its own private IP address, they are all part of your network’s primary IP address (Public IP Address). Your ISP provides the public IP address for your router, as explained above. ISPs typically have a big list of IP addresses from which to assign addresses to their clients. Your public IP address is the address that will be used by all devices outside your internet network (outside of home network) to identify your home network.

Public IP address have two types Dynamic and Public.

Dynamic IP Addresses

As the name says, IP addresses that are dynamic change on a regular basis. Usually an ISP (Internet Service Provider) purchase a big pool of IP addresses and assign them to their clients automatically. They re-assign them on a regular basis, and the older IP numbers are returned to the pool to be used for other users. This rationale behind this strategy is to save money for the ISP. Your ISP don’t have to perform specific procedures to re-establish a customer’s IP address if they move house. for an example, because the routine transfer of IP addresses is automated. There are also security advantages, as a changing of IP address makes it more difficult for hackers to maintain access to your network interface, even the hacker compromised it.

Static IP Addresses

Static IP addresses, unlike dynamic IP addresses, did not change. Once an static IP address is assigned by the network, it does not change. A static IP address is not required for most individuals and businesses, but it is required for businesses/individuals who plan to host their own server. This is because a static IP address ensures that the websites and email addresses associated with it have a stable IP address, which is essential if you want that other devices to be able to find them on the internet consistently. You can talk to your ISP for static IP address if required. Sometimes gamers (MineCraft) uses static IP addresses to host online game servers.

What is the best way to look up IP addresses?

The most straightforward way to determine your router’s public IP address is to Google “What is my IP address?” The solution will be displayed at the top of the page by Google.

Other websites will display the same information: they will be able to see your public IP address because your router has made a request and so released the information by visiting the site. IP Location takes a step further by displaying your ISP’s name as well as your city.

In most cases, this technique will only provide an approximation of position – where the provider is, but not the exact location of the device. Remember to log out of your VPN as well if you’re doing this. Obtaining the public IP address’s true physical geographical address is frequently difficult.

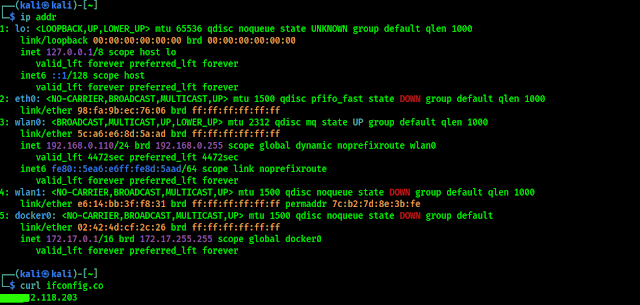
Finding your private IP and private IP address on Linux system is very easy, we need to run following command on our terminal

ip addr

The above command will show our private IP address. To find our public IP address we can search Google as we said previously, or we can run following command on our terminal:

curl ifconfig.co

In the following screenshot we can see the output of both commands:

finding ip address on linux terminal
For privacy reasons we hide our part of public IP address

Summary

To conclude, IP addresses come in many types and for many situations, but all follow the same procedure. Whether it’s locally assigned or it has come from your ISP, IPs are a consistent and necessary part of computer networking.

Basic Networking Part 2 — What Is Data Packets?

Introduction

It turns out that packets are involved in everything you do on the Internet. Packet is a basic unit of communication over Computer Network. Every Web page you receive, every e-mail you write is also made up of packets. Packet switched networks are networks that transport data in small packets.

what is data packets

What is a Packet?

On the Internet, an e-mail message is broken down into bytes of a specified size. These are the individual packages. Each packet contains information that will assist it in reaching its destination, such as the sender’s IP address, the intended receiver’s IP address, and a number that tells the network how many packets this e-mail message has been broken into. The data is carried in packets by the Internet’s protocols, Transmission Control Protocol/Internet Protocol (TCP/IP). Each packet contains a portion of your message’s body. Typically, a packet has 1,000 to 1,500 bytes.

Each packet is subsequently sent to its destination through the best available route, which may or may not be shared by all other packets in the message. This improves the network’s efficiency. First, the network can millisecond-by-millisecond balance the load across several pieces of equipment. Second, if a piece of network equipment fails while a message is being sent, packets can be routed around the fault, ensuring that the complete message is delivered.

Data Packet Structure

Most network packets are split into three parts:

Header – The header contains information about the data that the packet will carry. These instructions may contain the following:

  • The length of the packet (some networks have fixed-length packets, while others rely on the header to contain this information).
  • Synchronization (a few bits that help the packet match up to the network).
  • Packet number (which packet this is in a sequence of packets).
  • Protocol (on networks that carry multiple types of information, the protocol defines what type of packet is being transmitted: e-mail, Web page, streaming video etc.)
  • Destination address (where the packet is going).
  • Originating address (where the packet came from).
  • Other technical data.

Payload – Also known as a packet’s body or data. This is the data that the packet is sending to its intended destination. If the payload of a packet is fixed-length, it may be padded with blank data to make it the proper size.

Trailer – The trailer, also known as the footer, usually contains a handful of bits that inform the receiving device that the packet has ended. It may also include some form of error detection. Cyclic Redundancy Check is the most prevalent type of error checking employed in packets (CRC).

CRC is a really cool program. In some computer networks, this is how it works: It puts together the sum of all the 1s in the payload. The result is saved in the trailer as a hexadecimal value. The receiving device adds up the 1s in the payload and compares the result to the trailer’s value. The packet is valid if the values match. However, if the values do not match, the receiving party will be notified.

Conclusion

Consider how an e-mail message might be divided into packets as an example. Assume you’re sending an e-mail to a friend. The size of the e-mail is approximately 3,500 bits (3.5 kilobits). You’re sending it across a network that employs 1,024-bit fixed-length packets (1 kilobit). Each packet contains a 96-bit header and a 32-bit trailer, leaving 896 bits for the content. Four packets are required to separate the 3,500 bits of message into packets (divide 3,500 by 896). The payload will be 896 bits in three packets and 812 bits in the fourth. The contents of one of the four packages would be as follows:

The proper protocols, as well as the originating address, will be included in the header of each packet.

Basic Networking Part 1– How Do Computer Systems Communicate?

Introduction

Human communication and computer communication are very similar. Many parts of computer science are, in fact, comparable to human behavior. If you’re interested in learning how these machines communicate with one another and how data flows through a network, this article is for you. If computers appear to be a fascinating subject for your thinking, computer communication may pique your interest.

How Do Computer Systems Communicate

Before we go into computer communications, let’s have a look at the article’s structure. The first few paragraphs give an overview of computer systems. Following that, we’ll go over more technical topics like computer networking and network protocols.

Computers Connect with One Another using Their Own Network

On a daily basis, we use the internet. This essentially indicates that we’re all part of the same network. The Internet is a global network that connects all of the world’s users, allowing them to communicate with one another at any time and from any location because they are all members of the same network. A network is a collection of interconnected devices. It can also be a collection of smaller networks. A computer network is made up of two or more computers connected through a network media. Users on the same network can share the same hardware (a printer) and software (apps) and send various types of data such as text, video, and audio. Hardware is employed to connect them, such as the

There are two different sorts of networks. Local area networks and wide area networks are the two types. The key distinction is the network’s range of connectivity. Let’s start with a basic definition of what a local network is.
Because it is established locally, the LAN (Local Area Network) may connect a smaller number of computers, as its name suggests.

You could conceive of a local network as a system that connects people who share a common interest, such as computers in a classroom to allow students and staff to communicate, or computers in a business. The LAN can be a secure network that only they can access and use. As a result, the LAN now has authorized users who use their IP addresses as indicated below.

The network’s identification of the sender and recipient is also detailed below.
Let’s have a look at the wide area network now. The Wide Area Network (WAN) can be used to construct a larger network than the LAN as the number of users grows. The WAN is a network that links networks over wide geographical areas. Assume that the company has expanded its offices to other countries or locations and that they still wish to connect with one another. The Wide Area Network (WAN) is used to carry data over great distances or between networks that are connected to a larger one. Because of the number of users and complexity, WAN speeds can be slower than LAN speeds, however this is dependent on the settings.

What method does the network use to determine which computer is the intended recipient?

We’ve already established a LAN. We can join all of the machines in the same network with a single Ethernet connection. When computer A (or a user) wants to send a message to computer B, the message travels over the cable and is received by all computers in the network because they all share the same medium.

But how does the network know who the message is intended for?

The message is destined for a reader who is eager to read it and is likely to wish to exchange information in return. The router utilizes the MAC address of each machine to resolve this issue. This address ensures that the physical address of the machine is unique.

The Internet Protocol facilitates data transmission within a network. Network packets are used to send the data. A static IP address and a public IP address are assigned to each computer.

Your machine has its own private IP address. Your gadget is given an address by your ISP (Internet Service Provider). The router saves this IP address. A routing table is stored on the router and contains all of the private IP addresses (mobile, laptop, etc.) that are connected to this network.

Summary

The principles of computer communications are covered in this article. You now understand how data is transferred from a wire as a signal to another computer in readable form, going through several levels and protocols. When you press the Send button, the data (signal) becomes 01010101, which passes through the OSI model’s multiple layers

Network Security Testing – What Should You know ?

Regular cyber-attacks and the misuse of stolen data have become the norm, forcing people and by extension, companies that use the data to invest significantly in network security and data management. Many data breaches and network outages occur daily due to software vulnerabilities or cyber-attacks. The trend of network compromises and data thefts has increased exponentially over the years.
According to the United Nations, cybercrime has increased 600% during COVID-19. An IBM report estimates the worldwide average cost of a data breach at $3.86 million per breach.
computer, technology, social, internet, communication, security, website, social media, media, police, facebook, multimedia, screenshot, www, communicate, social networking, social network, internet page, networking, networks, Free Images In PxHere
Let’s get a better understanding of the importance of cyber security testing in securing networks and preventing data breaches.

What is security testing?

Security experts perform real-world attacks on your network during penetration testing to identify vulnerabilities and assess the overall risk to your network’s security. The concept behind penetration testing is that cybersecurity experts (whether given information about your security or not) use the same methods as cybercriminals to find network vulnerabilities, exploit them, and move throughout the system. It goes beyond a simple vulnerability report because it involves the good guys pretending to be the bad guys to expose your network security flaws and employee training weaknesses.
Posing as a hacker enables the company to identify security risks, remove false positives, and add a manual component to the test. These tests have a tremendous impact on an organization, from compliance and risk assessments to increased security awareness.

Penetration testing stages

Penetration testing can be broken into 9 stages. Here is the overview of each stage:
Stage 1: Information gathering
In this stage, the test engineer learns everything about your company and its employees from the external world through research. The team uses the same resources a bad guy would use to attack your networks, such as your company website, applications and workers’ social media.
Stage 2: Enumeration & identification
The testers, in this stage, examine your network for vulnerable, open ports, services and applications.
Stage 3: Vulnerability scanning
It is the final stage in the research and preparation process, during which they test both manually and automatically to identify network vulnerabilities.
Stage 4: Attack surface analysis
At this stage, the tester compiles all their preparation and determines the best attack method, including exploiting network vulnerabilities, leading to the creation of an attack plan. 
Stage 5: Penetration & exploitation
The plan is put into action in this stage, to compromise and exploit the vulnerabilities in the network. 
Stage 6: Privilege escalation
The next step is to gain domain admin access. The team will search the network for ways to gain administrative access.
Stage 7: Create persistence
This stage’s goal is to ensure the network’s long-term persistence. Typically, the test engineer may establish a backup, personal login with admin access to the system.
Stage 8: Pivot
After establishing persistence and moving throughout the network to access, the tester would need new data. It helps the tester find the information hackers need to achieve their goals.
Stage 9: End goal
After all the preparation and network movement, the QA experts finally reach the goal to breach an intellectual property, sensitive information or financial accounts.

How to conduct network penetration testing?

Network penetration testing is executed through three common methods mentioned below:
Black box
Black box testing is leveraged with no previous knowledge of the network’s operation or technical characteristics. As a result, the test works by performing a targeted attack after thoroughly exploring the given network.
Businesses that manage sensitive data and wish to keep an eye on all potential security holes can use this realistic cyber-attack version.
Gray box
A ‘gray box’ test has the same function as a black-and-white test. Stolen login knowledge enables unauthorized access to internal information such as user privileges and technical documents in an average system.
It is one of the most common network pentests which is done for highly targeted attacks framed to understand the attack direction of an average hacker.
White box
Network specialists gather data about the system, identify potential weaknesses, and target the specific infrastructure to evoke a response. If black is realistic and gray is moderately intrusive, the ‘white box’ test is like an audit that checks the impacts of increased security.
Finally, companies employ this kind of a last run-through to ensure that their system is impenetrable to even the most hardcore hacker.

Types of Penetration Testing

Majorly, there are two types of penetration testing:
Network testing
Finding security flaws and vulnerabilities in a network’s infrastructure is the primary goal of a pen test. After conducting extensive research, a tester performs several network tests. It’s critical to conduct these network tests locally and remotely to gather as much data as possible.
Social engineering
Cyber ciminal’s psychological tricks often lead to successful breaches (95% of successful attacks are spear phishing). A pen test should therefore use similar strategies. This form of pen test entails the testing of company employees.
Types of social engineering
Social engineering can be classified into following types:
Remote testing
Testers use electronic means, such as spear-phishing, to trick an employee into compromising network information or credentials.
Physical testing
Test engineers leverage direct employee contact to find and retrieve sensitive data. Many testers may impersonate people over the phone or in-person to find unlocked computers or potential security flaws. 
Client-side tests
This includes testing of web browsers, content creation software, and other applications. These tests find application security flaws locally. For example, a cyber criminal can easily exploit a missing application update or patch to further their attack.
Web application
This test looks for web-based application security flaws beyond the client network and devices. This type of test is extremely complex to perform correctly, and it can take a long time to test each web application in use thoroughly.
Wireless network
A wireless network test examines a company’s wireless devices. It involves accessing devices like smartphones, tablets, and laptops to look for vulnerabilities. It also searches for flaws in the wireless access points and wireless protocol, looking for ways to exploit the devices and the overall network.

Conclusion

In today’s interconnected world, it is critical to protect your network. However, what if your team lacks the resources or expertise to conduct network security testing effectively? In such a scenario, you can take the help of quality assurance services that can help you to implement network vulnerability analysis and eliminate your external network’s security weaknesses systematically.

Kali Linux File System

In our this guide we are going to talk about file system of Kali Linux this is very crucial for a user using Kali Linux. For the new comers who comes to Linux from Windows it is very important to understand the file system. For those who comes from another Linux distribution (Like, Ubuntu, Linux Mint etc) with a basic Linux knowledge can easily get this.

Kali Linux File system

The directory structure of Kali Linux system is based on the Unix File system Hierarchy Standard (FHS), and that’s how the directories are structured inside Kali Linux. In our Windows system, the root directory is C: , but in Kali Linux, it’s a forward slash (/). Please do not confuse the term “root directory” with the “root user’s home directory” (which is /root), because they are two different things. the latter is the home is the home directory (/root) for the root user.

Talking about root user, root user is the super user, for an example it can be consider as Administrative user on Windows system, previously Kali Linux comes with root user by default but after 2020.1 update Kali Linux comes with non-root user by default, that means we need to run sudo if we want to execute high-privileged commands. New user should be careful using sudo because wrong command could destroy our system.

To understand the file system of Kali Linux we need to open our terminal window and execute the command cd / , here cd stands for change directory, and / is our root directory. That means we are changing the directory to the root directory. Then we need to run ls (list) command to see all the files/folders here. As we can see in the following screenshot:

root directory files

In the above screenshot we can see some contents on our root directory. We need to know about them to understand the file system.

  • /bin (binaries): This directory contains Linux binaries like the cd and ls command that we executed earlier.
  • /sbin (system binaries): This directory holds system binary files that serve as administrative commands (like fdisk).
  • /boot: This directory contains the Linux bootloader files.
  • /dev (devices): This directory contains the device configuration files (like /dev/null ).
  • /sys: This is similar to /dev, which contains configurations about devices and drivers.
  • /etc (etcetera): This directory contains all the administration system files (like /etc/passwd shows all the system users in Kali Linux).
  • /lib (libraries): This directory hods the shared libraries for the binaries inside /bin and /sbin.
  • /proc (processes): This directory contains the processes and kernel information files.
  • /lost+found: As in the name, this directory contains the files that have been recovered.
  • /mnt (mount): This directory contains the mounted directories (example, a remote file share).
  • /media: This directory holds the removable media mounted directories (like DVD).
  • /opt (option): This directory is used for add‐on software package installation. It is also used when installing software by users (example, hacking tools that you download from GitHub).
  • /tmp (temporary): This is a temporary folder used temporarily, the holdings are wiped after each reboot. The tmp folder is a good place to download our tools for privilege escalation once we got a limited shell.
  • /usr (user): This directory contains many sub-directories. In fact, /usr/share/ is a folder that we need to memorize because most of the tools that we use in Kali Linux (like Nmap, Metasploit, etc.) are stored there, and it also contains the wordlist dictionary files (/usr/share/wordlists).
  • /home: This is the home for Kali Linux users (example /home/kali/).
  • /root: Home directory for root user.
  • /srv (serve): This folder contains some data related to system server functionalities (like data for FTP servers).
  • /var (variable): This folder contains variable data for databases, logs, and websites. For an example, /var/www/html/ contains the files for the Apache2 web server.
  • /run (runtime): This directory holds runtime system data (like currently logged‐in users).

We need to check about these file systems. This is much different from our familiar Windows File system but it’s not hard. In our personal opinion Linux File systems are quite easy to understand then Windows File system.

We just need to some practice and continue using it to get familiar with Kali Linux file system. Either from file manager or from the terminal. We will say to use terminal, then our practice on terminal will be better.

Love our articles? Make sure to follow us on Twitter and GitHub, we post article updates there. To join our KaliLinuxIn family, join our Telegram Group. We are trying to build a community for Linux and Cybersecurity. For anything we always happy to help everyone on the comment section. As we know our comment section is always open to everyone. We read each and every comment and we always reply.
DNSX — Run Multiple DNS Queries

During penetration testing of a website or web application we must need to gather information as much as we can about our target. Gathering DNS information is also must be do for a security expert.

dnsx on Kali Linux

In today’s article we are going to cover dnsX, it’s a tool created by projectdiscovery. It is a fast and multi-purpose DNS toolkit allow to run multiple DNS queries of our choice with a list of user-supplied resolvers. It also supports DNS wildcard filtering like shuffledns. We will learn about installing dnsX on our Kali Linux system and use it.

Key Features of dnsX

  • Simple and Handy utility to query DNS records.
  • A, AAAA, CNAME, PTR, NS, MX, TXT, SOA query support.
  • DNS Resolution / Brute-force support.
  • Custom resolver input support.
  • Multiple resolver format (TCP/UDP/DOH/DOT) support.
  • stdin and stdout support.
  • Automatic wildcard handling support.

Installing dnsX on Kali Linux

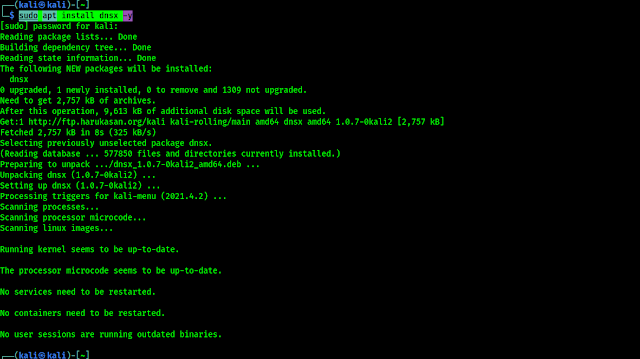
After 2022.1 update of Kali Linux dnsX is added to Kali Linux repository, so the  installation will be hassle-free, we just need to run the following one liner command on our terminal:

sudo apt install dnsx -y

In the following screenshot we can see the output of the above command:

dnsx installing on kali linux

Done! dnsX is successfully installed on our Kali Linux system.

Using dnsX on Kali Linux

Let’s start with the help section of dnsX tool. To check the options we run the following command:

dnsx -h

In the following screenshot we can see the help options of dnsX tool:

dnsx help options on kali linux

Now let’s start using it with an example, here we have a list of subdomains we can run the following command to check for active subdomains:

dnsx -l path/to/subdomains.txt
dnsx on Kali Linux

let’s suppose we found some subdomains using Subfinder, now we can easily check for active subdomains from the list of passive subdomains we got from various sources. Following command will be an example:

subfinder -silent -d hackthissite.org | dnsx -silent

In the above command we used -silent flag to keep our terminal clean. The command will take some time to collect all the data. We can see the output of the above command in the following screenshot:

dnsx with subfinder

Also dnsX can be used to print A records, for an example:

subfinder -silent -d hackthissite.org | dnsx -silent -a -cname -resp

In the following screenshot we can see the A records with the subdomains:

dnsx printing a records

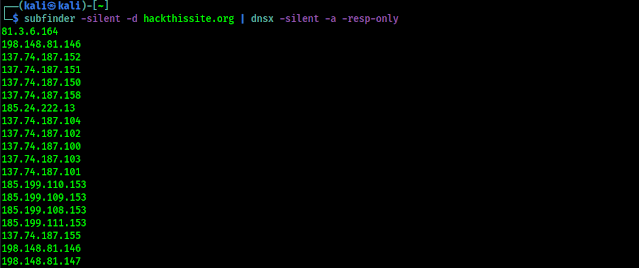
Also it can extract only the A records. To do so we run the following command:

subfinder -silent -d hackthissite.org | dnsx -silent -a -resp-only

Now it will extract A records only, as we can see in the following screenshot:

dnsx a records only

dnsX can be used to extract CNAME records, for an example:

subfinder -silent -d hackthissite.org | dnsx -silent -cname -resp

We can see the output in the following screenshot:

cnames found by dnsx

We can see the dns status codes by using dnsX tool, as we did in the following command:

subfinder -silent -d hackthissite.org | dnsx -silent -rcode noerror,servfail,refused

Following screenshots shows the output of the applied command:

dnsx dns status codes

This dnsX tool also can perform bruteforce subdomains for given domain or list of domains using -d and -w flag, for example we can check this.

Extra Talks

  1. By default, dnsx checks for A record.
  2. By default, dnsx uses Google, Cloudflare, Quad9 resolver.
  3. Custom resolver list can be used using -r flag.
  4. Domain name (-wd) input is mandatory for wildcard elimination.
  5. DNS record flag can not be used when using wildcard filtering.
  6. DNS resolution (-l) and DNS Bruteforcing (-w) can’t be used together.

This is how we can use dnsX tool on Kali Linux, and collect DNS information for security testing.

Love our articles? Make sure to follow us on Twitter and GitHub, we post article updates there. To join our KaliLinuxIn family, join our Telegram Group. We are trying to build a community for Linux and Cybersecurity. For anything we always happy to help everyone on the comment section. As we know our comment section is always open to everyone. We read each and every comment and we always reply.
[Fixed] No WiFi Adapter Found on Kali Linux

When we install Kali Linux on Desktop or Laptop we didn’t connect it with Wi-Fi.
Sometimes internal WiFi adapter not found in our Kali Linux system. In this detailed post we learn how we can install Wi-Fi in Kali Linux.
If we have Desktop computer then we should use the Wi-Fi adopters. This usually doesn’t need to install drive, if need then we should go the manufacturer’s website searching for drives in Linux. Have a Laptop then try following.
Laptop PC’s comes with on board Wi-Fi. Now it becomes hard to install Wi-Fi drivers and use onboard Wi-Fi chipset when we have direct install (not in Virtual Machines). So usually beginners use the LAN cable for internet or the external Wi-Fi adapter (like Alfa card) . Those methods works finely but decrees the portability of a laptop computer.

Install wifi in Kali Linux
Install WiFi in Kali Linux

Now we are going to install Wi-Fi driver in our Laptop. First of all we need a network connection with decent speed, it may be from LAN cable or from the mobile using USB tethering.
Then we open a Terminal window and update our Kali Linux by using apt update command:

sudo apt-get update

It require the root password to continue. After updating we use git clone command to clone Broadcom Installer.
Usually most of the laptop works with Broadcom Wi-Fi drivers and our command will be following:

git clone https://github.com/mehedishakeel/BroadcomInstaller2017

After cloning it we go to the folder using cd command:-

cd BroadcomInstaller2017

Then before run the automated bash script we give it permissions to run by using following command:

sudo chmod +x Broadcom.sh

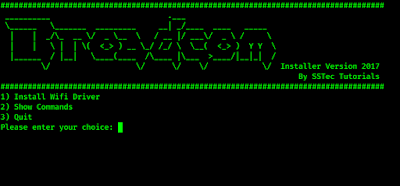
Then we run the bash script by applying following command:

sudo bash Broadcom.sh

Now it will show us some options. Here we choose (1) Install WiFi driver to automatically install and setup everything for us.

install wifi in kali linux

This will take some time depending on our system performance and internet speed. Sit back and take a coffee, because it might take some time.
After finishing the installation this script will restart our PC. So don’t panic if it’s restarts automatically. After boot up again it will show us the Wi-Fi connectivity in the top right corner, and now we can connect our PC with Wi-Fi network with password

Wifi in Kali Linux
Installed Wi-Fi on Kali Linux


If don’t have the password of the Wi-Fi then we can follow this tutorial. Playing with WiFi ? Fern and WiFi Pumpkin will help us to do more fun.

In this tutorial we learned how we can install Wi-Fi driver in Kali Linux, specially on primary install in Laptop.
Using Kali Linux in daily basis? Then follow some special tips about it by reading our this article.
Love our articles? Make sure to follow us on Twitter and GitHub, we post article updates there. To join our KaliLinuxIn family, join our Telegram Group. We are trying to build a community for Linux and Cybersecurity. For anything we always happy to help everyone on the comment section. As we know our comment section is always open to everyone. We read each and every comment and we always reply.

Naabu – Simple, Fast and Reliable Port Scanner

Port scanning is a very crucial part of gathering information about a web service. Previously we had talked about Nmap, Masscan, Amap port scanners. But in today’s article we are going to cover about Naabu. We install and use naabu on our Kali Linux system.

Naabu port scanner on Kali Linux

Naabu is a port scanning tool written in Go that allows us to enumerate valid ports for hosts in a fast and reliable process. It is actually a very simple tool that does fast SYN/CONNECT scans on the host or list of hosts and lists all ports that return a reply. Isn’t it sounds cool?

Key features of Naabu

  • Fast And Simple SYN/CONNECT probe based scanning.
  • Optimized for ease of use and lightweight on resources.
  • Automatic handling of duplicate hosts between multiple subdomains.
  • NMAP Integration for service discovery.
  • Piped input / output support for integrating in workflows.
  • Multiple Output formats supported (JSON, File, Stdout).
  • Multiple input support including HOST/IP/CIDR notation.

Installing Naabu on Kali Linux

Installing naabu on Kali Linux is very easy. We just need to run a single command to install it. The command is following:

sudo apt install naabu -y

In the following screenshot we can see the output of the above command using that naabu is installed on our system.

installing naabu on kali linux

Now we can use naabu on our Kali Linux.

Using Naabu on Kali Linux

As always, we start with the man page (help options) of naabu. To check it’s uses we need to run following command:

naabu -h

In the following screenshot we can see the output of the above command:

naabu help options

Now we are going to test it against a target host. Here for just an example we are going to test it on hackthissite.org, so we need to run following command:

naabu -host hackthissite.org

In the following screenshot we can see the output of our applied command:

naabu is running on Kali Linux

We can see that naabu found two open ports on our target website. If we are looking for a specified port number then we can specify the port number with -p flag.

naabu -p 80,21 -host hackthissite.org

In the following screenshot we can see that naabu is just look for our specified ports only and skips 443 port:

naabu specified ports

If we didn’t specify the port numbers then by default naabu will check nmap’s Top 100 ports. We can also use some per-configured port ranges:

  • -top-ports 100 : Scans for top 100 nmap ports.
  • -top-ports 1000 : Scans for top 1000 nmap ports.
  • -p – : Scans for all the ports from 1 to 65535.

We can also specify which ports we don’t wanna check. If we don’t like to check port 21 and 80 on our target then we need to run following command:

naabu -p - -exclude-ports 21,80 -host hackthissite.org

In the following screenshot we can see the output of the above command:

naabu uncommon port scanning

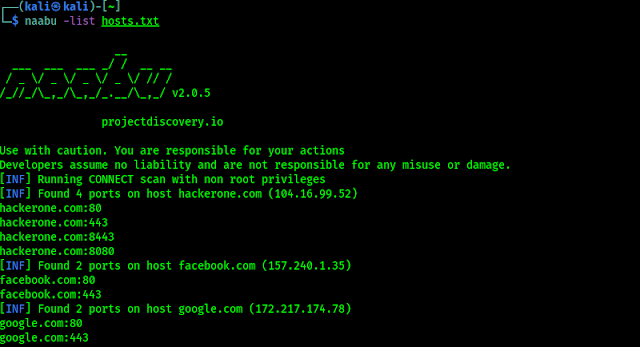
If we need to run naabu against a list of target hosts, we need to have a text file of hosts (one host on a single line), then run following command on our terminal:

naabu -list hosts.txt

In the following screenshot we can see the output of the above command:

naabu host list port scanning

We can see in the above picture that we scanned all the target hosts ports. We can use -json flag at the end to get the output in JSON lines format. We can use -o flag to save the results on a file. Also we can just use -silent flag to see the result only on the output.

Integration with Nmap

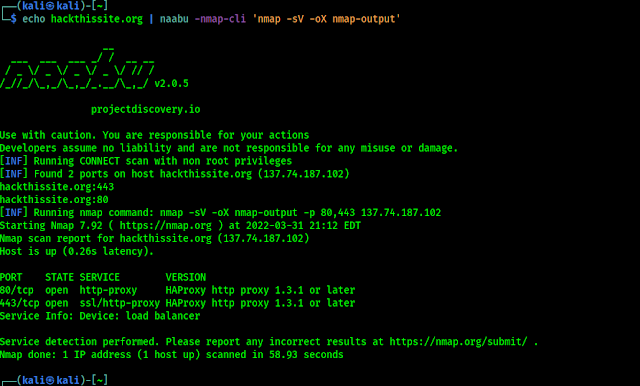
We can use together Naabu and Nmap, Nmap will be very useful for discover services running on the port. Here we have nmap installed on our system and we have to use nmap-cli to perform this. So our example command will be like following:

echo hackthissite.org | naabu -nmap-cli 'nmap -sV -oX nmap-output'

In the following screenshot we can see that Naabu is working perfectly working with nmap:

naabu integration with nmap

So here in this this article we learned about Naabu, a simple, fast and reliable port scanner on our Kali Linux system. Naabu is quite easy to use and simple. It is also very fast.

Love our articles? Make sure to follow us on Twitter and GitHub, we post article updates there. To join our KaliLinuxIn family, join our Telegram Group. We are trying to build a community for Linux and Cybersecurity. For anything we always happy to help everyone on the comment section. As we know our comment section is always open to everyone. We read each and every comment and we always reply.


Open Whatsapp chat
Whatsapp Us
Chat with us for faster replies.