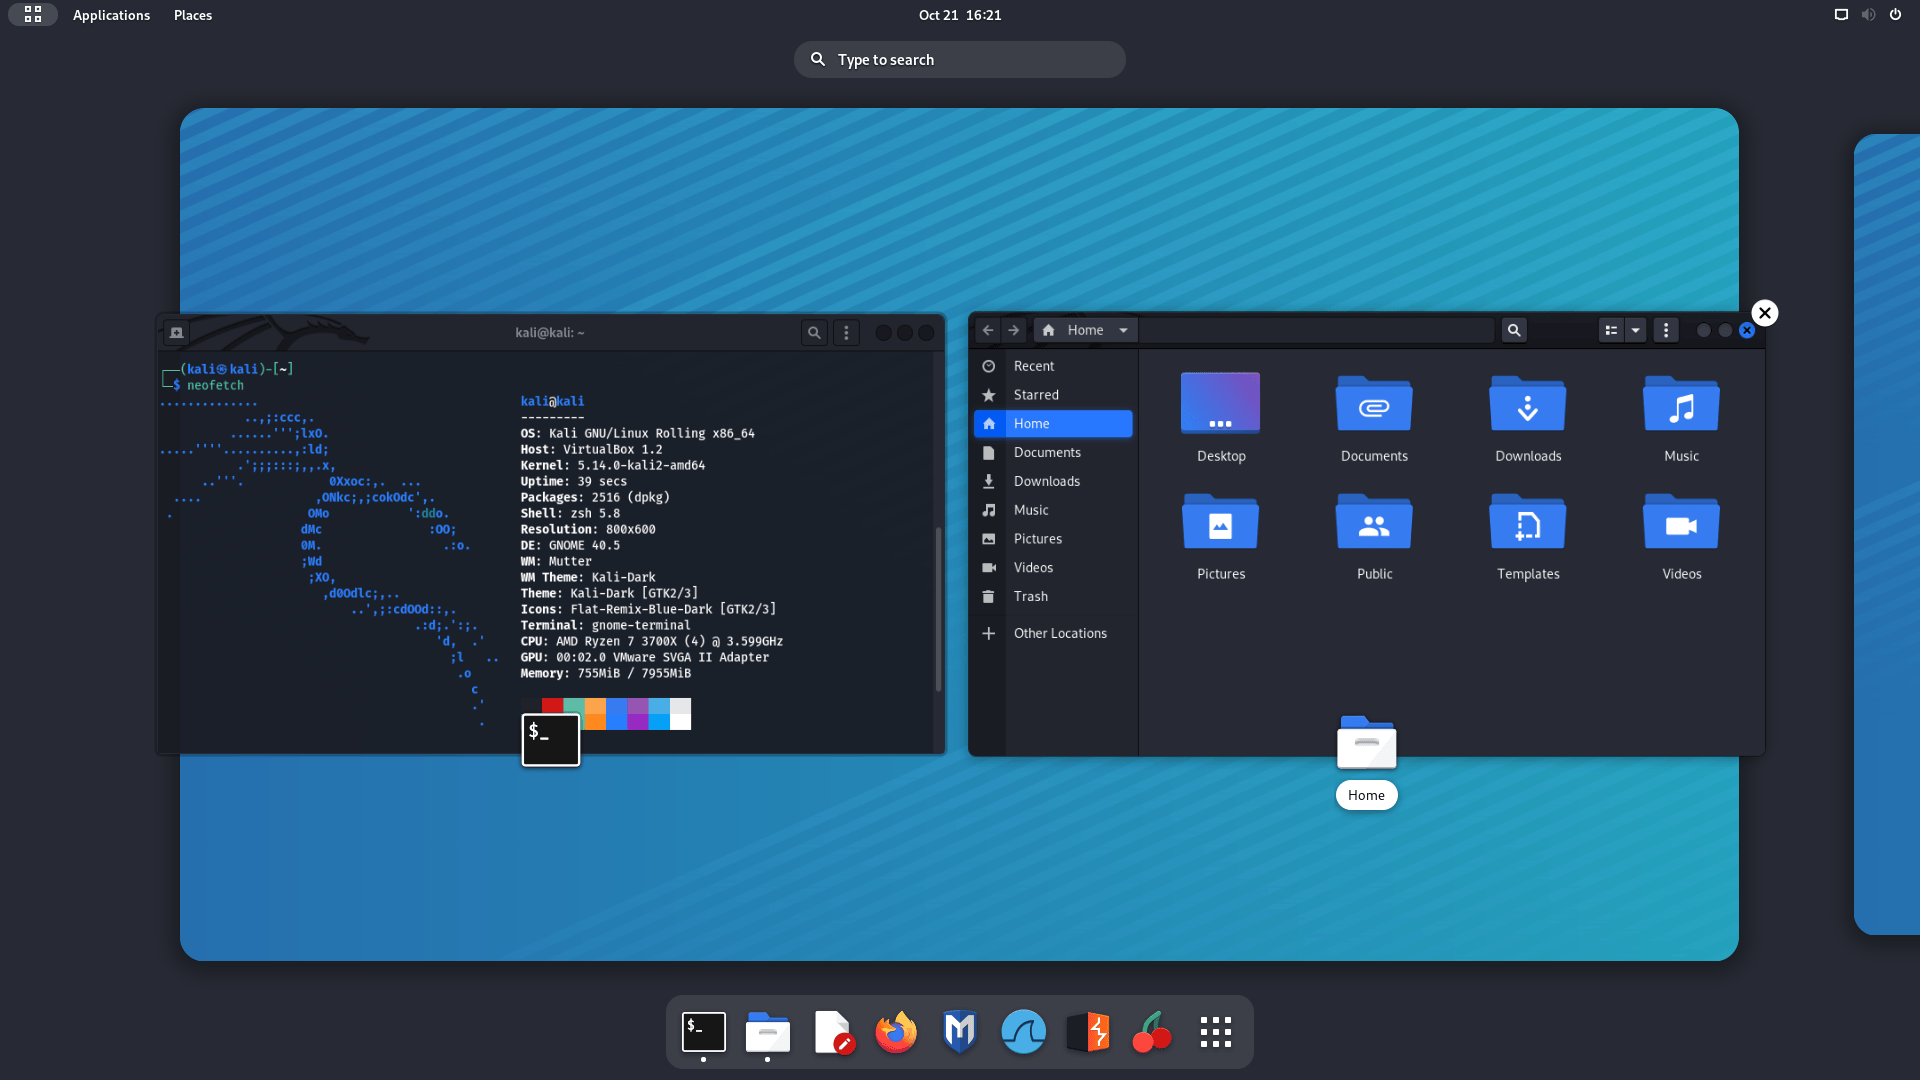
Kali Linux

Kali Linux is a Debian-derived Linux distribution designed for digital forensics and penetration testing. It is maintained and funded by Offensive Security.

Free Port Forwarding without Router

Previously, in our some articles like, SSH port forwarding and Portmap we discussed that how we can use port forwarding without router, and access our localhost site on the internet. In our this article we are going to cover another method to forward port without router.

Why we need this? specially when we have router and we use static IP or using NO-IP services.

This is a very good question. Well, we are in cybersecurity field where anonymity matters a lot. In real world during penetration testing smart attackers didn’t use routers and static IP. It increase chances to get traced. Port forwarding using SSH or tunnels also might be traces (not fully anonymous) but it will be a little bit tough. So we can use VPN, proxychains and TOR to get anonymous.

Free Port Forwarding without Router Kali Linux

Now coming to the article, in this tutorial we are going to use localtunnel service. Using this service is very easy, we don’t need to mess with DNS and firewall settings.

Installing localtunnel on Kali Linux

We can easily install localtunnel using Node Package Manager. So, we need to install Node Package Manager (npm) on our Kali Linux or any other Debian based Linux distribution. We use following command to do this:

sudo apt install npm

Because localtunnel uses Node JS that because we need to install npm. This will install some packages and complete the process in couple of minutes, dependig on our system performance and internet speed.

installing npm on kali linux


After installing npm we use this package manager to install localtunnel. We use following command to install localtunnel:

sudo npm install -g localtunnel

In the following screenshot we can see that localtunnel installed on our system in some seconds.

installing localtunnel using node package manager

Port Forwarding using LocalTunnel

We have installed localtunnel on our system. Now we just need to forward our localhost on the internet.

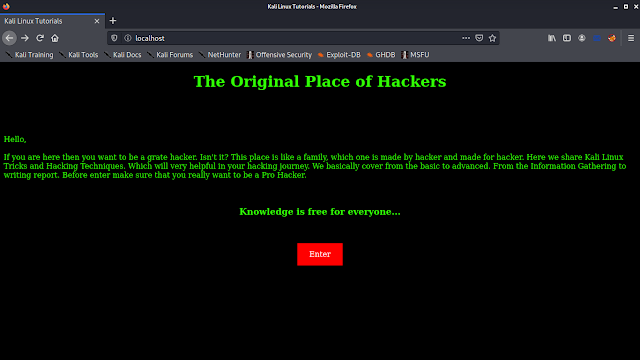
Here we have a localhost service running on our localhost using apache2. This is a simple webpage for showing an example.

sample webpage on running on localhost

This is running on our port 80, so we need to forward our port 8- using localtunnel to access our localhost on the internet.

A very tiny command will do this,

lt --port 80

We just put lt for localtunnel then specify our –port number (in our case it is 80). After applying the above command we get a URL.

localtunnel port forwarded URL

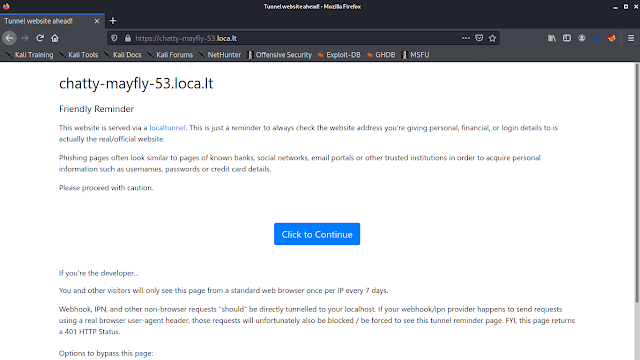
By opening this URL we can access our localhost from anywhere in the internet. Before that we got a warning page (first time only) to prevent spamming or misusing the service.

localtunnel warning

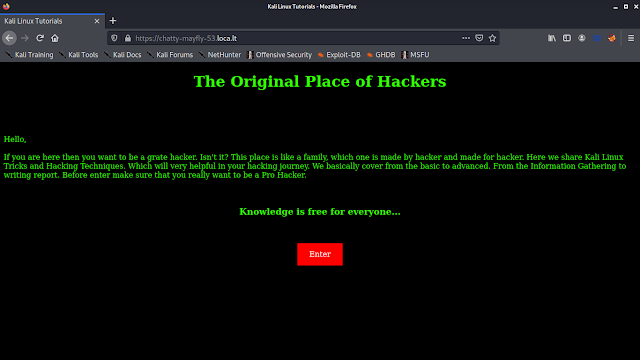
In the above screenshot we can see the warning page for first time when we open the localtunnel link. When we click on “Click to Continue” we reach to our localhost page, as we can see it in the following screenshot:

localhost page on internet

We can open this page from any device or network until the localtunnel connection open. We also have open this link on our phone and reach to that web page, shown in the following screenshot:

localtunnel on phone

Localtunnel will be not very much useful for phishing etc for the warning page. But this is a very easy method for port forwarding without router. This might be very handy to show a project to client remotely. We can easily forward port by using this on our Kali Linux or any other Debian based Linux distribution.

Warning:- This tutorial is written for pure educational purpose only. If anyone do any illegal activity then we are not responsible for that.

Love our articles? Make sure to follow us on Twitter and GitHub, we post article updates there. To join our KaliLinuxIn family, join our Telegram Group. We are trying to build a community for Linux and Cybersecurity. For anything we always happy to help everyone on the comment section. As we know our comment section is always open to everyone. We read each and every comment and we always reply.
Manage Files using Terminal

In our previous short article we learned about the File system of Linux. In this article we are going to learn about how we can deal with files directly from our terminal window.

But did we must have to learn this? Because Kali Linux and other most popular Linux distributions comes with good graphical user interface (GUI), so why we need to learn how to something with a file from command line where we can do it just like we do on Windows system?

manage files from terminal

Well in our opinion when we are reading this on this website then we have interest on cybersecurity field. When we are dealing with an remote system (read compromising a system) we have to do it on terminal. We need to break the privileges and get into it. There are lots of things with file we need to do here (from modifying system file data to uploading shells). So we need to have at-least a basic idea to dealing with files from terminal.

Creating a File using Terminal

First we will learn how we can create a file on Linux terminal. We will going to use touch command. We just need to run touch filename command to create a file. As shown in the following screenshot:

creating files on Linux

Copy Files using Terminal

We can copy files/directory from a directory to another one by using terminal window. To do that we need to use cp command. Suppose we have a file on our /home/kali/desktop directory. We need to copy this file to /home/kali/new_folder directory. We use following command for that:

cp full/path/file destination/path

As we can see in the following screenshot:

copy files uding linux terminal

In the following screenshot we can see that our file is copied to our destination directory. We did this for a file only we can do the same for a folder/directory.

Moving Files using Terminal

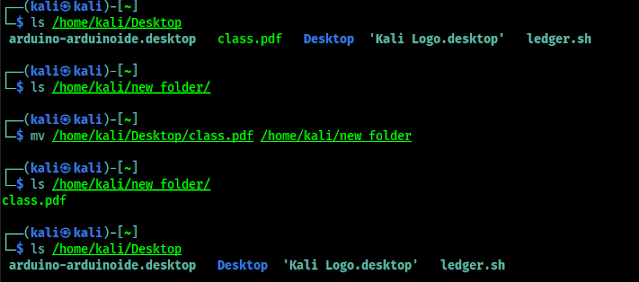
We can move a file from a directory to another directory to other directory by using mv command. This is very similar like cp command. mv full/path/of/file destination/path as we can see in the following screenshot:

moving files using terminal
Our file is moved from source directory

Renaming Files using Terminal

Basically we move a file/directory on the same directory and change the name. That is what renaming do. The mv command to change the name of a file without moving it to another directory.

renaming files on terminal
We can see that we renamed the file

Deleting Files using Terminal

We also can delete a file directly from terminal by simply using rm command. We just need to rm filename command to delete any file. To delete a file forcefully we need to use -f flag -r flag used to remove contents recursively.

deleting file using terminal
Deleting files using Terminal

Editing Files using Terminal

Let we have take look at file editing in terminal. As we told that this is too much important to have Linux skill, especially during the pen-testing if we need access to a Linux or UNIX based OS or server.

There are some cool text editors like gedit, leafpad and mousepad, they may looks far better than command line text editors for their graphical user interface, but we will focus on terminal based text editors. Everyone might have their own favorite text editors, but here we are going to cover two most common options, Nano and Vi.

Nano

Nano is the most user friendly and simplest text editors. To open a file and start editing we simply run nano <file name>.

nano filename.txt

After the file opened we can start editing the text as we can do on any graphical user interface using keyboard. As we can see in the following screenshot:

editing text using nano text editor on terminal
Editing text using nano text editor on terminal

If we see in the bottom of following screenshot, we can see the command menu there. We need to memorize some widely used keyboard shortcuts like:

  • CTRL+O – Write changes to the file.
  • CTRL+K – Cut to Current Line.
  • CTRL+U – Uncut a line, and paste it at the cursor location.
  • CTRL+W – Search
  • CTRL+X – Exit

To know more about nano, we need to see it’s official documentation.

vi

vi is very powerful text editor with it’s lightning speed, especially  when it comes to automated repetitive tasks. However, it has a relatively sleep learning curve and is nowhere near as simple to use as Nano. It is so much complex so we cover the basis only. Similar to nano, to edit a we need to run vi filename command.

After the file is opened, we need to enable the insert-text mode to begin typing. To do this, we need to press I key and start typing and editing file.

To disable insert-text mode and go back to command mode, we need to press Esc key. In command mode we can use following command to use it.

  • dd    – Delete the current line.
  • yy    – Copy the current line.
  • p     – Paste from clipboard.
  • x     – Delete the current character.
  • :w    – Write the current file to disk and stay in vi.
  • :q!    – Quit without saving.
  • :wq   – Save and Quit.
vi text editor

Frankly speaking, vi is very absurd to use, many users avoid it. However as a penetration tester’s point of view learning vi is very good so, have some time to exploring it. vi is installed on every POSIX-complaint system. vi lovers considered as ultra-pro Linux user in the community.

vi is extremely powerful, Want to explore vi ? The following sources have very good manual to learn vi.

  1. Learning the vi Editor
  2. vi Debian Manual

Comparing Files using Terminal

Comparing files may seems irrelevant for normal users, but system admins, network engineers, penetration testes and other IT related professionals rely on this skill widely.

In this section, we’ll take a look at a couple of tool that can easily help us during file comparing.

comm

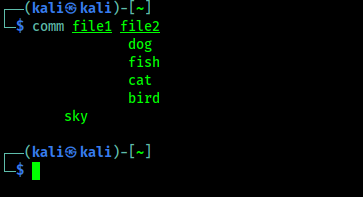
The comm utility compares between two text files then displays the lines that are unique to each one, also shows the lines they have in common. comm outputs three space-offset columns. The first column will be the output unique lines of the first file. The second column will contain unique lines of the second file, and the third column contains lines that are shared by both files.

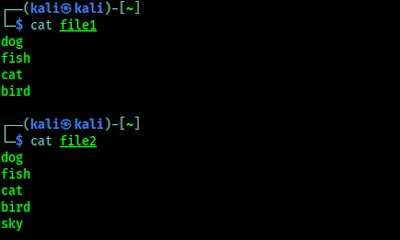
For an example here we have two files “file1” and “file2“, these files contains some words, as we can see in the following screenshot:

two similar files

Now we are going to compare these two files using comm command. So we are going use following command:

comm file1 file2

The output of the above command shown in the following screenshot:

comparing two files

In the above screenshot, we can see that it compares both files.

Vimiff

The vimdiff command opens with multiple files, on in each window. It also shows the differences between files by highlighting them. Which makes easier to find the differences between files. So we run the command as following:

vimdiff file1 file2

We can see the output in the following screenshot:

vimdiff comparing files
We can notice the differences easily for highlighted area.

We can use some shortcuts which will be helpful for us, those are following:

  • do: Get changes from the other window to current window.
  • dp: Sends the changes from current window to another window.
  • ]c: Jumps to the next difference.
  • [c: Jumps to the previous difference.
  • CTRL+W: Switches to the other split window.

Downloading Files using Terminal

Now we are going to take a look on downloading files using terminal. For downloading files we are going to use wget and curl.

wget

The wget command, which we will use extensively, downloads files using the HTTP/HTTPS and FTP protocols. We can use wget url/of/file to download a file.

wget file download

In the above screenshot we had download a file using wget and -o flag to make a copy of the downloaded file our chosen name.

curl

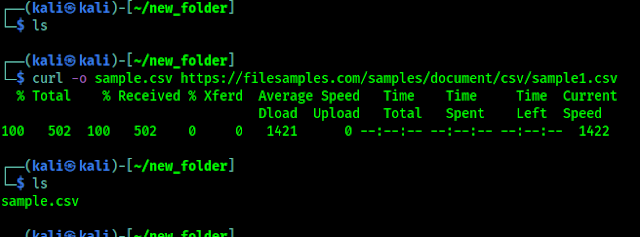
curl is a tool for transferring data to a server or from a server using host protocols including IMAP/S, POP3, SCP, SFTP, SMB/S, SMTP/S, TELNET, TFTP and others. A penetration tester can use curl to upload things (read payload) on server, or download things from server, and build complex requests. Basic use of curl is very similar to wget.

curl download using terminal

axel

axel is a download accelerator that transfers a file from a FTP or HTTP server through multiple connections. axel has a vast array of features, but the most common feature is almost similar to wget and curl. We also can use -n flag, which is used to specify the number of multiple connections to use.

axel download files

This is how we can manage files directly from Linux terminal. In this article, we learnt how we can copy, move, rename, delete, edit, compare and download files on Linux or UNIX like system. We don’t need GUI for this. Learning these things are very important for cybersecurity students.

Love our articles? Make sure to follow us on Twitter and GitHub, we post article updates there. To join our KaliLinuxIn family, join our Telegram Group. We are trying to build a community for Linux and Cybersecurity. For anything we always happy to help everyone on the comment section. As we know our comment section is always open to everyone. We read each and every comment and we always reply.

Best USB WiFi Adapter For Kali Linux 2022 [Updated April]

Best WiFi Adapter for Kali Linux

The all new Kali Linux 2022.1 was rolling out and we can simply use it as our primary operating system because of the non-root user. The main benefit of using Kali Linux as primary OS is we got the hardware support. Yes, we can do our all penetration testing jobs with this Kali Linux 2021, but to play with wireless networks or WiFi we need some special USB WiFi adapters in Kali.
Best WiFi Adapter for Kali Linux

Here we have listed some best USB Wireless adapters Kali Linux in 2021. These WiFi adapters are 100% compatible with Kali Linux and supports monitor mode and packet injection, which will help a lot in WiFi penetration testing.

Best WiFi Adapter for Kali Linux

Sl No.
WiFi Adapter
Chipset
Best for
Buy
1
AR9271
Good Old Friend
2
AR9002U/RTL8188EUS
Single Band for Beginners
3
RTL8821AU
Best in Budget
4
RT 3070
Best in it’s Price Range
5
RT 3070
Compact and Portable
6
RT 5572
Stylish for the Beginners
5
RTL8812AU
Smart Look & Advanced
6
RTL8814AU
Powerful & Premium
7
RT5372
Chip, Single Band

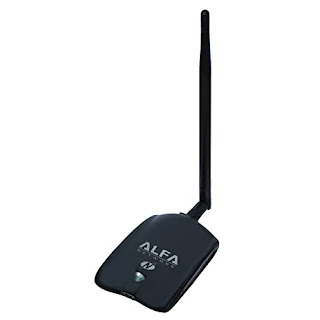
Alfa AWUS036NH

We are using this USB WiFi adapter from the BackTrack days (before releasing Kali Linux) and still we consider it as one of the best. For it’s long range signals we can do our penetration testing jobs from a long distance.

Alfa AWUS036NHA Kali Linux WiFi Adapter 2020

Alfa AWUS036NH is plug and play and compatible with any brand 802.11g or 802.11n router using 2.4 GHz wavelength and supports multi-stream & MIMO (multiple input multiple output) with high speed transfer TX data rate up to 150 MBPS. It also comes with a clip which can be used to attach this adapter on a laptop lid.

    1. Chipset: Atheros AR 9271.
    2. Compatible with any brand 802.11b, 802.11g or 802.11n router using 2.4 Ghz wave-length.
    3. Includes a 5 dBi omni directional antenna as well as a 7 dbi panel antenna.
    4. Supports security protocols: 64/128-bit WEP, WPA, WPA2, TKIP, AES.
    5. Compatible with Kali Linux RPi with monitor mode and packet injection.
    6. High transmitter power of 28 dBm – for long-rang and high gain WiFi.
      https://www.amazon.com/Alfa-AWUS036NH-802-11g-Wireless-Long-Range/dp/B003YIFHJY/ref=as_li_ss_tl?dchild=1&keywords=Alfa+AWUS036NHA&qid=1594882122&sr=8-6&linkCode=ll1&tag=adaptercart-20&linkId=2f09cf7cc9b84fcd2be61c590af1d25c&language=en_US
      TP-Link WN722N was very popular WiFi adapter for cybersecurity students. But after relesing the version 2 and 3, it is not so popular now, because it doesn’t support monitor mode and packet injection directly. But in it’s price range it is easy buy. This WiFi adapter have a detachable antenna which makes it very portable.
      tp link wn722n wifi adapter

      TP-LinkWN722N have AR9002U chipset on it’s version 1 and RTL8188EUS chipset on version 2/3 We have an article to use TP-Link WN722N Version 2 and 3 for monitor mode and packet injection on Kali Linux.

      1. Chipset: AR9002U/RTL8188EUS.
      2. Compatible with 2.4 Ghz band only.
      3. 3 dBi onmi directional & detachable antenna.

      We need to remember one thing that this adapter’s version 2 and 3 didn’t support Monitor Mode and Packet Injection directly we need a tweaking on it as we discussed on this article.

      https://www.amazon.com/Alfa-AWUS036NH-802-11g-Wireless-Long-Range/dp/B003YIFHJY/ref=as_li_ss_tl?dchild=1&keywords=Alfa+AWUS036NHA&qid=1594882122&sr=8-6&linkCode=ll1&tag=adaptercart-20&linkId=2f09cf7cc9b84fcd2be61c590af1d25c&language=en_US

      TP-Link AC600/T2U Plus

      Here comes the real budget king. This TP-Link AC600 or T2U Plus has really proven itself with monitor mode, packet injection and soft AP support. This WiFi adapter is not plug and play on Kali Linux. We just need to set the driver for TP-Lnik AC600 on Kali Linux.

      tplink ac 600tplink t2u plus wifi adapter on kali linux

      It comes with a fixed 5dBi antenna which can be 180° rotatable. In this price segment it supports monitor mode on both 2.4 Ghz and 5 Ghz networks. It can be the best choice for ethical hacking students. It has lots of features in this budget.

      1. Chipset: RTL8821AU.
      2. Dual band monitor mode support.
      3. Fixed Antenna

      It also require a very little bit of tweaking to make it work on Kali Linux. All about it we had already discussed on our previous article. In our opinion go with this WiFi adapter when have a tight budget, because it’s build quality is not like the Alfa Cards.

      https://www.amazon.com/Alfa-AWUS036NH-802-11g-Wireless-Long-Range/dp/B003YIFHJY/ref=as_li_ss_tl?dchild=1&keywords=Alfa+AWUS036NHA&qid=1594882122&sr=8-6&linkCode=ll1&tag=adaptercart-20&linkId=2f09cf7cc9b84fcd2be61c590af1d25c&language=en_US

      Alfa AWUS036NHA

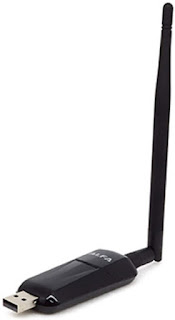
      Alfa again. Alfa provides the best WiFi adapters for Kali Linux. This adapter is the older version of Alfa AWUS036NH with Ralink RT3070 chipset. AWUS036NHA is the IEEE 802.11b/g/n Wireless USB adapter with 150 Mbps speed This is also compatible with IEEE 802.11b/g wireless devices at 54 Mbps.

      Alfa AWUS036NH Kali Linux WiFi Adapter 2020

      This plug and play WiFi adapter supports monitor mode and packet injection in any Linux distribution and Kali Linux. Alfa AWUS036NHA comes with a 4 inch 5 dBi screw-on swivel rubber antenna that can be removed and upgrade up to 9 dBi.

        1. Chipset: Ralink RT 3070.
        2. Comes with a 5 dBi omni directional antenna as well as a 7 dBi panel antenna.
        3. Supports security protocols: 64/128-bit wep, wpa, wpa2, tkip, aes
        4. Compatible with Kali Linux (Also in Raspberry Pi) with monitor mode and packet injection.
          https://www.amazon.com/Alfa-AWUS036NH-802-11g-Wireless-Long-Range/dp/B003YIFHJY/ref=as_li_ss_tl?dchild=1&keywords=Alfa+AWUS036NH&qid=1594870855&s=amazon-devices&sr=8-1&linkCode=ll1&tag=adaptercart-20&linkId=4c49c0097d6157190cf04122e27714ed&language=en_US

          Alfa AWUS036NEH

          This Alfa WiFi Adapter is compact and tiny, but it has a good range. It supports plug and play so connect it with Kali Linux machine and start playing with WiFi security. The antenna is detachable and makes it very portable. We have used this to build our portable hacking machine with Raspberry Pi and Kali Linux.

          Alfa AWUS036NEH Kali Linux WiFi Adpater 2020

          Alfa AWUS036NEH is the ultimate solution for going out and red teaming attacks. The long high gain WiFi antenna will give us enough range to capture even low signal wireless networks. This adapter is slim and doesn’t require a USB cable to use.

            1. Chipset: Ralink RT 3070.
            2. Supports monitor mode and packet injection on Kali Linux and Parrot Security on RPi.
            3. Compact and portable.
              https://www.amazon.com/AWUS036NEH-Range-WIRELESS-802-11b-USBAdapter/dp/B0035OCVO6/ref=as_li_ss_tl?dchild=1&keywords=Alfa+AWUS036NEH&qid=1594870918&sr=8-3&linkCode=ll1&tag=adaptercart-20&linkId=c6578f6fb090f86f9ee8917afba3199a&language=en_US

              Panda PAU09 N600

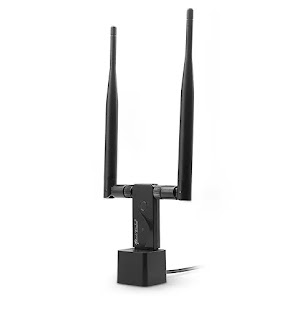
              Besides Alfa, Panda is also a good brand for WiFi adapters with monitor mode. Panda PAU09 is a good WiFi adapter to buy in 2020. This dual-band plug & play adapter is able to attack both 2.4 GHz as well as 5 GHz 802.11 ac/b/g/n WiFi networks.

              Panda PAU09 WiFi adapter for monitor mode

              This adapter comes with a USB docker and dual antennas, which looks really cool. It is also detachable into smaller parts. This adapter is reliable even on USB 3 and works great and fully supports both monitor mode and injection which is rare on a dual band wireless card out of the box.

                1. Chipset: Ralink RT5572.
                2. Supports monitor mode and packet injection on Kali Linux, Parrot Security even in RPi.
                3. 2 x 5dBi antenna.
                4. It comes with a USB stand with a 5 feet cable.
                5. Little bit of heating issue (not so much).
                  https://www.amazon.com/Panda-Wireless-PAU09-Adapter-Antennas/dp/B01LY35HGO/ref=as_li_ss_tl?dchild=1&keywords=Panda+PAU09&qid=1594870963&sr=8-1-spons&psc=1&spLa=ZW5jcnlwdGVkUXVhbGlmaWVyPUEzRUUwQjNVSkNGMEFIJmVuY3J5cHRlZElkPUEwODkwNzI3MkZHWUFNUTBRMlRTQSZlbmNyeXB0ZWRBZElkPUEwNzkxNzgzMTBaUEdDS05IUzdDTSZ3aWRnZXROYW1lPXNwX2F0ZiZhY3Rpb249Y2xpY2tSZWRpcmVjdCZkb05vdExvZ0NsaWNrPXRydWU=&linkCode=ll1&tag=adaptercart-20&linkId=d9d43db491c7cf14863cc99c1b8b7797&language=en_US

                  Alfa AWUS036ACH / AC1200

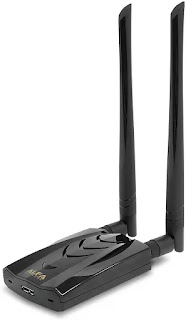
                  In Kali Linux 2017.1 update Kali Linux was released a significant update – support for RTL8812AU wireless chipset. Now Alfa AWUS036ACH is a BEAST. This is a premium WiFi adapter used by hackers and penetration testers. It comes with dual antennas and dual band technology (2.4 GHz 300 Mbps/5 GHz 867 Mbps) supports 802.11ac and a, b, g, n.

                  Alfa AWUS036ACH WiFi adapter for Kali Linux

                  These antennas are removable and if we require higher range, then we can connect an antenna with greater dbi value and use it as a long range WiFi link which makes this one of the best WiFi adapters. Also this adapter has an awesome look.

                  If budget is not an issue then this adapter is highly recommended.

                    1. Chipset: RealTek RTL8812AU.
                    2. Dual-band: 2.4 GHz and 5 GHz.
                    3. Supports both monitor mode & packet injection on dual band.
                    4. Premium quality with high price tag.
                      https://www.amazon.com/Alfa-Long-Range-Dual-Band-Wireless-External/dp/B00VEEBOPG/ref=as_li_ss_tl?dchild=1&keywords=Alfa+AWUS036ACH&qid=1594871102&sr=8-3&linkCode=ll1&tag=adaptercart-20&linkId=928256b6b245a63277f865d406f44c02&language=en_US

                      Alfa AWUS1900 / AC1900

                      Now this is the beast, then why is it at last? It is last because of its high price range. But the price is totally worth it for this USB WiFi adapter. If the previous adapter was a beast then it is a monster. Alfa AWUS1900 has high-gain quad antenna that covers a really long range (500 ft in an open area).
                      This is a dual band WiFi adapter with high speed capability 2.4GHz [up to 600Mbps] & 5GHz [up to 1300Mbps]. It also has a USB 3.0 interface.

                      Alfa AWUS036ACH The best wifi adapter for hacking in Kali Linux

                      Monitor mode and packet injection supported with both bands and it will be very useful for serious penetration testers. We also can attach this on our laptop display with it’s screen clip provided with the box.

                      What we got in the box?

                      • 1 x AWUS1900 Wi-Fi Adapter
                      • 4 x Dual-band antennas
                      • 1 x USB 3.0 cable
                      • 1 x Screen clip
                      • 1 x Installation DVD-Rom (doesn’t require on Kali Linux. Plug&Play)
                      • A consistent solution for network congestion!
                        1. Chipset: RealTek RTL8814AU.
                        2. Dual-band: 2.4 GHz and 5 GHz.
                        3. Supports both monitor mode & packet injection on dual band.
                        4. Premium quality with high price tag.
                        5. Very long range.
                          https://www.amazon.com/Alfa-AC1900-WiFi-Adapter-Long-Range/dp/B01MZD7Z76/ref=as_li_ss_tl?dchild=1&keywords=Alfa+AWUS036ACH&qid=1594871169&sr=8-4&linkCode=ll1&tag=adaptercart-20&linkId=d62c81825eace1b0f09d0762e84881c4&language=en_US

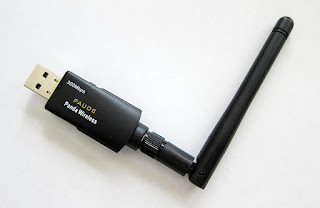
                          Panda PAU 06

                          Yes, This low cost Panda PAU 06 WiFi adapter supports Monitor Mode and Packet Injections. But we really don’t suggest to buy this adapter if budget is not an issue.
                          panda pau 06 wifi adapter for Kali Linux
                          The main reason is this WiFi adapter doesn’t supports dual-band frequency (only supports 2.4GHz), it doesn’t supports 5GHz frequency.
                          This WiFi adapter comes with Ralink RT5372 chipset inside it. 802.11n standards supports 300MB per second maximum speed.
                          This adapter takes less power from computer, but other adapters doesn’t took too much power from system (this point is negligible).
                          panda pau 06 order on amazon

                          Extras

                          There are some more WiFi adapters that we did not cover because we didn’t test them on our hands. These WiFi adapters were owned by us and some of our friends so we got a chance to test these products.Be Careful to choose from unofficial sellers, because sometimes they sell exactly same model with a cheaper chipset which surely not support monitor mode neighter packet injection. As per our own experience Alfa cards are the best in the case of WiFi Hacking.

                          How to Choose Best Wireless Adapter for Kali Linux 2020

                          Before going through WiFi adapter brands let’s talk something about what kind of WiFi adapter is best for Kali Linux. There are some requirements to be a WiFi penetration testing wireless adapter.

                          • Should support Monitor mode.
                          • The ability to inject packets and capture packets simultaneously.

                          Here are the list of WiFi motherboards supports Monitor mode and Packet injection.

                          • Atheros AR9271 (only supports 2.4 GHz).
                          • Ralink RT3070.
                          • Ralink RT3572.
                          • Ralink RT5370N
                          • Ralink RT5372.
                          • Ralink RT5572.
                          • RealTek 8187L.
                          • RealTek RTL8812AU (RTL8812BU & Realtek8811AU doesn’t support monitor mode).
                          • RealTek RTL8814AU
                          • RTL8188EUS (requires modified driver)
                          • RTL8821AU (require some installations)

                          So we need to choose WiFi Adapter for Kali Linux carefully. For an Example, on the Internet lots of old and misleading articles that describe TP Link N150 TL-WN722N is good for WiFi security testing. But it is not totally true. Actually it was.The TP Link N150 TL-WN722N’s previous versions support monitor mode. The version 1 comes with Atheros AR9002U chipset and supports monitor mode. Version 2 and 3 has the Realtek RTL8188EUS chipset and requires some modification on it’s driver then we can use it. TP Link N150 TL-WN722N version 1 is not available in the market right now. So clear these things and don’t get trapped.

                          Which WiFi adapter you like the most for Kali Linux?


                          WiFi Hacking in Kali Linux

                          Kali Linux is the most widely used penetration testing operating system of all time. It comes with lots of tools pre-installed for cyber security experts and ethical hackers. We can perform web application penetration testing, network attack as well as wireless auditing or WiFi hacking. We have already posted some lots of tutorials on our website and some good WiFi auditing tutorials like AirCrack-Ng.

                          Why Do We Use External USB WiFi Adapters in Kali Linux?

                          A WiFi adapter is a device that can be connected to our system and allows us to communicate with other devices over a wireless network. It is the WiFi chipset that allows our mobile phone laptop or other devices which allows us to connect to our WiFi network and access the internet or nearby devices.
                          But most of the Laptops and mobile phones come with inbuilt WiFi chipset so why do we need to connect an external WiFi adapter on our system ? Well the simple answer is our in-built WiFi hardware is not much capable to perform security testing in WiFi networks.Usually inbuilt WiFi adapters are low budget and not made for WiFi hacking, they don’t support monitor mode or packet injection.
                          If we are running Kali Linux on Virtual Machine then also the inbuilt WiFi Adapter doesn’t work for us. Not even in bridge mode. In that case we also need an external WiFi adapter to play with WiFi networks. A good external WiFi adapter is a must have tool for everyone who has interest in the cyber security field.

                           
                          WSL2 installation of Kali Linux will not support any kind (Inbuilt or External) of Wi-Fi adapters.

                          Kali Linux Supported WiFi Adapters

                          Technically almost every WiFi adapter supports Kali Linux, but those are useless on WiFi hacking if they don’t support monitor mode and packet injection. Suppose, we buy a cheap WiFi adapter under $15 and use it to connect WiFi on Kali Linux. That will work for connecting to wireless networks but we can’t play with networks.
                          It doesn’t make sense, when we are using Kali Linux then we are penetration testers so a basic WiFi adapter can’t fulfill our requirements. That’s why we should have a special WiFi adapter that supports monitor mode and packet injection. So in this tutorial Kali Linux supported means not only supported it means the chipset has ability to support monitor mode and packet injection.

                          What is Monitor Mode

                          Network adapters, whether it is wired or wireless, are designed to only capture and process packets that are sent to them. When we want to sniff a wired connection and pick up all packets going over the wire, we put our wired network card in “promiscuous” mode.
                          In wireless technology, the equivalent is monitor mode. This enables us to see and manipulate all wireless traffic passing through the air around us. Without this ability, we are limited to using our WiFi adapter to only connect to wireless Access Points (APs) that accept and authenticate us. That is not what we are willing to settle for.
                          In the Aircrack-ng suite, we need to be able to use airodump-ng to collect or sniff data packets.

                          What is Packet Injection

                          Most WiFi attacks require that we are able to inject packets into the AP while, at the same time, capturing packets going over the air. Only a few WiFi adapters are capable of doing this.
                          WiFi adapter manufacturers are not looking to add extra features to their standard wireless adapters to suit penetration testers needs. Most wireless adapters built into your laptop are designed so that people can connect to WiFi and browse the web and send mails. We need something much more powerful and versatile than that.
                          If we can’t inject packets into the Access Point (in Aircrack-ng, this is the function of Aireplay-ng), then it really limits what we do.
                          If we are using Kali Linux and want to be a security tester or ethical hacker then a special WiFi adapter is a must have tool in our backpack. As per our own experience listed Alfa cards in this list are best USB wireless adapter for Kali Linux, going with them may be costly but they are really worth it. For more assistance comment below we reply each and every comment.

                          We are also in Twitter join us there. Our Telegram group also can help to choose the best WiFi adapter for hacking and Kali Linux.

                          TP-Link AC600/T2U Plus Best Budget WiFi Adapter for Kali Linux ?

                          To perform wireless auditing we need some special WiFi adapters that supports monitor mode, packet injection and soft AP mode. Alfa cards are known for best quality and reliable. But Alfa card’s price is high for students.

                          In our this article we are going to cover a budget friendly TP-Link WiFi adapter that supports monitor mode, packet injection and soft AP. TP-Link AC600 is a perfect budget WiFi adapter for cybersecurity students. It also have supports of 2.4Ghz and 5Ghz bands on Kali Linux.

                          tp-link ac 600 kali linux

                          TP-Link AC600 comes with a 5dBi antenna which can rotate 180° to cover a long range. This WiFi adapter comes with RTL8821AU chipset which not supported on our Kali Linux (2022.1) directly. So if we plug it in via our system’s USB port, we will see nothing will happen. Ever we can’t see it’s network interface. Let’s configure it for our Kali Linux system.

                          Configuring TP-Link AC600 for Kali Linux

                          After plug it in with our system we check for our network interfaces by using following command:

                          iwconfig

                          In the following screenshot we can see that we cant see any external wireless network interface (in our case wlan0 is our inbuilt adapter).

                          iwconfig network interfaces on Kali Linux

                          Now we check connected devices on our USB via following command:

                          lsusb

                          The output sown in the following screenshot:

                          devices list connected with kali linux

                          Here we can see our TP-Link adapter (highlighted) with the chipset. It means it connected but we need to install drivers for it. Before installing drivers we need to make sure that we are using a updated version of Kali Linux.

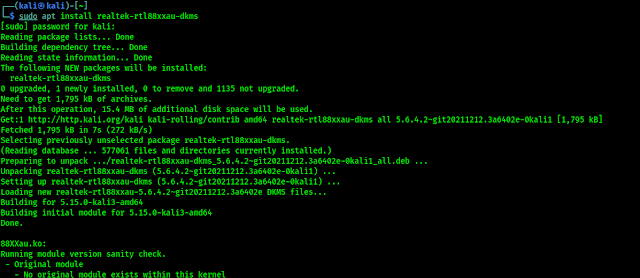
                          To install TP-Link AC600 driver on our updated Kali Linux we just need to run following command:

                          installing AC600 driver on our Kali Linux system

                          In the above screenshot we can see the output of our applied command. After installing the driver it also not gonna work. What we need ? Yes we need a reboot. Lets reboot our system.

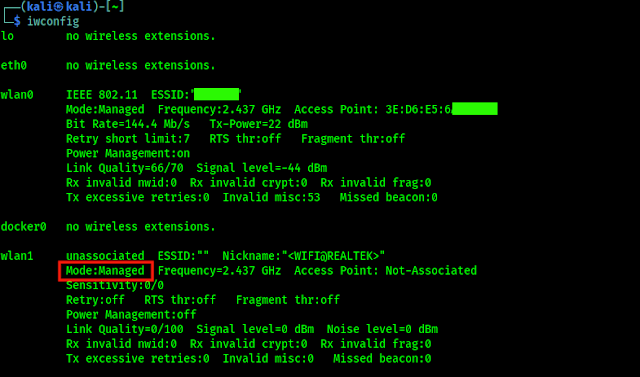
                          After the reboot we can check again our network interfaces by using following command:

                          iwconfig

                          We can see the result in the following screenshot:

                          network interfaces on kali

                          Now we can see the wlan1 interface which is our TP-Link AC600 adapter. In the above screenshot we can notice that the mode is managed. We can change it to monitor mode by using following commands one by one:

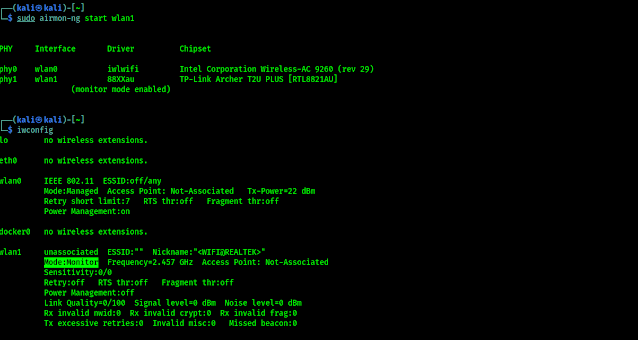
                          sudo airmon-ng check kill
                          sudo airmon-ng start wlan1

                          Now we check if the monitor mode is started or not by using following command:

                          iwconfig

                          The following screenshot shows the output of the above commands.

                          starting monitor mode on tplink ac600

                          We can see that our wlan1 interface now have Monitor Mode (highlighted). Now lets check if it is working or not. To do so we need to run following command:

                          sudo airodump-ng wlan1

                          In the following screenshot we can see that we are searching for target WiFi.

                          monitor mode working on tplink ac600

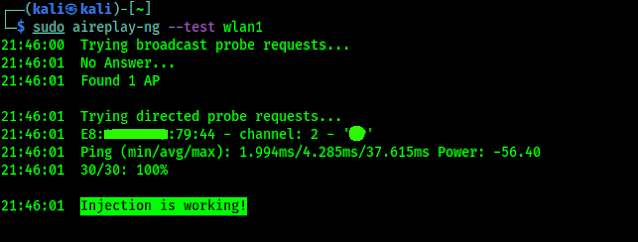
                          So, it’s time to check for the packet injection is working perfectly or not by using following command:

                          sudo aireplay-ng --test wlan1

                          In the following screenshot we can see that packet injection is also working fine.

                          packet injection is working fine

                          Let we check for softAP mode by using following command:

                          sudo airbase-ng -a xx.xx.xx.xx.xx.xx --essid "ESSID" -c 12 wlan1

                          We can choose any BSSID (in above example x refers to any number) and ESSID on the above command -c is for specify a channel. We can see the output in the following screenshot:

                          soft ap started on tplink ac600

                          In the above screenshot we can see that we have started a soft AP on 01:02:03:04:05:06 BSSID, and the ESSID is Kali_Tutorials on channel 12 with our wlan1 interface. Now we can see a wireless network around us using other devices on our given ESSID.

                          We left one more thing that TP-Link AC600 supports dual band and our previous all the examples were on 2.4 Ghz, so how we can work with 5Ghz.

                          Let’s check for 5Ghz support, but we can’t scan 5Ghz networks using aircrack-ng so we run following command to scan 5Ghz networks using TP-Link AC600:

                          sudo airodump-ng --band a wlan1

                          In the following screenshot we can see 5Ghz networks around us:

                          changing 5Ghz interface

                          Now we can also see iwconfig to see our network interfaces and in the following screenshot:

                          5ghz network interfaces

                          We can see in the above screenshot that our wlan1 is on 5Ghz.

                          Extra Talks

                          TP-Link AC600 is a very good affordable WiFi adapter for penetration testing students, not just only pocket friendly, it has quality also. It supports 5Ghz band with monitor mode, packet injection and soft AP. These things makes it very competitive with other adapters (especially Alfa cards).

                          This is how we can use TP-Link AC600 on our Kali Linux and use for Wireless auditing.

                          Love our articles? Make sure to follow us on Twitter and GitHub, we post article updates there. To join our KaliLinuxIn family, join our Telegram Group. We are trying to build a community for Linux and Cybersecurity. For anything we always happy to help everyone on the comment section. As we know our comment section is always open to everyone. We read each and every comment and we always reply.

                          TP-Link WN722N Version 2/3 Monitor Mode and Packet Injection Support

                          TP-Link WN722N is a very popular WiFi adapter for wireless auditing. It is low budget and beginner friendly so cybersecurity students and new learners always look for it. Now it becomes a problem because TP-Link WN722N Version 1 comes with Atheros AR9002U chipset and supports monitor mode and packet injection. Version 2/3 has the Realtek RTL8188EUS chipset and doesn’t support monitor mode or packet injection. Also TP Link N150 TL-WN722N version 1 have low availability in the market right now.

                          So in our this article we are going to cover how we can set TP-Link WN722N Version 2 or Version 3 on our Kali Linux and for Monitor Mode & Packet Injection. In that way we can use this affordable and reliable WiFi adapter for WiFi security testing.

                          TP-Link WN722N Version 2/3 Monitor Mode and Packet Injection Support on Kali Linux

                          We got a TP-Link WN722N Version 2 WiFi adapter on our hand (shown in the following picture) and we will show how to use Monitor Mode and Packet Injection on it.

                          TP-Link WN722N V 2
                          We can see the Model and Version on the back of the device

                          Now we are going to connect it on our system. After connecting it we can see it is working and we can connect to our WiFi networks with it (plug and play), but that is not our intention we need Monitor Mode and Packet Injection. Lets fire up our terminal and run following command to check our wireless network interfaces:

                          iwconfig

                          ????????

                          In the above screenshot we can see that in our case wlan0 is our system’s inbuilt wireless interface and wlan1 is our TP-Link WN722N’s network interface (wlan0 and wlan1 etc depends on the system, confused what is yours? Then unplug the TP-Link WN722N and run ifconfig and check then again plug it in and check again you will get it).

                          Now we run the following command to check if Packet Injection is supported or not on our TP-Link WN722N WiFi adapter by using following command:

                          sudo aireplay-ng --test wlan1

                          The output shown in the following screenshot:

                          checking for monitor mode

                          In the above screenshot we can see that our external WiFi adapter don’t support Monitor Mode. So, we need to change the driver of this TP-Link WN722N adapter.

                          TP-Link WN722N V 2/3 Monitor Mode on Kali Linux

                          First of all we need to have an updated Kali Linux system (sudo apt update && sudo apt upgrade), We are on all updated Kali Linux box. Then we need to install some dependencies on our system by applying following command:

                          sudo apt install dkms bc build-essential libelf-dev -y

                          After applying the above command above programs will be installed on our system as we can see in the following screenshot:

                          install dependecies on kali linux

                          Then we need to check for kernel updates by using following command:

                          sudo apt install linux-headers-$(uname -r)

                          In the following screenshot we can see that we are already on a updated kernel:

                          checking for kernel updates

                          Now we remove the current driver of RTL8188EUS driver by using following command:

                          sudo rmmod r8188eu.ko

                          Then we need to be the root user by applying following command:

                          sudo -i

                          We can see the results of the above commands in the following screenshot:

                          logged in as root user on Kali Linux

                          Now we need to blacklist old drivers by using following commands one by one:

                          echo "blacklist 8188eu" >> "/etc/modprob.d/realtek.conf"
                          echo "blacklist r8188eu" >> "/etc/modprob.d/realtek.conf"

                          After it is done our old drivers are removed. Here we need a reboot, rebooting our system will prevent errors for the rest of this setup. So we must need to Reboot.

                          After a reboot we need to install that driver which one supports Monitor Mode & Packet Injection on TP-Link WN722N. To do that we need to clone a driver built by aircrack-ng form GitHub by using following command on our terminal window:

                          git clone https://github.com/aircrack-ng/rtl8188eus

                          We can see cloning process on the following screenshot:

                          cloning rtl8188eus driver from github

                          After the installation process is done, we need to navigate to our cloned directory by applying following command:

                          cd rtl8188eus

                          Then we need compile this driver by using following command:

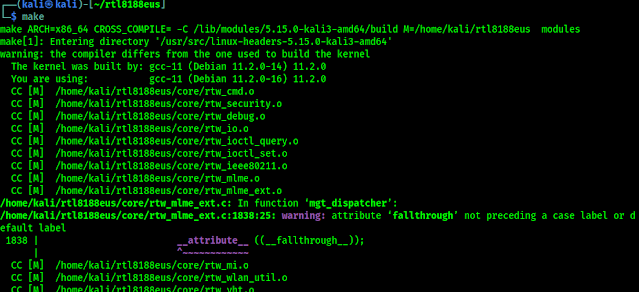
                          sudo make

                          Following screenshot shows the output of the compilation process:

                          compilation process of wifi driver on kali linux

                          This compilation process may take couple of minutes depending on our system performance. Then we need to run following command to install the compiled driver:

                          sudo make install

                          Following screenshot shows the output of the command:

                          compiled program installing

                          Now we need to run following command to set all up:

                          sudo modprobe 8188eu

                          Now we are almost set, we just need a reboot. If everything was right then we are ready to rock after reboot. After the reboot is done let’s again check our network interfaces using following command:

                          iwconfig

                          Here we can see that the mode is still not showing Monitor Mode. Wait a bit, we need to turn on Monitor Mode on our wlan1 interface. To do that we run following commands on our terminal one by one:

                          sudo ifconfig wlan1 down
                          sudo iwconfig wlan1 mode monitor

                          Now we can check our network interfaces status by using following command:

                          iwconfig

                          We can see the output in the following screenshot:

                          tplink wn722n monitor mode

                          In the above screenshot we can see that our wlan1 got Monitor Mode (highlighted in red). BINGO

                          Let’s check it it is working well or not by scanning WiFi networks around us. To do so we need to run following command:

                          sudo airodump-ng wlan1

                          We can see the output on the following screenshot:

                          monitor mode scanning with tplink wn722n version 2

                          In the above screenshot we can see that we can scan for targets with our TP-Link WN722N Version 2 WiFi adapter on our Kali Linux system.

                          Let we check for packet injection by using following command (We tried this on the beginning):

                          sudo aireplay-ng --test wlan1

                          In the following screenshot we can see the output of the applied command:

                          packet injection is working on tplink wn722n

                          In the above screenshot we can see that Packet Injection is working” on our TP-Link WN722N Version 2 WiFi adapter on our Kali Linux system.

                          Video Tutorial

                          Our article is inspired from David Bombal’s Youtube video. We can check his following video for a video tutorial:

                          This is how we can get monitor mode and packet injection support on TP-Link WN722N version 2 and 3 (same process) on our Kali Linux system.

                          Love our articles? Make sure to follow us on Twitter and GitHub, we post article updates there. To join our KaliLinuxIn family, join our Telegram Group. We are trying to build a community for Linux and Cybersecurity. For anything we always happy to help everyone on the comment section. As we know our comment section is always open to everyone. We read each and every comment and we always reply.

                          Kali Linux – Basic Terminal Uses

                          In our this article we are going to cover the basic uses of Terminal window on Kali Linux. Hence Kali Linux comes with GUI, but terminal is the most powerful thing on Linux systems. There are lots of terminal tools we need to use during security testing, so we need to learn at least the basics of terminal.

                          As a Penetration tester we use a lot of commands on our daily basis. In our previous articles we have used a lot of commands. But here we will learn basic uses of terminal and some basic commands that will help a lot on our penetration tester journey.

                          Basics of Kali Linux Terminal

                          First of all we need top open our terminal window from our Kali Linux desktop. We also can use CTRL+ALT+T key combination to open the terminal window directly from our keyboard. Kali Linux default terminal window looks like following screenshot:

                          kali linux terminal
                          Kali Linux default terminal

                          Let’s learn some basics of terminal. We can work on text based things using terminal window. We can write commands, then press Enter ⤶ key to run/execute the command. Sometime things are messed up then we need to clear the terminal using clear command or CTRL+L to clear the terminal. To open a new terminal window from our current terminal session CTRL+SHIFT+T.

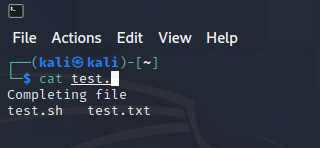
                          To complete the command or the filename on terminal we can press the TAB key. If there are some files starting with same name then whenever we press TAB key it will display all the options in place. We should open our terminal window and practice these things while reading this article.

                          For an example we have two files with same name at starting test.sh and test.txt on our home directory. When we press the TAB key then we can see that we got the both options, as we can see in the following screenshot:

                          tab key to complete the command

                          If we run a command and then we need to stop it’s execution we need to press CTRL+C key combination. To close the terminal window we can press CTRL+D key combo or use exit command.

                          We can also shut down and restart our system using terminal window. To shut down our system we need to use poweroff and for restart we need to use reboot command with root privilege.

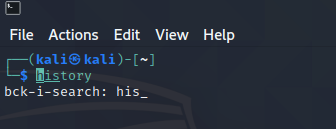
                          To check our recently used commands on terminal we can use history command, and to use any command used before (reverse command search) we can use CRTL+R and then type the part of the command then terminal will suggest the command. As we can see in the following screenshot:

                          reverse command search
                          CTRL+R, then we just type his and it suggest history

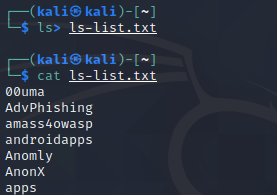
                          Not only in Kali Linux, Linux in general we need to understand there are lots of redirections in terminal window. For an example we have to write our file list (ls) output on a text (txt) file e need to run following command:

                          ls> ls-list.txt

                          We can see the output in the following command:

                          ls list file

                          Using the above command we save the output of ls command on a text file and provide the text file a name (ls-list.txt), and we redirected the output by using a > (grater than) character.

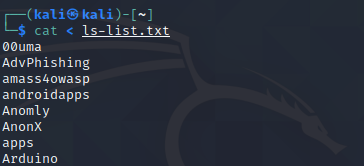
                          We also do the opposite by redirecting (printing using cat) the text file contents into the terminal window by using the < (less than) character.

                          cat < ls-list.txt
                          printing on terminal using less than

                          There is another redirection we need to know is the command pipe. In short, we can combine the output of each command and use it on next command using | character.

                          command 1 | command 2 | command 3

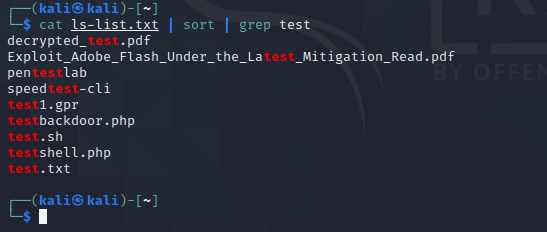
                          For an example we need to read a file then short the results and finally use grep command to filter out some text strings. Here we are going to extract files starting with ‘test.‘. So we need to use following commands combining with |

                          cat ls-list.txt | sort | grep test

                          We can see in the output in the following screenshot:

                          combining commands

                          Basic Kali Linux Commands

                          Now, let’s drive into Kali Linux usage and explore some basic Kali Linux (Linux, in general) commands.

                          Man Pages

                          Most of the executable programs on the Linux command line contains a formal piece of documentation is called manual pages or man pages. A special program called man is used to view these pages. Man pages generally have a name, a synopsis, a description of the command’s purpose, and the corresponding options, parameters, or switches. Let’s look at the man page for the ls (list) command:

                          man ls

                          This will show us the manual of ls command, as we can see in the following screenshot:

                          Exploring the manuals for the ls command using man
                          Exploring the manuals for the ls command using man

                          We can see in the top of the above screenshot that ls is ‘User Command’. Man pages are organized by dividing into various sections as following:

                          1. User commands.
                          2. System administration commands.
                          3. Programming interfaces for kernel system calls.
                          4. Programming interfaces to the C library.
                          5. Special files such as device nodes and drivers.
                          6. File formats.
                          7. Games and amusements such as screen-savers.
                          8. Miscellaneous.

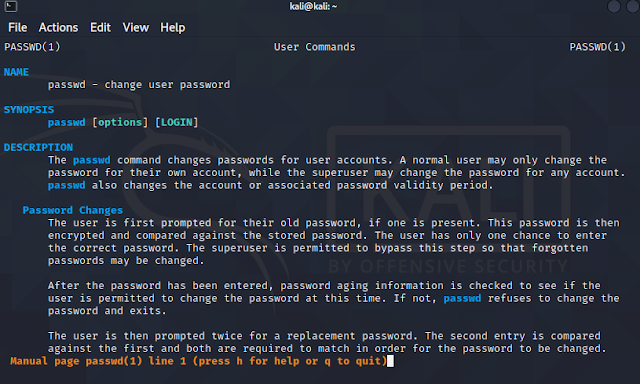
                          To know more about a command we can search a keyword. For example, we need to learn about the file format of /etc/passwd file. We can apply following command to learn more about this:

                          man passwd

                          The above command will show information about passwd command as we can see in the following screenshot:

                          manulas for passwd command

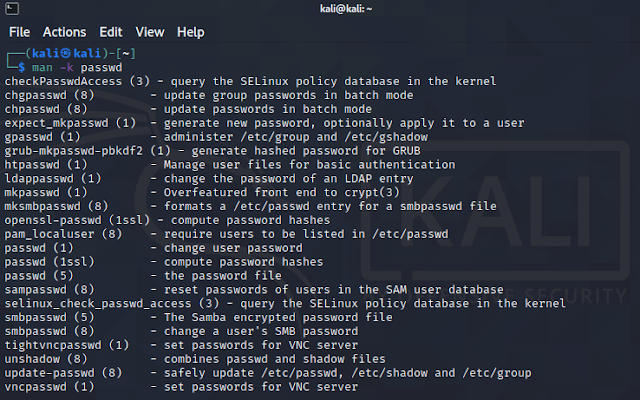
                          Also we can use -k flag with man to do a keyword search.

                          man -k passwd

                          We can see the output on the following screenshot:

                          manual options for passwd command

                          We also can filter out the search by using regular expression.

                          man -k '^passwd$'

                          In the above command, the regular expression is enclosed by a caret (^) and dollar sign ($), to match the entire line and avoid sub-string matches. The output shows in the following screenshot:

                          filtering man page search results

                          We can now look at the exact passwd manual page (5) we are interested in by referencing the appropriate section:

                          man 5 passwd
                          man options of passwd command

                          Man pages are usually the quickest way to learn more about a Linux command. So we need to take some time and explore the man pages.

                          Apropos

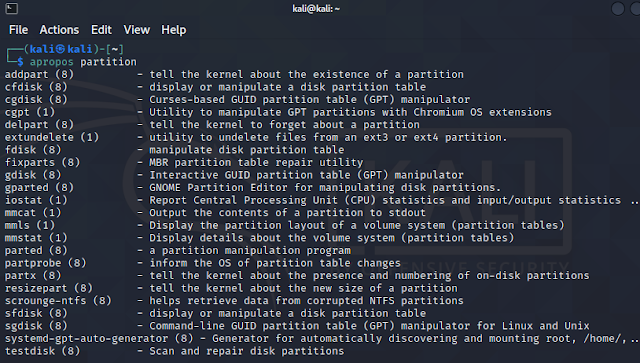
                          By using apropos command we can see a list of all topics in the man pages. Although this is a bit raw, it’s often helpful for finding a specific command based on the description. For an example , we want to partition a hard drive but can’t remember the name of the command. We can figure this out with an apropos search for “partition”.

                          apropos partition

                          We can see the commands list with description in the following screenshot:

                          apropos

                          Check that apropos have similar output like man -k, in fact both are the same.

                          List

                          The ls command prints a basic file listing on the directory to the terminal window. We can modify the output results with various flags. Like -a flag is used to display all files (including hidden files) and the -1 option displays each file on a single line, which is very useful for automatic scripts.

                          ls command

                          Change Directories

                          Linux does not use Windows-style drive letters (C:). Here, all files, folders, and devices are baby of the root directory, represented by the / character (see our Kali Linux file system article). In our terminal can use the cd command followed by a path to change to the specified directory. The pwd command will print our current directory (which is helpful if we get lost inside files) and running cd will return to the home directory (/home/username). To understand this we need to check the following screenshot and practice it by our own.

                          changing directories

                          To return back from a directory to it’s parent/previous directory we can use cd .. command.

                          Creating Directories

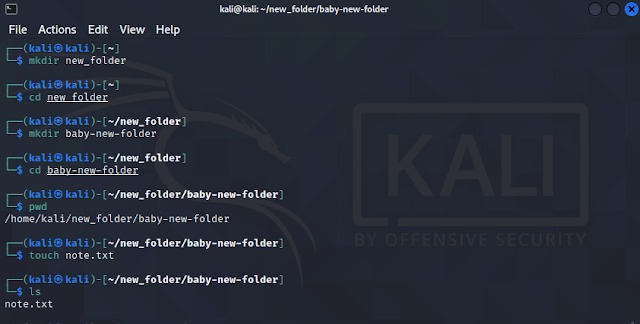
                          We can use mkdir command followed by the name of our new directory to create a new directory. Directory names can be contains space in middle, but when we are using command line interface it will be easier to work with directory names using underscores or hyphens instead.

                          To create a new file we can use touch command followed by the name of our new file. Example of mkdir and touch command is shown in the following screenshot:

                          creating directories

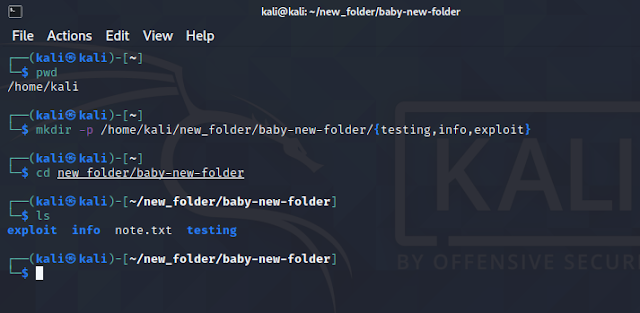
                          We also can create multiple directories at a same time using -p flag. -p is capable to create directories inside parent directory. Suppose we need to add 2 directories inside our newly created (above example) directory (which is /home/kali/new_folder/baby-new-folder). We can do it from our home by using -p as shown in the following command:

                          mkdir -p /home/kali/new_folder/baby-new-folder/{testing,info,exploit}

                          We can see the output in following screenshot:

                          Creating diirectories advanced way

                          Searching for Files

                          There are three most common Linux commands for searching files on terminal, those are which, locate and find. Utilities of these commands are similar but work and output of these utilities are different.

                          Which

                          which command searches between the directories that are defined in the $PATH environment variable for a given file name. This variable contains a listing of all the directories that Kali Linux searches when a command is applied without its path. If a match is found, which returns the full path of the file as shown below:

                          which command

                          Locate

                          The locate command is the quickest way to find the locations of files and directories in Kali Linux. To do the search on a much shorter search time, locate searches a built-in database named locate.db rather than checking the entire hard disk. This database is automatically updated on a regular basis by the cron scheduler. To manually update the locate.db database, we can use the sudo updatedb command.

                          locate command

                          Find

                          The find command is the most complex and flexible tool in these three. Understanding it’s syntax sometimes very hard, but it is very powerful than a normal search. In the following screenshot we did the most basic search using find command, where we start our search from root directory (/) and look for the filename starts with sbd.

                          find command

                          Where which and locate command searches files by using their names, find can search files by it’s name, type, size, time, permissions etc. find is an complex yet very powerful search tool. We can know more about it here.

                          In our this part we just covered the basics terminal uses and some basic Linux commands. We will about more commands on our upcoming parts. Hope this article was enjoyable and informative.

                          Love our articles? Make sure to follow us on Twitter and GitHub, we post article updates there. To join our KaliLinuxIn family, join our Telegram Group. We are trying to build a community for Linux and Cybersecurity. For anything we always happy to help everyone on the comment section. As we know our comment section is always open to everyone. We read each and every comment and we always reply.

                          Kali Linux System Management

                          In our this article we are going to learn how we can handle our Linux box. This is the basics for system admins and penetration testers. Here we will learn about starting/stopping system service, installing stuffs on Linux and much more. We are covering things as a penetration testers perspective on our Kali Linux system. But this same things can be done on any Debian based Linux distribution, like Ubuntu, Linux Mint, Elementary OS etc.

                          kali linux system management

                          These things we are going to learn will lead our whole Linux (specially Debian-based) journey not only Kali Linux.

                          Linux Host Information

                          To know our hostname on Linux, we just need to execute the hostname command on our terminal window. As we can see in the following screenshot:

                          hostname on linux

                          Hostname is the name of our computer. If we want to change it we can edit it’s configuration file by sudo nano etc/hostname command. Then we put their our required name for the computer. Then we need to save it then reboot too see the effects.

                          Linux OS Information

                          Knowing the information of an Operating System or OS is very essential for privilege escalation. So that the penetration tester can gain information if the version used is vulnerable. To know the information of the OS we need to run uname -a command.

                          uname operating system information

                          In the above screenshot we had used -a flag to know all the information. If we need any specific information about then we can use different flags like kernel name (-s), network node hostname (-n), kernel release (-r), kernel version (-v), machine hardware name (-m), processor type (-p), hardware platform (-i), name of operating system (-o).

                          Linux Hardware Information

                          On Linux system, if we want to know about our system’s hardware information then we need to know these commands.

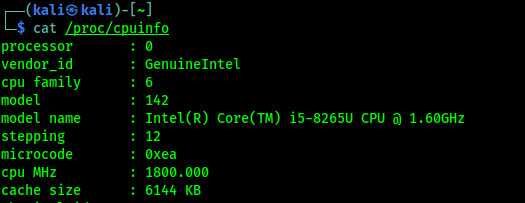
                          To check our CPU information we need to check our /proc/cpuinfo by using following command:

                          cat /proc/cpuinfo
                          cpu information on linux

                          Almost same way if we wanna check our RAM information then we need to run cat /proc/meminfo command. We can see the output on the following screenshot.

                          ram information on Linux

                          To see attached devices with our system (like hard disk, disk partitions etc), then we need to use sudo fdisk -l (here -l flag displays partitions) command. This also show us external drives connected with our system.

                          fdisk to display partitions

                          To display the list of USB devices like mouse, keyboard, thumb drive, wifi adapter, rtl-sdr etc we need to use lsusb command. As we can see in the following screenshot.

                          usb devices attached list

                          To see all the mounted directories into the file system, then we need to execute mount command.

                          mounted directories

                          Managing Services on Linux

                          Services are servers that can run on our Linux or Kali Linux system, such as SSH Apache, FTP etc.

                          To manage  services on Linux we need to use commands like following

                          • sudo service servicename status to check the status of the service.
                          • sudo service servicename start to start a service.
                          • sudo service servicename stop to stop a service.
                          • sudo service servicename restart to restart a service.

                          We also can use sudo systemctl servicename status/start/stop/restart to do the same thing.

                          Package Management

                          For doing package management first we need to update our Kali Linux system’s repository. We have an entire article on Kali Linux repository. In short Kali Linux repository is located on /etc/apt/sources.list, we can open it by using following command:

                          sudo nano /etc/apt/sources.list

                          After putting sudo password we can see the default repository in the following screenshot:

                          kali linux repository

                          We can update our system or download new tools directly from repository. to update our system (like Windows update), we need to run following command:

                          sudo apt update -y

                          To upgrade the system we need to run following command:

                          sudo apt upgrade -y

                          We have an previous article on updating Kali Linux system.

                          Installing Packages on Linux

                          There are various ways to installing packages or software on Linux system. Commonly there are two ways:

                          • Installing from software packages.
                          • Installing from repository.

                          When we are installing a software package, we need to download the package with .deb extension from the internet then we need to run sudo dpkg -i filename.deb command to install the package.

                          To download packages from repository we need to run command like sudo apt install packagename command.

                          To remove software package from our system we need to run sudo apt remove packagename command.

                          To find a package name on repository we need to run command apt-cache search packagename.

                          Finally, if we need to install a package and we’re not sure if the package is exists on the repository or not we need to run command apt-cache show packagename.

                          Process Management on Linux

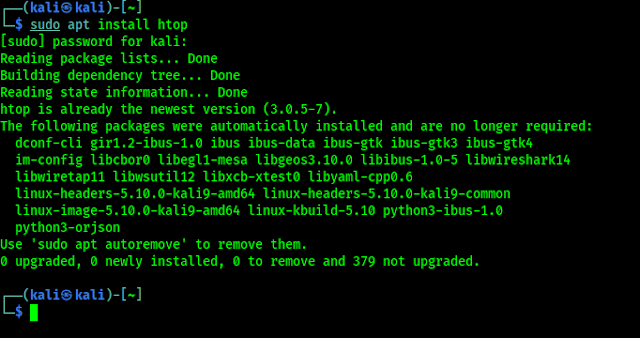
                          One of our most favorite process management tool on Kali Linux is htop. But it is not come pre-installed on Kali Linux. We need to install it from repository by using following command:

                          sudo apt install htop
                          installing htop on kali linux

                          After installing it we need to run htop command and we can see all the  running process on our terminal window, as we can see in the following screenshot:

                          htop showing running process
                          While taking screenshot, we got the highlighted process

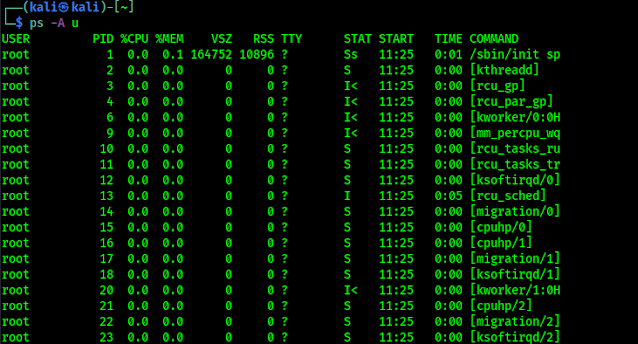
                          Another way to get the list of currently running process is by using the ps -A u command, as we can see in the following screenshot.

                          processing on Linux

                          We can see the PID (Process Identification Number) on both screenshot we can this are the numbers of the processing. We can stop any processing services by running kill PID_NUMBER command. If the system refuse to kill it we can do it forcefully by applying kill -9 PID_NUMBER command.

                          This is about how we can manage process and manage our Linux system. Love our articles? Make sure to follow us on Twitter and GitHub, we post article updates there. To join our KaliLinuxIn family, join our Telegram Group. We are trying to build a community for Linux and Cybersecurity. For anything we always happy to help everyone on the comment section. As we know our comment section is always open to everyone. We read each and every comment and we always reply.
                          Bash Scripting on Kali Linux

                          When we are talking about Linux and Terminal, we can’t left Bash scripting. Bash scripting will be very helpful to become a cybersecurity expert, we can automate payloads and other tasks. On our this article we are gonna talk about ‘Bash Scripting‘ and how to write accurate scripts on Linux.

                          Bash Scripting on Kali Linux

                          The GNU Bourne-Again Shell (Bash) is a powerful tool and scripting engine. We can do automate many tasks on command-line. In our this guide we are learning Bash scripting and know some practical use case. Here we assume that we know about the Linux files, which discussed on previous article.

                          Introduction to Bash Scripting

                          A Bash script is a plain-text file that contains a series of commands that are executed as if they had been typed on terminal window. In general, Bash scripts have an optional extension of .sh for identification (but it can be run without extension name), begin wit #!/bin/bash and must have executable permission set before the script can be executed. Let’s write a simple “Hello World” Bash script on a new file using any text editor, named it hello-world.sh and write the following contains inside it:

                          #!/bin/bash

                          # Hello World on Bash Script.

                          echo “Hello World!”

                          Then save and close it. In the above script we used some components which we need to explain:

                          • Line 1: #! is known as shebang, and it is ignored by the Bash interpreter. The second part, /bin/bash, is absolute path to the interpreter, which is used to run the script. For this we can identify that, this a “Bash script”. There are various types of shell scripts like “zsh” and “C Shell script” etc.
                          • Line 2: # is used to add a comment. Hashed (#) tests will be ignored by interpreter. This comments will help us to take special notes for the scripts.
                          • Line 3: echo “Hello World!” uses the echo Linux command utility to print a given string to the terminal, which in this case is “Hello World!”.

                          Now we need to make this script executable by running following command:

                          chmod +x hello-world.sh

                          In the following screenshot we can see the output of the above command:

                          granting permission on bash script

                          Now we can run the script by using following command:

                          bash hello-world.sh

                          We can see that our script shows output of “Hello World!” on our terminal as we can see in the following screenshot:

                          hello world output on bash

                          The chmod command, with +x flag is used to make the bash script executable and bash along with scriptname.sh we can run it. We can ./scriptname.sh to run the script. This was our first Bash script. Let’s explore Bash in a bit more detail.

                          Variables

                          Variables are used for temporarily store data. We c an declare a variable to assign a value inside it, or read a variable, which will “”expand” or “resolve” it to its store value.

                          We can declare variable values in various ways. The easiest method is to set the value directly with a simple name=value declaration. We should remember that there are no spaces between or after the “=” sign.

                          On our terminal we can run following command:

                          name=Kali

                          Then we again run another command:

                          surname=Linux

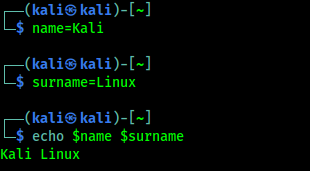
                          Variable declaring is pointless unless we can use/reference it. To do this, we precede the variable with $ character. Whenever Bash see this ($) syntax in a command, it replaces the variable name with it’s value before executing the command. For an example we can echo both this variable by using following command:

                          echo $name $surname

                          In the following screenshot we can the output shows the values of the variables:

                          using varriables in bash

                          Variables names might be uppercase, lowercase or a mixture of both. Bash is case sensitive, so we must be consistent when declaring and expending variables. The good practice to use descriptive variable names, which make our script much easier for others to understand and maintain.

                          Bash interprets certain characters in specific ways. For example, the following declaration demonstrates an improper multi-value variable declaration:

                          hello=Hello World

                          In the following screenshot, we can see the output.

                          not an example of variable

                          This was not necessarily what we expected. To fix this type of error we can use single quote (‘) or double quote (“) to enclose our text. Here we need to know that Bash treats single quotes and double quotes differently. When Bash meets the single quotes, Bash interprets every enclosed character literally. When enclosed in double quotes, all characters are viewed literally expect “$” and “” meaning variables will be expended in an initial substitution pass on the enclosed text.

                          In the case of above scenario we the following will help to clarify:

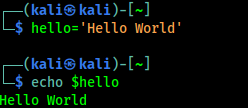
                          hello='Hello World'

                          Now we can print this variable using echo, shown in following screenshot:

                          right use of variables

                          In the above example, we had used the single quote (‘) to use the variable. But when we use the hello variable with something other then we need to use double quote (“), we can see following for better understanding:

                          hello2="Hi, $hello"

                          Now we can see the print (echo) of new $hello2 variable on the following screenshot:

                          varibales using double quote

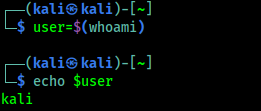
                          We can also set the value of the variable to the result of a command or script. This is also known as command substitution, which allows us to take the output of  a command (what would normally be printed to the screen) and have it saved as the value of a variable.

                          To do this, place the variable name in parentheses “()“, preceded by a “$” character:

                          user=$(whoami)
                          echo $user

                          Here we assigned the output of the whoami command the user variable. We then displayed it’s value by echo. In the following screenshot we can see the output of the above command:

                          take a variable as another variable in bash

                          An alternative syntax for command substitution using backtick (`), as we can see in the following commands:

                          user2=`whoami`
                          echo $user2

                          This backtick method is older and typically discouraged as there are differences in how the two methods of command substitution behave. It is also important to note that command substitution happens in a subshell and changes to variables in the subshell will not alter variables from the master process.

                          Arguments

                          Not all Bash scripts require arguments. However, it is extremely important to understand how they are interpreted by bash and how to use them. We have already executed Linux commands with arguments. For example, when we run command ls -l /var/log, both -l and /var/log are arguments to the ls command.

                          Bash scripts are not different, we can supply command-line arguments and use them in our scripts. For an example we can see following screenshot:

                          supplying arguments to bash script

                          In the above screenshot, we have created a simple Bash script, set executable permissions on it, and then ran it with two arguments. The $1 and $2 variables represents the first and second arguments passed to the script. Let’s explore a few special Bash variables:

                          Variable Name Description
                          $0 The name of the Bash script
                          $1 – $9 The first 9 arguments to the Bash script
                          $# Number of arguments passed to the Bash script
                          $@ All arguments passed to the Bash script
                          $? The exit status of the most recently run process
                          $$ The process id of the current script
                          $USER The username of the user running the script
                          $HOSTNME The hostname of the machine
                          $RANDOM A random number
                          $LINENO The current line number in the script

                          Some of these special variable can be useful when debugging a script. For example, we might be able to obtain the exit status of a command to determine whether it was successfully executed or not.

                          Reading User Input

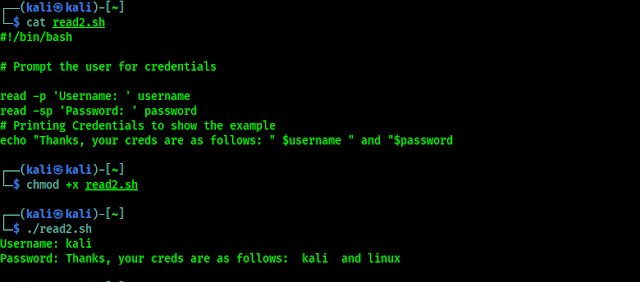
                          Command-line arguments are a form of user input, but we can also capture interactive user input during a script is running with the read command. We are going to use read to capture user input and assign it to a variable, as we did in the following screenshot:

                          read user input on Bash Script

                          We can alter the behavior of the read command with various command line options. Two of the most commonly flags include -p, which allows us to specify a prompt, and -s, which makes the user input silent/invisible (might be helpful for credentials). We can see an example in the following screenshot:

                          read user input silently on bash

                          If, Else, Elif

                          If, Else, Elif are considered as most common conditional statements, which allow us to show different actions based on different conditions.

                          The if statement is quite simple. This checks to see if a condition is true, but it requires a very specific syntax. We need to be careful to attention to this syntax, especially the use of required spaces.

                          if statement on bash

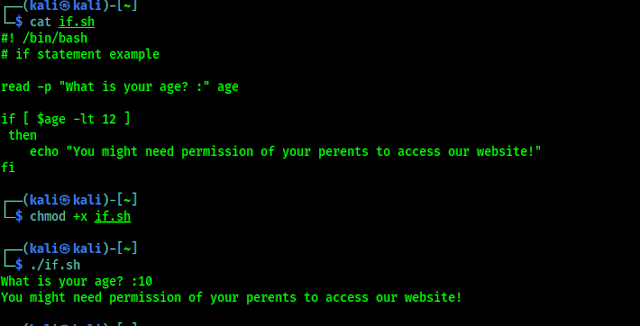
                          In the above screenshot if “some statement” is true the script will “do some action“, these action can be any command between then and fi. Lets look at an actual example.

                          if statement showing example

                          On the above example, we used an if statement to check the age inputted by a user. If the user’s age was less than (-lt) 12, the script would output a warning message.

                          Here the square brackets ([ &]) in the if statement above are originally reference to the test command. This simply means we can use all of the operators that are allowed by the test command. Some of the widely used operators include:

                          • -n VAR – True if the length of VAR is greater than zero.
                          • -z VAR – True if the VAR is empty.
                          • STRING1 = STRING2 – True if STRING1 and STRING2 are equal.
                          • STRING1 != STRING2 – True if STRING1 and STRING2 are not equal.
                          • INTEGER1 -eq INTEGER2 – True if INTEGER1 and INTEGER2 are equal.
                          • INTEGER1 -gt INTEGER2 – True if INTEGER1 is greater than INTEGER2.
                          • INTEGER1 -lt INTEGER2 – True if INTEGER1 is less than INTEGER2.
                          • INTEGER1 -ge INTEGER2 – True if INTEGER1 is equal or greater than INTEGER2.
                          • INTEGER1 -le INTEGER2 – True if INTEGER1 is equal or less than INTEGER2.
                          • -h FILE – True if the FILE exists and is a symbolic link.
                          • -r FILE – True if the FILE exists and is readable.
                          • -w FILE – True if the FILE exists and is writable.
                          • -x FILE – True if the FILE exists and is executable.
                          • -d FILE – True if the FILE exists and is a directory.
                          • -e FILE – True if the FILE exists and is a file, regardless of type (node, directory, socket, etc.).
                          • -f FILE – True if the FILE exists and is a regular file (not a directory or device).

                          We had applied these things to the above if statement example and we remove the square brackets using test string. But we think that the square bracket makes the code more readable.

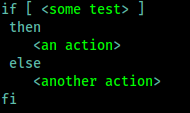
                          We also can perform a particular set of actions if a statement is true and other statement is false. To do this, we can use the else statement, which has the following syntax:

                          else statement in bash

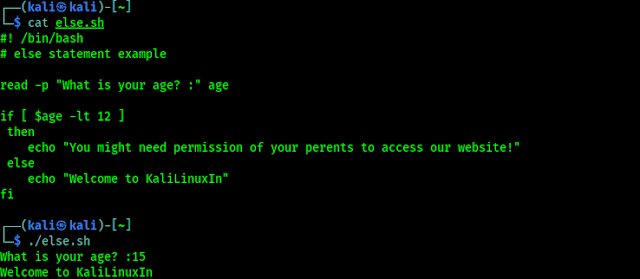
                          Now for an example we expand our previous age example including our else statement, as shown in the following screenshot:

                          using of else statement in bash example

                          We can easily notice that the else statement was executed when the inputted age was not less than 12.

                          We can add more arguments to the statements with the help of elif statement. The example will be following:

                          elif statement on bash

                          Let’s extend our age example with elif statement in the following screenshot:

                          using of elif statement on bash

                          On the above example we can see that the code is little bit complex compared to if and else. Here when the user inputs the age grater than 60 elif statement will be executed and output the “Salute …” message.

                          These are the basic uses of bash. Here we learn some simple bash scripts. There are lots of more topic to cover but we don’t want to make the article longer. If you want next part please Tweet us.

                          In today’s article we learned Basics of Bash scripting on our Kali Linux. Not only Kali Linux this tutorial will work on any Debian based Linux distro like Ubuntu, Linux Mint etc.

                          Love our articles? Make sure to follow us on Twitter and GitHub, we post article updates there. To join our KaliLinuxIn family, join our Telegram Group. We are trying to build a community for Linux and Cybersecurity. For anything we always happy to help everyone on the comment section. As we know our comment section is always open to everyone. We read each and every comment and we always reply.
                          Best 15 Gadgets For Ethical Hackers on Amazon 2022

                          Our in this platform we usually talk about various applications and their uses to check loopholes on systems. But penetration testers not only uses software applications, they also need some hardware to perform the tasks. In this detailed article we are going to cover hardware devices & gadgets used by an ethical hacker. Let’s start with a warning.

                          Warning:- This article is written for educational purpose only. To make it more ethical, we just only talk about the hardware devices publicly available in Amazon. Using these devices on our own for educational purpose isn’t crime, but using these devices against others without proper permission is illegal. So use these devices responsibly, we and Amazon will not be responsible for talking and selling these kind of product.

                          Hardwares and gadgets used by hackers

                          Lets start with a computer, most of cybersecurity experts prefer laptops, not desktops because laptops are portable. We had wrote an entire article about best laptops for Kali Linux, Moving forward ethical hackers uses some other hardware devices that is our main topic for today.

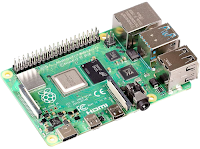
                          1. Raspberry Pi 4

                          Raspberry Pi dominating the market of single board computers (SBC). This device used by almost every security personals.

                          Raspberry pi

                          This is very useful we can install entire Kali Linux on this credit card sized computer. Raspberry Pi also can be used in many other projects. Cybersecurity experts use it on various way. We can see in Mr. Robot Season 1 Episode 5, how Elliot hacked the climate control network to destroy magnetic tapes.

                          There are unlimited uses of raspberry pi for an ethical hacker. This device is a must have for everyone on infosec and programming field.

                          buy Raspberry Pi on amazon

                          2. Raspberry Pi Zero W

                          This is a small handheld computer, ideal for carrying the best penetration testing software tools, and to handle all the external hardware hacking tools. The most known Cybersecurity distro for it is P0wnP1 A.L.O.A. and Kali Linux. P4wnP1 is a highly customizable USB attack platform, based on a low cost Raspberry Pi Zero or Raspberry Pi Zero W. The successor of P4wnP1 is called P4wnP1 A.L.O.A. We recommend the USB type-A pongo-pin adapter shown in the above picture.

                          We also can use it a headless system (without monitor). This device connected with a power bank in our bag and we can control it from our mobile device on our hand(using VNC).

                          buy from amazon

                          3. USB Rubber Ducky

                          usb rubber ducky

                          USB Rubber ducky is created and developed by Hak5. Nearly every computing devices accepts human input from keyboards, hence the ubiquitous HID specification – or Human Interface Device. Keyboards announce themselves to computers as HID devices and are in turn automatically recognized and accepted.

                          The USB Rubber Ducky delivers powerful payloads in seconds by taking advantage of the target computers inherent trust all while deceiving humans by posing as an ordinary USB drive.

                          In simple words, if we plug it on a computer, the computer think it is a keyboard and it will inject (type, save and execute) our preset payload on the computer. There are lots of payload available for this device. Also we can easily write our own code.

                          This is one of the bast way to compromise a system having physical access.

                          buy from amazon

                          4. WiFi Pineapple

                          The Wi-Fi pineapple is the original Wi-Fi attack tool developed by Hak5. There are three different models available from Hak5. They all are good, here we choose Mark VII model for it’s value for money.

                          Wifi pineeapple

                          This will automate the auditing of WiFi networks and saves the results. We can control it with awesome web based interface. This is really a very good product for security testing o wireless networks.

                          buy from amazon

                          5. HackRF One

                          HackRF One from Great Scott Gadgets is a Software Defined Radio peripheral capable of transmission or reception of radio signals from 1 MHz to 6 GHz. Designed to enable test and development of modern and next generation radio technologies. We can read and manipulate radio frequencies using this device.

                          hackrf one

                          HackRF One is an open-source hardware platform that can be used as a USB peripheral or programmed for stand- alone operation. This SDR offers one important improvement compared to other cheap alternatives. But the Radio Frequency (RF) quality isn’t good as expected.

                          buy from amazon

                          6. Ubertooth One

                          Ubertooth One is the most famous Bluetooth hacking tool we can find on the market. It is an open source 2.4 GHz wireless development platform suitable for Bluetooth hacking. Commercial Bluetooth monitoring equipment can easily be priced at over $10,000 , so the Ubertooth was designed to be an affordable alternative platform for monitoring and development of new BT, BLE and similar wireless technologies.

                          ubertooth

                          Ubertooth One is designed primarily as an advanced Bluetooth receiver, offering capabilities beyond that of traditional adapters, which allow for it to be used as a BT signal sniffing and monitoring platform. Although the device hardware will accommodate signal broadcasting, the firmware currently only supports receiving and minimal advertising channel transmission features.

                          buy from amazon

                          7. WiFi Deauther Watch

                          As the name said it’s a deauther, it de-authenticate the WiFi users and they got disconnected. It’s not a jammer. It uses ESP8266 WiFi development board to do so. Here it’s watch version is looks super cool gadget for every hacker.

                          wifi deauther

                          While a jammer just creates noise on a specific frequency range (i.e. 2.4 GHz), a deauthentication attack is only possible due to a vulnerability in the Wi-Fi (802.11) standard. The deauther does not interfere with any frequencies, it is just sending a few Wi-Fi packets that let certain devices disconnect. That enables us to specifically select every target. A jammer just blocks everything within a radius and is therefore highly illegal to use.

                          buy from amazon

                          8. USB Killer

                          Computers doesn’t check the current flowing through USB, because it uses computers own power and can’t transmit more voltage. But what if we took an advantage of this to burn our (using on others is totally illegal) entire system.

                          USB Killer

                          When plugged into a device, the USB Killer rapidly charges its capacitors from the USB power lines. When the device is charged, -200VDC is discharged over the data lines of the host device. This charge/discharge cycle is repeated many times per second, until the USB Killer is removed. As the result target device becomes burned and unrepairable.

                          Its compact size and flash-drive style housing makes it an important device in every pen-tester’s toolkit. It can be used multiple times as we want.

                          buy from amazon

                          9. Bad USB

                          This is a super alternative of USB Rubber Ducky. This device contains customized HW based on Atmega32u4 and ESP-12S. This device allows keystrokes to be sent via Wi-Fi to a target machine. The target recognizes the Ducky as both a standard HID keyboard and a serial port, allows interactive commands and scripts to be executed on the target remotely.

                          bad usb with wifi

                          Attacker can easily carry it as a thumb drive and plug into any PC to inject payload, running own command on it, it also can be controlled over WiFi. It looks like innocent USB thumb drive, which is a great advantage. But this is doesn’t have faster speed like USB Rubber Ducky.

                          buy from amazon

                          10. Hardware Keylogger

                          A hardware keylogger can be inserted between USB keyboard and computer. It captures all the keystrokes made from the keyboard, must have thing for every cybersecurity expert.

                          hardware keylogger

                          This is a basic hardware keylogger. It has 16 MB storage. Which is sufficient to capture keystrokes for a year generally. Later we can remove it and plug on our computer to read the keystrokes. Some keyloggers comes with WiFi controlling and SMS controlling functionality. No software can detect it’s there.

                          buy from amazon

                          11. Adafruit Bluefruit LE Sniffer

                          Adafruit luefruit LE Friend is programmed with a special firmware image thatturns it into an easy to use Bluetooth Low Energy sniffer. We can passively capture data exchanges between two Bluetooth Low Energy (BLE) devices, pushing the data into Wireshark, the open source network analysis tool, where you can visualize things on a packet level, with useful descriptors to help us make sense of the values without having to crack open the 2000 page Bluetooth 4.0 Core Specification every time.

                          ble sniffer

                          Note: We can only use this device to listen on Bluetooth Low Energy devices! It will not work on Bluetooth (classic) devices. Firmware V2 is an improved firmware from Nordic now has better Wireshark-streaming sniffer software that works with all OS for live-streamed BLE sniffing. The sniffer firmware cannot be used with the Nordic DFU bootloader firmware, which means that if we want to reprogram this device you must use a J-Link (and a SWD programmer board). We cannot over-the-air (OTA) reprogram it.

                          buy from amazon

                          12. Micro-controllers

                          There are lots of micro-controllers used by ethical hackers. Some of them are must have in a ethical hackers backpack.

                          NodeMCU ESP8266

                          nodemcu esp8266

                          ESP8266 is a $6 WiFi development board and it can be used in various way, we can make WiFi deauther by our own. It also can be used to create phishing pages over WiFi.

                          buy from amazon

                          Arduino Pro Micro

                          This tiny micro-controller is one of the best choice for ethical hackers. We can make our own DIY USB Rubber Ducky.

                          Arduio pro micro

                          Arduino Pro Micro is really good thing at a very low price. But if we want to change the script then we need to reset and upload new script on it from our computer.

                          buy from amazon

                          13. RTL-SDR

                          RTL-SDR is a very cheap software defined radio that uses a DVB-T TV tuner dongle based on the RTL2832U chip-set.

                          rtl sdr devices

                          It can be used to intercept radio frequencies. We can use it for listening others conversations. It is also able to intercept GSM mobile calls and SMS. It is very useful for cybersecurity experts.

                          buy from amazon

                          14. Proxmark3 NFC RFID Card Reader

                          Owning a Promark3 means owing the most powerful and most complete device RFID/NFC (LF & HF) testing in the frequencies of 125KHz / 134KHz / 13.56MHz.

                          promark 3

                          This devices can make read the data of RFID and NFC cards and then make a copy of it. We can write the new copies on blank cards provided with this package. We we need more we can buy more blank cards on Amazon.

                          Therefore, investing some more bucks in upgrading it, it’s not a bad idea. To improve its range we need the extended range antennas for LF and HF.

                          Another new and nice upgrade for it, is the Blue Shark Bluetooth 2.0 upgrade, that permits controlling the proxmark3 wirelessly plus adding an external battery to create an autonomous proxmark3 that can be connected and controlled from your computer or smartphone. The Walrus NFC application has been updated to permit control by Bluetooth. It also fixes the high temperature concerns adding a metal cooler.

                          buy from amazon

                          WiFi Adapters (Monitor Mode & Packet Injection)

                          wifi adapter for kali linux

                          WiFi adapter specially which supports monitor mode and packet injection is essential for WiFi penetration testing. So most of the hackers uses it. We had noticed that Alfa makes awesome adapters for cyber-security personals. We already discussed it on our Best WiFi adapter for Kali Linux article. Please check out that article before buying an WiFi adapter.

                          Wifi adapter price on amazon

                          Something Extra

                          This is the gadgets for hackers we can directly buy from Amazon and help us on our ethical hacking journey. There are some more gadgets used by hackers but talking about them will be not ethical here. Most of them manufactured from china and available on some online stores. There are some cool stores like Hak5, but in this article we discussed about some gadgets which are openly available on Amazon.

                          Warning:- Using the above devices is not illegal. They are selling publicly on Amazon. But using these devices to harm anyone is totally illegal. We listed them for educational purpose and to safe ourselves from these kind of devices. If anyone uses this devices to harm anyone then we are not responsible for that, Amazon also not responsible. So use this devices responsibly, always remember:

                          Spiderman is also Anonymous

                          That’s for today. Love our articles? Make sure to follow us on Twitter and GitHub, we post article updates there. To join our KaliLinuxIn family, join our Telegram Group. We are trying to build a community for Linux and Cybersecurity. For anything we always happy to help everyone on the comment section. As we know our comment section is always open to everyone. We read each and every comment and we always reply.

                          Kali Linux 2021.4 Update is Here !

                          The last update of Kali Linux in 2021 is Rolling to ROCK.

                          Say Welcome to Kali Linux 2021.4! This release welcomes a mixture of new items as well as enhancements of existing features, and is ready to be downloaded (from our updated page) or upgraded if we have an existing Kali Linux installation.

                          kali linux 2021.4 update is here

                          The summary of the changelog since the 2021.3 release from September 2021 is:

                          • Improved Apple M1 support
                          • Wide compatibility for Samba
                          • Switching package manager mirrors
                          • Kaboxer theming
                          • Updates to Xfce, GNOME and KDE
                          • Raspberry Pi Zero 2 W + USBArmory MkII ARM images
                          • More tools

                          Kali on the Apple M1

                          As we announced in Kali 2021.1 we supported installing Kali Linux on Parallels on Apple Silicon Macs, well with 2021.4, we now also support it on the VMware Fusion Public Tech Preview thanks to the 5.14 kernel having the modules needed for the virtual GPU used. We also have updated the open-vm-tools package, and Kali’s installer will automatically detect if we are installing under VMware and install the open-vm-tools-desktop package, which should allow we to change the resolution out of the box. As a reminder, this is still a preview from VMware, so there may be some rough edges. There is no extra documentation for this because the installation process is the same as VMWare on 64-bit and 32-bit Intel systems, just using the arm64 ISO.

                          As a reminder, virtual machines on Apple Silicon are still limited to arm64 architecture only.

                          Extended Compatibility for the Samba Client

                          Starting Kali Linux 2021.4, the Samba client is now configured for Wide Compatibility so that it can connect to pretty much every Samba server out there, regardless of the version of the protocol in use. This change should make it easier to discover vulnerable Samba servers “out of the box”, without having to configure Kali.

                          This setting can be changed easily via the command-line tool kali-tweaks. In the Hardening section, one can choose the value Default instead, which reverts back to Samba’s usual default, and only allow using modern versions of the Samba protocol.

                          samba client on kali

                          As one can see on this screenshot, there’s also a similar setting for OpenSSL. We might want to refer to the 2021.3 release announcement for more details on this setting.

                          Easy Package Manager Mirror Configuration

                          By default, when a Kali system is updated, the package manager (APT) downloads packages from a community mirror nearby. But did we know that it’s also possible to configure Kali to get its package from the CloudFlare CDN? To be honest, this is old news. But what’s new is that we can now use kali-tweaks to quickly configure whether APT should use community mirrors or the CloudFlare CDN.

                          mirror configuration

                          So which one is best, community mirrors or CloudFlare CDN? There’s no good answer. The time that it actually takes to update Kali can vary greatly and depends on many factors, including the speed of our Internet connection, our location, and even the time of day, if ever we live in a place where Internet traffic jam occurs at rush hour. The point is: if ever Kali updates are slow, the best we can do is to try to switch from community mirrors to CloudFlare CDN, or the other way round, and find what works best for we. And with kali-tweaks, it’s never been easier!

                          Kaboxer Theme Support

                          With the latest update of Kaboxer tools no longer look out of place, as it brings support for window themes and icon themes (placed respectively inside /usr/share/themes and /usr/share/icons). This allows the program to properly integrate with the rest of the desktop and avoids the usage of ugly fallback themes.

                          Here is a comparison of how zenmap (zenmap-kbx package) looks with the default Kali Dark theme, compared to the old appearance:

                          kaboxer theme

                          New Tools in Kali

                          It would not be a Kali release if there were not any new tools added! A quick run down of what’s been added (to the network repositories):

                          • Dufflebag – Search exposed EBS volumes for secrets
                          • Maryam – Open-source Intelligence (OSINT) Framework
                          • Name-That-Hash – Do not know what type of hash it is? Name That Hash will name that hash type!
                          • Proxmark3 – if we are into Proxmark3 and RFID hacking
                          • Reverse Proxy Grapher – graphviz graph illustrating our reverse proxy flow
                          • S3Scanner – Scan for open S3 buckets and dump the contents
                          • Spraykatz – Credentials gathering tool automating remote procdump and parse of lsass process.
                          • truffleHog – Searches through git repositories for high entropy strings and secrets, digging deep into commit history
                          • Web of trust grapher (wotmate) – reimplement the defunct PGP pathfinder without needing anything other than our own keyring

                          Desktop & Theme Enhancement

                          This release brings updates for all the 3 main desktops (Xfce, GNOME, and KDE), but one that is common to all of them is the new window buttons design. Previous buttons were designed to fit the window theme of Xfce but did not work well with the other desktops and lacked personality. The new design looks elegant on any of the desktops and makes it easier to spot the currently focused window.

                          kali theme enlargement

                          Xfce

                          The panel layout has been tweaked to optimize horizontal space and make room for 2 new widgets: the CPU usage widget and the VPN IP widget, which remains hidden unless a VPN connection is established.

                          Following the steps of other desktops, the task manager has been configured to “icons only”, which, with the slight increase in the panel’s height, makes the overall look cleaner and improves multitasking in smaller displays.

                          The workspaces overview has been configured to the “Buttons” appearance, as the previous configuration “Miniature view” was too wide and a bit confusing for some users. Now that each workspace button takes less space in the panel, we have increased the default number of workspaces to 4, as it’s a usual arrangement in Linux desktops.

                          To finish with the modifications, a shortcut to PowerShell has been added to the terminals dropdown menu. With this addition, we can now choose between the regular terminal, root terminal, and PowerShell.

                          If we prefer the previous configuration for any of the widgets, we can modify or remove them by pressing Ctrl + Right-Click over it.

                          powershell

                          In addition to the Xfce design tweaks, In the image above, we can also observe the new customized prompt for PowerShell (in the two-line mode). Same as for zsh and bash, it includes an alternative one-line prompt that can be configured with kali-tweaks.

                          Bonus Tips For Virtual Desktops!

                          • We can add or remove workspaces with the shortcuts: Alt + Insert / Alt + Delete
                          • We can move through workspaces with the shortcuts:
                            • Ctrl + Alt + <ARROW_KEY> to move in the direction of the arrow key.

                              • (if we add Shift we move the current focused window)
                            • Ctrl + Alt + <WORKSPACE_NUM> to move to a specific workspace, based on its number.
                            • Ctrl + Super + <WORKSPACE_NUM> to move a window to a specific workspace, based on its number.

                          Virtual desktops

                          GNOME 41

                          In this update, GNOME desktop has received not one, but two version bumps. It’s been one year since the last major update of the GNOME desktop in Kali (with GNOME 3.38) and since then there have been two releases of the desktop environment:

                          All themes and extensions have been updated to support the new shell:

                          Kali linux themes

                          gnome 41

                          KDE 5.23

                          The KDE team celebrated its 25th anniversary releasing the update 5.23 of the Plasma desktop. This update, now available in Kali, brings a new design for the Breeze theme, which improves the look of Plasma with details that add glossiness and style to the desktop. Along with the theme improvements, the System Settings (Under Global Theme > Colors) brings a new option to pick the desktop accent color.

                          From Kali’s side, the new window theme for KDE is now based on the source code of the breeze theme instead of using the Aurorae theme engine. This fixes previous issues with window scaling for HiDPI displays.

                          How to Upgrade Your Kali Theme

                          With these theme changes, we may not get them if we upgrade Kali. This is because the theme settings are copied to our home folder when our user is first created. When we upgrade Kali, it is upgrading the operating system, so upgrading does not alter personal files (just system files). As a result, in order to get these theme tweaks, we need to either:

                          • Do a fresh Kali install
                          • Create a new user and switch to that
                          • Delete our Desktop environment profile for the current user and force reboot. Example of Xfce can be found below:
                          kali@kali:~$ mv ~/.config/xfce4{,-$(date +%Y.%m.%d-%H.%M.%S)}
                          kali@kali:~$
                          kali@kali:~$ cp -rbi /etc/skel/. ~/
                          kali@kali:~$
                          kali@kali:~$ xfce4-session-logout --reboot --fast

                          Kali NetHunter Updates

                          Thanks to the amazing work of @yesimxev, we have a new addition to the NetHunter app: The Social-Engineer Toolkit!

                          This release features the first module from SET: the Spear Phishing Email Attack, with many more to come – watch this space…

                          Now we can use the Kali NetHunter app to customise our own Facebook, Messenger, or Twitter direct message email notifications for our social engineering attacks:

                          social engineering toolkit

                          Thanks to everyone that contributed to this feature by participating in the Twitter poll. We could not have done it without input!

                          Kali ARM Updates

                          Notable changes this release

                          • All images now use ext4 for their root filesystem, and resize the root filesystem on first boot. This results in a speed-up over previous releases which were using ext3, and a reduced boot time on the first reboot when resize happens.
                          • Raspberry Pi Zero 2 W support has been added, but like the Raspberry Pi 400, there is no Nexmon support.
                          • Speaking of the Raspberry Pi Zero 2 W, since it is so similar to the Zero W, we have also added a PiTail image to support the new processor with better performance.
                          • Raspberry Pi images now support USB booting out of the box since we no longer hardcode the root device.
                          • Raspberry Pi images now include versioned Nexmon firmware. A future release of kalipi-config will allow we to switch between them, if we would like to test different versions.
                          • Images that use a vendor kernel will now be able to set the regulatory domain properly, so setting our country will give access to channels properly for wireless.
                          • Pinebook Pro can now be overclocked. The big cores get 2GHz and the little cores get 1.5GHz added.

                            • echo 1 | sudo tee /sys/devices/system/cpu/cpufreq/boost to enable
                            • echo 0 | sudo tee /sys/devices/system/cpu/cpufreq/boost to disable
                          • USBArmory MkII image has been added.

                          Kali ARM build-scripts have seen a massive amount of changes:

                          • They are vastly more simplified – thanks to Francisco Jose Rodriguez Martos, and cyrus104 for all of their contributions to make this happen.
                          • We can now choose which desktop we would like to install (or none at all using --minimal)
                          • There is even an option of no desktop and no tools (--slim) if we would like to build a custom image up from scratch

                          Kali-Docs Updates

                          Anyone can help out, anyone can get involved!


                          Miscellaneous

                          Kali-Cloud & Cron

                          Some users noticed that the venerable cron package was missing from the Kali AWS Cloud image. This was not intentional, and it’s now fixed.

                          Remote Desktop Protocol Audio

                          The quieter you become, the more you are able to hear”, goes the saying. And for those running Kali in a VM and using RDP to connect, it’s been very quiet indeed, as the sound never worked with this configuration. However this long period of silence is coming to an end! Sound should be enabled and work out of the box from now on. If ever it does not, make ourself heard on the bug tracker 😉

                          Python Command

                          The command python is no more! Instead, we need to use python3 (or if we have to, python2 due it being at End Of Life). Alternatively we can install python-is-python3 to restore python as an alias for python3.

                          Download Kali Linux 2021.4

                          Fresh Images: So what are waiting for? Start downloading already!

                          Seasoned Kali Linux users are already aware of this, but for the ones who are not, we do also produce weekly builds that you can use as well. If you cannot wait for our next release and you want the latest packages (or bug fixes) when you download the image, you can just use the weekly image instead. This way you’ll have fewer updates to do. Just know that these are automated builds that we do not QA like we do our standard release images. But we gladly take bug reports about those images because we want any issues to be fixed before our next release!

                          Existing Installs: If you already have an existing Kali Linux installation, remember you can always do a quick update:

                          echo "deb http://http.kali.org/kali kali-rolling main non-free contrib" | sudo tee /etc/apt/sources.list
                          sudo apt update && sudo apt -y full-upgrade
                          [ -f /var/run/reboot-required ] && sudo reboot -f
                          ┌──(kali㉿kali)-[~]
                          └─$
                          grep VERSION /etc/os-release
                          VERSION="2021.4"
                          VERSION_ID="2021.4"
                          VERSION_CODENAME="kali-rolling"

                          ┌──(kali㉿kali)-[~]
                          └─$
                          uname -v
                          #1 SMP Debian 5.14.16-1kali1 (2021-11-05)

                          ┌──(kali㉿kali)-[~]
                          └─$
                          uname -r
                          5.14.0-kali4-amd64

                          NOTE: The output of uname -r may be different depending on the system architecture.

                          As always, should you come across any bugs in Kali, please submit a report on our bug tracker. We’ll never be able to fix what we do not know is broken! And Twitter is not a Bug Tracker!
                          Open Whatsapp chat
                          Whatsapp Us
                          Chat with us for faster replies.