Kali Linux

Kali Linux is a Debian-derived Linux distribution designed for digital forensics and penetration testing. It is maintained and funded by Offensive Security.

Amass — Mapping Attack Surface Automatically

In our this guide we are going to cover an awesome information gathering tool called Amass originally created by Jeff Foley, later it adopted by OWASP and Jeff is Amass project leader now.

Amass is a command line open-source tool that helps information security professionals to perform network mapping of attack surfaces and perform external asset discovery using open source information gathering and active reconnaissance techniques.

amass on kali linux

In order to do this, Amass heavily focuses on DNS, HTTP and SSL/TLS data discovering and collecting. Amass uses its own internal mechanism and it also integrates perfectly with some external services (SecurityTrails, AlienVault, Shodan etc) to increase the efficiency and power of it’s results.

In our detailed guide we are going to learn how to install & use Amass on Kali Linux. So without wasting any more time lets get started.

How to Install Amass on Kali Linux

If we are using an updated version of Kali Linux large, then we don’t need to install Amass on our system, it comes pre-installed. But if Amass doesn’t present on our Kali Linux system then we can easily install it by simply using following command:

sudo apt install amass-common

How to use Amass on Kali Linux

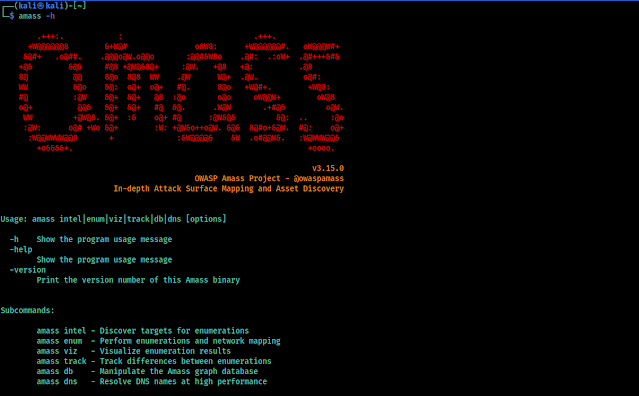
Before starting using any tool we should check it’s help options. We are also doing the same for Amass also. To check it’s help we run following command on our terminal window:

amass -h

In the following screenshot we can see the output of our applied command:

amass help options

In the above help menu we can see that Amass have some options. Let’s have a look on to them:

  • intel: Collect intelligence on the target in order to determine our starting point.
  • evum: Perform enumeration & mapping of our target to determine possible attacks.
  • viz: Show the results on a visual formats with analysis and future research.
  • track: Compare results across enumerations to see changes in their attack surface.
  • db: Manage the graph databases storing the enumeration results.
  • dns: Resolve DNS names at high performance.

Getting Subdomains using Amass Enum

Enough talking about Amass. Let’s use it. The most basic use of it is “subdomain enumeration”. We can do it by applying following command:

amass enum -d oswap.org

Here we have used -d flag to specify our target domain. In the following screenshot we can see the output of our applied command:

subdomain finding using amass

That is the basic subdomain discovery. We can get better results using following command:

amass enum -d example.com -active -cidr 1.2.3.4/24,4.3.2.1/24 -asn 12345

Getting Information using Intel

We can do a lot of tings with Amass. For an example we are looking for an organization using “google” in their name. We can use following command to do this:

amass intel -org "google"

After applying the above command we need to give couple of minutes to find it. We can see it on the following screenshot:

amass intel information gathering

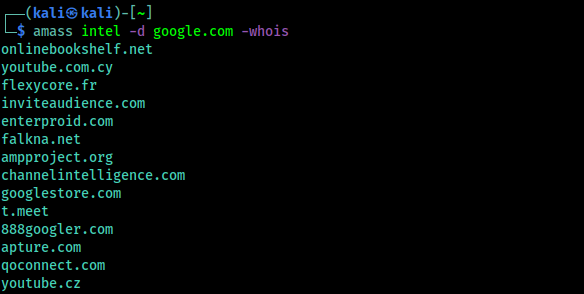
We can also reverse whois data. By this way we can grab the details from the specified domain’s whois records, and then tries to find other domains with the similar whois records. That way we can know about a website owner have other websites. We can use following command to do this:

amass intel -d oswap.org -whois

The output shows in the following screenshot:

reverse whois data using amass

These all domains have similar whois information as Google.com, so there is high chance that Google owns them.

SSL Certificate Grabbing

If we know IP addresses and feed it to Amass using -active flag, Amass will pull the SSL certificate from every IP address within the IP range and then spits back the domain that the SSL cert is associated with. For an example we use the following command:

amass intel -active -cidr 173.0.84.0/24

In the following screenshot we can see that it is running on a well known Paypal-owned CIDR range.

SSL certificate grabbing using amass

Tracking using Amass

Our every scan done with amass is automatically stored on our system that we ran it on. Then, if we run the same scan again, amass will track any changes that have taken place since your last scan. The most perfect way to use this feature is to discover which new subdomains have appeared since our last scan. For example, We had scanned oswap.org on the morning, so I ran the following command to track that.

amass track -d oswap.org

In the following screenshot we can see there are no changes. If we got some new subdomains that means that might be vulnerable.

amass tracking

Visualization on Amass

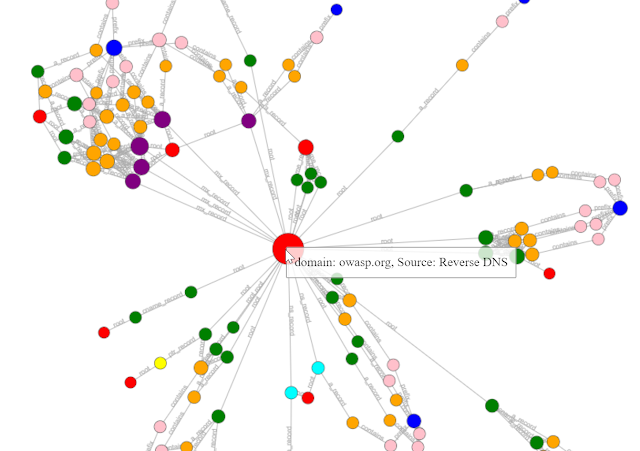
Frankly speaking we are not fan of this. During the information gathering we love to see the results on a text based format, but visualization on Amass looks really cool. We need to use viz for that, as we did in the following screenshot:

amass viz

This viz subcommand on Amass allow us to visualize all the gathered information of target (stored in the Amass graph database) for a target in a number of ways. Results can also be imported into Maltego for more OSINT analysis.

Amass Database

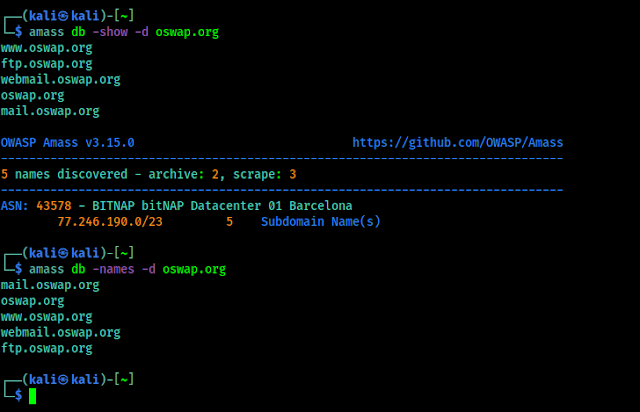
Amass Database (db) is a Amass subcommand that is useful to view the recon data for every scan that we had ever done.
To list all of the details of all of our previous scans, we need to simply run command like amass db show, If we want to see details of a specific domain, then we just need to add the -d flag like following,

amass db -show -d oswap.org

If we prefer a nice clean, plain output, we can output the discovered domains or subdomains using the -names flag instead of -show. The outputs are shown in the following screenshot:

amass db

In the above screenshot we just have the subdomains, because we did not gather more information on oswap.org, but if we have it will show us.

Amass Scripting Engine

Like Nmap scripting engine Amass also have scripting engine which can be used to add our own data sources on Amass. Like we have an updated API which Amass doesn’t integrated yet, so we don’t need to wait for Amass adds it. We can add it on Amass and use it. For more details we can check this manual.

For more detailed guide we can suggest some awesome sources to learn more about Amass:

  1. Official Amass Tutorial
  2. Amass Extensive Tutorial

Amass is really a great tool for information gathering and recon works. In this article we saw that how we can use Amass on our Kali Linux system.

Love our articles? Make sure to follow us on Twitter and GitHub, we post article updates there. To join our KaliLinuxIn family, join our Telegram Group. We are trying to build a community for Linux and Cybersecurity. For anything we always happy to help everyone on the comment section. As we know our comment section is always open to everyone. We read each and every comment and we always reply.
Playing Games on Kali Linux

The corona-virus pandemic has put a wall on being social. We thought this would be a great time to learn new things on ethical hacking and cybersecurity, because we are in homes and have lots of free time.

But how much more will we learn, sometimes things are getting boring. Thinks to play games on Kali Linux ? Gaming on Linux ? 
playing games in Linux

Kali Linux is for gaming?


Approximately 2% of computer users use Linux that’s why game companies didn’t focus on Linux. So Linux is not for hardcore gaming and Kali is obviously not made for gaming. We all know that, it is made for cybersecurity and digital forensic.
But many users use Kali Linux as a full time OS after the default non-root update comes in 2020. Non-root update comes for this, but as a full time OS there should be some games for time pass. Our listed games can be played on other Debian based Linux distributions like Ubuntu. There is a process to play Windows games in Linux using wine tool, but here we discuss about direct installation.

Some awesome games for Kali Linux

 Minecraft

Playing Minecraft in Kali Linux
Minecraft is a very popular game from Mojang and we don’t think it requires any introduction. Yes, we can play this addictive game in our Kali Linux system.
We just need to download the Minecraft.deb file from this official link. After download finished we need to open our terminal and move to the downloaded (cd Downloads by default) location and run following command:
sudo apt install ./Minecraft.deb
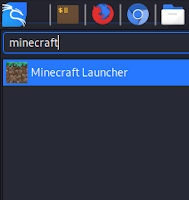
It will starts the installation process and after installation finished we can run Minecraft searching on Whisker menu like following screenshot:
Minecraft in Kali Linux
Or we can use minecraft-launcher command in terminal. Yoo! We just finished installing Minecraft on Kali Linux. Now we just need to login and enjoy (beware from Enderman).

Torcs

Torcs linux racing game

TORCS (The Open Racing Car Simulator) is a pretty cool game for racing game lovers. Torcs can be played as just a standard racing game, where the player drives around the tracks trying to get first position, but an alternative usage is as a platform to develop an artificial intelligence driver that can drive itself through Torcs’s tracks.

We can develop our own AI driver (also called a robot) in C or C++. Torcs is programmed to enable pre-programmed AI drivers to race against one another.

Single-player races range from practice runs to championships, and there is a split-screen multi-player mode for up to 4 players. To set up this with multi-monitor read this.

This game supports keyboard, mouse, joystick, and steering wheel all type of inputs.

We can install this game by using following command:

sudo apt-get install torcs

This is a big download (approx half GB) so it will take a little bit time to install depending on our internet connection. After installation process is done we can play torcs by using following command:

torcs

Gnome-Chess

gnome chess playing in Kali Linux

The game of chess is over 1300 years old and is one of the most popular board games in the world. We can easily install chess in our Kali Linux and enjoy it.
To install gnome-chess we simply use apt-get install command:

sudo apt-get install gnome-chess

After installing it we can open it by just typing gnome-chess in the terminal.

Pacman

Pacman in Kali Linux

Old is Gold. Pacman is the real king of arcade gaming. We can easily install Pacman in our Kali Linux by using following command:

sudo apt-get install pacman4console

Then to play pacman we need to enter following command:

pacman4console

Note: We can’t run pacman (pacman4console) in small terminal window. It would be better to maximize terminal before run pacman4console command.

Tetris

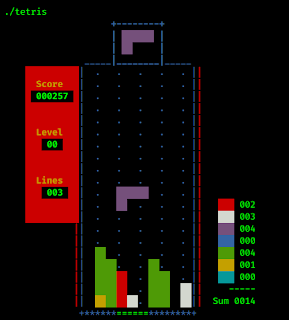
tetris playing in Linux

This makes nostalgic. This addictive puzzle game can be played in our Kali Linux’s terminal window. First we need to download it from here.

It will be downloaded on our downloads folder now to decompress it we use following commands:

cd Downloads && tar -xvf vitetris*.tar.gz

Then we go to vitetris folder by using following command:

cd vitetris*

Then we configure it by using following command:

sudo ./configure

Now we need to run make command:

sudo make

It’s time to install, so we use following command:

sudo make install

Now we can tun tetris by using following command:

./tetris

This game has 2 player mode with controller support.

There is another easy way to install Tetris game on Linux. We just need to type following command to install it:

sudo apt-get install quadrapassel

Then type quadrapassel in terminal to play it.

Quadrapassel is a clone of Tetris with GUI, but it does not have 2 player mode.

This ways we can enjoy the famous arcade game Tetris in our Kali Linux.

GNOME Games

GNOME desktop environment have a good collection of puzzle games Chess is mentioned above, but there are a lots of games like Sudoku, Tetris, Robots, Mines, 2048, Four in a row etc.

However Kali Linux moved to Xfce from GNOME but these games will work here and all other Debian based Linux distributions. The look and fell of these games will remind us the GNOME environment.

Full list of GNOME Games

  1. 2048 (Clone of a popular game 2048)
  2. aisleriot (Pack of 88 Solitaire card games)
  3. gnome-chess (Chess game)
  4. four-in-a-row (Clone of Connect Four)
  5. five-or-more (Clone of popular windows game Color Lines)
  6. hitori (Hitori of Linux)
  7. iagno (Clone of game called Reversi)
  8. gnome-klotski (Sliding block puzzle game)
  9. gnome-mahjongg (Clone of Mohjongg solitaire)
  10. gnome-mines (Clone of Minesweeper)
  11. gnome-nibbles (Rebuild version of Nibbles)
  12. quadrapassel (Tetris in Linux)
  13. gnome-robots (Clone of turn-based popular game Robots)
  14. gnome-sudoku (Sudoku is a number based popular puzzle)
  15. lightsoff (Brainteaser)
  16. gnome-taquin (two 15-puzzle games)
  17. gnome-tetravex (Based of edge-maching game Tetravex)
  18. swell-foop (Clone of SameGame)
  19. tali (dice game close to Yahtzee/Kismet)

These games are very easy to install, we just need to use apt install command with sudo. If we want to install gnome-sudoku then we need to use following command:

sudo apt install gnome-sudoku

Like this way we can install other gnome-games using sudo apt install game-name (game names are in bold in the above list).

There was some more games in GNOME games list but they have removed these games:

  • blackjack
  • gbrainey
  • gnome-mastermind
  • gnome-pipes
  • gnome-untangle

BSD Games

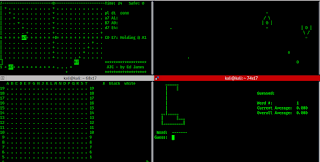
BSD games

BSD Games is a collection of 40 retro games in terminal. This collection is good, some respected names in this list are:

  • Hangman
  • Robots
  • Quiz
  • Air traffic controller
  • Hunt

To install this package we just need to run following command:

sudo apt install bsdgames

Then we can launch this game by applying games names, like hangman in terminal. We can see the full list of BSD games.

These are the best games to play on Kali Linux or other Debian based Linux distro. If we missed any game or having any issue on installing, fell free to comment on the comment section.

 
Love our articles? Make sure to follow us on Twitter and GitHub, we post article updates there. To join our KaliLinuxIn family, join our Telegram Group. We are trying to build a community for Linux and Cybersecurity. For anything we always happy to help everyone on the comment section. As we know our comment section is always open to everyone. We read each and every comment and we always reply.
How to install Arduino Software (IDE) on Kali Linux

Arduino is an open-source electronics platform that can be used for various tasks. In cybersecurity it is also used to perform various attacks. But to code any type of Arduino boards we need the Arduino IDE installed our system, where we can write our codes and upload the program in our Arduino board.

In our this detailed guide we are going to learn how to install Arduino software aka Arduino IDE on our Kali Linux system. This guide can be followed to install Arduino IDE on any Debian-based Linux system.

How to install Arduino IDE on Kali Linux

Install Arduino IDE on Kali Linux

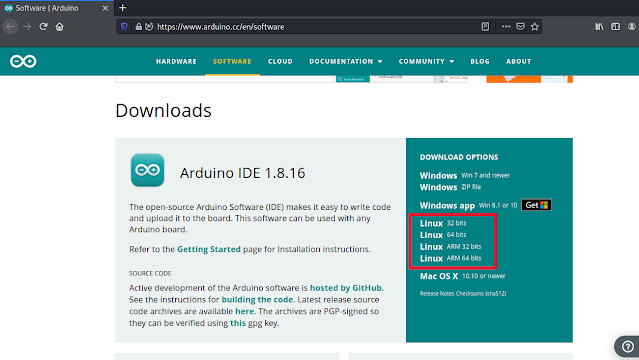
To install Arduino IDE on our Kali Linux system first of all we need to navigate to the official Arduino download page from our browser. We can see various types of Linux downloads there as we can highlighted on the following screenshot:

Arduino IDE download for Kali LInux

Here we are using Linux 64 bits, so we choose Linux 64 bits. On the next page we can see it is requesting for donation, although we can download it by clicking on “Just download” as shown in the following screenshot:

arduino download page

Now the download window will open in front of us. Here we need to save our file.

arduino download starting

After this our download of our tar compressed file will be started. After the download is finished we need to open our terminal window then navigate to our Downloads directory where we just downloaded the Arduino IDE’s compressed file by using following command:

cd Downloads

Here we need to extract our compressed file by using following command:

tar -xvf arduino*.tar.xz

In the following screenshot we can see the output of the applied command:

arduino extracting
We highlighted the output folder

After the process is complete we need to move to the extracted directory (highlighted on the above screenshot) by using following command:

cd arduino-1.8.16

Here if we want we can see the files by using ls command. There we got install.sh file, which can be used to install Arduino IDE on our Kali Linux. To do so our command will be following:

sudo ./install.sh

In the following screenshot we can see that Arduino IDE is successfully installed on our system (it might prompt for the root password).

arduino IDE installed on Kali Linux

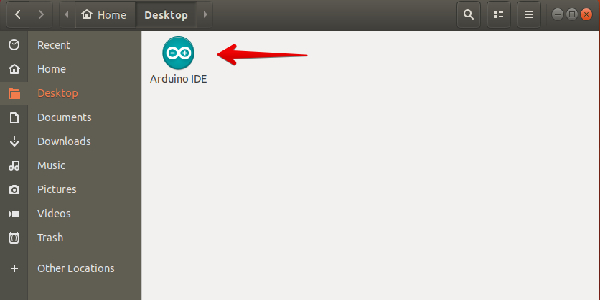
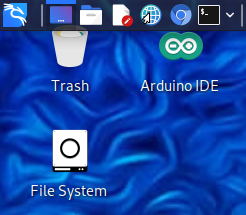
Now we can close terminal, we can see shortcut of Arduino IDE Desktop Icon on our Desktop.

arduino shortcut on Desktop

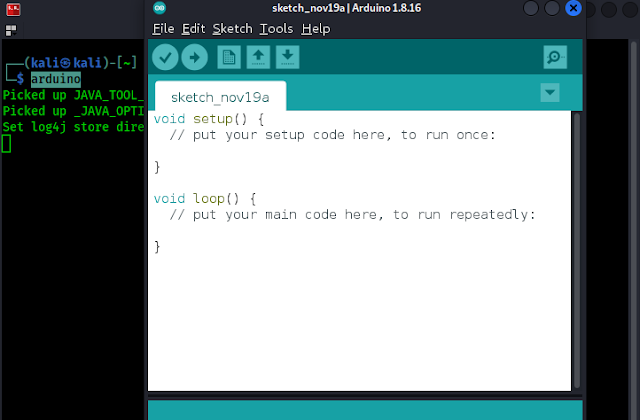
Now we can open Arduino from our Desktop (simple double click) or we can also open Arduino IDE from our our terminal by simply applying arduino command:

arduino

As we can see in the following screenshot, we successfully installed Arduino IDE on our system.

Arduino installed on Kali Linux
Arduino IDE successfully installed on our Kali Linux system

This is how we can install Arduino Software or Arduino IDE on Kali Linux.

Love our articles? Make sure to follow us on Twitter and GitHub, we post article updates there. To join our KaliLinuxIn family, join our Telegram Group. We are trying to build a community for Linux and Cybersecurity. For anything we always happy to help everyone on the comment section. As we know our comment section is always open to everyone. We read each and every comment and we always reply.

Own Airplane Radar using RTL-SDR on Kali Linux

In our previous article we learnt the basics of RTL-SDR, what is it and how to set and use it on our Kali Linux system. So in this article we are not going to cover the basics again. Please make sure to read our previous article carefully. One more thing, buying RTL-SDR from our Amazon link will support us, we earn a little commission income.

Let’s start today’s article. Today we are going to discuss about how we can create our own Airplane radar using our RTL-SDR device on our Kali Linux system. This way we can know about the airplanes around us using their radio signals. So without wasting time let’s get started.

Airplane Radar Using RTL-SDR on Kali Linux

We need to connect our RTL-SDR with our Kali Linux laptop/desktop or Raspberry Pi then we need to open our terminal window and run following command to clone dump1090:

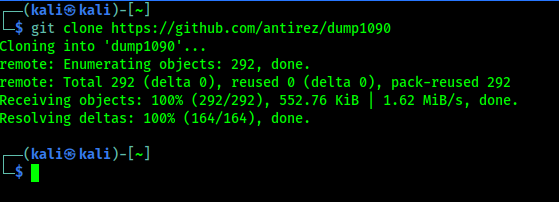
git clone https://github.com/antirez/dump1090

In the following screenshot we can see that we had successfully cloned dump1090 on our system.

dump 1090 clonning from GitHub

Now we move the dump1090 directory by using following command:

cd dump1090

Here we just need to type the following command:

make

We can see the output of the preceding command in the following screenshot:

dump1090 on Kali Linux

Now we got the executable file (dump1090). Now we can run this tool, by using following command:

./dump1090 --interactive --net

Now we can see our nearby airplanes on our terminal, as we can see in the following screenshot:

Airplanes on our terminal using RTL-SDR

Here we can see some details of Airplanes like Flight Number, Speed, Altitude (height from surface) Latitude, Longitude etc. It’s not end. There are more.

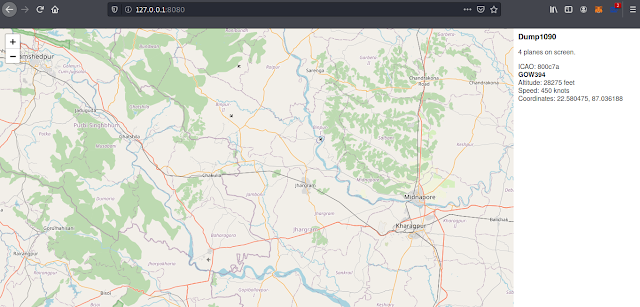
We open our browser and navigate to http://127.0.0.1:8080, here we can see the world map and in this map we can locate our nearby airplanes on the map. We can see the direction and their movements, shown in the following screenshot:

planes on our own radar

In the above screenshot we can see there are four planes nearby us, we also can track their movements. Whenever we click over a plane we can see the details about it. Shown in the following screenshot:

Airplane radar at home using Kali LInux and RTL-SDR

In our previous RTL-SDR article we set up RTL-SDR on Kali Linux and tune radio frequencies using GQRX. On our this article we create our own Airplane radar. What’s next? Want an article on GSM hacking (ethically) using RTL-SDR ? Let us know in the comment section.

Love our articles? Make sure to follow us on Twitter and GitHub, we post article updates there. To join our KaliLinuxIn family, join our Telegram Group. We are trying to build a community for Linux and Cybersecurity. For anything we always happy to help everyone on the comment section. As we know our comment section is always open to everyone. We read each and every comment and we always reply.

Beginners Guide of RTL SDR (Software Defined Radio) on Kali Linux

SDR stands for Software defined Radio which is a radio communication system where components that have been traditionally implemented in hardware. We can use a SDR device as our super ear like Daredevil.

What is a RTL SDR?

In February 2012 the first FM radio signal was received with an RTL2832U chipset (Created for Digital HD TV), and RTL-SDR dongle using custom SDR drivers, After then tons of security researchers, hackers, makers, students and electronics lovers bought the RTL-SDR devices.

Basically RTL SDR device is a software defined radio signal receiver, wait a minute! Did we just say Radio signal receiver? Isn’t it actually my grandfather’s FM radio does? Not like that actually The FM radios signals used to carry commercial radio signals between 88 and 108 MHz. An RTL SDR can go through a very wide range (22-2200 MHz, depending on tuner model). We had mentioned this device on our Hardware for Hackers article. A RTL SDR device is looks like following:

RTL SDR Software Defined Radio on Kali Linux

We can buy this device from Amazon.

buy rtlsdr on amazon

What we can do with RTL SDR?

We can do a lot of things with a RTL-SDR device they are following:

  • Listening to FM radio.
  • Tracking aircraft positions like a radar with ADS-B decoding.
  • Listening to unencrypted Police/Ambulance/Fire/EMS conversations.
  • Listening to aircraft traffic control conversations.
  • Decoding aircraft ACARS short messages.
  • Scanning trunking radio conversations.
  • Decoding unencrypted digital voice transmissions.
  • Tracking maritime boat positions like a radar with AIS decoding.
  • Decoding POCSAG/FLEX pager traffic.
  • Scanning for cordless phones and baby monitors.
  • Tracking & receiving meteorological agency launched weather balloon data.
  • Tracking our own self launched high altitude balloon for payload recovery.
  • Receiving wireless temperature sensors and wireless power meter sensors.
  • Listening to VHF amateur radio.
  • Decoding ham radio APRS packets.
  • Watching analogue broadcast TV.
  • Sniffing GSM signals.
  • Using RTL-SDR on your Android device as a portable radio scanner.
  • Receiving GPS signals and decoding them.
  • Using RTL-SDR as a spectrum analyzer.
  • Receiving NOAA weather satellite images.
  • Listening to satellites and the ISS.
  • Listening to unencrypted military communications.
  • Radio astronomy.
  • Monitoring meteor scatter.
  • Listening to DAB broadcast radio.
  • Use RTL-SDR as a panadapter for your traditional hardware radio.
  • Decoding taxi mobile data terminal signals.
  • Use RTL-SDR as a true random number generator.
  • Listening to amateur radio hams on SSB with LSB/USB modulation.
  • Decoding digital amateur radio ham communications such as CW/PSK/RTTY/SSTV.
  • Receiving HF weatherfax.
  • Receiving digital radio mondiale shortwave radio (DRM).
  • Listening to international shortwave radio.
  • Looking for RADAR signals like over the horizon (OTH) radar, and HAARP signals.

We can see there are tons of work can be done with the RTL-SDR device.

Requirements to use RTL-SDR?

  1. First of all we need a RTL-SDR device, We got our RTL-SDR device from NooElec for testing, a special thanks to them. We can buy this model on Amazon. It comes with three type of antennas, a coax cable and obviously a RTL-SDR device with RTL2832U chipset.
  2. We also need a Kali Linux desktop/laptop or a Raspberry Pi, any other OS like other Linux distros, Mac even Windows also works with RTL-SDR. But here we are going to do our stuffs with our most loved Kali Linux.
  3. We need a RTL-SDR software (Most of which is free and open-source).

Setting up RTL-SDR on Kali Linux

In this article we are going to set up and RTL-SDR device on our Kali Linux system and test it with it’s a basic use.

First of all we need to make ready our RTL-SDR device, connect it with the coax cable and attach antenna. Then plug it to our system’s USB port. After plugging it in we need to check if our system is recognizing it by using following command:

sudo lsusb

In the following screenshot we can see our RTL2831U chipset, in the highlighted area.

rtl sdr is connected

It’s fine, our RTL-SDR device is connected to our system. But here is a problem, as we told this RTL2832U chipset is created for TV so default Debian driver may think it as a TV Tuner. We need to fix it at first. We have to blacklist those drivers to do so.

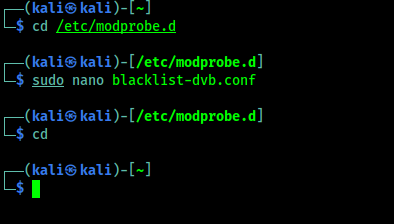
We need to go to the /etc/modprob.d directory by using following command:

cd /etc/modprobe.d

Here we need to use the following command:

sudo nano blacklist-dvb.conf

Then nano will open in front of us as we can see in the following screenshot:

nano for creating configuration file

Here we need to type following lines:

blacklist dvb_usb_rtl28xxu

We did it, shown in the following screenshot:

blacklisting default debian drivers

Then we press CTRL+X then we press Y then we need to press Enter ⤶ to save this file and exit.

Debian default drivers and exit
We had used cd command to get back to our home directory.

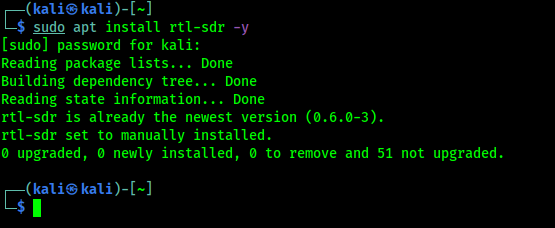
Now we need to test our RTL-SDR device if it is working perfectly. To do that we need to install rtl-sdr package on our system by using following command:

sudo apt install rtl-sdr -y

In the following screenshot we can see the output of above command:

installing rtlsdr packages on Kali Linux
It is already installed on our system

Now to check if our RTL-SDR is working perfectly we need to run following command on our terminal window:

rtl_test

After some seconds we can cancel it and check for data losses (after the initial one). If we didn’t see ant packet losses message then it is working fine.

rtl sdr device testing

Now we had almost completed our RTL-SDR setup on our Kali Linux we just need to install an RTL-SDR software to tune.

Installing and Using GQRX on Kali Linux

We are going to install an open-source software called GQRX.

GQRX is an open-source software-defined radio (SDR) receiver powered by the GNU radio and the Qt graphical toolkit.

GQRX has many features such as:

  • Discovering devices connected to a computer.
  • Processing I/Q data.
  • AM, SSB, CW, FM-N and FM-W (mono and stereo) de-modulators.
  • Recording and playing back audio to/from WAV file.
  • Recording and playing back raw baseband data.
  • Streaming audio output over UDP.

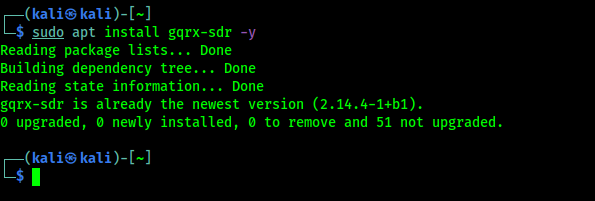
GQRX comes with Kali Linux repository so we just need to apply following command on our terminal to install it:

sudo apt install gqrx-sdr -y

In the following screenshot we can see that gqrx is already installed on our system. The installation process will take some time depending on our system performance and internet speed.

GQRX installed on Kali Linux

Now we can just run the gqrx command on our terminal to start the gqrx.

gqrx

For the very first time we are running gqrx we got a configuration window. In the following screenshot we shows our working settings (mostly default).

gqrx first time configuration

After clicking on “OK” we will be in the gqrx main screen, In the following screenshot we can see that we had successfully running GQRX on our Kali Linux system.

running GQRX on Kali Linux

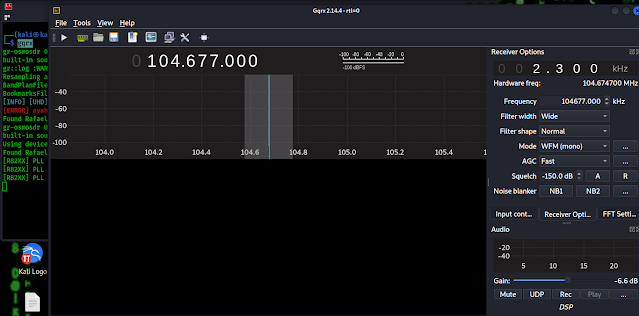
We can see the interface. On the Top left corner we can see the Play button (▶) which can be used to play and pause. In the left-hand side we can see the Receiver options box, where we can set various type of settings, like Frequency, width, mode etc.

Tuning FM Stations on Kali Linux

Let we set the frequency to our local FM Radio station. Here we need to remember one thing as we told previously that commercial radio stations only can use 88 to 108 MHZ. Here we can put the frequencies on KHz.

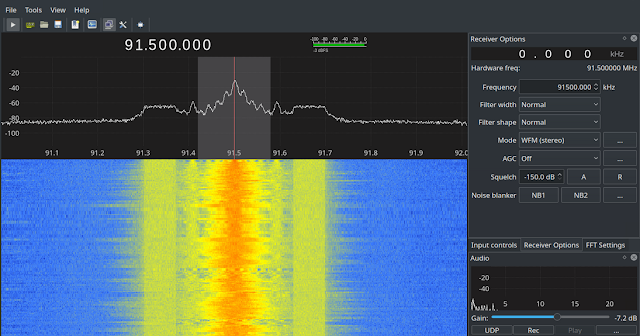
That means we need to x100 on our MHz frequencies to make it KHz. A simple math. If our local radio station transmitting frequency on 91.5 that means it;s in MHz we need to make it 91500 KHz, and set it to our Frequency on Receiver Options. Then we need to click on the Play ▶ Button. We also need to set the mode to WFM (mono/stereo which sounds good). Now we can listen our radio as we can see in the following screenshot:

listing radio on Kali Linux
Listening can’t be captured on a image but we can see the clear radio signals

YA. We did it! We can learn more on GQRX on GQRX tips and tricks and Decoding off keying.

Wait A Minute

Wait a minute. What just we did? We listen Radio on our computer? Why? We can do it on a little FM/Radio Player. People did the same thing since 40’s era. What is new here?

OK then, we can say we learnt installations and the basic use of GQRX (very powerful tool), we also had setup RTL-SDR on our system. Not only that, Now we can listen radio (no more commercial radio stations, please) conversation on emergency services like fire services, polices/cops etc.

Emergency services doesn’t uses commercial radio frequencies (88-108 MHZ), In different countries they use different frequencies. If we want to learn about their frequencies we can Google it. We can get the USA database of frequencies here.

FAQ

Can we transmit Radio signals using RTL-SDR?

No. We can’t. RTL-SDR is just a receiver, it can’t transmit radio signals. Transmitting long range signals without proper permission is illegal in various countries. We can check the laws of our respective country to know more on it.

Is It Legal to listen Emergency services radio?

This is totally different in various countries. Listening some emergency is not illegal. There are specific laws in all countries we need to know about them by simple Google search. But using a RTL-SDR device is not illegal, misusing it will be illegal. So we can’t show anything on our this article which is illegal to any country.

Can we listen GSM (2G) calls using RTL-SDR?

That’s tricky. We know that GSM calls are not end-to-end encrypted, but but they are encrypted at many steps along their path, so we can’t just tune into the GSM frequency and listen phone calls over the air like radio stations. We can capture and analyze GSM signals (not directly phone calls) using RTL-SDR. We will cover these things in our future article.

Hope this will cover the basics of RTL-SDR and it’s uses on Kali Linux. We are going to publish more articles and cover much more things on Software Defined Radio.

Love our articles? Make sure to follow us on Twitter and GitHub, we post article updates there. To join our KaliLinuxIn family, join our Telegram Group. We are trying to build a community for Linux and Cybersecurity. For anything we always happy to help everyone on the comment section. As we know our comment section is always open to everyone. We read each and every comment and we always reply.
[Easy] How to Install Brave Browser on Kali Linux

Brave Browser is really a good privacy & safety focused browser, which have advanced features like less memory per tab compared to Firefox and Chrome which make is very fast and lightweight, it comes with crypto wallet, private window through TOR network and many more. There are lots of good reason to use Brave Browser. But in this brief article we are not going to cover all the reasons to use Brave Browser.

Install Brave Browser on Kali Linux

Here in this article we just cover how we can install Brave Browser on Kali Linux system in short. Not only Kali, we can use this method to install Brave Browser on any other Debian based Linux Distribution (Like Ubuntu 16.04, Linux Mint 18, Elementary OS etc).

Installing Brave Browser on Kali Linux

First of all we need to open the Terminal, then we run the following command to install some packages.

sudo apt install apt-transport-https curl -y

It may prompt for the root password of our system before installing these packages. In the following screenshot we can see that these packages are installing:

bravebrowser packages

In the above screenshot we can see that these packages are installed. Now we need to run following command on our terminal for keyrings:

sudo curl -fsSLo /usr/share/keyrings/brave-browser-archive-keyring.gpg https://brave-browser-apt-release.s3.brave.com/brave-browser-archive-keyring.gpg

We can see what happens after applying the above command in the following screenshot:

brave browser keyring on Kali Linux

Now we need to add Brave Browser in our repository by using following command:

echo "deb [signed-by=/usr/share/keyrings/brave-browser-archive-keyring.gpg arch=amd64] https://brave-browser-apt-release.s3.brave.com/ stable main"|sudo tee /etc/apt/sources.list.d/brave-browser-release.list

We can see the output on the following screenshot:

brave browser repository on Kali Linux

Now we are almost ready to install Brave Browser on our Kali Linux system. We need to run a update to update our repository by using following command:

sudo apt update

After the update process is complete we can easily install Brave Browser by applying following command:

sudo apt install brave-browser

The installation of Brave Browser requires 96 MB to download and will take 300 MB disk space to install at this time (Updates changes the size), so the installation time will depend on our system performance and internet speed. We can see that Brave Browser is installed on our system in the following screenshot:

brave browser installation sucessful on Kali Linux

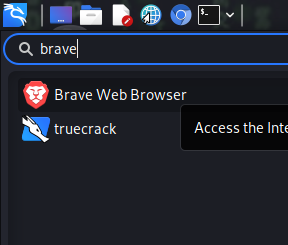
Now we can see Brave Browser on our application menu.

Brave Browser on Kali Linux

We can open the Brave Browser from here. We have opened it as we can see in the following screenshot:

brave browser opened on our system

In the above screenshot we can see that Brave Browser is running successfully. This is how we can install Brave Browser on our Kai Linux or any other Debian based Linux distribution.

Love our articles? Make sure to follow us on Twitter and GitHub, we post article updates there. To join our KaliLinuxIn family, join our Telegram Group. We are trying to build a community for Linux and Cybersecurity. For anything we always happy to help everyone on the comment section. As we know our comment section is always open to everyone. We read each and every comment and we always reply.

SUB404 — Easily Find Sub-Domain Takeover Vulnerability

In our recent articles we learned how we can find subdomains and what is subdomain takeover vulnerability. In our this article we are going to learn how we can find potential subdomain takeover vulnerability. Subdomain takeover vulnerability is a very serious issue in cybersecurity and may lead to a good bounty to bug bounty hunters.

sub 404 on Kali Linux to check subdomain takeover vulnerability

In today’s article we are going to discuss about an automated tool which will help us to discover potential subdomain that we can takeover. The tool is named Sub404. Sub404 is a tool created with Python3 and it is very fast as it is asynchronous.

After information gathering, during recon process we may found a lot of subdomains(for an example more than 10k ?). It is not possible to test each manually or with traditional requests or urllib method, because it is very slow. Using Sub 404 we can automate this task in much faster way. Sub 404 uses aiohttp/asyncio which makes this tool asynchronous and faster.

How Sub404 Works?

Sub404 uses subdomains list from text file (check our this article) and checks for URL of 404 Not Found status code and in addition it fetches CNAME (Canonical name) and removes those URL which have target domain name in CNAME. It also combines result from SubFinder and Sublist3r (subdomain discovery tool). If we don’t have target subdomains as two is better than one. But for this sublist3r and SubFinder tools must be installed in your system. Sub404 is very fast as we told, the creator of this tool claims that it is able to check 7K subdomains in less than 5 minutes.

Key Features of Sub404

  • Fast (as it is asynchronous).
  • Uses two more tools to increase efficiency.
  • Saves result in a text file for future reference.

Install & Use Sub404 on Kali Linux

To install Sub404 on our Kali Linux system we need to clone it from it’s GitHub repository by using following command:

git clone https://github.com/r3curs1v3-pr0xy/sub404

After applying the above command Sub404 will be downloaded on our current working directory. As we can see in the following screenshot:

sub404 clonning from github

Now we need to install two other tool on our Kali Linux system, because as we said Sub404 didn’t like to work alone. It requires two more subdomain discovery tools with it to increase efficiency. They are SubFinder and Sublist3r. In our recent article we talked about SubFinder. Anyways, we need to install both of these tools by simply using following command:

sudo apt install subfinder sublist3r -y

In the following screenshot we can see that both tools are successfully installed on our system.

installing subfinder and sublist3r on Kali Linux

Now we need to navigate inside the sub404 directory which we cloned by using following command:

cd sub404

Now we need to install requirements for Sub404 by applying following command:

pip install -r requirements.txt

The following screenshot shows the output of the above command:

installing requirements for sub404

Now we are ready to run. In our this (sub404) directory we got a python script named sub404.py, we need to use this script to run this tool. Let we check the help options for Sub404 by applying following command:

python3 sub404.py -h

In the following screenshot we can see the help options of Sub404:

sub404 help options on Kali Linux

We can directly provide Sub404 a domain to scan all the subdomains then check for subdomain takeover vulnerabilities on those subdomains automatically by using -d flag. Or we can provide Sub404 a list of subdomains (in txt format) to analyze them for subdomain takeover vulnerabilities by using -f flag. By using -p flag we can specify the protocol (HTTP or HTTPS), the default protocol s HTTPS.

Lets run it against a live website (everyone have the permission to hack this site) i.e hackthissite.org. To test on a domain we need to use following command:

python3 sub404.py -d hackthissite.org

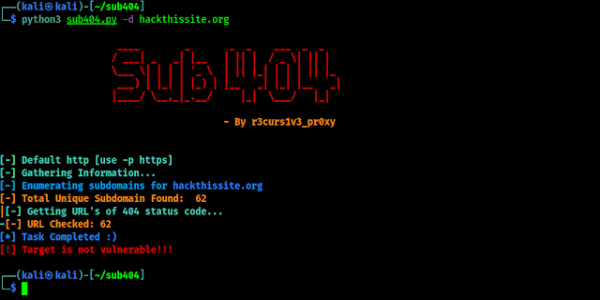
Then Sub404 will start scanning on it and find the subdomains then check for 404 status. Then check the CNAME of 404 subdomains. Is they are pointing to any 3rd party services. Then show us the results as we can see in the following screenshot:

sub404 live testing on Kali Linux

As we can see in the screenshot that our target isn’t vulnerable. That’s fine. This was our example target.

Now if we already have a list of subdomains (as we did in our SubFinder article), we can check on them also by applying following command:

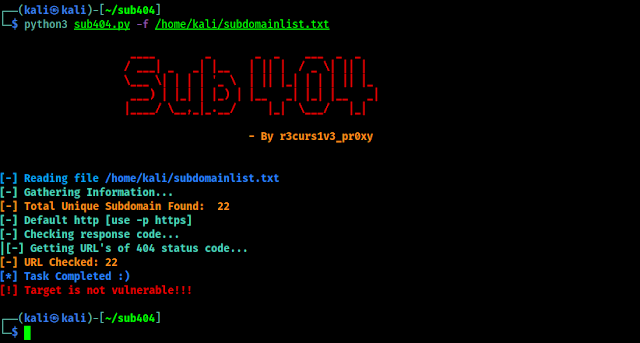
python3 sub404.py -f /home/kali/subdomainlist.txt

In the following screenshot we can see the output of the above command:

List of subdoamins checking

Seems we got no luck, this is also not vulnerable ??.

This is how we can check for subdomain takeover vulnerability on any website. But before that:

Waring: This tutorial is for educational and research purposes only. Hacking a subdomain without proper permission is a serious crime. If anyone does any illegal activity then we are not responsible for that.

That is all for today. Today we learnt how we can find subdomain takeover vulnerability very easily using Sub404 tool on our Kali Linux system. Also we learnt to not harm anyone using our super powers, “With great power comes great responsibility“.

Love our articles? Make sure to follow us on Twitter and GitHub, we post article updates there. To join our KaliLinuxIn family, join our Telegram Group. We are trying to build a community for Linux and Cybersecurity. For anything we always happy to help everyone on the comment section. As we know our comment section is always open to everyone. We read each and every comment and we always reply.

What is Subdomain Takeover Vulnerability in Easy Language

Subdomain takeover vulnerability is not new in cybersecurity space but it’s pretty much effective today’s time also. In the bug bounty field subdomain takeover vulnerability reports are rapidly growing.

subdomain takeover vunerability

The basic premise of a subdomain takeover is a host that points to a particular service not currently in use, which an adversary can use to serve content on the vulnerable subdomain by setting up an account on the third-party service. As an ethical hacker and a security analyst, We deal with this type of issue on a regularly.

What is Subdomain Takeover Vulnerability

For beginners subdomain takeover idea may not clear, so we are explaining it in very easy way.

Suppose our target is example.com and they are running a bug bounty program, because we just can’t go and takeover any other’s subdomain because it will be unethical. So we assume that example.com is running bug bounty program and we find a subdomain named subdomain.example.com, this subdomain shows 404 error.

subdomain 404 error

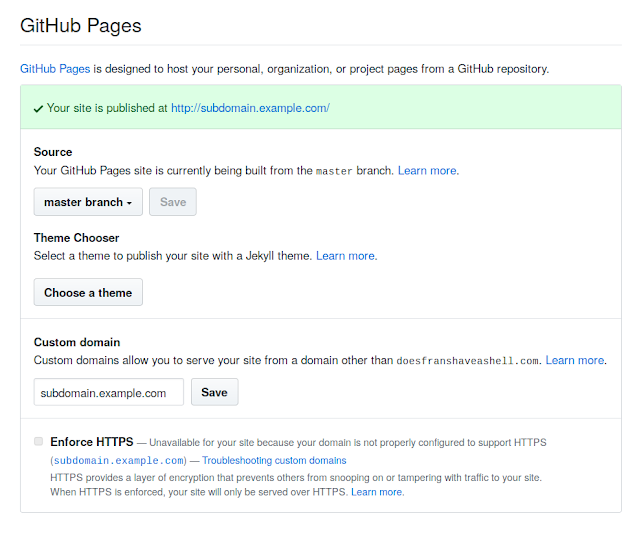
Now this subdomain is pointing to some another services. For an example we assume that this subdomain is pointing to GitHub Pages.

How do we know that it is pointing to GitHub Pages? Well, here we need to look on it’s DNS settings (in this case we can see GitHub clearly, but may be in other cases we need to check DNS).

We can run following command to check the host of subdomains:

host subdomain.example.com

Here we will get the IP address of the subdomain then we can check from where this IP address belongs by using following command:

whois <IP Address>|grep "OrgName"

Most of cybersecurity experts starts senses start tingling at this point. This 404 subdomain page indicates that no content is being served under the top-level directory and that we should attempt to add this subdomain to oue personal GitHub repository.

subdomain takeover on GitHub Pages

Broken Link Hijacking

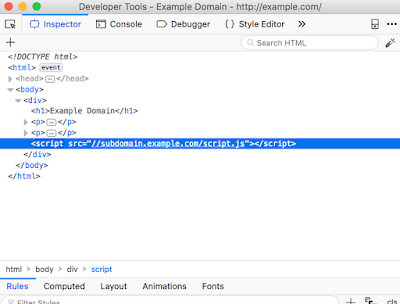
There are another way to takeover subdomains. It is referred as ‘Broken Link hijacking‘. These are vulnerable subdomains which do not necessarily belong to the target but they are used to serve content on the target’s website. This means that a resource is being imported on the target page, for an example, via a little fault in JavaScript code and the cybersecurity expert can claim the subdomain from which the resource is being imported.

Hijacking a host that is used somewhere on the page can ultimately lead to stored cross-site scripting (XSS), since the adversary can load arbitrary client-side code on the target page. The reason why we wanted to list this issue in this article, is to highlight the fact that, as a cybersecurity expert, We don’t want to only restrict ourselves to subdomains on our target host. We can easily expand our scope by inspecting source code and mapping out all the hosts that the target relies on.

broken link hijack

These are the basic principal of “Subdomain Takeover Vulnerability“. This is very important for Bug-Bounty hunters. We tried to explain this in very easy language.

Not only GitHub Pages we can do it if the 404 subdomain is pointed to AWS, Heroku, Readme and other services. We got a very informative article about subdomain takeover.

Love our articles? Make sure to follow us on Twitter and GitHub, we post article updates there. To join our KaliLinuxIn family, join our Telegram Group. We are trying to build a community for Linux and Cybersecurity. For anything we always happy to help everyone on the comment section. As we know our comment section is always open to everyone. We read each and every comment and we always reply.
SubFinder — Discover Hidden Sub-Domains

During web penetration testing we need to collect a lot of information related to our target website/webapp. There are lot of things to to in our some previous articles we mention them. Sub-domain finding is one of them. There are many subdomains may contains some valuable/juicy information for us.

subfinder find subdomains on kali linux

In our some previous articles we already discussed about some subdomain discovery tools, but in this article are going to use an faster sub-domain finder tool named SubFinder. SubFinder is a subdomain discovery tool that discovers valid subdomains for websites by using passive online sources. It has a simple modular architecture and is optimized for speed. SubFinder is built for doing one thing only – passive subdomain enumeration, and it does that very well.

SubFinder is written in Go Language and comes with Kali Linux repository. We can easily install it by using following command:

sudo apt install subfinder

The above command may prompt for sudo password, after providing our sudo password it will start downloading SubFinder. The tool is not large can be installed in some seconds with a decent internet connection, as we can see in the following screenshot:

installing sunfinder on Kali Linux

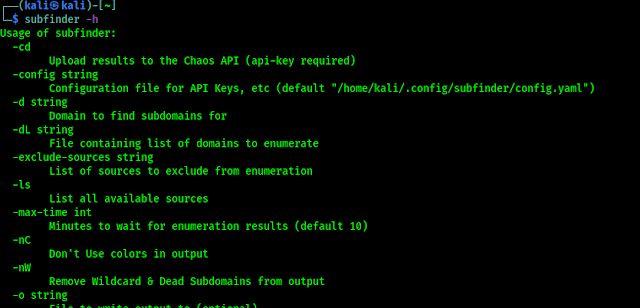
In the above screenshot we can see our required tool SubFinder is installed successfully. Let we check it’s helps by simply using following command:

subfinder -h

In the following screenshot we can see the help options of SubFinder.

subfinder help options

We can start discovering subdomains of our target website by using SubFinder. For an example we are going to check the subdomains of hackerone.com, so we will use the following command:

subfinder -d hackerone.com

In the following screenshot we can see that SubFinder is collecting subdomains of hackerone.com.

subdomain finder on kali linux

There are lots of options in the SubFinder tool, as we have seen on the help option. To save the output on a file we can use -o flag.

subfinder -d hackerone.com -o hackerone.txt

The above command will save our list of discovered subdomains on our mentioned file, as we can see in the following screenshot:

subdomains on a file

We can also use –all flag to use all sources, but it will be slow for enumeration.

This is very helpful for cybersecurity researchers because sometimes the website developers just not show the older and not using subdomains, as we know older things have a good chance to be vulnerable.

This is how we can discover hidden subdomains of a website using SubFinder on our Kali Linux system.

Love our articles? Make sure to follow us on Twitter and GitHub, we post article updates there. To join our KaliLinuxIn family, join our Telegram Group. We are trying to build a community for Linux and Cybersecurity. For anything we always happy to help everyone on the comment section. As we know our comment section is always open to everyone. We read each and every comment and we always reply.
Linux Staff Monitoring

Linux Staff Monitoring: When Demand Means Supply / Hubr

Monitask Employee Monitoring Software for Linux

Studying today’s market of our potential customers we, to our own surprise, came to the conclusion that the majority of large companies, which need personnel monitoring and time tracking in Linux. As it turned out, small and medium businesses prefer Linux systems for one simple reason – it is much cheaper. And since businesses are moving to Linux, HR tools should be supported and widely used in this environment.

Effective HR management requires a clear understanding of what each individual employee and the department as a whole is doing. This is especially evident in the example of one of our clients. His company includes several large departments, namely: All three of these departments do their work using Linux-based computers.

However, the specifics of the work are so different that it is difficult to perform a quality analysis of the work without using additional tools. Choosing our Linux-based employee monitoring product Monitask, our client was able to solve this issue for all the departments.Let us remember how timekeeping and productivity measurement used to be performed. At the entrance to the plant, there was a method of carding the time when an employee came in for his shift and the time when he left the workplace.

Productivity, on the other hand, was measured by the amount of output. But those times are gone, and now the working day begins with turning on the computer, and the result of the work is not always a finished and tangible product that can be measured in pieces. That is why tasks and methods of their solution today are completely different from what they used to be. Flexibility of settings, a wide range of possibilities and informative reports are required. And most importantly, it all should be automated and should not distract manager and subordinates from their main work. All possibilities of personnel monitoring software in Linux can be adjusted individually, so the final report is as informative and correct as possible. Regardless of the overall activity of the company and its size, the functionality of the employee monitoring system in Linux allows you to solve personnel management issues for any type of departments, including the above mentioned as well as the marketing, design, technical support, customer service departments, etc. For example, the accounting department is the link in the company that knows everything about everybody. Personal data of all employees, the money turnover, details of each transaction.

In general, all that, if it gets to third parties, can cause damage to the company and its employees. To solve this issue, we offer a permanent record of visited web-sites, screenshots with the name of the running application and recording from web-cameras, so you can track exactly who was using the computer at what time you are interested.Software Development Department also requires a certain record. To analyze each employee’s productivity, we offer features to assign and record the use of productive and unproductive programs. Also, to maintain discipline in the department you should activate the accounting of working hours and breaks. By the way, the employee can view his productivity report himself, so he can adjust his work.To monitor the call center in Linux, we have created an additional tool – Lockscreen. Thanks to this feature, there is no need to “bind” a computer to an employee. It is enough to assign each employee his own account and the corresponding password. Depending on who is using the computer at the moment, the account will be kept and data will be sent to their profile. This is very convenient if operators work in Linux in shifts or there is a large turnover of staff in the office.

Depending on the size of the company, its needs and capabilities, you can choose one of the solutions: a cloud service with the possibility of separately purchasing additional functions or a server version, which includes all possible elements of monitoring and accounting.

Open Whatsapp chat
Whatsapp Us
Chat with us for faster replies.