Search Results for: Nmap

AWS Certified Solutions Architect – Associate Training

AWS Certified Solutions Architect – Associate Training This credential helps organizations identify and develop talent with critical skills for implementing cloud initiatives. Earning AWS Certified Solutions Architect – Associate validates the ability to design and implement distributed systems on AWS. 70455 40400 93249 42613 WhatsApp Upcoming Batch Duration​ 24 Hours | 3 DaysFri-Sat-Sun Training Cost​​ …

AWS Certified Solutions Architect – Associate Training Read More »

What is Footprinting and its Techniques in Ethical Hacking?

What is Footprinting and its Techniques in Ethical Hacking?

Reading Time: 3 minutes Many youngsters are interested in cybersecurity aspects with the increase and widespread of cybersecurity concepts and career opportunities. Ethical hacking is one of the major topics that gained a lot of attention and interest. There has been a rise in data breaches, ransomware, compromised data by various means, etc. To catch a hacker, it is…

Read More

The post What is Footprinting and its Techniques in Ethical Hacking? appeared first on EC-Council Official Blog.

Amap — Application Mapping Tool, Banner Grabbing

Amap — Application Mapping Tool, Banner Grabbing

Amap is an application mapping tool that we can use to read banners from network services running on remote ports. In our this detailed article we are going to learn hot we can use Amap on Kali Linux to acquire service banners in order to identify the services running with open ports on a target system.

amap on Kali Linux

To use Amap to gather service banners, we will need to have a remote system running network services that discloses information when a client device connects to them. In our article we are going to use a Metasploitable2 instance for example. We already have an article about installing Metasploitable2.

Amap is comes preloaded with our Kali Linux system so we don’t need to install it on our system, we can directly run the following command on our terminal to see the help/options of Amap:

amap --h

The output of command shown in the following screenshot:

In the screenshot we can see that -B flag in Amap can be used to run Amap in banner mode. This have it collect banners for the specified IP and service port(s). This application can be used to collect the banner from a single service by specifying the remote IP address and port number.

For an example we run following command on our terminal:

amap -B 172.20.10.10 21

This command will scan our Metaspoitable2 IP to grab the banner of port 21. The result shown in the following screenshot:

banner garbbing on port 21 using amap

On the above screenshot, we can see that Amap has grabbed the service banner from port 21 on the Metasploitable2 system. We can also run this command to perform a scan of all the possible TCP ports, all the possible ports must need to scanned. The portions of the TCP headers that define the source & destination port address are both 16 bits in length, also each bit can retain a value of 1 or 0. So there are 216 or 65536 possible TCP port addresses. To scan all the TCP ports all we need to specify the range of 1 to 65535. We can do this by using following command on our terminal:

amap -B 172.20.10.10 1-65535

In the following screenshot we can see the output of the applied command.

amap banner grabbing of all ports

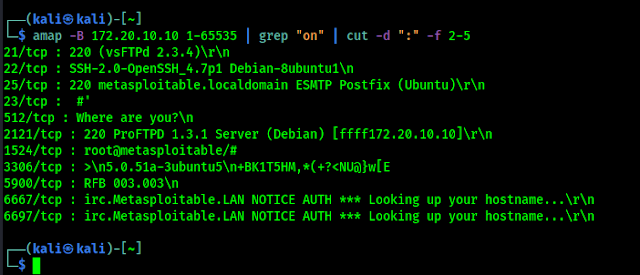
In the above screenshot we can see that we got the opened ports and their banners. Sometimes the normal output of the command shows lots of unnecessary & redundant information that can be extracted from the output. Like the IP address & metadata is there without any logic. We can filter the output using following command:

amap -B 172.20.10.10 1-65535 | grep "on" | cut -d ":" -f 2-5

Now in the following screenshot we can see that the output is to the point.

filtered output of amap

This shows the principal that tells how Amap can accomplish the task of banner grabbing is same as some other tools like Nmap. Amap cycles through the list of destination port address, attempts to establish a connection with each port, and then receives every returned banner that is sent upon connection to the service running on the port.

Love our articles? Make sure to follow us on Twitter and GitHub, we post article updates there. To join our KaliLinuxIn family, join our Telegram Group. We are trying to build a community for Linux and Cybersecurity. For anything we always happy to help everyone on the comment section. As we know our comment section is always open to everyone. We read each and every comment and we always reply.

How to Stay Anonymous Completely [100% Perfect]

How to Stay Anonymous Completely [100% Perfect]

In today’s article we are going to discuss about how we can be anonymous on the internet, because we all love privacy. Sometimes we need to do some private jobs on the internet. So anonymity is important. We can say we can use Tor, VPN to be anonymous. But that’s totally not true.

The perfect say is “Privacy is a myth“. We can use the Tor, VPN, Proxychains etc to increase our privacy, but those methods are not totally bulletproof. But in this article we are going to discuss about some techniques that will be really helpful to be more anonymous on the internet. This is going to be another level of anonymity if we didn’t do any mistake from our side.

How to Stay Anonymous Completely on Kali Linux

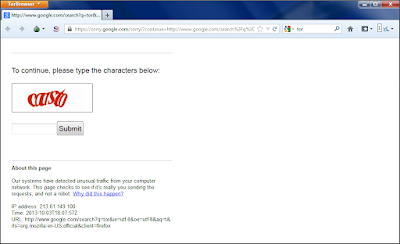
Before going further we need to have a clear idea about Tor and VPN like stuffs. After that we are good to go. As we know that Tor a very good way to be anonymous on internet, but some services detects that we are using Tor and restricts us to use the services. A good example is Google.

google detects tor
Google catch Tor network

Also the VPN providers may keep our activity logs on their database (Paid VPN providers told that, they don’t keep logs. But can we trust them? let us know in the comment section below). Then what to do?

Be Anonymous Online

So, in this article we are going to talk about a easy, fast and effective way to be anonymous online. By following this real IP address will be very very hard to detect by anyone on the world, we just need to finish the article totally to get the pro idea.

The idea is easy yet powerful. We are going to use Tor and Proxychains together. First we run Tor then we run our proxychains. By doing this services like Google TorCheck etc will get the IP address of our proxy servers and those proxyservers also don’t have our real IP address, they have the IP address of our Tor. Let’s practically do it. For the first time we need to do some proxychains configurations and need to learn basics of it.

Configuring ProxyChains

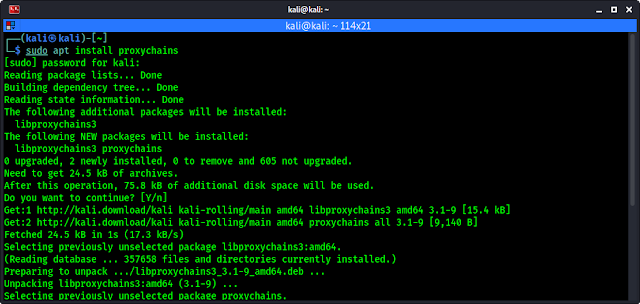
Proxychains comes pre-installed with Kali Linux, also we can install it using following command:

sudo apt install proxychains
installing proxychains on Kali Linux

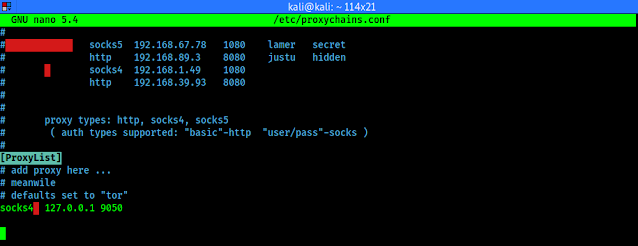
After that we need to configure it as we want to use. Let we open the configuration file by using following command:

sudo nano /etc/proxychains.conf

The above command will open the proxychains configuration file as we can see in the following screenshot:

proxychains configuration file

If we scroll down to the end of the file we can see the list of proxies.

proxylists

We can add our proxy servers here. First is proxy type then IP address then port number. We also can add username and password of the proxy server (If required). Everything is shown in the following screenshot:

Proxylists configuration
Proxy list explained

Now we can add proxies list here.

Just not only proxies list we can configure many more things here, like if the proxy server is taking to much time then we can set timeout for them.

proxy timeout settings
Proxy timeout settings

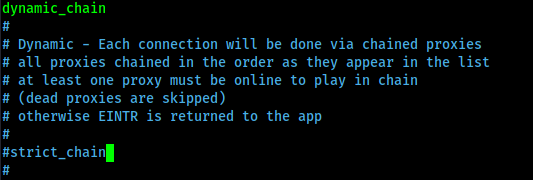
We also can configure various type of chains (proxychains) here, like dynamic chain, random chain, strict chain. The works of the chains is well written here.

various type of proxychains

But in easy language we can explain them as following. Suppose we have a list of proxies in this configuration file.

  • Dynamic Chain:- In this chain our proxy server’s list will maintain the order we have set, but if one or more proxy server is not working it will skip it to get the connection.
  • Strict Chain:- In this type of chain our proxy server’s order will maintained and also every proxy server must need to work otherwise it will not make the connection.
  • Random Chain:- In this type it will use random proxies from our proxy server’s list. It will not maintain any order.

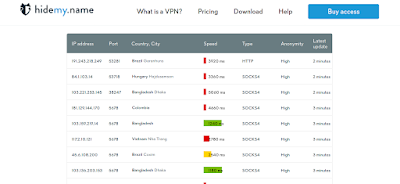
Here we are going to set multiple proxy servers in our proxy list. Where to get free proxies? well there are some websites that provides us free and paid proxies. HidemyName, Genode and Proxy-List etc.We can Google “free proxy server” for more.

hidemyname

We can see the IP address and port of proxy servers, also we can see country/city, speed, type, anonymity etc in the list. We just need the Type, IP and port to add them on our proxychains.conf file. Here we had add two proxies on the configuration file.

Proxy lists in proxychains configuration file on Kali Linux

Here for example we are going to use dynamic proxy chains. So we remove the ‘#’ before the dynamic chain and put a ‘#’ before the strict chain to disable it. Shown in the following screenshot:

dynamic proxy chain enabled

Now we can save and close the proxy chains configuration file by pressing CTRL+X then Y, Then Enter ⤶.

Using Tor with Proxychains

We can install Tor services on our Kali Linux system by using following command:

sudo apt install tor

In the following screenshot we can see that tor is installing on our system:

installing tor on kali linux
Installing Tor on Kali Linux

After the installation is complete we can start the Tor services by using following command:

sudo service tor start

Then our Tor services will start, we can check the status of the services by using following command:

sudo service tor status

Yes, our Tor services is running successfully, we can see it in the following screenshot:

Tor services is running

Now we can check this on our browser. We open our browser and navigate to torchecker. In the following screenshot we can see that we are using Tor and it detects it. Now all websites or services on the internet can catch us that we are using Tor network. Here we runs our proxychains.

If we want to run proxychains with our browser we need to type following command on our terminal:

proxychains firefox

Now our firefox browser will open in front of us. Lets have a look at TorChecker.

Proxychains with Tor
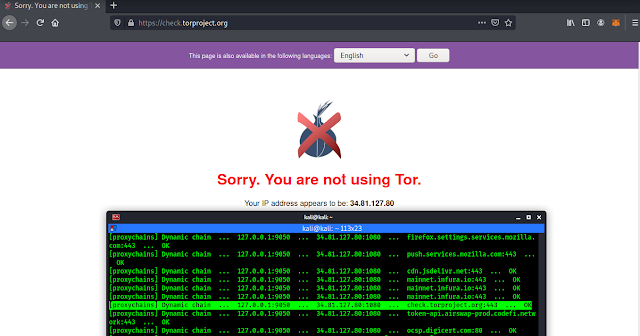
It detects the IP of Proxyservers

As the above screenshot we can see that it can’t detect us that we are using Tor. But Tor services is running. Then why it can’t detect it? Our connection is going through the Tor nodes to the proxy servers by doing proxy servers didn’t getting our real IP. If they keep logs they can, but our real IP will remain hidden for Tor. We can see it on the following screenshot:

proxychains used with tor on Kali Linux

Here we can directly use Tor Tor is good for anonymity but as we told some websites and services didn’t allow Tor network IP’s. Now they can’t detect us and we can do all the things online remain anonymous.

By using this method not only web surfing we can do almost every task. Like by using the following command we can use it for nmap scanning:

proxychains nmap -Pn google.com
using nmap with proxychains on kali linux

Now in the above screenshot we can see that we are scanning using Nmap with the help of Tor and Proxychains.

Things We Should Aware

  • We need to remember that after sometimes we need to check if our tor services are running properly by using sudo service tor status command.
  • Here we had used dynamic chain for an example but in this dynamic chain if we got any issue with one proxy sever it will skip it. So if we want a better result we need to use strict chain.
  • Here for an example we have used only two proxy servers but for better anonymity we need to use as much as proxy server we can. But one thing, increasing amount of proxy servers will decrease the internet speed.
  • We need to check if the proxy we got for free is working or not. In real life scenario they mostly found dead. We can use some proxy checker tools to check if they are working or not. It the proxy is not working then we might get “socket error or timeout!” error.
  • Proxychains configuration file uses Tor because of it’s default Tor proxychains configuration. We shouldn’t remove Tor’s proxy from here. If we removed Tor’s proxy from here then proxychain will not work with Tor.


tor default proxy
Default proxy for Tor Should not remove

This is all about smart way to be anonymous in the internet world. Here we had used Tor, but Tor checkers didn’t catch us. Internet will got our Proxy server’s IP and the Proxy server will get our Tor network’s IP. By that way we can browse the Internet anonymously.

Love our articles? Make sure to follow us on Twitter and GitHub, we post article updates there. To join our KaliLinuxIn family, join our Telegram Group. We are trying to build a community for Linux and Cybersecurity. For anything we always happy to help everyone on the comment section. As we know our comment section is always open to everyone. We read each and every comment and we always reply.

TIDos Web Application Penetration Testing Framework

TIDos Web Application Penetration Testing Framework

August 28, 2021 TIDos Web Application Penetration Testing Framework Tidos Framework is an open source toolkit that performs all major web application tests, such as: B. Enlightenment, scanning, enumeration, and vulnerability analysis. All tasks are performed in phases with the integrated modules. The total number of modules exceeds 100, most of which are used for …

TIDos Web Application Penetration Testing Framework Read More »

EyeWitness — Web Footprints and Enumeration

EyeWitness — Web Footprints and Enumeration

EyeWitness is a tool that is designed for Kali Linux and allows a penetration tester to capture screenshots of a website without leaving the Terminal. It also provide some server header info, and identify default credentials if known.

EyeWitness does all of the work in the background. Imagine having to visually profile multiple websites, open Virtual Network Computing (VNC) servers, and use Remote Desktop Protocols (RDPs). This can be a time-consuming task. EyeWitness takes the screenshots, stores them offline, and generates HTML reports.

EYEWITNESS Kali Linux

EyeWitness comes with Kali Linux repository. We can install it using apt-get install but if we want we also can clone it from GitHub, but here we Kali users download it by using following command:

sudo apt-get install eyewitness

After providing our root superuser password it will start downloading, as we can see in the following screenshot.

installing eyewitness on Kali Linux

Now we can check the help options of this eyewitness tool by using following command:

eyewitness -h

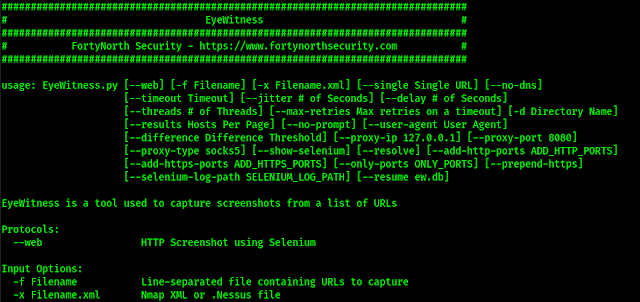
Above command will lead us to the help section of eyewitness tool, as shown in the following screenshot:

eyewitness help options

Let it run against our own website as a single target. So we need to use following command:

eyewitness --web --timeout 20 --single kalilinux.in

Here we have set –web flag because our target runs on web protocol, we have set the –timeout on 20 seconds (this is optional default is 7 seconds) because we know our website and internet connection both are slow ?. Then we put a –single target.

On the following screenshot we can see the output generated by eyewitness.

Eyewitness generates reports

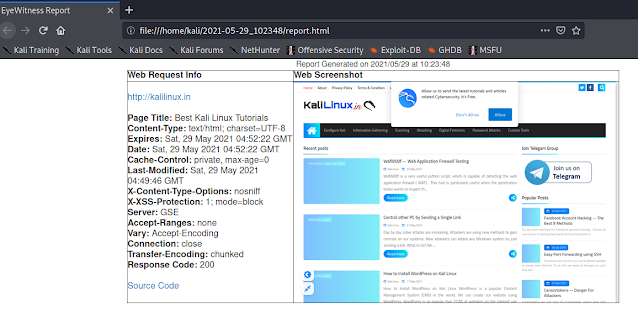
This output is saved on home/kali/2021-5-29_102348 (Path will be different for everyone, but mentioned here) as we can see on the above screenshot. It also prompts for opening the report now. Here we press Y and Enter. Then the HTML report will open in front of us on our default browser, as we can see on the following screenshot:

eyewitness html report

This is for taking screenshot of a single website without visiting it, the left-hand column contains information about the web request, while the right-hand column contains the screenshots.

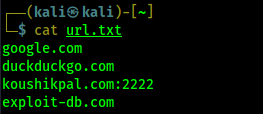
Now If we have to visually profile multiple websites, open Virtual Network Computing (VNC) servers, and use Remote Desktop Protocols (RDPs) then we need to have a list of all URLs. Here we have one list of URLs separated by new line.

list of sites to test

Now we use following command to take screenshot of every URLs on the url.txt file by using following command:

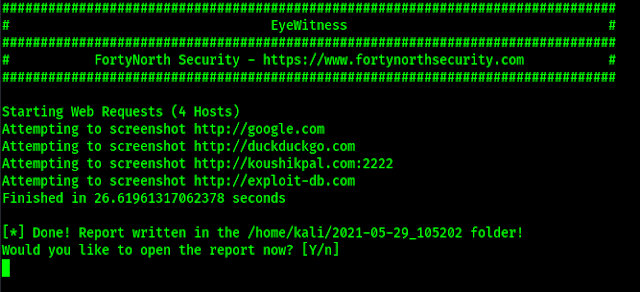
eyewitness -f url.txt --web

Here -f flag used to import targets from a file. If we want to import target from Nmap XML or .Nessus file then we need to use -x flag in the place of -f flag. The output is showing on the following screenshot:

eyewitness reports of urls lists

After opening the report we can see is on our browser.

eyewitness reports in html format

This tool is very handy when profiling multiple services and websites at once. Now that we have completed this article, and we are able to perform web enumeration using the EyeWitness tool on our Kali Linux system.

Love our articles? Make sure to follow us to get all our articles directly on inbox. We are also available on Twitter and GitHub, we post article updates there. To join our family, join our Telegram Group. We are trying to build a community for Linux and Cybersecurity. For anything we always happy to help everyone on the comment section. As we know our comment section is always open to everyone. We read each and every comment and we always reply.

Kali Linux 2021.2 Update is Here !

Kali Linux 2021.2 Update is Here !

The second update of Kali Linux in 2021 is live and reday to ROCK.

Say Welcome to Kali Linux 2021.2! This release welcomes a mixture of new items as well as enhancements of existing features, and is ready to be downloaded (from our updated page) or upgraded if you have an existing Kali Linux installation.

A quick summary of the change log since the 2021.1 release from February 2021 is:

Introducing Kaboxer v1.0

For developers, this is a great new tool in the arsenal. Users will, hopefully, not realise that they are using it, only noticing that previously problematic tools now work correctly!

Without repeating what has already been posted, this technology allows us to correctly package up programs that were previously difficult, with items such as complex dependencies or legacy programs & libraries (such as Python 2 or dated SSL/TLS).

With Kaboxer’s launch, we have released 3 packages using it:

If you want to read more, please see either our blog post covering it, or our documentation around it.

Kaboxer is still in its infancy, so please be nice & patient with it.

Releasing Kali-Tweaks v1.0

Announcing Kali-Tweaks! This is our little helping hand for Kali users, with the idea to help customize Kali to your own personal taste quickly, simply, and the correct way. This should help you to stop doing repetitive tasks.
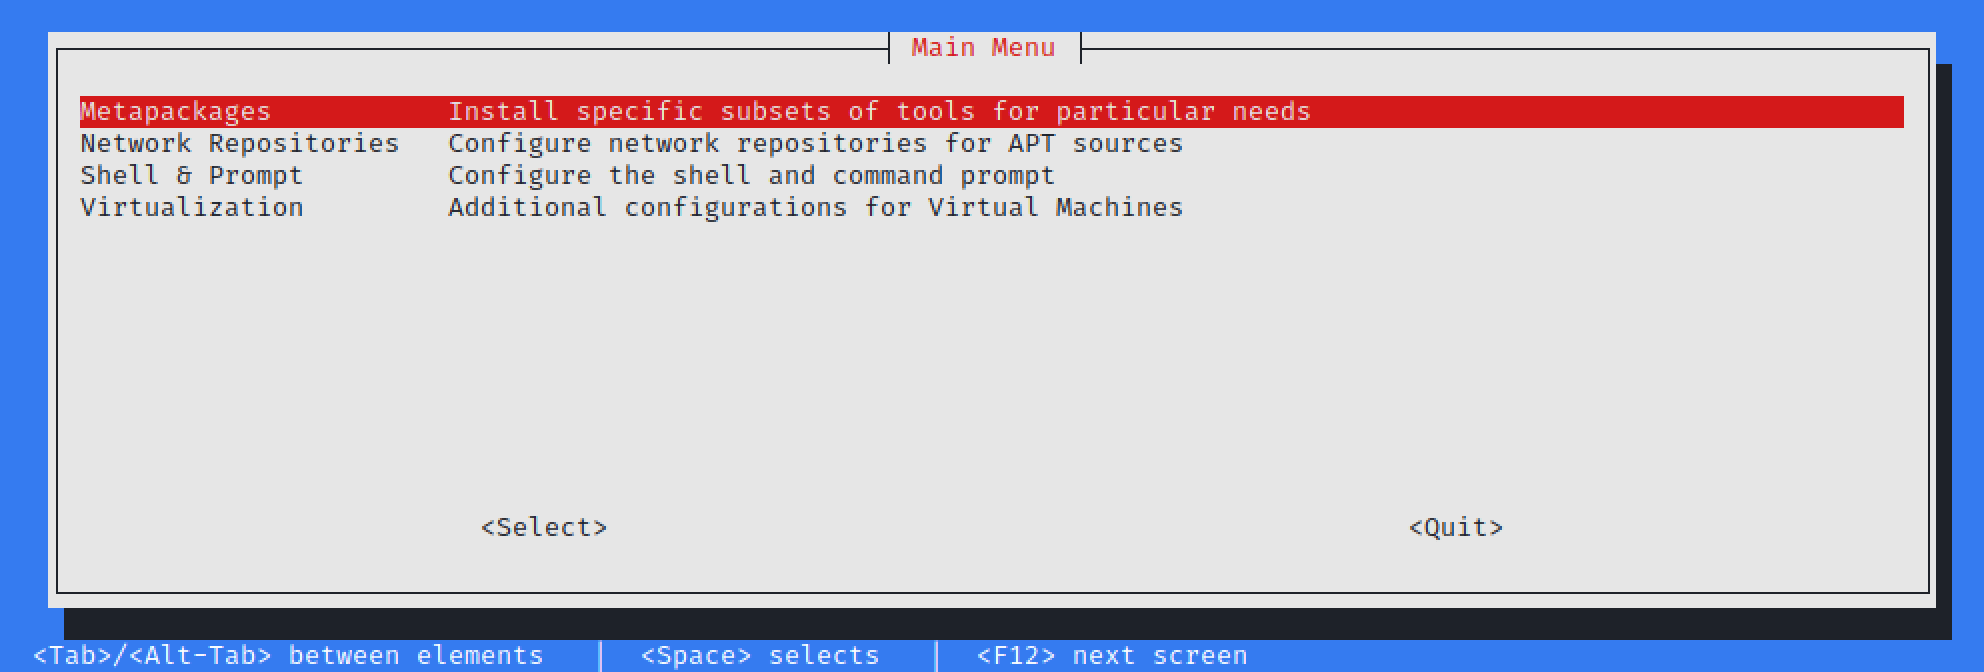
Kali-Tweaks 1.0

Currently Kali-Tweaks will help out with:

  • Metapackages – Installing/removing groups of tools, which may not have been available while installing Kali if you did not use the installer image
  • Network Repositories – Enabling/disabling “bleeding-edge” & “experimental” branches
  • Shell & Prompt – Switch between two or one line prompt, enable/disable the extra line before the prompt, or configure Bash or ZSH as the default shell
  • Virtualization – Using Kali as a guest VM? Do a few actions to make the experience easier!

Our philosophy is to always understand what you are running, before you run it. That way, it reduces the chances of any undesirable nasty surprises. Which is why we will always encourage anyone to do actions manually before automating it, so you get to understand what is happening under the hood. On the flip side, we also understand there is so much to remember. Then when you sprinkle in people’s bad habits, which often have long term implications and end up breaking Kali, there is room for improvement. So, we started developing Kali-Tweaks. Where possible, Kali-Tweaks will also display what commands are being executed to help educate users.

We do want to mention a few things:

  • kali-tweaks has been marked as “recommended” rather than “required”. As a result, if you are upgrading Kali, it may not be included. On the other hand, you can remove kali-tweaks without removing anything else
  • On the subject of upgrading; depending on how old your Kali installation is, you may need to reset your shell resource (e.g. .bashrc & .zshrc) before you can use the “configure prompt” section. This is because it will not have the necessary variables. Should you want to, make sure to backup, reset, and restore
  • The last thing to point out, when changing the default login shell; please log out and in again (either graphically or remote console) for it to have an effect

It is still early days with Kali-Tweaks, and we already have ideas of what to expand into, but we welcome any suggestions from you!

Kali-Tweaks is still in its infancy, so please be nice & patient with it.

Refreshed Bleeding-Edge Branch

Kali’s Bleeding-Edge branch has been around since March 2013, but we have recently completely restructured the backend.

For those not too familiar with Bleeding-Edge branch, here is a breakdown:

  • Kali by default opts to be stable where possible when packaging. This means some tools may appear to be “out-dated”
  • We do this by looking to see when the tool author(s) signals “everything up to to this point is good”, by doing a “point release(e.g. 1.0 or 2.1)
  • Developers often use source-code version control, allowing them to track any changes
  • How programmers use source-code version control depends on their work flow, experience, and team size
    • Developers can use a “tag” feature found in most source-code version control to signal when there is a new version (this is what Kali prefers)
    • However, some people may say if it makes it to “master” or “main” branch, then it is “production ready”
  • There are times where it has been “a while” (months or even years) since doing a tag for a stable release (aka point release), and people get frustrated that there are no updates (e.g. hashcat or impacket).

You may then end up skipping the Kali package and compiling your favorite tool’s source-code. This might then conflict with Kali’s packaging, and it is your responsibility to maintain the program. This is where bleeding-edge branch comes in.

Since moving over to GitLab, we have been able to create Kali-Bot to help with heavy lifting and automation

  • Automatically package tag’d releases to kali-experimental branch
  • Automatically package the last commit to kali-bleeding-edge branch

This is a fully automated procedure, as a result, the testing that goes into our packaging is automated as well (unlike anything that is in kali-rolling branch which has manual testing involved). If there has not been a unit test created, its not going to be tested for. This means there is a chance packages will be broken, and more trust goes into the tool author having correctly developed the tool.

If you want to give it a try, have a look at our kali-bleeding-edge documentation to learn how to enable the repository and how to tell apt to select a package from this repository. Once the repository has been enabled, it looks like this:

kali@kali:~$ dpkg -l 
| grep ffuf
ii ffuf 1.3.1-0kali1 amd64 
Fast web fuzzer written in Go (program)
kali@kali:~$
kali@kali:~$ sudo apt install -y ffuf/kali-bleeding-edge
...
kali@kali:~$
kali@kali:~$ dpkg -l
| grep ffuf
ii ffuf 1.3.1+git20210505.1.f032167-0kali1~jan+nus1 amd64 
Fast web fuzzer written in Go (program)
kali@kali:~$

Not every tool has made it to the new system yet as there are still many limitations to overcome, but to see what is supported and also how many:

kali@kali:~$ curl -s -L 'http://http.kali.org/kali/dists/kali-bleeding-edge/main/binary-amd64
/Packages' 
| awk -F ': ' '/^Package: /{print $2}'
...
kali@kali:~$
kali@kali:~$ curl -s -L 'http://http.kali.org/kali/dists/kali-bleeding-edge/main/binary-amd64/
Packages' 
| awk -F ': ' '/^Package: /{print $2}'
| wc -l
78
kali@kali:~$
kali@kali:~$ curl -s -L 'http://http.kali.org/kali/dists/kali-experimental/main/binary-amd64/
Packages' 
| awk -F ': ' '/^Package: /{print $2}'
| wc -l
192
kali@kali:~$
kali@kali:~$ curl -s -L 'http://http.kali.org/kali/dists/kali-rolling/main/binary-amd64/
Packages' 
| awk -F ': ' '/^Package: /{print $2}'
| wc -l
59518
kali@kali:~$

The numbers will only grow bigger and better as time goes on, with less bugs in the code and more unit tests in place!

If you are a tool author and want to get your software on the list, please chat to us, and we can show how to enable webhooks!

Disabled Privileged Ports

We have patched our kernel to remove the restriction of requiring privilege permission in order to use TCP & UDP ports under 1024 (meaning 0/TCP-UDP <= 1023/TCP-UDP). This was done because:

  • We see Kali as a desktop OS, rather than a server
  • This “well-known” privileged port range is reserved for server services (e.g. 80/TCP HTTP, 443/TCP HTTPS)
  • With the switch from Kali’s root to non-root user by default, rather than doing a port forward from outside the privilege ports to a restricted port, people were just running the program with super-user permissions instead
    • We get it. It’s quicker to run: $ sudo <program>,
    • Rather than remembering something like: $ sudo iptables -A PREROUTING -t nat -i eth0 -p tcp --dport 80 -j REDIRECT --to-port 8888
    • It also can get complex and confusing with a lot of redirects setup in place
    • Alternatively people were using authbind to allow certain users to use certain ports
  • This defeats the point of switching to non-root user!
    • Let’s reduce any possible attack surface!

Now, this change won’t appear in all instances as some flavors of Kali operate without our kernel. This depends on which platform you use (such as Cloud instances, Docker or WSL). If you are on a platform that does not use our customized Kernel, this change will not be applied. For example, the top one uses Kali’s kernel on a bare metal install, and below uses Kali in a docker container, so its using the host’s kernel:

kali@kali:~$ uname -r
5.10.0-kali7-amd64
kali@kali:~$

...vs...

$ docker run --rm --interactive --tty kalilinux/kali:latest uname -r
5.10.25-linuxkit
$

New Tools in Kali Linux 2021.2

It would not be a Kali release if there were not any new tools added! A quick run down of what’s been added (to Kali’s archive and network repositories):

  • CloudBrute – Find a company infrastructure, files, and apps on the top cloud providers
  • Dirsearch – Brute force directories and files in web servers
  • Feroxbuster – Simple, fast, recursive content discovery
  • Ghidra – Reverse engineering framework
  • Pacu – AWS exploitation framework
  • Peirates – Kubernetes penetration
  • Quark-Engine – Android malware scoring system
  • VSCode a.k.a. Visual Studio Code Open Source (“Code-OSS”) – Code editor

Ghidra and VSCode have been included into the kali-linux-large metapackage, so they are included on the installer image for people doing a fresh install. Otherwise you will need to upgrade Kali (if you already have the kali-linux-large install) or manually install them (if you want them!):

kali@kali:~$ sudo apt update && sudo apt install -y ghidra code-oss

A few notes about code-oss (aka VSCode):

  • We are compiling this from source, rather than using the pre-built binaries
    • The upside to this is that telemetry data is disabled by default
    • The downside is that some aspects of the marketplace may not work. If you find these limitations a problem, you may wish to uninstall the Kali package and switch to the VSCode pre-built binaries
  • You also may question why it was named code-oss, rather than code
    • Code-OSS is what the source-code calls itself, which is used as the base before the configurations are applied for the pre-compiled binaries that gets distributed as “code”
    • As we are using the source-code, we used the variables defined by it
    • The two different names help to distinguish the differences between them (also prevents any clashes and conflicts!)
    • We also included various aliases in our package to help bridge between the two different versions. Meaning, calling vscode and code will use our package, code-oss, with a friendly notice (when installed)
  • If you already have the pre-compiled version installed, upgrading Kali will not replace it
    • However, when manually installing code-oss, it will then replace it!

Theme Enhancement

Command Line

If you are using ZSH, with the latest Kali profile applied, you can toggle between the two-line prompt and one-line prompt by pressing: CTRL + p (at the same time). This will only have an effect for the current session. If you would like to set it permanently, see kali-tweaks.

XFCE 4

We have switched up the quick launch tray in the top left, by:

  • Dropping the screen recorder button (as a result package can also be removed, kazam)
  • Adding a text editor shortcut (this uses mousepad as it is a quick and light)_
    • If you are looking for something that is more substantial, try code-oss
  • Adding in a web browser icon, which starts the default browser (often FireFox)
  • Adding a drop-down menu to select the user for default terminal (terminal or root terminal & Kali’s default is QTerminal)

root terminal emulator

To give you an idea of how the toggling between the terminal user works:

Inside of Thunar (Xfce’s default file manager), if you right-click in the main window, you should have a new option, Open as Root:
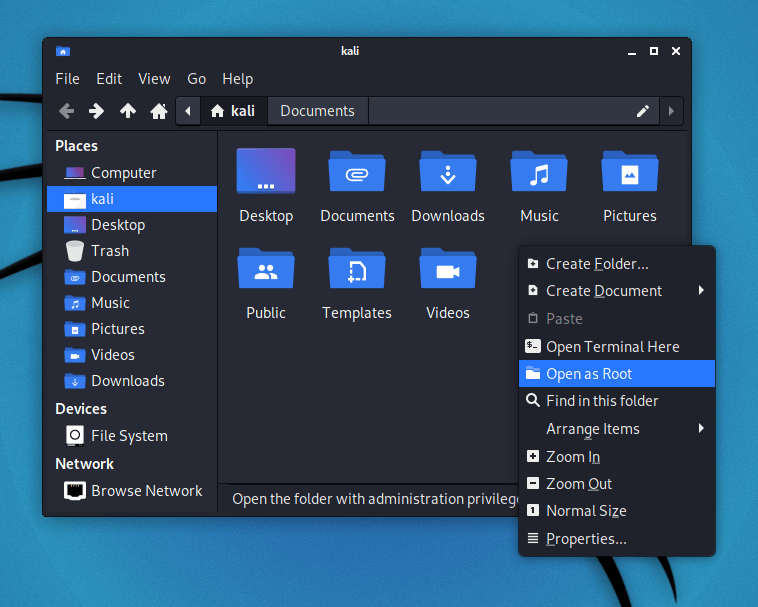
open as root on thuner file manager


With these theme changes, you may not get them if you upgrade Kali. This is because the theme settings are copied to your home folder when your user is first created. When you upgrade Kali, it is upgrading the operating system, so upgrading does not alter personal files (just system files). As a result, in order to get these theme tweaks, you need to either:

  • Do a fresh Kali install
  • Create a new user and switch to that
  • Delete your Xfce profile for the current user and relogin

Desktop Wallpaper & Login Background

People who have upgraded, you may have spotted that there is a new default login wallpaper and desktop background, but there are extras as well in this release:

Kali Linux Wallpapers

Whilst on the subject of wallpapers, if you have not noticed, previously we had been operating on an refresh cycle about every 6 months, where we would change the default login and desktop as well as included other art work if they were not to your taste. Going forwards, we are aiming to change the defaults at every 20xx.1 release (meaning it happens right at the start of every year). So it will still change again in 6 months, but this will be the last time! We will still aim to add extra wallpapers every 6 months, however, only change the defaults yearly.

Finally, we have updated kali-community-wallpapers & kali-wallpapers-legacy packages as well!

Raspberry Pi Recharged

Two new packages:

  • kalipi-config – “raspi-config on steroids” to assist in the initial setup of Kali Linux on a Raspberry Pi
  • kalipi-tft-config– assist in the initial setup of TFT displays on a Raspberry Pi

And other improvements:

  • Got built-in Bluetooth working on Raspberry Pi 4 & Raspberry Pi 400 (meaning all Raspberry Pi’s built-in bluetooth work!)
  • This is due to bluez, bluez-firmware , and pi-bluetooth packages forked and patched
  • Raspberry Pi kernel updated to 5.4.83
  • mt76 devices now work on Raspberry Pi 2 and 3 if you pass the option disable_usb_sg=1 when loading the mt76_usb module
  • 1500% performance improvement
  • First boot from 20 minutes to 15 seconds
  • Console scrolling working

Kali NetHunter Updates

Plenty of improvements under the hood, including:

  • Improved compatibility with dynamic partitions
  • Improvements to persistence of Magisk root
  • Improvements to Bluetooth and settings menus
  • Inclusion of rtl88xxau patches for older kernels in the kernel builder

And the highlight:

Android 11 support for:

  • Nokia 6.1
  • OnePlus One
  • OnePlus Nord
  • Xiaomi Poco F1
  • Xiaomi Mi A3
  • Samsung Galaxy S20 FE 5G

The Kali NetHunter repository now contains 179 kernels for 72 devices and 32 pre-built images are available on our download page

Huge thanks to @kim0coder, @yesimxev, @Svirusx, @Martinvlba, @CaliBerrr, @maade69 and the entire Kali NetHunter community for making this release happen. You absolutely rock!

More Docker support/Parallels support/Bug fixes

There are even more improvements to Kali, that are outside of the above text. Below are other note-worthy items:

  • Our Kali-Docker images are now available for arm64 and armhf as well as amd64
  • We have patched pkexec, so now Qt applications which have been ran as root will maintain the dark theme and the HiDPI setting
  • On a fresh Kali install, wireshark can now be run by unprivileged users
  • A couple of bugs were fixed in command-not-found, which is the terminal helper that helps you installing missing programs
  • Accessibility features were not installed by default (this was a mistake on our side that is now fixed)
  • Fixed a terminal font issue with special characters
  • Apple M1 users, Parallels is no longer in “Technical Preview” and as part of the release, they’ve fixed Kali image detection.
  • Win-KeX v2.10 has been released which now supports multiscreen
  • Kali’s logo is now included in the nerd-fonts project, so, with their next release you’ll be able to customize your terminal with the dragon. If you want to try it now, we’ve created a patched Fira-Code font with these new changes (the code for the logo is uF32B)

kali logo print

Download Kali Linux 2021.2

Fresh Images: So what are you waiting for? Start grabbing Kali already!

Seasoned Kali Linux users are already aware of this, but for the ones who are not, we do also produce weekly builds that you can use as well. If you cannot wait for our next release and you want the latest packages (or bug fixes) when you download the image, you can just use the weekly image instead.

This way you’ll have fewer updates to do.

Just know that these are automated builds that we do not QA like we do our standard release images. But we gladly take bug reports about those images because we want any issues to be fixed before our next release!

Existing Installs: If you already have an existing Kali Linux installation, remember you can always do a quick update:

echo "deb http://http.kali.org/kali kali-rolling main non-free contrib" | sudo tee /etc/apt/sources.list
sudo apt update && sudo apt -y full-upgrade
[ -f /var/run/reboot-required ] && sudo reboot -f

You should now be on Kali Linux 2021.2. We can do a quick check by doing:

┌──(kali㉿kali)-[~]
└─$ grep VERSION /etc/os-release
VERSION="2021.2"
VERSION_ID="2021.2"
VERSION_CODENAME="kali-rolling"

┌──(kali㉿kali)-[~]
└─$ uname -v
#1 SMP Debian 5.10.28-1kali1 (2021-04-12)

┌──(kali㉿kali)-[~]
└─$ uname -r
5.10.0-kali7-amd64

NOTE: The output of uname -r may be different depending on the system architecture.

As always, should you come across any bugs in Kali, please submit a report on our bug tracker. We’ll never be able to fix what we do not know is broken! And Twitter is not a Bug Tracker!

Open Whatsapp chat
Whatsapp Us
Chat with us for faster replies.