Search Results for: Nmap

CERT-UA Uncovers New Malware Wave Distributing OCEANMAP, MASEPIE, STEELHOOK

December 30, 2023 The Computer Emergency Response Team of Ukraine (CERT-UA) has warned of a new phishing campaign orchestrated by the Russia-linked APT28 group to deploy previously undocumented malware such as OCEANMAP, MASEPIE, and STEELHOOK to harvest sensitive information. The activity, which was detected by the agency between December 15 and 25, 2023, targets government entities Article posted by: https://thehackernews.com/2023/12/cert-ua-uncovers-new-malware-wave.html ——————————————————————————————————————– …

CERT-UA Uncovers New Malware Wave Distributing OCEANMAP, MASEPIE, STEELHOOK Read More »

Unveiling the Power of Nmap: Dive into Network Scanning Techniques

Unveiling the Power of Nmap: Dive into Network Scanning Techniques

November 4, 2023 Welcome to our video on network scanning techniques using Nmap! Continue reading on Medium » Article posted by: https://medium.com/@pentesterclubpvtltd/unveiling-the-power-of-nmap-dive-into-network-scanning-techniques-0687fe32a93b?source=rss——cehv12-5 ——————————————————————————————————————– Infocerts, 5B 306 Riverside Greens, Panvel, Raigad 410206 Maharashtra, India Contact us – https://www.infocerts.com

Zenmap – GUI of Nmap

Zenmap – GUI of Nmap

Zenmap is Official Graphical User Interface (GUI) version of Nmap. Zenmap is also very powerful tool like nmap. For it’s graphical interface and easy menus makes it very easy to use.

Zenmap install on Kali Linux 2021

Previously Zenmap comes pre-installed on Kali Linux but newer version (from 2019.4) doesn’t comes with Zenmap. So in our this article we are going to learn how to install Zenmap on Kali Linux in 2023 and use it.

Installing Zenmap on Kali Linux 2023

Zenmap relies on deprecated Python 2 libraries that are not available in Kali Linux. So it is not available on Kali Linux repository. Also it’s official .deb file comes with some errors during installing. So we are going to install it using Kaboxer (Kali Applications Boxer).

To install it we need to have an updated system. We need to apply following command to install Zenmap on our Kali Linux system.

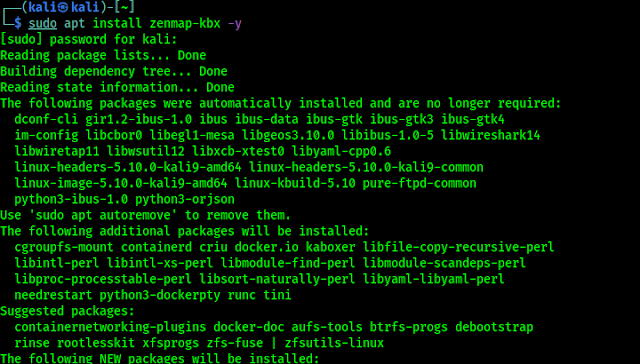
sudo apt install zenmap-kbx -y

After providing our root password the installation will be started, as we can see in the following screenshot:

installing zenmap on kali linux

After the installation is complete we just need to run following command to start Zenmap:

zenmap-kbx

Now we can see that the above command opens Zenmap on our Kali Linux system in the following screenshot:

zenmap on kali linux

This is how we can install and run Zenmap on Kali Linux using Kaboxer.

Using Zenmap on Kali Linux

After a successful installation we can use Zenmap. If we use Zenmap with root then we can use it’s all options. So we open it with root by using following command:

sudo zenmap

We can see that Zenmap is opened on the following screenshot:

Zenmap running on kali linux 20121

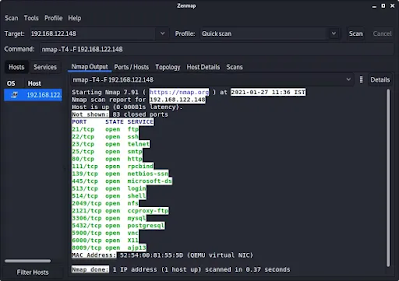
Here everything is very easy. Here we need to put the IP address of our target network. For an example we are choosing our localhost system’s IP address (192.168.122.148), we also can choose the website’s address.

Then we need to choose the profile as “Quick Scan“. For an example we have chosen “Quick Scan” we can choose other profiles as per our requirements. Then we just need to click on “Scan”. Then the result will comes in front of us as the following screenshot:

zenmap scan results

In the above screenshot we can see the open ports on our target.

Once the scan has completed, we can click on each tab to get further details about our target. If we’re performing a scan on an entire network, the “Topology” tab will help us create a network diagram of the target network.

Zenmap is very easy to use and user-friendly. This is how we can install Zenmap on Kali Linux new versions and it’s uses.

Liked our article? Then make sure to follow our mail-subscription to get new articles directly on inbox. We also update articles on our Twitter and GitHub profiles. Make sure to follow us there. We also have Telegram group for chatting with everyone.

For any kind of problem and queries make sure to comment in the comment section. We always reply.

Masscan — 1000 Times Faster Than NMAP

Masscan — 1000 Times Faster Than NMAP

Masscan is the fastest network port scanner. It can scan the whole internet under 6 minutes with 25 millions per second data transmitting speed. Is it faster than flash?

Masscan kali linux

This fastest port scanner gives the output like nmap but masscan works like unicornscann, Zenmap internally(asynchronous scan). It is faster because of flexibility allowing arbitrary ranges and port ranges.

Masscan uses it’s own custom TCP/IP stack. Anything other than a simple port scan may cause conflict with the local TCP/IP stack.

We will discuss later the differences between masscan and nmap, now let’s check how to install and use masscan in our system.

Installing Masscan

Masscan comes pre-installed with the Kali Linux full version. We can check the basic uses by simply enter following command:

masscan

If our system doesn’t have masscan then we need to install it. Before installing it we need to install it’s dependencies by using following command:

sudo apt-get install clang git gcc make libpcap-dev

Then we can install it by applying following command:

sudo apt-get install masscan

Dependencies doesn’t require to install it, these dependencies help masscan to work perfectly. We also can install it from it’s GitHub repository. The following commands will be useful to install it from Git repository.

git clone https://github.com/robertdavidgraham/masscan
cd masscan 
sudo make

Uses of Masscan

Masscan is used for scan a network, if we want to scan a single port then we can perform it by applying following command:

sudo masscan 172.217.167.46 -p443

This will scan for a single port 443.

We also can use this tool to scan multiple ports separated by comma(,). The example is following:

sudo masscan 172.217.167.46 -p443,80,4444
masscan mutiple port scan

To scan a range of ports we can use following command:

sudo masscan 172.217.167.46 -p12-443

The above command will scan for port 12 to port 443 on our given IP address.

So in case we need to find all the ports then we can use following command;

sudo masscan 172.217.167.46 -p0-65535

There are a limited number of ports, that is 65535. The above command will check for every port.

Lightning Speed!

We said that masscan is the fastest scanner but after using previous commands we didn’t feel that it is faster.

The reason is masscan scans at the rate of 100 packets/sec, which is slow. To increase it we need to use –rate flag with it.

sudo masscan 172.217.167.46 -p0-65535 --rate 25000000

Using the above command we can achieve the fastest speed (25 million packets/sec).

One more thing, we can’t achieve the max speed on Mac, Windows or Virtual Linux systems. Masscan works best on primary installed Linux systems. On other systems we can get only 300,000 packets/sec. That is really fast but with the Linux system we can get the maximum speed.

To scan faster we must need to have a very good internet connection. Usually it happens that masscan can achieve the highest speed but our internet connection can’t send 25 million packets per second. Although the speed we got was faster than any other port scanner.

To see the fastest effect we should choose a bigger network to scan. On small networks or in single IP we can’t see the faster speed in our eyes. Because scanning small networks is work of some seconds so we can’t feel the speed. Let’s talk about it.

Masscan can scan the entire internet in 6 minutes according to it’s author Robert Graham. If we want to scan the whole internet for a specific port (443 port for example) we can use following command:

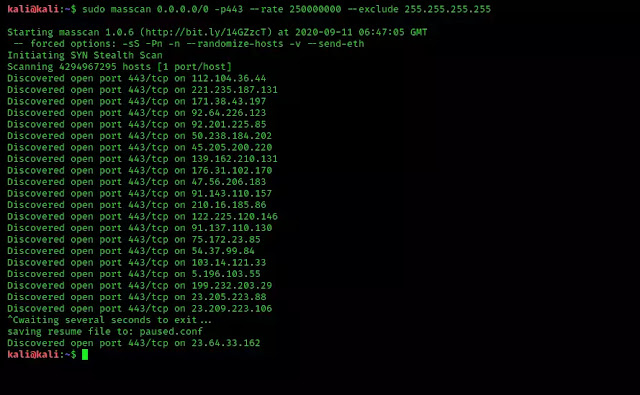
sudo masscan 0.0.0.0/0 -p443 --rate 250000000 --exclude 255.255.255.255

This command will scan the whole internet for 443 ports, and show us the result as fast as possible. Here we have stopped the scanning. We can see the screenshot.

scanning the whole internet

This is how we can find a specific or vulnerable port all over the internet.

Some More Uses

To save the output result in a file we can use following command:

sudo masscan 172.217.167.46 -p0-65535 > example.txt

Not only txt format we also can save the results in XML (-oX), Grepable (-oG) and JSON (-oJ) formats. We like the Grepable format because we can use the output on other tools.

We also can scan a network for the top ports. So if we give it ‐‐top-ports 100. It’ll scan the top 100 most common ports discovered according to nmap. We can choose our top ports numbers, an example of this is following (Scans for top 10 ports):

sudo masscan 172.217.167.46 --top-ports 100 --rate 100000

There is a pause function in masscan, Yes we can pause the scanning process and resume it when we need. Scanning on a large network we found it useful. During the scanning process we can press CTRL+C then after some seconds it will pause it and save a paused.conf file. This file has all the settings and progresses from the scan. We can resume the scanning process again by using following command:

sudo masscan --resume paused.conf

Nmap vs Masscan

In this article we have learned that masscan has very good features, the output looks like nmap but there are lot’s of differences between. Those are following:

  • Nmap uses synchronous mode scanning which is very slow but accurate but masscan uses asynchronous mode scan which is very fast but not so much accurate.
  • Masscan doesn’t check if the host is up or not, it always treats the host as online but nmap always checks if the host is up or down.
  • Masscan never converts domain names to IP addresses. We manually need to find the IP address and provide it to masscan. But nmap works finely with IP and domain names.
  • We always need to specify ports on masscan.

To know more about nmap vs masscan we can check this article.

There are also some similarities in nmap and masscan. Masscan have some nmap compatible settings/ flags. To check them we can use masscan -nmap command.

Masscan Web UI

The Offensive Security team has created a web interface for masscan. Using that process we can use masscan on a easy web based GUI. Here is the full guide from Offensive security.

masscan web based interface
Image copyright Offensive Security.

That’s all about masscan. Love our articles? Make sure to follow us on Twitter and GitHub, we post article updates there. To join our KaliLinuxInfamily, join our Telegram Group. We are trying to build a community for Linux and Cybersecurity. For anything we always happy to help everyone on the comment section. As we know our comment section is always open to everyone. We read each and every comment and we always reply.

How to Find the Best Nmap Scan for Penetration Testing Initiatives  

Nmap Scans for Cybersecurity and Penetration Testing | Sydney Chamberlain |Penetration Testing Nmap stands for “Network Mapper,” a free, open-source tool created in 1997. While nearly 25 years old, it remains the gold standard tool for vulnerability assessments, port scanning, and network mapping. While other tools (both free and paid) have come along offering similar…

The post How to Find the Best Nmap Scan for Penetration Testing Initiatives   appeared first on Cybersecurity Exchange.

Find Vulnerabilities using NMAP Scripts (NSE)

Find Vulnerabilities using NMAP Scripts (NSE)

Nmap comes pre-installed with Kali Linux. Not just Kali Linux Nmap comes pre-installed with every security focused operating system. We have already discussed how to use Nmap for active reconnaissance in our previous article “NMAP — The Network Mapper“.

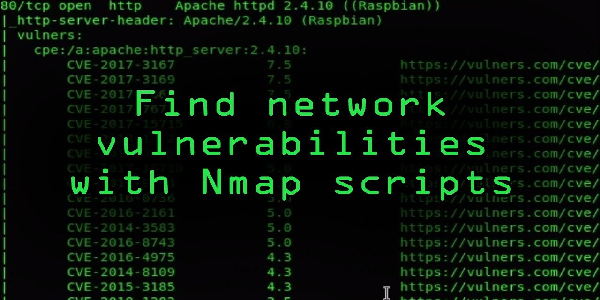
But cybersecurity experts don’t just use Nmap for scanning ports and services running on the target system, Nmap also can be used for vulnerability assessment and much more using NSE (Nmap Scripting Engine).

Vulnerability scanning using nmap scripts

The Nmap Scripting Engine (NSE) has revolutionized the possibilities of a port scanner by allowing users to write scripts that perform custom tasks using the host information collected by Nmap. As of September 2021, when we are writing this article, Nmap has over 600+ scripts on Nmap version 7.91.

Nmap scripts for security testing

Penetration testers uses Nmap’s most powerful and flexible features, which allows them to to write their own scripts and automate various tasks. NSE (Nmap Scripting Engine) was developed for following reasons:

  • Network Discovery:- This is the primary purpose that most of the people utilize Nmap for network port discovery, which we had learned in our “Nmap – The Network Mapper” article.
  • Classier version detection of a service:- There are tons of services with multiple version details for the same service, so Nmap makes it more easy to identify the service.
  • Backdoor detection:- Some of the Nmap scripts are written to identify the pattern of backdoors. If there are any worms or malicious program infecting the network, it makes the attacker’s job easy to short down and focus on taking over the machine remotely.
  • Vulnerability Scanning:- Pen testers also uses Nmap for exploitation in combination with other tools such as Metasploit or write a custom reverse shell code and combine Nmap’s capability with them for exploitation.

Before jumping in to finding vulnerabilities using Nmap we must need to update the database of scripts, so newer scripts will be added on our database. Then we are ready to scan for vulnerabilities with all Nmap scripts. To update the Nmap scripts database we need to apply following command on our terminal window:

sudo nmap --script-updatedb

In the following screenshot we can see that we have an updated Nmap scripts database.

nmap script database update

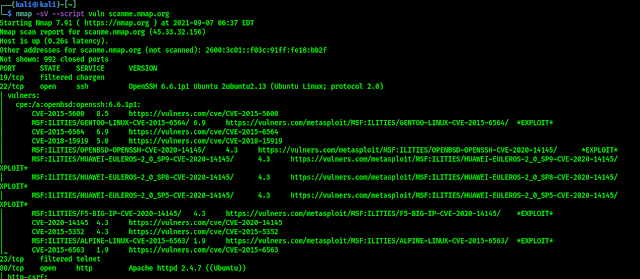
Now we are ready to scan any target for vulnerabilities. Well we can use following command to run all vulnerability scanning scripts against a target.

nmap -sV --script vuln <target>

As we can see in the following screenshot:

nmap vulnerability scripts

When we are talking about Nmap Scripts then we need to know that, not only vulnerability scanning (vuln) there are lots of categories of Nmap scripts those are following:

  • auth: This categorized scripts related to user authentication.
  • broadcast: This is a very interesting category of scripts that use broadcast petitions to gather information. 
  • brute: This category is for scripts that help conduct brute-force password auditing.
  • default: This category is for scripts that are executed when a script scan is executed ( -sC ).
  • discovery: This category is for scripts related to host and service discovery.
  • dos: This category is for scripts related to denial of service attacks.
  • exploit: This category is for scripts that exploit security vulnerabilities.
  • external: This category is for scripts that depend on a third-party service. 
  • fuzzer: This category is for Nmap scripts that are focused on fuzzing.
  • intrusive: These scripts might crash system by generate lot of network noise, sysadmins considers it intrusive.
  • malware: This category is for scripts related to malware detection.
  • safe: This category is for scripts that are considered safe in all situations.
  • version: This category is for NSE scripts that are used for advanced versioning.
  • vuln: This category is for scripts related to security vulnerabilities.

So we can see that we can do various tasks using Nmap using Nmap Scripting Engine scripts. When we need to run all the scripts against single target we can use following command:

nmap -sV --script all <target>

In the following screenshot we can see that all scripts are using against one target, but here every script will run so it will consume good amount of time.

nmap all scripts running at once

That is all for this article. We will back again with Nmap. Hope this article helps our fellow Kali Linux users. Love our articles? Make sure to follow us on Twitter and GitHub, we post article updates there. To join our KaliLinuxIn family, join our Telegram Group. We are trying to build a community for Linux and Cybersecurity. For anything we always happy to help everyone on the comment section. As we know our comment section is always open to everyone. We read each and every comment and we always reply.

Ashok in Action — Elevate Recon Skills

Ashok in Action — Elevate Recon Skills

Before we go on a road trip on any adventure, what’s the first thing we do? We do a proper plan! We check the maps (Nowadays on a phone Map), look for the best routes, and maybe even scout out a few interesting stops along the way. Or we watch any YouTube video of that trip to know about various things. Skipping this step would leave us wandering aimlessly, and nobody wants that. The same goes for cybersecurity spaces.

Reconnaissance, or recon in short, is that essential planning phase in our cybersecurity world. It’s like doing a bit of homework before doing the attack. Whether we’re looking to fortify your defenses or test them, understanding what we’re up against is half the battle. Without good recon, it’s like trying to find “One Piece” without a road poneglyphs—pretty much impossible!

Installation and use of Ashok on Kali Linux

In this article, We’re excited to introduce to Ashok, a tool that’s as reliable as our favorite road trip song playlist. Whether we’re just curious or looking to add a new skill to our cybersecurity toolkit, We hope this journey as enjoyable as discovering a new vulnerabilities on the test target. Let’s get started.

 As written on Ashok’s GitHub Page:

Before any real attacks are planned So Ashok is an Incredible fast recon tool for penetration tester which is specially designed for Reconnaissance phase. And in Ashok-v1.1 you can find the advanced google dorker and wayback crawling machine.

Main Features of Ashok

  • Wayback Crawler Machine
  • Google Dorking without limits
  • Github Information Grabbing
  • Subdomain Identifier
  • Cms/Technology Detector With Custom Headers

Install Ashok on Kali Linux

 Installing Ashok on our Kali Linux system is very easy. We just need to open our terminal window and apply the following command to clone it from GitHub:

git clone https://github.com/powerexploit/Ashok

After that we can see the output in the following screenshot:

clonning Asoke from GitHub

In the above screenshot we can see the output of above command. Now Ashok is on our system. So we just need to change our current working directory to Ashok by using the following command:

cd Ashok

Now we need to install requirements by applying following command:

python -m pip install -r requirements.txt

This command will install all the necessary things to run on our Kali Linux system. As we can see in the following screenshot.

Installing requirements for Ashok

Now we can run Ashok tool on our Kali Linux system.

Running Ashok on Kali Linux

Now the time has come that we run Ashok on our system. Before running it on a target we check Ashok’s help section. To do that we need to run following command:

python Ashok.py --help

In the following screenshot we can see the output of the above command:

Ashok help section

In the above screenshot we can see that how to use Ashok for different recons. In the following list we shows the uses of Ashok:

HTTP headers using –headers

DNS lookup using –dns

Sub-domain lookup using –subdomain

NMAP scan using –nmap

Extract data using Github username of target –username

CMS (Content Management System like WordPress and other) Detection using –cms

Extract links from target domain using –extract

CIDR (Classless Inter-Domain Routing) subnet lookup using –cidr

Banner grabbing using –banner

GeoIP of target IP address using –geoip

Internet archive crawling of target domain using –wayback

Google dorking using number of results as dork number using –dorknumber

For more details we can head over to Ashok’s WiKi Page. Let’s do a DNS scan of google.com. To do this we need to run following command:

python Ashok.py --dns google.com

We can see the output on the following screenshot:

DNS scan using Ashok

We also search for Internet archive (Wayback Machine) crawling on Ashok on our domain by using following command:

python Ashok.py --wayback kalilinx.in

 We can see the result on the following screenshot:

Ashok wayback machine crawling testing

The outputs of this scan also saved in Ashok’s directory as we can see in the screenshot below.

Wayback Machine's results stored

This is the uses of Ashok as our recon tool. Here just for example we show two use cases. But it is capable to do more. We can check it’s Wiki page to learn more uses of it.

This is how we can install and use Ashok and do our reconnaissance works easily on our Kali Linux system. Love our article? Make sure to follow us on Twitter and GitHub, we post article updates there. To join our KaliLinuxIn family, join our Telegram Group & Whatsapp Channel. We are striving to build a community for Linux and cybersecurity. For anything we always happy to help everyone on the comment section. As we know our comment section is always open to everyone. We read each and every comment and we always reply.

CEH MASTER Module 13 Web Application Attacks

August 6, 2024 Module 13 – Web Application Attacks Topics in This Chapter: GUI Web Hacking URL-Based Attacks Common Web Application Vulnerabilities Web Application Attack Tools Google Hacking Methods to Enhance Web Security Web Password Cracking Techniques Web applications are programs that run on web servers like http://vncert.gov.v/ and are categorized by their functions such …

CEH MASTER Module 13 Web Application Attacks Read More »

CEH MASTER Chapter 2 Footprinting & Reconnaissance

August 6, 2024 FOOTPRINTINGInformation Gathering Process Competitive IntelligenceNslookup and DNSstuffFinding the Target’s IP AddressDNS RecordsTracerouteEmail TrackingWhat is a Web Spider?RECONNAISSANCE Information Gathering Process FOOTPRINTING The first step in the attack process is gathering information about the target from publicly available data on the internet. This can be done using online applications like Whois, Domain Check …

CEH MASTER Chapter 2 Footprinting & Reconnaissance Read More »

CompTIA Pentest+ (PT0-002) – Lesson 16: Performing Post-Exploitation Pivoting and System Penetration

August 6, 2024 CompTIA Pentest+ (PT0-002) – Lesson 16: Performing Post-Exploitation Pivoting and System Penetration Guide on Performing Post-Exploitation Pivoting and System Penetration Objectives: When given a scenario, research attack vectors and perform network attacks. When given a scenario, perform post-exploitation techniques. Explain the use cases of the following tools in the phases of a …

CompTIA Pentest+ (PT0-002) – Lesson 16: Performing Post-Exploitation Pivoting and System Penetration Read More »

Open Whatsapp chat
Whatsapp Us
Chat with us for faster replies.