Search Results for: Nmap

Interview: A Cybersecurity Expert Shares His Tips for System Hacking

Interview: A Cybersecurity Expert Shares His Tips for System Hacking A conversation with Certified Ethical Hacker Nicola Kalderash https://www.youtube.com/watch?v=wPv81DDRIHQ Threat actors engage in system hacking to access sensitive data and functions, escalate privileges, run malicious code, and conceal or destroy files. We asked Certified Ethical Hacker (C|EH) Nicola Kalderash for his system hacking tips and…

The post Interview: A Cybersecurity Expert Shares His Tips for System Hacking appeared first on Cybersecurity Exchange.

C|PENT Review, Preparation Tips, and Cyber Range Experience: Advice From a Licensed Penetration Tester (Master)

What Is Incident Management and What Are Its Advantages? Business owners are always looking for ways to keep their company safe from unforeseen security incidents, which can cause significant losses. One way to do this is by implementing an incident management process. What is incident management, and why do organizations need it? This article will…

The post C|PENT Review, Preparation Tips, and Cyber Range Experience: Advice From a Licensed Penetration Tester (Master) appeared first on Cybersecurity Exchange.

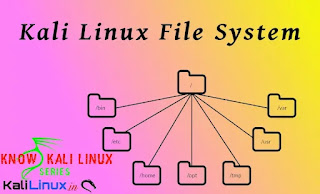
Kali Linux File System

In our this guide we are going to talk about file system of Kali Linux this is very crucial for a user using Kali Linux. For the new comers who comes to Linux from Windows it is very important to understand the file system. For those who comes from another Linux distribution (Like, Ubuntu, Linux Mint etc) with a basic Linux knowledge can easily get this.

Kali Linux File system

The directory structure of Kali Linux system is based on the Unix File system Hierarchy Standard (FHS), and that’s how the directories are structured inside Kali Linux. In our Windows system, the root directory is C: , but in Kali Linux, it’s a forward slash (/). Please do not confuse the term “root directory” with the “root user’s home directory” (which is /root), because they are two different things. the latter is the home is the home directory (/root) for the root user.

Talking about root user, root user is the super user, for an example it can be consider as Administrative user on Windows system, previously Kali Linux comes with root user by default but after 2020.1 update Kali Linux comes with non-root user by default, that means we need to run sudo if we want to execute high-privileged commands. New user should be careful using sudo because wrong command could destroy our system.

To understand the file system of Kali Linux we need to open our terminal window and execute the command cd / , here cd stands for change directory, and / is our root directory. That means we are changing the directory to the root directory. Then we need to run ls (list) command to see all the files/folders here. As we can see in the following screenshot:

root directory files

In the above screenshot we can see some contents on our root directory. We need to know about them to understand the file system.

  • /bin (binaries): This directory contains Linux binaries like the cd and ls command that we executed earlier.
  • /sbin (system binaries): This directory holds system binary files that serve as administrative commands (like fdisk).
  • /boot: This directory contains the Linux bootloader files.
  • /dev (devices): This directory contains the device configuration files (like /dev/null ).
  • /sys: This is similar to /dev, which contains configurations about devices and drivers.
  • /etc (etcetera): This directory contains all the administration system files (like /etc/passwd shows all the system users in Kali Linux).
  • /lib (libraries): This directory hods the shared libraries for the binaries inside /bin and /sbin.
  • /proc (processes): This directory contains the processes and kernel information files.
  • /lost+found: As in the name, this directory contains the files that have been recovered.
  • /mnt (mount): This directory contains the mounted directories (example, a remote file share).
  • /media: This directory holds the removable media mounted directories (like DVD).
  • /opt (option): This directory is used for add‐on software package installation. It is also used when installing software by users (example, hacking tools that you download from GitHub).
  • /tmp (temporary): This is a temporary folder used temporarily, the holdings are wiped after each reboot. The tmp folder is a good place to download our tools for privilege escalation once we got a limited shell.
  • /usr (user): This directory contains many sub-directories. In fact, /usr/share/ is a folder that we need to memorize because most of the tools that we use in Kali Linux (like Nmap, Metasploit, etc.) are stored there, and it also contains the wordlist dictionary files (/usr/share/wordlists).
  • /home: This is the home for Kali Linux users (example /home/kali/).
  • /root: Home directory for root user.
  • /srv (serve): This folder contains some data related to system server functionalities (like data for FTP servers).
  • /var (variable): This folder contains variable data for databases, logs, and websites. For an example, /var/www/html/ contains the files for the Apache2 web server.
  • /run (runtime): This directory holds runtime system data (like currently logged‐in users).

We need to check about these file systems. This is much different from our familiar Windows File system but it’s not hard. In our personal opinion Linux File systems are quite easy to understand then Windows File system.

We just need to some practice and continue using it to get familiar with Kali Linux file system. Either from file manager or from the terminal. We will say to use terminal, then our practice on terminal will be better.

Love our articles? Make sure to follow us on Twitter and GitHub, we post article updates there. To join our KaliLinuxIn family, join our Telegram Group. We are trying to build a community for Linux and Cybersecurity. For anything we always happy to help everyone on the comment section. As we know our comment section is always open to everyone. We read each and every comment and we always reply.

Naabu – Simple, Fast and Reliable Port Scanner

Naabu – Simple, Fast and Reliable Port Scanner

Port scanning is a very crucial part of gathering information about a web service. Previously we had talked about Nmap, Masscan, Amap port scanners. But in today’s article we are going to cover about Naabu. We install and use naabu on our Kali Linux system.

Naabu port scanner on Kali Linux

Naabu is a port scanning tool written in Go that allows us to enumerate valid ports for hosts in a fast and reliable process. It is actually a very simple tool that does fast SYN/CONNECT scans on the host or list of hosts and lists all ports that return a reply. Isn’t it sounds cool?

Key features of Naabu

  • Fast And Simple SYN/CONNECT probe based scanning.
  • Optimized for ease of use and lightweight on resources.
  • Automatic handling of duplicate hosts between multiple subdomains.
  • NMAP Integration for service discovery.
  • Piped input / output support for integrating in workflows.
  • Multiple Output formats supported (JSON, File, Stdout).
  • Multiple input support including HOST/IP/CIDR notation.

Installing Naabu on Kali Linux

Installing naabu on Kali Linux is very easy. We just need to run a single command to install it. The command is following:

sudo apt install naabu -y

In the following screenshot we can see the output of the above command using that naabu is installed on our system.

installing naabu on kali linux

Now we can use naabu on our Kali Linux.

Using Naabu on Kali Linux

As always, we start with the man page (help options) of naabu. To check it’s uses we need to run following command:

naabu -h

In the following screenshot we can see the output of the above command:

naabu help options

Now we are going to test it against a target host. Here for just an example we are going to test it on hackthissite.org, so we need to run following command:

naabu -host hackthissite.org

In the following screenshot we can see the output of our applied command:

naabu is running on Kali Linux

We can see that naabu found two open ports on our target website. If we are looking for a specified port number then we can specify the port number with -p flag.

naabu -p 80,21 -host hackthissite.org

In the following screenshot we can see that naabu is just look for our specified ports only and skips 443 port:

naabu specified ports

If we didn’t specify the port numbers then by default naabu will check nmap’s Top 100 ports. We can also use some per-configured port ranges:

  • -top-ports 100 : Scans for top 100 nmap ports.
  • -top-ports 1000 : Scans for top 1000 nmap ports.
  • -p – : Scans for all the ports from 1 to 65535.

We can also specify which ports we don’t wanna check. If we don’t like to check port 21 and 80 on our target then we need to run following command:

naabu -p - -exclude-ports 21,80 -host hackthissite.org

In the following screenshot we can see the output of the above command:

naabu uncommon port scanning

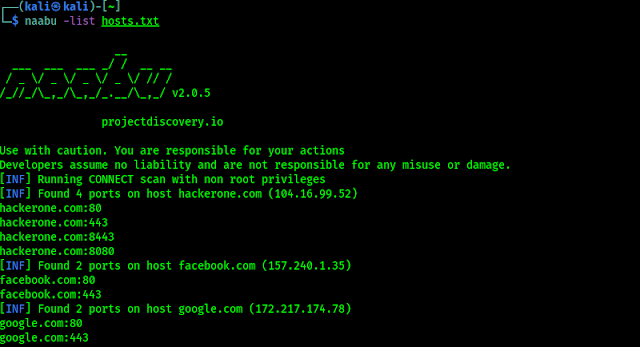
If we need to run naabu against a list of target hosts, we need to have a text file of hosts (one host on a single line), then run following command on our terminal:

naabu -list hosts.txt

In the following screenshot we can see the output of the above command:

naabu host list port scanning

We can see in the above picture that we scanned all the target hosts ports. We can use -json flag at the end to get the output in JSON lines format. We can use -o flag to save the results on a file. Also we can just use -silent flag to see the result only on the output.

Integration with Nmap

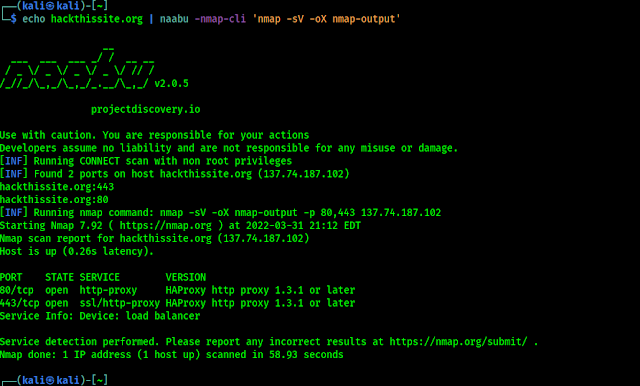
We can use together Naabu and Nmap, Nmap will be very useful for discover services running on the port. Here we have nmap installed on our system and we have to use nmap-cli to perform this. So our example command will be like following:

echo hackthissite.org | naabu -nmap-cli 'nmap -sV -oX nmap-output'

In the following screenshot we can see that Naabu is working perfectly working with nmap:

naabu integration with nmap

So here in this this article we learned about Naabu, a simple, fast and reliable port scanner on our Kali Linux system. Naabu is quite easy to use and simple. It is also very fast.

Love our articles? Make sure to follow us on Twitter and GitHub, we post article updates there. To join our KaliLinuxIn family, join our Telegram Group. We are trying to build a community for Linux and Cybersecurity. For anything we always happy to help everyone on the comment section. As we know our comment section is always open to everyone. We read each and every comment and we always reply.


 What Is Footprinting in Penetration Testing? 

Understanding the Steps of Footprinting: A Guide for Penetration Testers To properly mitigate the risks of malicious hacks, cybersecurity professionals need to understand the different techniques that attackers use. One of these techniques is footprinting: the process of collecting data about an organization or other target with the intent of committing a cyberattack. In this…

The post  What Is Footprinting in Penetration Testing?  appeared first on Cybersecurity Exchange.

What Are the Phases of a Penetration Test?

Understanding the Phases of the Penetration Testing Process Penetration testing is the process of identifying the security vulnerabilities in a system or network and trying to exploit them. The results of penetration tests play a vital role in finding and patching security flaws. In this article, we’ll discuss the responsibilities of a penetration tester and…

The post What Are the Phases of a Penetration Test? appeared first on Cybersecurity Exchange.

Northern Michigan University Hosts YooperCon 2021 with EC-Council’s CyberQ

Northern Michigan University Hosts YooperCon 2021 with EC-Council’s CyberQ

Northern Michigan University’s (NMU)Northern Michigan University’s (NMU) YooperCon event helped facilitate capture the flag (CTF) competitions and other cybersecurity awareness-focused sessions to support nearly 240 high school students interested in pursuing cybersecurity education pathways in the Upper Peninsula region of Michigan. [Tampa, FL, January 10, 2022]: Northern Michigan University, an EC-Council Academia and ATC partner, hosted the YooperCon 2021 events in November for […]
10 Cyber Security Tools to Watch Out for in 2021

10 Cyber Security Tools to Watch Out for in 2021

10 Cyber Security Tools to Watch Out for in 2021

With an immense number of companies and entities climbing onto the digital bandwagon, cybersecurity considerations have come up as limelight. Besides, new technologies such as Big Data, IoT, and Artificial Intelligence/Machine Learning are gradually more making inroads into our everyday lives, the threats related to cybercrime are mounting as well. Additionally, the usage of mobile and web apps in transacting financial information has put the complete digital stuff exposed to cybersecurity breaches.

The inherent risks and vulnerabilities found in such apps can be exploited by attackers or cybercriminals to draw off crucial information data counting money. Internationally, cyber-security breaches have caused a yearly loss of USD 20.38 million in 2019 (Source: Statista). Plus, cybercrime has led to a 0.80 percent loss of the entire world’s Gross domestic product, which sums up to approx. USD 2.1 trillion in the year 2019 alone (Source: Cybriant.com).

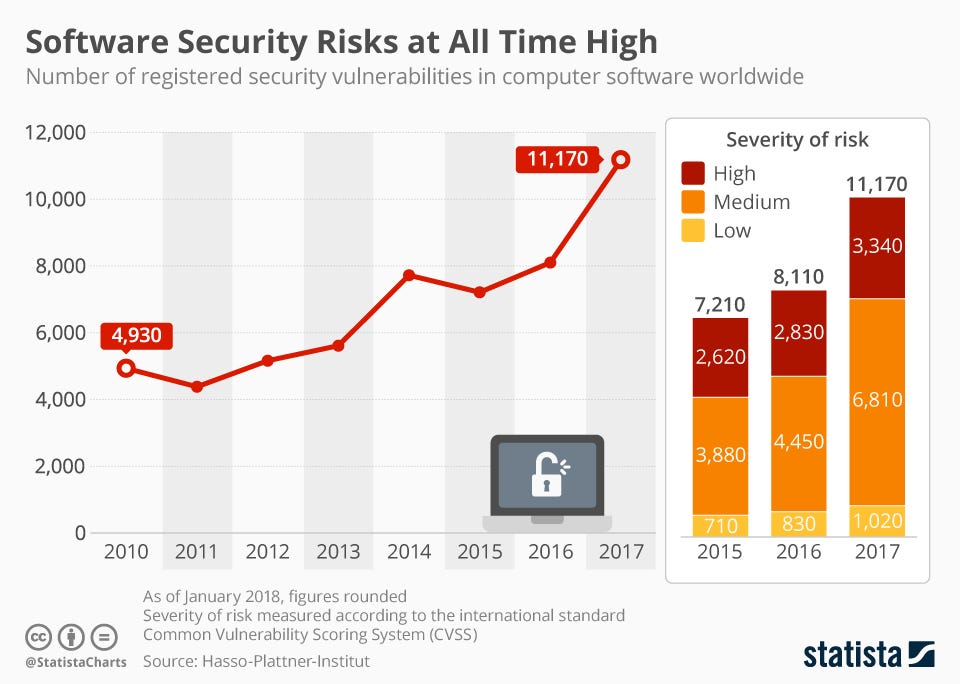
Statista Report 2018 “Security Threats at All-Time High”. The no. of security threats or vulnerabilities in all kinds of Information Technology software is at an all-time high.

Statista Report 2018 “Security Threats at All-Time High

Even the spiraling pandemic has introduced a distressing impact on several enterprises and companies worldwide, the majority of companies arbitrarily attempted or moved their business sections to the untouched or unaffected digital space. Most security funds were, yet, also battered as a collateral outcome of the complete economic downturn. The shrinking budgets mainly exacerbated traumatic digital transformation by gross disregard of privacy and cybersecurity components of the subtle process.

To stem the rot and preempt adverse penalties of cyberthreat or crime, like losing client trust and brand repute, cybersecurity testing should be made compulsory. Cybersecurity expense is nonetheless forecasted to rebound and hit again in the year 2021, giving relief for exhausted CISOs, and their shattered IT, cybersecurity teams. Meanwhile, I would like to acquaint you with a series of best cybersecurity tools that can make a palpable divergence for your overall security program and 2021 budget plans.

What Is Penetration Testing?

The penetration test is a kind of Security testing that is carried out to assess the security of the system (software, hardware, information system, or networks environment). The main objective of this type of testing is to scrutinize all the security risks or vulnerabilities that are found in an app by assessing the system’s security with malevolent techniques and to safeguard the data from the hackers and manage the system’s functionality. Penetration testing is a kind of Non-functional test which intends to make official attempts to breach the system’s security. It is also called a Pen Test or Pen Testing and the QA engineer or tester who performs this testing is considered as a pen tester aka ethical hacker.

What Are the Best Cyber Security Tools for 2021?

Any app security testing method shall require the conduct of a functional test. This way, several security issues, and vulnerabilities can be detected, which if not rectified in time can result in hacking. There are a plethora of paid and open source testing tools available in the market. Let’s discuss the top 10 cybersecurity testing tools to look out for in 2021:

1. NMap

NMap is a short form of Network Mapper. NMap is an open-source and free security scanning tool for security auditing and network exploration. It works on Windows, Linux, HP-UX, Solaris, BSD variants (comprising Mac OS), AmigaOS. NMap is used to detect what hosts are accessible on the network, what versions and OSs they are running, what services those hosts are providing, what kind of firewalls/ packet filters are in use etc., Several network and systems administrators find it beneficial for regular jobs like check for open ports, maintaining service upgrade schedules, network inventory, and monitoring service or host uptime. It comes with both GUI interfaces and command line

Core Features:

  • Determines hosts on a network
  • It is used to determine network inventory, network mapping, maintenance, and asset management
  • Produces traffic to hosts on a network, response time measurement, and response analysis
  • Used to recognizes open ports on target hosts in the arrangement for auditing
  • To search and exploit risks as well as vulnerabilities in a network

Download: NMap

2. Wireshark

It is one of the best tools and freely accessible open-source pen-testing tools. Generally, it is one of the network protocol analyzers, it allows you to capture and coordinatively browse the traffic running on a system network. It runs on Linux, Windows, Unix, Solaris, Mac OS, NetBSD, FreeBSD, and several others. Wireshark can be extensively used by educators, security experts, network professionals, and developers. The information that is recovered through the Wireshark software testing tool can be viewed through a Graphical User Interface or the TTY-mode TShark utility.

Core Features:

  • Rich VoIP analysis
  • Live capture and offline scrutiny
  • In-depth examination of hundreds of protocols
  • Runs on UNIX, Linux, Windows, Solaris, macOS, NetBSD, FreeBSD, & various others
  • Captured system or network data can be browsed through a GUI, or through the TTY-mode TShark utility
  • Read/write several variant capture file formats
  • Captured files compressed via gzip can be de-compressed concurrently
  • Coloring rules can be applied to the packet list for intuitive and rapid analysis
  • Live data can be read from Blue-tooth, PPP/HDLC, internet, ATM, Token Ring, USB, etc.,
  • Outcome can be exported to PostScript, CSV, XML, or plain text

Download: Wireshark

3. Metasploit

It is a computer security project that offers the user vital information about security risks or vulnerabilities. This framework is an open-source pen test and development platform that offers you access to the recent exploit code for several apps, platforms, and operating systems. Some of the jobs that can be attained in Metasploit from a pen test perspective comprise vulnerability scanning, listening, and exploiting known vulnerabilities, project reporting, and evidence collection. It has a command-line and Graphical User Interface clickable interface that works on Linux, Windows, as well as Apple Mac OS. Metasploit is a commercial tool but it comes with an open-source limited trial.

Core Features:

  • Network discovery
  • It has a command-line and GUI interface
  • Works on Windows, Linux, & Mac OS X
  • Module browser
  • Basic exploitation
  • Manual exploitation
  • Vulnerability scanner import
  • Metasploit community edition is offered to the InfoSec community without charge

Download: Metasploit

4. Netsparker

This commercial security test tool is a web app security scanner. Netsparker is a deadly accurate, automatic, and simple to use web app security scanner. This amazing tool is mainly used to identify security risks automatically like Cross-Site Scripting (XSS) and SQL injection in web services, web apps, and websites. Its proof-based Scanning technology does not simply report risks; it also generates a Proof of Concept to confirm they aren’t false positives. Therefore, there is no point in wasting your time by verifying the detect vulnerabilities manually after a scan is ended.

Core Features:

  • Advanced web scanning
  • Vulnerability assessment
  • HTTP request builder
  • Web services scanning
  • Proof-centric scanning technology for dead-accurate threats finding and scan outcomes
  • Full HTML5 support
  • SDLC integration
  • Exploitation
  • Reporting
  • Manual tests
  • Automated identification of custom 404 error pages
  • Anti-Cross-site Request Forgery (CSRF) token support
  • Anti-CSRF token support
  • REST API support

Download: Netsparker

5. Acunetix

It is a completely automatic web vulnerability scanner that identifies and reports on over 4500 web app vulnerabilities counting all variants of XSS XXE, SSRF, Host Header Injection, and SQL Injection. Acunetix smartly detects around 4500 web vulnerabilities. Acunetix is a commercial tool. Its DeepScan Crawler scans AJAX-heavy client-side SPAs and HTML5 websites. It enables users to export detected vulnerabilities to problem trackers like GitHub, Atlassian JIRA, Microsoft TFS (Team Foundation Server). It is obtainable on Linux, Windows, and Online.

Core Features:

  • A high detection rate of risks and vulnerabilities with lower false positives
  • Integrated vulnerability management — organize and control risks
  • Deeply crawl and scrutinize — automatic scans all websites
  • Integration with popular WAFs and Issue trackers like GitHub, JIRA, TFS
  • Open-source network security scanning and Manual test tools
  • Run on Linux, Windows, and online

Download: Acunetix

6. Nessus

It is a vulnerability assessment solution for security practitioners and it is formed and maintained by a company called Tenable Network Security. Nessus aids in detecting and fixing vulnerabilities like software flaws, malware, missing patches, and misconfigurations across a variety of OSs, apps, and devices. It supports Windows, Linux, Mac, Solaris, etc. It specializes in IPs scan, website scanning, compliance checks, Sensitive data searches, etc., and assists to detect the ‘weak-spots’.

Core Features:

  • Configuration audits
  • Mobile device audits
  • Reports can be simply tailored to sort by host or vulnerability, generate an executive summary, or compare scanning outcomes to highlight alterations
  • Detect vulnerabilities that enable a remote attacker to access confidential data from the system
  • Identifies both the remote faults of the hosts that are on a network and their local flaws and missing patches as well

Download: Nessus

7. W3af

It is a Web Application Attack and Audit Framework. W3af is a free tool. W3af secures web apps by searching and exploiting all web app vulnerabilities. It determines 200 or more vulnerabilities and controls your overall risk exposure on the website. It detects all sorts of vulnerabilities such as Cross-Site Scripting (XSS), SQL injection, unhandled application errors, Guessable Credentials, and PHP misconfigurations. It has both a console and graphical UI. It works on Mac, Linux, and Windows OS.

Core Features:

  • Assimilation of web and proxy servers into the code
  • Proxy support
  • Injecting payloads into roughly every section of the HTTP request
  • HTTP Basic and Digest authentication
  • Cookie handling
  • UserAgent faking
  • HTTP response cache
  • DNS cache
  • File upload using multipart
  • Add custom headers to requests

Download link: W3af

8. Zed Attack Proxy

Zed Attack Proxy is a free and open-source security testing tool, developed by OWASP. Popularly known as ZAP, Supported by Unix/Linux, Windows, and Mac OS, ZAP allows you to find a set of security risks and vulnerabilities in web apps, even at the time of the development and testing phase. This tool is simple to use, even if you are a novice in pen-testing.

Core Features:

  • Authentication support
  • AJAX spiders
  • Automatic Scanner
  • Forced Browsing
  • Dynamic SSL certificates
  • Web Socket Support
  • Plug-n-hack support
  • Intercepting Proxy
  • REST-based API and so on

Download link: ZAP

9. Burpsuite

It is also essentially a scanner (with a restricted “intruder” tool), even though several security test experts swear that penetration test without this tool is unimaginable. It isn’t free, yet very lucrative. It generally works wonders with crawling content and functionality, intercepting proxy, web app scanning, etc. One can use this on Mac OS X, Windows, and Linux environments.

Core Features:

  • Cross-Platform Supported
  • Very Light Weight And Stable
  • Can Work With Almost All Browsers.
  • Perform customize attacks
  • Well Design User Interface
  • Can Assist in crawling Website
  • Aid in scanning Https/ HTTP Request and Response

Website: Burp suite

10. Sqlninja

It is one of the best open-source penetration testing tools. The aim of Sqlninja is to exploit SQL injection threats and vulnerabilities on a web app. This automated testing tool utilizes Microsoft SQL Server as a back-end. Sqlninja has a command-line interface. Sqlninja works on Linux, as well as Apple Mac OS X. It comes with a slew of descriptive features, counting remote commands, DB fingerprinting, and its detection engine.

Core features:

  • Direct and reverse shell, both for UDP and TCP
  • Fingerprinting of the remote SQL Server
  • Formation of a custom XP cmdshell when the original one has been disabled
  • Withdrawal of data from the remote Database
  • Operating System privilege escalation on the remote database server
  • Reverse scan to seek a port that can be utilized for a reverse shell

Download: Sqlninja

Wrapping Up

These are the top cybersecurity testing tools that will give you security for your personal data, mitigate the rates of data breaches, as well as stolen hardware. Other advantages of these tools count tighter security and greater privacy. These must-have security tools will help you evade cyberattacks and secure your IT infrastructure. Lastly, such security software requires up-gradation and maintenance to constantly have top-notch security.


10 Cyber Security Tools to Watch Out for in 2021 was originally published in Dev Genius on Medium, where people are continuing the conversation by highlighting and responding to this story.

Kali Linux 2021.4 Update is Here !

Kali Linux 2021.4 Update is Here !

The last update of Kali Linux in 2021 is Rolling to ROCK.

Say Welcome to Kali Linux 2021.4! This release welcomes a mixture of new items as well as enhancements of existing features, and is ready to be downloaded (from our updated page) or upgraded if we have an existing Kali Linux installation.

kali linux 2021.4 update is here

The summary of the changelog since the 2021.3 release from September 2021 is:

  • Improved Apple M1 support
  • Wide compatibility for Samba
  • Switching package manager mirrors
  • Kaboxer theming
  • Updates to Xfce, GNOME and KDE
  • Raspberry Pi Zero 2 W + USBArmory MkII ARM images
  • More tools

Kali on the Apple M1

As we announced in Kali 2021.1 we supported installing Kali Linux on Parallels on Apple Silicon Macs, well with 2021.4, we now also support it on the VMware Fusion Public Tech Preview thanks to the 5.14 kernel having the modules needed for the virtual GPU used. We also have updated the open-vm-tools package, and Kali’s installer will automatically detect if we are installing under VMware and install the open-vm-tools-desktop package, which should allow we to change the resolution out of the box. As a reminder, this is still a preview from VMware, so there may be some rough edges. There is no extra documentation for this because the installation process is the same as VMWare on 64-bit and 32-bit Intel systems, just using the arm64 ISO.

As a reminder, virtual machines on Apple Silicon are still limited to arm64 architecture only.

Extended Compatibility for the Samba Client

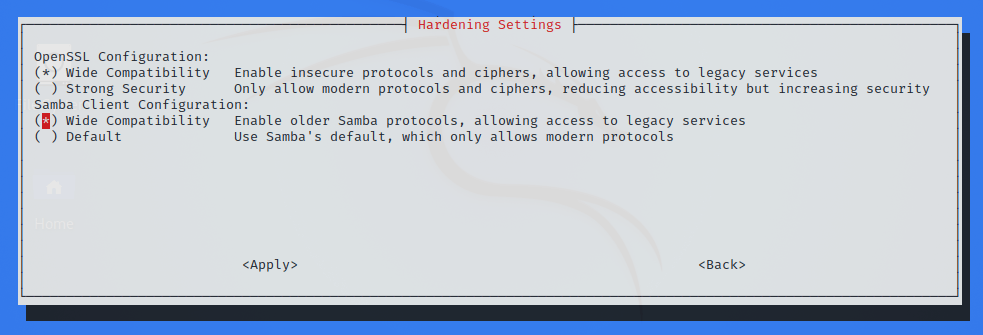
Starting Kali Linux 2021.4, the Samba client is now configured for Wide Compatibility so that it can connect to pretty much every Samba server out there, regardless of the version of the protocol in use. This change should make it easier to discover vulnerable Samba servers “out of the box”, without having to configure Kali.

This setting can be changed easily via the command-line tool kali-tweaks. In the Hardening section, one can choose the value Default instead, which reverts back to Samba’s usual default, and only allow using modern versions of the Samba protocol.
samba client on kali

As one can see on this screenshot, there’s also a similar setting for OpenSSL. We might want to refer to the 2021.3 release announcement for more details on this setting.

Easy Package Manager Mirror Configuration

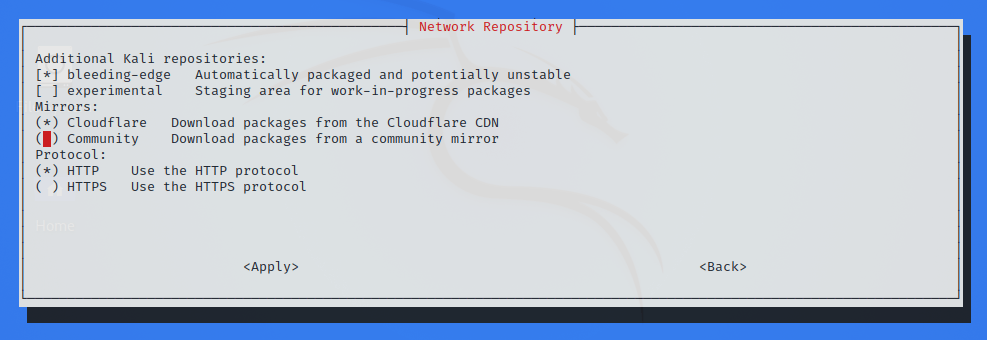
By default, when a Kali system is updated, the package manager (APT) downloads packages from a community mirror nearby. But did we know that it’s also possible to configure Kali to get its package from the CloudFlare CDN? To be honest, this is old news. But what’s new is that we can now use kali-tweaks to quickly configure whether APT should use community mirrors or the CloudFlare CDN.
mirror configuration

So which one is best, community mirrors or CloudFlare CDN? There’s no good answer. The time that it actually takes to update Kali can vary greatly and depends on many factors, including the speed of our Internet connection, our location, and even the time of day, if ever we live in a place where Internet traffic jam occurs at rush hour. The point is: if ever Kali updates are slow, the best we can do is to try to switch from community mirrors to CloudFlare CDN, or the other way round, and find what works best for we. And with kali-tweaks, it’s never been easier!

Kaboxer Theme Support

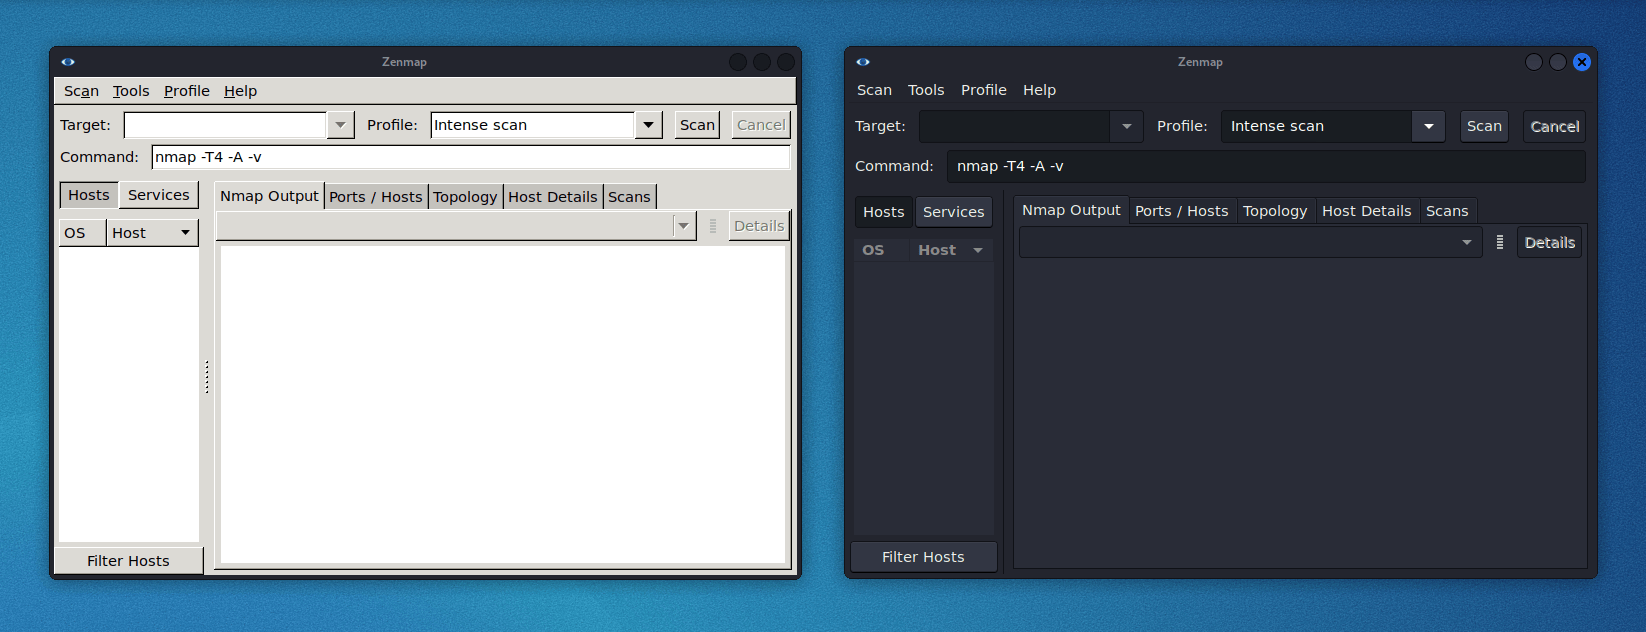
With the latest update of Kaboxer tools no longer look out of place, as it brings support for window themes and icon themes (placed respectively inside /usr/share/themes and /usr/share/icons). This allows the program to properly integrate with the rest of the desktop and avoids the usage of ugly fallback themes.

Here is a comparison of how zenmap (zenmap-kbx package) looks with the default Kali Dark theme, compared to the old appearance:
kaboxer theme

New Tools in Kali

It would not be a Kali release if there were not any new tools added! A quick run down of what’s been added (to the network repositories):

  • Dufflebag – Search exposed EBS volumes for secrets
  • Maryam – Open-source Intelligence (OSINT) Framework
  • Name-That-Hash – Do not know what type of hash it is? Name That Hash will name that hash type!
  • Proxmark3 – if we are into Proxmark3 and RFID hacking
  • Reverse Proxy Grapher – graphviz graph illustrating our reverse proxy flow
  • S3Scanner – Scan for open S3 buckets and dump the contents
  • Spraykatz – Credentials gathering tool automating remote procdump and parse of lsass process.
  • truffleHog – Searches through git repositories for high entropy strings and secrets, digging deep into commit history
  • Web of trust grapher (wotmate) – reimplement the defunct PGP pathfinder without needing anything other than our own keyring

Desktop & Theme Enhancement

This release brings updates for all the 3 main desktops (Xfce, GNOME, and KDE), but one that is common to all of them is the new window buttons design. Previous buttons were designed to fit the window theme of Xfce but did not work well with the other desktops and lacked personality. The new design looks elegant on any of the desktops and makes it easier to spot the currently focused window.
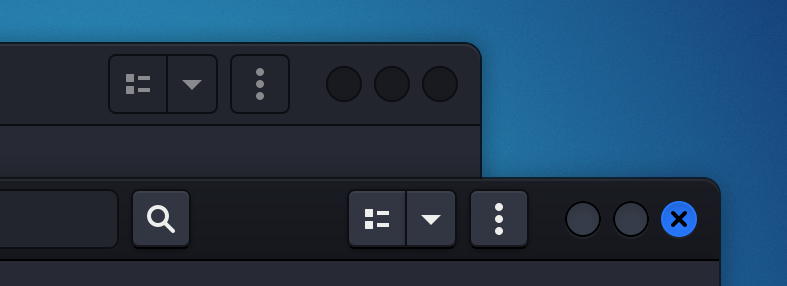
kali theme enlargement

Xfce

The panel layout has been tweaked to optimize horizontal space and make room for 2 new widgets: the CPU usage widget and the VPN IP widget, which remains hidden unless a VPN connection is established.

Following the steps of other desktops, the task manager has been configured to “icons only”, which, with the slight increase in the panel’s height, makes the overall look cleaner and improves multitasking in smaller displays.

The workspaces overview has been configured to the “Buttons” appearance, as the previous configuration “Miniature view” was too wide and a bit confusing for some users. Now that each workspace button takes less space in the panel, we have increased the default number of workspaces to 4, as it’s a usual arrangement in Linux desktops.

To finish with the modifications, a shortcut to PowerShell has been added to the terminals dropdown menu. With this addition, we can now choose between the regular terminal, root terminal, and PowerShell.

If we prefer the previous configuration for any of the widgets, we can modify or remove them by pressing Ctrl + Right-Click over it.
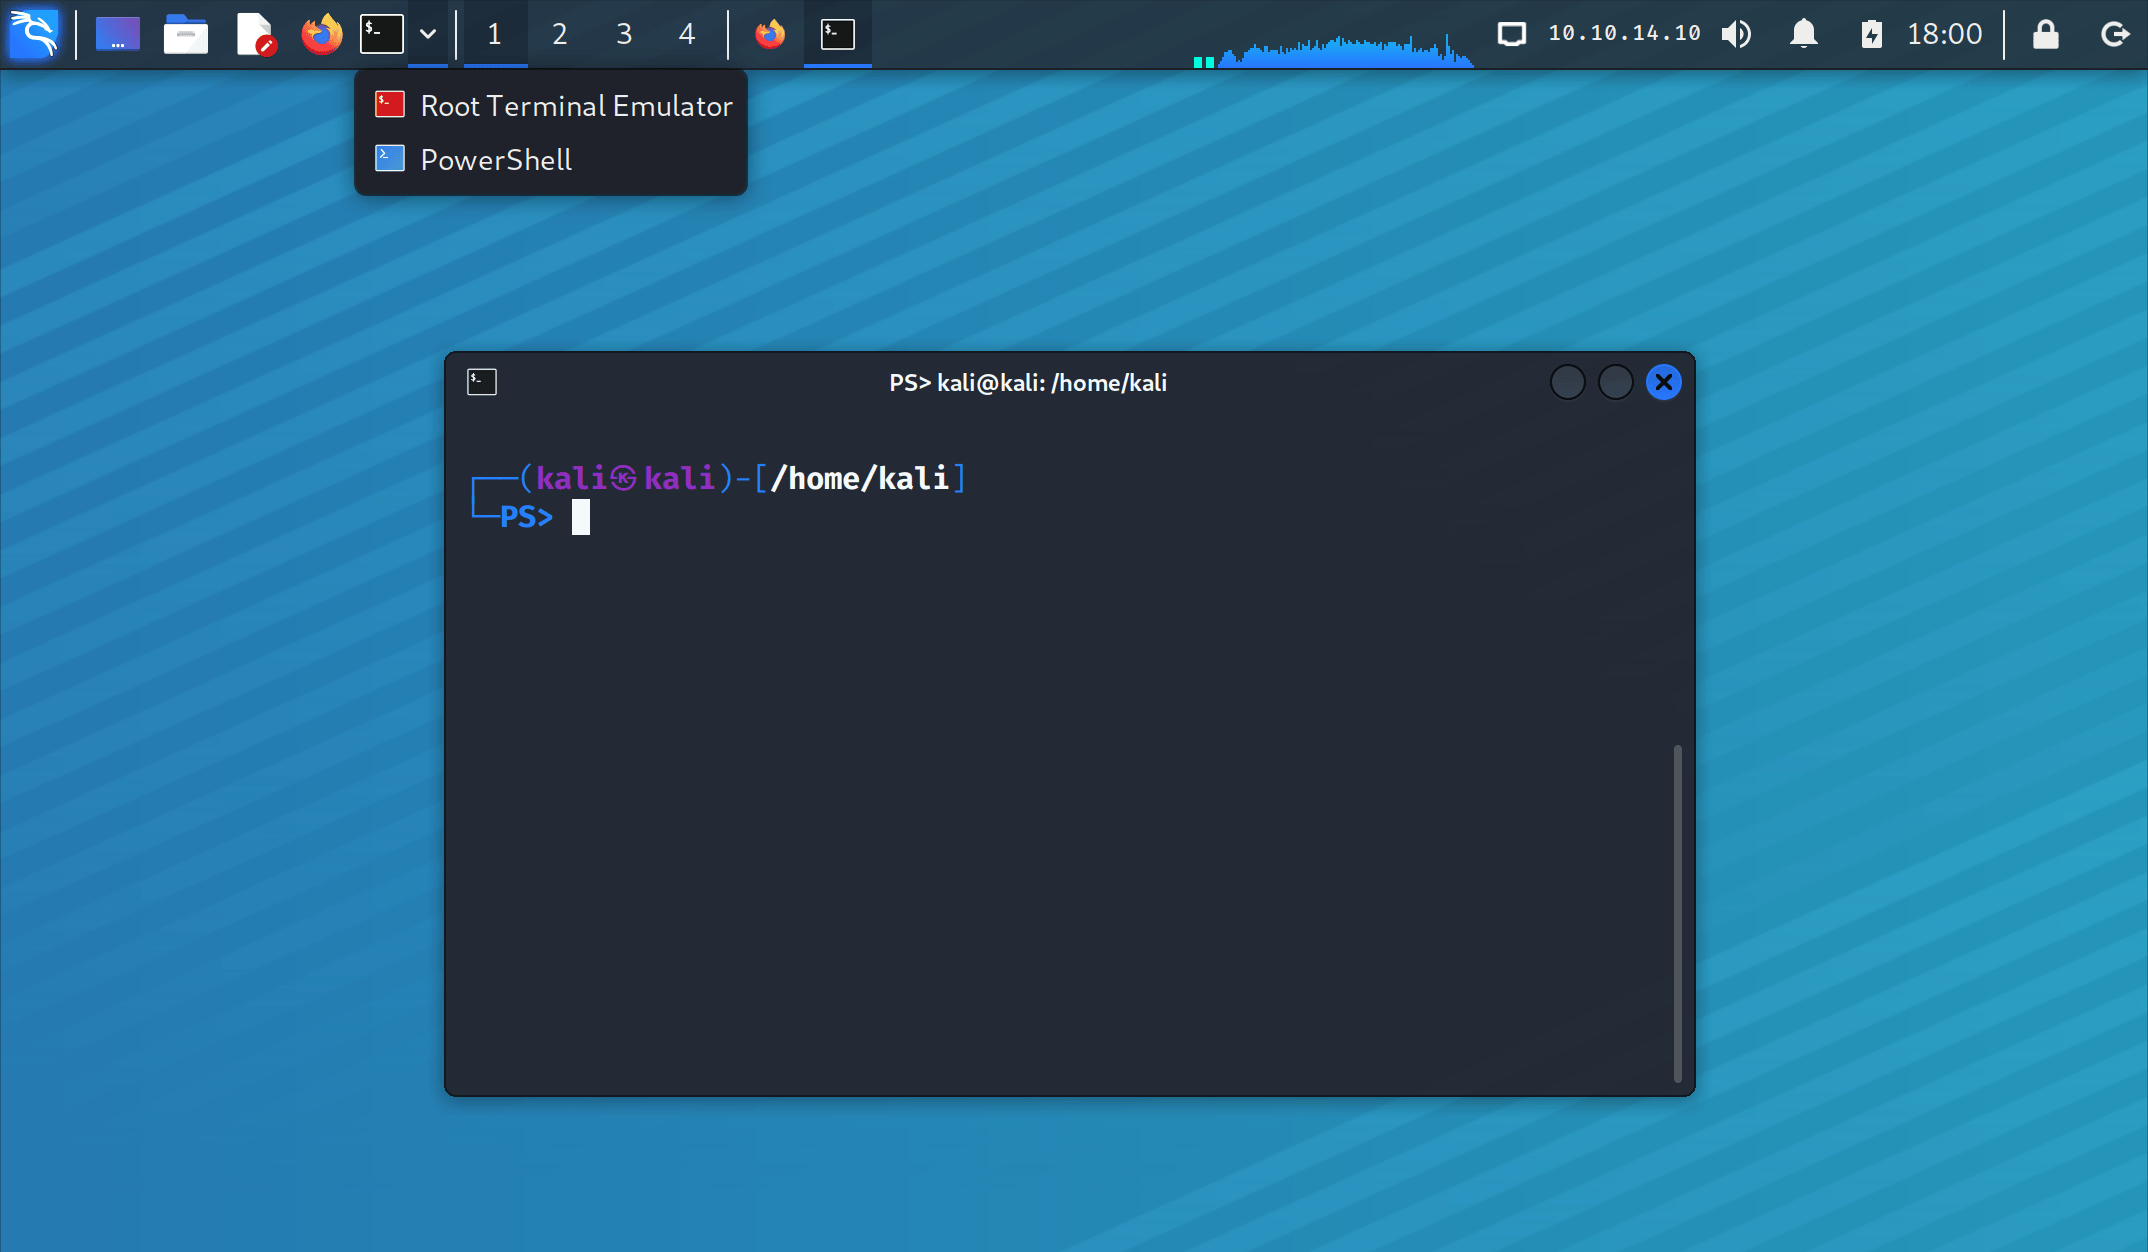
powershell

In addition to the Xfce design tweaks, In the image above, we can also observe the new customized prompt for PowerShell (in the two-line mode). Same as for zsh and bash, it includes an alternative one-line prompt that can be configured with kali-tweaks.

Bonus Tips For Virtual Desktops!

  • We can add or remove workspaces with the shortcuts: Alt + Insert / Alt + Delete
  • We can move through workspaces with the shortcuts:
    • Ctrl + Alt + <ARROW_KEY> to move in the direction of the arrow key.

      • (if we add Shift we move the current focused window)
    • Ctrl + Alt + <WORKSPACE_NUM> to move to a specific workspace, based on its number.
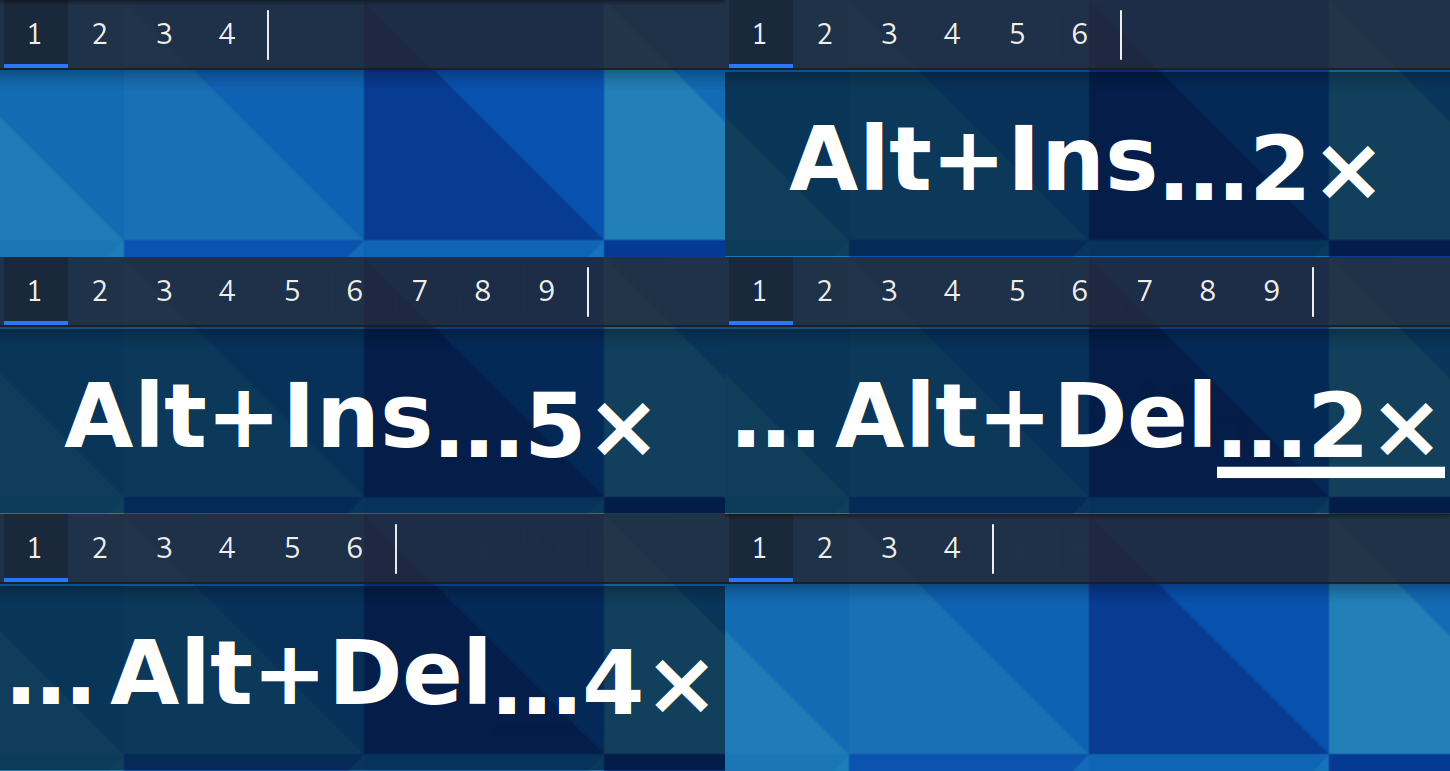
    • Ctrl + Super + <WORKSPACE_NUM> to move a window to a specific workspace, based on its number.

Virtual desktops

GNOME 41

In this update, GNOME desktop has received not one, but two version bumps. It’s been one year since the last major update of the GNOME desktop in Kali (with GNOME 3.38) and since then there have been two releases of the desktop environment:

All themes and extensions have been updated to support the new shell:
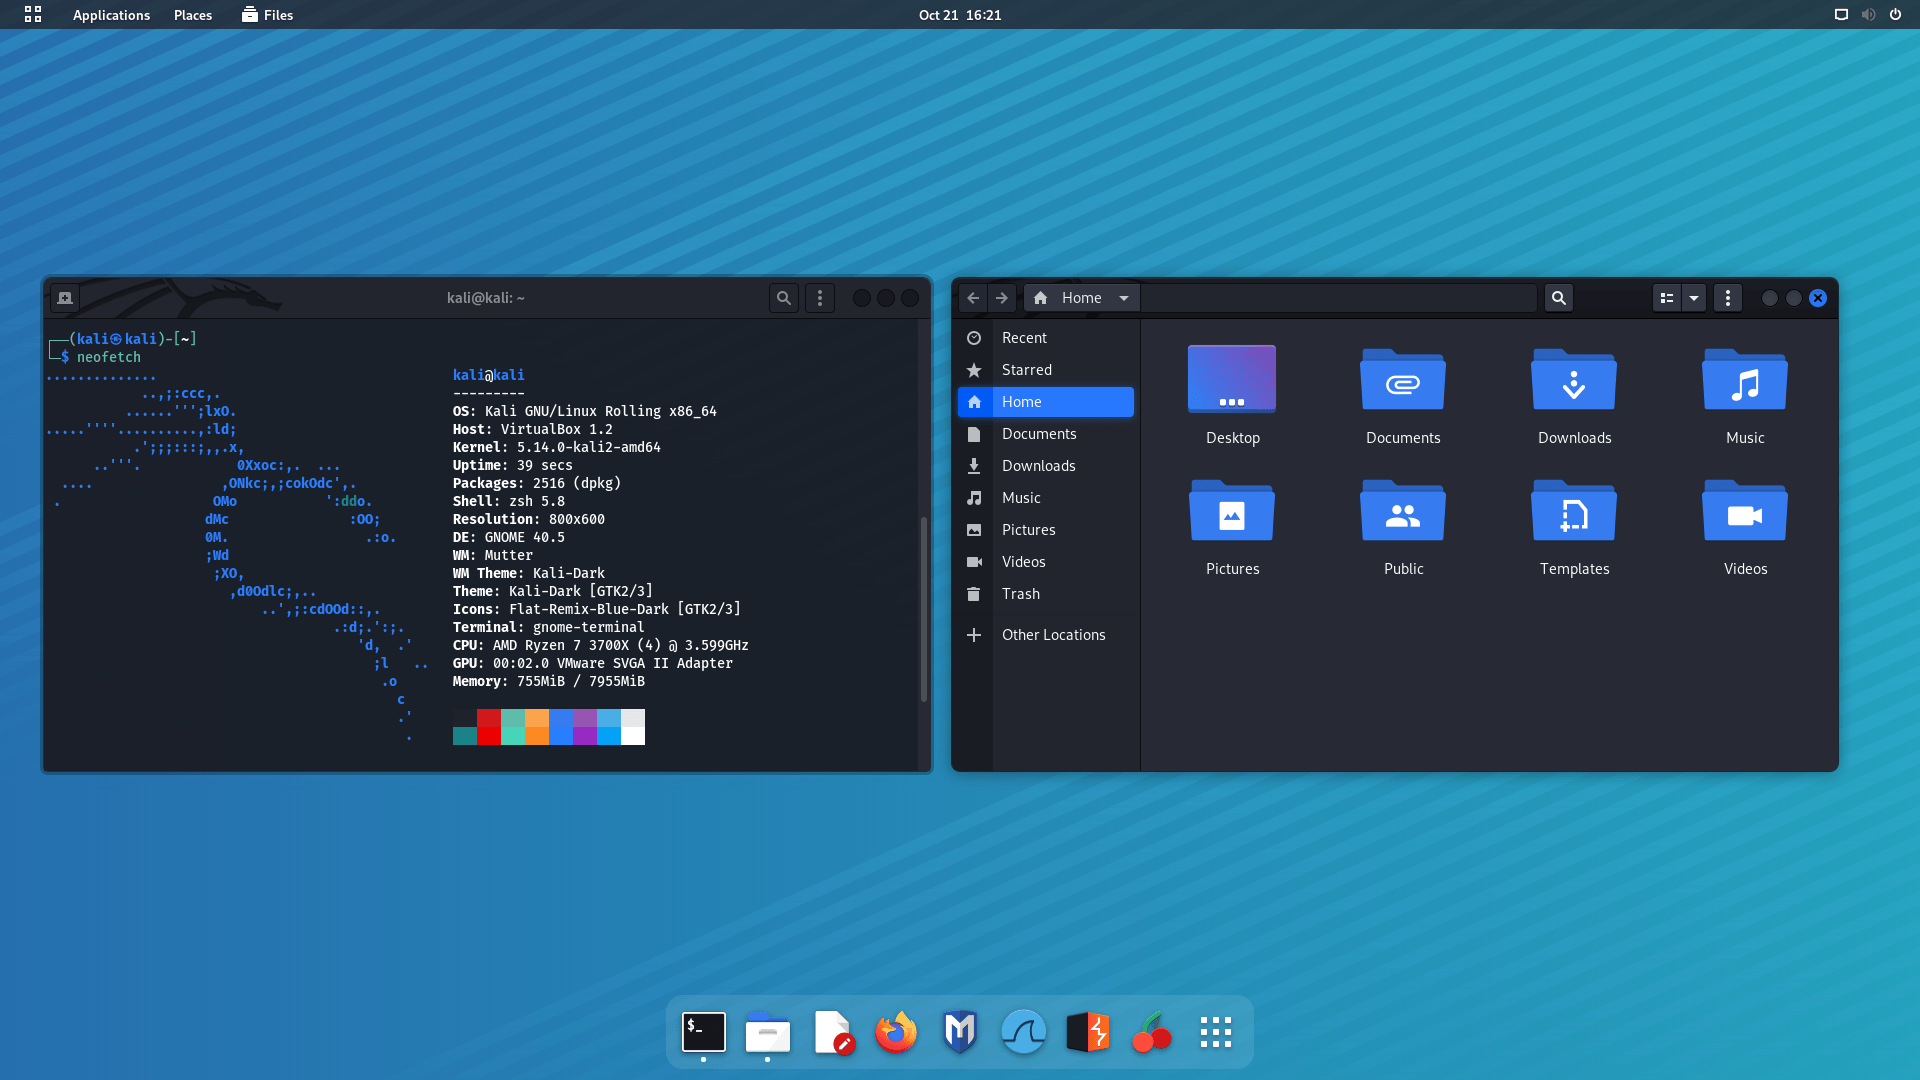
Kali linux themes

gnome 41

KDE 5.23

The KDE team celebrated its 25th anniversary releasing the update 5.23 of the Plasma desktop. This update, now available in Kali, brings a new design for the Breeze theme, which improves the look of Plasma with details that add glossiness and style to the desktop. Along with the theme improvements, the System Settings (Under Global Theme > Colors) brings a new option to pick the desktop accent color.

From Kali’s side, the new window theme for KDE is now based on the source code of the breeze theme instead of using the Aurorae theme engine. This fixes previous issues with window scaling for HiDPI displays.

How to Upgrade Your Kali Theme

With these theme changes, we may not get them if we upgrade Kali. This is because the theme settings are copied to our home folder when our user is first created. When we upgrade Kali, it is upgrading the operating system, so upgrading does not alter personal files (just system files). As a result, in order to get these theme tweaks, we need to either:

  • Do a fresh Kali install
  • Create a new user and switch to that
  • Delete our Desktop environment profile for the current user and force reboot. Example of Xfce can be found below:
kali@kali:~$ mv ~/.config/xfce4{,-$(date +%Y.%m.%d-%H.%M.%S)}
kali@kali:~$
kali@kali:~$ cp -rbi /etc/skel/. ~/
kali@kali:~$
kali@kali:~$ xfce4-session-logout --reboot --fast

Kali NetHunter Updates

Thanks to the amazing work of @yesimxev, we have a new addition to the NetHunter app: The Social-Engineer Toolkit!

This release features the first module from SET: the Spear Phishing Email Attack, with many more to come – watch this space…

Now we can use the Kali NetHunter app to customise our own Facebook, Messenger, or Twitter direct message email notifications for our social engineering attacks:

social engineering toolkit

Thanks to everyone that contributed to this feature by participating in the Twitter poll. We could not have done it without input!

Kali ARM Updates

Notable changes this release

  • All images now use ext4 for their root filesystem, and resize the root filesystem on first boot. This results in a speed-up over previous releases which were using ext3, and a reduced boot time on the first reboot when resize happens.
  • Raspberry Pi Zero 2 W support has been added, but like the Raspberry Pi 400, there is no Nexmon support.
  • Speaking of the Raspberry Pi Zero 2 W, since it is so similar to the Zero W, we have also added a PiTail image to support the new processor with better performance.
  • Raspberry Pi images now support USB booting out of the box since we no longer hardcode the root device.
  • Raspberry Pi images now include versioned Nexmon firmware. A future release of kalipi-config will allow we to switch between them, if we would like to test different versions.
  • Images that use a vendor kernel will now be able to set the regulatory domain properly, so setting our country will give access to channels properly for wireless.
  • Pinebook Pro can now be overclocked. The big cores get 2GHz and the little cores get 1.5GHz added.

    • echo 1 | sudo tee /sys/devices/system/cpu/cpufreq/boost to enable
    • echo 0 | sudo tee /sys/devices/system/cpu/cpufreq/boost to disable
  • USBArmory MkII image has been added.

Kali ARM build-scripts have seen a massive amount of changes:

  • They are vastly more simplified – thanks to Francisco Jose Rodriguez Martos, and cyrus104 for all of their contributions to make this happen.
  • We can now choose which desktop we would like to install (or none at all using --minimal)
  • There is even an option of no desktop and no tools (--slim) if we would like to build a custom image up from scratch

Kali-Docs Updates

Anyone can help out, anyone can get involved!


Miscellaneous

Kali-Cloud & Cron

Some users noticed that the venerable cron package was missing from the Kali AWS Cloud image. This was not intentional, and it’s now fixed.

Remote Desktop Protocol Audio

The quieter you become, the more you are able to hear”, goes the saying. And for those running Kali in a VM and using RDP to connect, it’s been very quiet indeed, as the sound never worked with this configuration. However this long period of silence is coming to an end! Sound should be enabled and work out of the box from now on. If ever it does not, make ourself heard on the bug tracker 😉

Python Command

The command python is no more! Instead, we need to use python3 (or if we have to, python2 due it being at End Of Life). Alternatively we can install python-is-python3 to restore python as an alias for python3.

Download Kali Linux 2021.4

Fresh Images: So what are waiting for? Start downloading already!

Seasoned Kali Linux users are already aware of this, but for the ones who are not, we do also produce weekly builds that you can use as well. If you cannot wait for our next release and you want the latest packages (or bug fixes) when you download the image, you can just use the weekly image instead. This way you’ll have fewer updates to do. Just know that these are automated builds that we do not QA like we do our standard release images. But we gladly take bug reports about those images because we want any issues to be fixed before our next release!

Existing Installs: If you already have an existing Kali Linux installation, remember you can always do a quick update:

echo "deb http://http.kali.org/kali kali-rolling main non-free contrib" | sudo tee /etc/apt/sources.list
sudo apt update && sudo apt -y full-upgrade
[ -f /var/run/reboot-required ] && sudo reboot -f
┌──(kali㉿kali)-[~]
└─$
grep VERSION /etc/os-release
VERSION="2021.4"
VERSION_ID="2021.4"
VERSION_CODENAME="kali-rolling"

┌──(kali㉿kali)-[~]
└─$
uname -v
#1 SMP Debian 5.14.16-1kali1 (2021-11-05)

┌──(kali㉿kali)-[~]
└─$
uname -r
5.14.0-kali4-amd64

NOTE: The output of uname -r may be different depending on the system architecture.

As always, should you come across any bugs in Kali, please submit a report on our bug tracker. We’ll never be able to fix what we do not know is broken! And Twitter is not a Bug Tracker!
Amass — Mapping Attack Surface Automatically

Amass — Mapping Attack Surface Automatically

In our this guide we are going to cover an awesome information gathering tool called Amass originally created by Jeff Foley, later it adopted by OWASP and Jeff is Amass project leader now.

Amass is a command line open-source tool that helps information security professionals to perform network mapping of attack surfaces and perform external asset discovery using open source information gathering and active reconnaissance techniques.

amass on kali linux

In order to do this, Amass heavily focuses on DNS, HTTP and SSL/TLS data discovering and collecting. Amass uses its own internal mechanism and it also integrates perfectly with some external services (SecurityTrails, AlienVault, Shodan etc) to increase the efficiency and power of it’s results.

In our detailed guide we are going to learn how to install & use Amass on Kali Linux. So without wasting any more time lets get started.

How to Install Amass on Kali Linux

If we are using an updated version of Kali Linux large, then we don’t need to install Amass on our system, it comes pre-installed. But if Amass doesn’t present on our Kali Linux system then we can easily install it by simply using following command:

sudo apt install amass-common

How to use Amass on Kali Linux

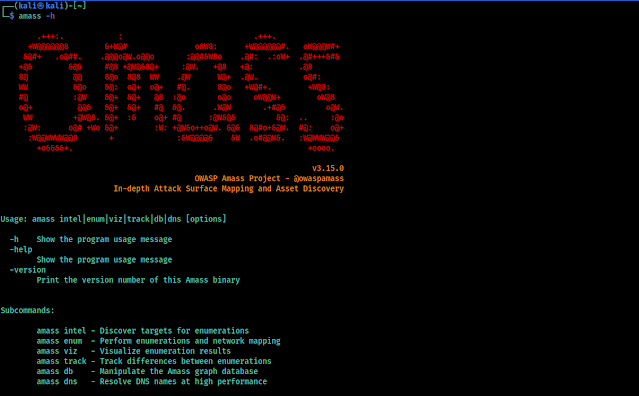
Before starting using any tool we should check it’s help options. We are also doing the same for Amass also. To check it’s help we run following command on our terminal window:

amass -h

In the following screenshot we can see the output of our applied command:

amass help options

In the above help menu we can see that Amass have some options. Let’s have a look on to them:

  • intel: Collect intelligence on the target in order to determine our starting point.
  • evum: Perform enumeration & mapping of our target to determine possible attacks.
  • viz: Show the results on a visual formats with analysis and future research.
  • track: Compare results across enumerations to see changes in their attack surface.
  • db: Manage the graph databases storing the enumeration results.
  • dns: Resolve DNS names at high performance.

Getting Subdomains using Amass Enum

Enough talking about Amass. Let’s use it. The most basic use of it is “subdomain enumeration”. We can do it by applying following command:

amass enum -d oswap.org

Here we have used -d flag to specify our target domain. In the following screenshot we can see the output of our applied command:

subdomain finding using amass

That is the basic subdomain discovery. We can get better results using following command:

amass enum -d example.com -active -cidr 1.2.3.4/24,4.3.2.1/24 -asn 12345

Getting Information using Intel

We can do a lot of tings with Amass. For an example we are looking for an organization using “google” in their name. We can use following command to do this:

amass intel -org "google"

After applying the above command we need to give couple of minutes to find it. We can see it on the following screenshot:

amass intel information gathering

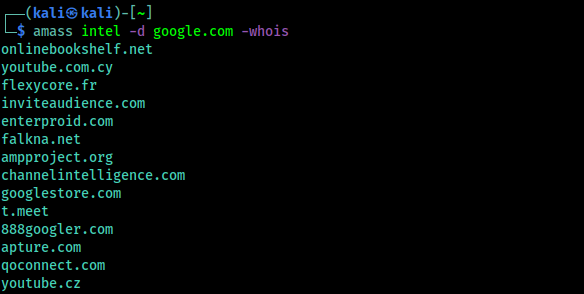
We can also reverse whois data. By this way we can grab the details from the specified domain’s whois records, and then tries to find other domains with the similar whois records. That way we can know about a website owner have other websites. We can use following command to do this:

amass intel -d oswap.org -whois

The output shows in the following screenshot:

reverse whois data using amass

These all domains have similar whois information as Google.com, so there is high chance that Google owns them.

SSL Certificate Grabbing

If we know IP addresses and feed it to Amass using -active flag, Amass will pull the SSL certificate from every IP address within the IP range and then spits back the domain that the SSL cert is associated with. For an example we use the following command:

amass intel -active -cidr 173.0.84.0/24

In the following screenshot we can see that it is running on a well known Paypal-owned CIDR range.

SSL certificate grabbing using amass

Tracking using Amass

Our every scan done with amass is automatically stored on our system that we ran it on. Then, if we run the same scan again, amass will track any changes that have taken place since your last scan. The most perfect way to use this feature is to discover which new subdomains have appeared since our last scan. For example, We had scanned oswap.org on the morning, so I ran the following command to track that.

amass track -d oswap.org

In the following screenshot we can see there are no changes. If we got some new subdomains that means that might be vulnerable.

amass tracking

Visualization on Amass

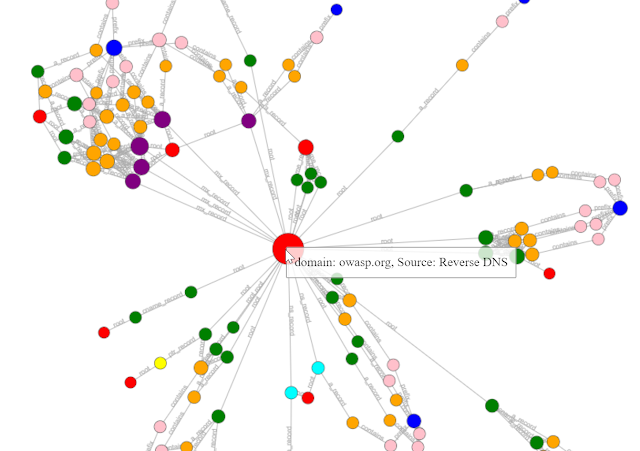
Frankly speaking we are not fan of this. During the information gathering we love to see the results on a text based format, but visualization on Amass looks really cool. We need to use viz for that, as we did in the following screenshot:

amass viz

This viz subcommand on Amass allow us to visualize all the gathered information of target (stored in the Amass graph database) for a target in a number of ways. Results can also be imported into Maltego for more OSINT analysis.

Amass Database

Amass Database (db) is a Amass subcommand that is useful to view the recon data for every scan that we had ever done.
To list all of the details of all of our previous scans, we need to simply run command like amass db show, If we want to see details of a specific domain, then we just need to add the -d flag like following,

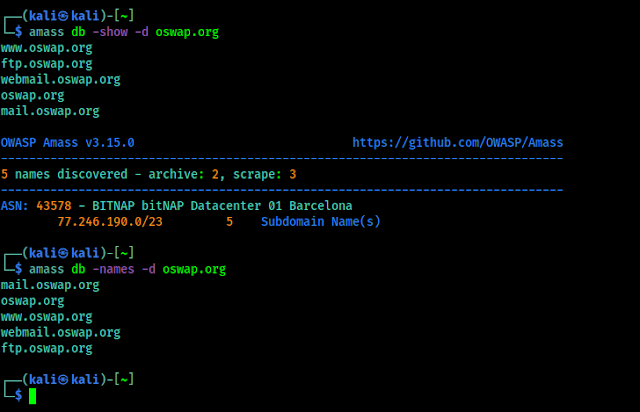
amass db -show -d oswap.org

If we prefer a nice clean, plain output, we can output the discovered domains or subdomains using the -names flag instead of -show. The outputs are shown in the following screenshot:

amass db

In the above screenshot we just have the subdomains, because we did not gather more information on oswap.org, but if we have it will show us.

Amass Scripting Engine

Like Nmap scripting engine Amass also have scripting engine which can be used to add our own data sources on Amass. Like we have an updated API which Amass doesn’t integrated yet, so we don’t need to wait for Amass adds it. We can add it on Amass and use it. For more details we can check this manual.

For more detailed guide we can suggest some awesome sources to learn more about Amass:

  1. Official Amass Tutorial
  2. Amass Extensive Tutorial

Amass is really a great tool for information gathering and recon works. In this article we saw that how we can use Amass on our Kali Linux system.

Love our articles? Make sure to follow us on Twitter and GitHub, we post article updates there. To join our KaliLinuxIn family, join our Telegram Group. We are trying to build a community for Linux and Cybersecurity. For anything we always happy to help everyone on the comment section. As we know our comment section is always open to everyone. We read each and every comment and we always reply.

Open Whatsapp chat
Whatsapp Us
Chat with us for faster replies.