Kali Linux

Kali Linux is a Debian-derived Linux distribution designed for digital forensics and penetration testing. It is maintained and funded by Offensive Security.

Andriller — Forensic Investigation of Android Phone on Kali Linux

Android holds its position as the leading mobile phone operating system in worldwide. Having an Android phone is very common nowadays. Forensic testing of an Android phone is very crucial for every digital forensics experts.

In today’s digital forensics article we are going to learn about Andriller. Andriller is software utility with a collection of forensic tools for smartphones. It performs read-only, forensically sound, non-destructive acquisition from Android devices.

We learn how to install andriller on our Kali Linux system and use it against our own device.

Andriller Digital Forencics of Android on Kali Linux

First of all we need to clone the GitHub repository of andriller on our system by applying following command;

git clone https://github.com/den4uk/andriller.git

After the cloning process complete we can navigate to the directory by using cd command:

cd andriller

Here we got some files but to install and use andriller we need to focus on two files they are setup.py and andriller-gui.py.

Andriller clonned in Kali linux

We set the permissions of both files using following command.

sudo chmod +x setup.py andriller-gui.py

The following screeshot shows the output of applied command.

setting up permission of andriller

Now we can run the setup & install andriller. To do that we run following command on our terminal:

sudo python3 setup.py install

The above command will install all the dependencies to run this tool.

Here we recommended to run following command to install adb and python-tk for error-less works.

sudo apt-get install android-tools-adb python3-tk

After installing the dependencies we can run the tool by simply using following command:

python3 andriller-gui.py

Then the GUI (Graphical User Interface) window of andriller will open in front of us as we can see in the following screenshot:

Andriller GUI on Kali Linux

Here we need to set our “Output Location” we click there and set our output location. Here we choose our Desktop location.

Now we just need to connect an Android device with our Kali Linux system through USB, we need to use data cable here (USB debugging is must on Android device). After connecting data cable with the device we can use the “Check” option to check if our android device is connected or not.

After connecting our Android device we just need to click on “Extract” to get the report. After clicking on export we can see that our Android device is asking for backing up data here we just need to click on “back up my data”, as we did in the following screenshot:

backup request from android

Then our process will be started. If we have chosen or tick ✅ the “Shared Storage”, then Andriller will backup the whole storage which will be time consuming otherwise it will backup the system files only.

After completing the process the reports will be saved on our given location as a html file and browser opens the report automatically. As we can see in the following screenshot.
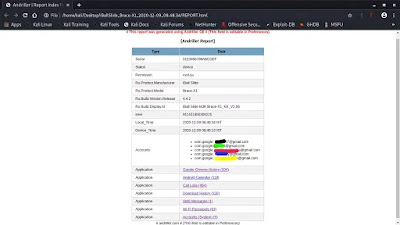
Andriller report of Android device
Hided some personal information

Here we can see the all details of the Android device. We can check the Google Accounts, Call logs, Browser history, WiFi passwords, SMS and much more.

Here is a screenshot of WiFi passwords.

Andriller extracted WiFi Passwords

Lots of information we can extract from an Android device using Andriller.

This is how we can perform digital forensics on an Android device. One more things, if we have a device with root permission then we can see the maximum results.

Love our articles? Make sure to follow us on Twitter and GitHub, we post article updates there. To join our KaliLinuxIn family, join our Telegram Group. We are trying to build a community for Linux and Cybersecurity. For anything we always happy to help everyone on the comment section. As we know our comment section is always open to everyone. We read each and every comment and we always reply.

Install Nessus on Kali Linux

In this detailed article we learn “How to install Nessus on Kali Linux 2020.x“. Nessus is a very popular and widely used vulnerability scanner and assessment tool for testing web application and mobile application.

Nessus will be very helpful for penetration testers and bug bounty hunters. Nessus also helpful for web and mobile app developers to find and fix vulnerabilities.


Install Nessus on Kali

Nessus is always updated and useful libraries for vulnerability and configuration checks. Also it’s analysis is very fast and accurate.

Key-Features of Nessus

  • The latest intelligence, rapid updates, an easy-to-use interface.
  • Covers an industry-leading 50,000+ vulnerabilities.
  • Network devices: Nessus can audit firewalls/routers/switches (Juniper, Check Point, Cisco, Palo, Alto Networks), printers, storage.
  • Virtualization: Nessus also can audit Virtual Systems like, VMware, VirtualBox, ESX, ESXi, vSphere, vCenter, Hyper-V, and Citrix Xen Server.
  • Operating systems: Nessus can run against Windows, Mac, Linux, Solaris, BSD, Cisco iOS, IBM iSeries.
  • Databases: It will scan inside various databases like, Oracle, SQL Server, MySQL, DB2, Informix/DRDA, PostgreSQL, MongoDB
  • Web applications: Nessus can find vulnerabilities in Web servers, web services, OWASP vulnerabilities.
  • Cloud: We can use Nessus to scans cloud applications and instances like Salesforce and AWS et.
  • Compliance: Helps meet government, regulatory and corporate requirements. Nessus also will be useful for personal and development uses.

Installing Nessus on Kali Linux 2020.x

Nessus doesn’t comes pre-installed with Kali Linux, so we need to download and install it manually.

Nessus vulnerability scanner package is available for download in Tenable’s site. This is the official download site for Nessus.

Nessus download for Kali Linux

We download the 64 bit version for our Kali Linux system. It will be saved on our Downloads folder. So we open the terminal there and run following command to install Nessus on Kali.

sudo dpkg -i Nessus*.deb

Then it will start installing as shown in the following screenshot:

Installing Nessus deb file in Kali Linux

Okey, It is now installed. Let’s check if the installation is correct and Nessus is working or not.

First we enable Nessus service by using following command:

sudo systemctl enable nessusd

This command will enable nessusd services. After this we can start this service by using following command:

sudo systemctl start nessusd

Then we can check if it is running successfully or not via applying following command:

sudo systemctl status nessusd.service

If everything will be perfect then it should show outputs as following screenshot.

Nessus service is running sucessfully

In the above screenshot we can clearly see that Nessus service (nessusd) is active and running successfully.

Nessus installed successfully

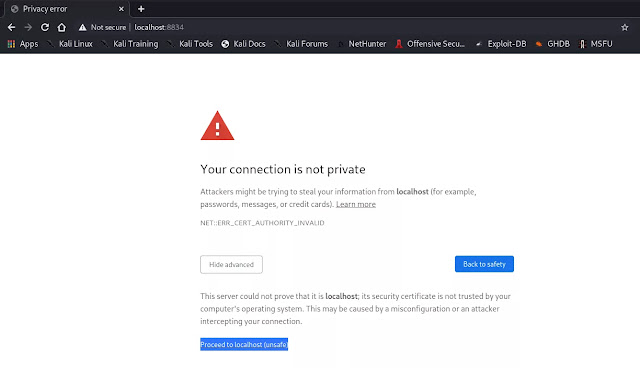
Now we can run this. We need to open our web browser and navigate to https://localhost:8834 here we might got security warnings form browser but we can ignore it, because it is our localhost.

avoiding the browser warnngs

So we go to Advanced and processed to localhost.

Then we reach the beautiful Nessus Setup, as shows in the following screenshot:

Nessus Set-UP

Here we can “Continue” with “Nessus Essentials”. Then we got a form asking about our details like name and e-mail id. Here we need to provide a original e-mail id because Nessus will verify it. So we fill it and click to 

Nessus setup form fill up

Then we click on “E-mail” and an “Activation Code” will be send to our given e-mail id.

Nessus activation

Now we give the “Activation Code” and click on “Continue”, in the following screenshot we have hided our activation code.

Nessus sends activation code

Then we need to create user by creating username and password for login.

Creating username and paswsword for nessus

Then we can login. After login we see the front page of Nessus.

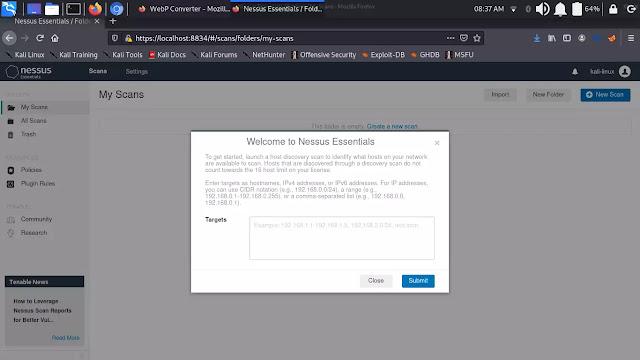
Nessus front page

Here we can submit our targets. Targets like hostnames, IP address (IPV6 or IPV4), to scan the target. We can put networks here to scan.

Similarly we can close this and click on “New Scan” to add targets, here we got lots of options as we can see in the following screenshot.

nessus new scan

From here we can scan our targets and know about it’s vulnerabilities.

Nessus is very useful for security researcher and it is very easy to use it. So in this tutorial we learned how we can install Nessus on Kali.

We can stop Nessus service on our system after using it by applying following command:

sudo systemctl stop nessusd

To start it again we can use:

sudo systemctl start nessusd

Then we just can go to https://localhost:8834 for Nessus.

Nessus also have a Paid Professional version to know about it please check this.

Love our articles? Make sure to follow us on Twitter and GitHub, we post article updates there. To join our KaliLinuxIn family, join our Telegram Group. We are trying to build a community for Linux and Cybersecurity. For anything we always happy to help everyone on the comment section. As we know our comment section is always open to everyone. We read each and every comment and we always reply.

8 Cybersecurity Tips to Stay Protected in 2022

Encryption is becoming increasingly crucial than ever. Individuals reveal more excellent sensitive details as they spend more fantastic hours on the Internet. However, this raises substantial concerns since personal information might end up in unwanted hands. This is because confidential material security is critical for both persons and corporations.

Cybersecurity Tips to Stay Protected

Cybercriminals can gain personal financial info or National Insurance numbers, and information intrusions frequently result in identification theft. Corporations that suffer an information attack risk losing their image and income. In addition, it could jeopardize their ownership.

Safeguarding personal information is crucial whether you are a company like an escape room operator or an individual. This post will go through our recommended eight cybersecurity strategies for maintaining personal data safety.

1. Save personal files frequently

Restore is a duplicate of both digital and actual files. Possessing backup is highly recommended if your documents become unavailable or corrupted because of a cyberattack. In a nutshell, it’s a catastrophic rehabilitation strategy.
It is an excellent alternative for recovering from significant information loss or malware assaults.

Save important sensitive information to a different disk, location, or device. Backups guarantee you can restore the information to its previous condition if anything unexpected occurs. If the information is updated regularly, you should periodically back up all machines that save sensitive data.

2. Make use of secure passwords

One might be inclined to use a singular password for each of your services since it is simpler to remember. But this is not suggested because attackers are likely to expect it. Create a separate passcode for every one of your accounts. You might question if someone can keep so several passwords. We don’t need to, though; instead, we use a credential manager.

It is a technology that maintains all your credentials together, and users only have to recall one password to access the others. Credential management is also helpful since it eliminates the need to take down passwords, something you must prevent at all costs.

3. Create utilization of firewalls and antiviral software

Another more effective strategy to combat cybercriminals is to use anti-virus software. It prevents spyware and similar malware from infiltrating your computer and jeopardizing all of your valuable data. Select reputable providers for anti-virus technology and put it on the device.

Barriers may likewise safeguard your information from harmful assaults. It could detect viruses, hackers, and other dangerous activity occurring on the Internet. It also determines what information may have reached the device. Macintosh OS X and Microsoft currently include firewalls, dubbed Mac Security and Microsoft Firewall, respectively.

4. Set up either two-factor login or multi-factor authentication

To supplement the usual password technique of internet recognition, use two-factor or multi-factor authentication. Usually, provide your login and password, but with two-factor authentication, users must also enter one additional authentication method, such as a Personal Identity Code. You may also use a fingerprint or an alternative password.

Multi-factor authentication increases protection by requiring fewer than three additional verification methods. For example, when users sign in to a website, customers must provide a one-time password that customers will get by smartphone or email. Putting up MFA creates tiered protection and enables unauthorized users’ extra challenges to obtain the data.

5. Understanding Hacking Scams – Be wary of emails and cell phone calls, especially pamphlets

We previously talked about phishing schemes being more dangerous than ever this year. In a phishing scheme attempt, the attacker disguises themself as someone or something other than the sender to trick the recipient into disclosing credentials, clicking a malicious link, or opening an attachment that infects the user’s system with malware, trojan, or a zero-day vulnerability exploit. This frequently results in a ransomware attack. In reality, spoofing tactics are the source of most ransom outbreaks.

6. Secure Your Identification Details

Personal Identification Information (PII) is any data that may be used to recognize or identify a person by a cybercriminal. Name, address, phone number, date of birth, Social Security Number, IP address, geographical details, and any additional tangible or digital identifying data are examples of PII. Organizations that adhere to the PCI DSS requirements should secure customer payment card information.

7. Securely Use Your Portable Device

Your portable phone is currently prey for more than 1.5 billion additional smartphone malware occurrences, as reported by McAfee Labs. These are some short mobile phone protection tips:

  • Create a Challenging Cell phone Passcode that is not your birthday or banking PIN.
  • Download Applications from Reliable Places
  • Maintain All Devices Up to Update – Hackers Take Advantage of Vulnerabilities in Unpatched Old Running Platforms
  • Avoid transmitting personally identifiable info or confidential details by text message or email.

8. Keep up to date

When security flaws are discovered, computer upgrades can be distributed. Yes, download alerts can be bothersome, but the difficulty of upgrading and resetting your system pales compared to the danger of infection with ransomware or other security concerns. Consistently upgrade your equipment to the most recent edition to secure yourself.

Author Bio: Charlotte Lin is a content creator at escaperoom.com. She’s a passionate young woman, mother to an amazing nine-year-old, and an avid reader. Over the years, writing has helped her explore and understand the world as well as her own self. She loves to travel, meet new people, and spend quality time with her daughter. You can find her on LinkedIn.

Secure GUI VPN for Kali Linux

In our some previous articles we have talked about data-privacy and VPN. If we are using Kali Linux, and we need to use a VPN for it then our this easy and short tutorial will help a lot.

Proton VPN is a Swiss based (Switzerland which has some of the world’s strongest privacy laws) Free and reliable Virtual Private Network which will give us security, privacy and freedom from Internet censorship, allowing us to access any website or content. In our this detailed guide we are going to learn how we can set the Proton VPN GUI (Graphical User Interface) application on our Kali Linux system.

protonvpn on Kali Linux

Key Features of Proton VPN

  • No activity logs
  • Open source
  • Strong encryption
  • Swiss privacy
  • Kill Switch and Always-on VPN
  • Tor over VPN
  • DNS leak protection
  • VPN Accelerator
  • NetShield Ad-blocker
  • Worldwide streaming

There was a premium feature of this VPN ($5 USD/month) with more servers and connection with a higher speed. We don’t promote this, so we suggest to go with the basic free plan. Let’s install this mighty VPN on our system.

Installing Proton VPN on Kali Linux

First of all we need to download Proton VPN’s DEB package installs the Proton VPN repository on our system. We can click here to download the DEB package of Proton VPN.

It will be downloaded on our ~/Downloads directory by default. So we need to run following command on our terminal window:

sudo apt-get install ~/Downloads/protonvpn-stable-release_1.0.1-1_all.deb

The output of the above screenshot shows in the following screenshot:

Installing proton VPN on Kali Linux

This will take some time to finish, then we need to update our system by running following command:

sudo apt-get update

After the updating is complete, we need to install ProtonVPN by running following command:

sudo apt-get install protonvpn

The above command will install ProtonVPN as we can see in the following screenshot:

installing protonvpn on Kali Linux

The installation process will not take much time. After the process is complete ProtonVPN will be installed on our Kali Linux.

Using Proton VPN on Kali Linux

After Installing Proton VPN we can see ProtonVPN on our Application Menu.

protonvpn on Kali Linux

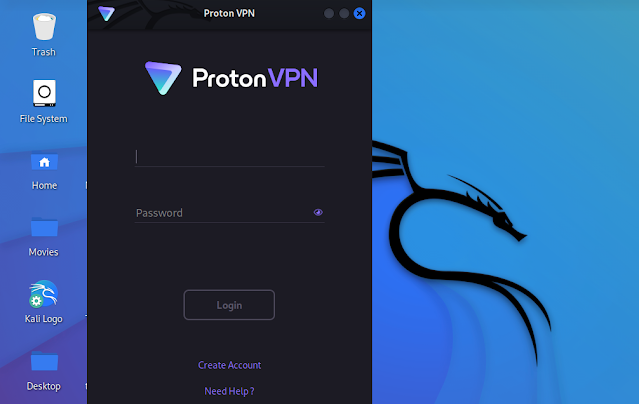
Now we need to open it, we will see ProtonVPN client as we can see in the following screenshot:

Proton VPN on Kali Linux

Here we need click on “Create Account” to create an ProtonVPN account. We just need to create a username and a password and provide our e-mail address and verify it.

Pro Tip:- We can use temp-mail services to register on Proton VPN due to maintain our privacy.

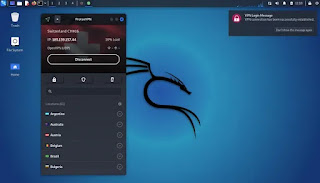
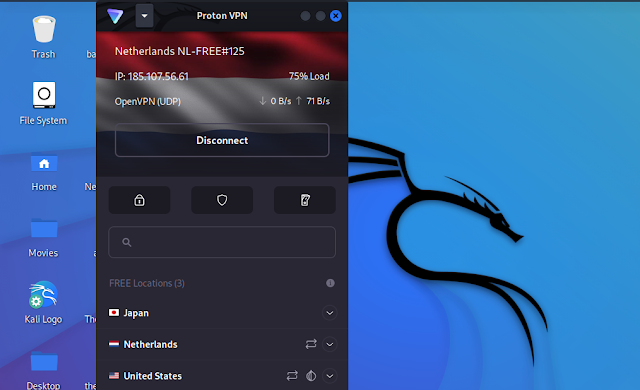
After creating an account we can login in the ProtonVPN client application on our system, then connect it and use it as simple as shown in the following screenshot:

Proton VPN running on Kali Linux

Now it is very easy to use. We don’t need to remember commands or configuration files like other VPNs for Kali Linux. This is quite simple like any mobile VPN application.

In this article we learned how we can simply use VPN apps on Kali Linux, Proton VPN on Kali is very simple and easy to use. The above method can be applied for other Debian based Linux distributions like Ubuntu, Linux Mint and Elementary OS etc.

Love our articles? Make sure to follow us on Twitter and GitHub, we post article updates there. To join our KaliLinuxIn family, join our Telegram Group. We are trying to build a community for Linux and Cybersecurity. For anything we always happy to help everyone on the comment section. As we know our comment section is always open to everyone. We read each and every comment and we always reply.

Cybersecurity Risks of Online Betting

Due to the limited opportunities to go out and engage in typical activities before the epidemic, online casinos and best betting in play sites are becoming increasingly popular with gamblers. Most industries were successfully integrated into society’s internet use, and people maintained economic growth through more straightforward and quicker transactions than before. The benefits of internet services are also beneficial to the gaming industry, and players welcome new developments like these.

Bet on cricket online games at 1xBet
Photo by John Schnobrich on Unsplash

Despite the enormous success several sectors have had using the internet; there are always risks and concerns for all users. One of the primary targets of cyberattacks is the gaming sector, and numerous people have fallen prey to countless shady scams. Make sure you are aware of some cybersecurity concerns if you intend to utilize online betting sites for your gambling to avoid making poor choices. Bet on cricket online games at 1xBet can be considered much safer then other betting sites.

Risks to Online Betting Sites’ Cybersecurity

Operators of online casinos are aware of these issues and take all necessary precautions to safeguard their clientele and business. They will make sure to act quickly so as not to miss any ongoing updates to cyber threats. Here are some more specifics regarding the dangers of online betting sites’ cybersecurity.

Multiple Threats with High Risk

Companies that build within their verticals tend to produce their software quickly, frequently resulting in data breaches. Data breaches are terrible for a business, as they harm its reputation and bottom line.

Cybersecurity dangers and other significant hacking activities target online casinos as simple targets every hour. The software technicians must give these attacks many facets, careful thought, planning, and attention to detail.

Attackers will attempt to exploit hashing algorithms and random number generators to boost their odds of winning at slots. Ideological groups may potentially attempt to harm your company. Hackers also target your customer database and clientele, two crucial components of an online bookmaker’s operation.

Pen Testing on Online Betting Sites

Moving parts necessary for an online betting site operation include customers, reliable systems from game creators, physical infrastructure providers, their systems, and other crucial elements. This indicates that your business has a lot of components with a high potential for cybersecurity concerns. You should secure yourself against them essentially.

Penetration testers are typically hired by online bookmakers and third-party service providers to audit and check their systems every few months. Many operators use chaos engineering to ensure that hackers cannot access sensitive data. Pen testers can evaluate an open gambling platform, including mission-critical services’ DDoS mitigation and third-party endpoints.

Experts will confirm the Payment Card Industry Data Security Standard’s compliance and legal responsibilities. Error messages might leave behind malicious inputs and crumbs, which can be used as a jumping-off point by pen testers to identify attackers who aren’t inside the boundaries of the online betting site.

A machine detects abnormal behavior

An online betting site’s training and interface use streams of data to recognize betting patterns, spin frequency, pointer movement, and other information required for clean transactions and a high level of cleanliness for its users. This provides the advantages of a massive attack to toggle winning spins in the event of a considerable exploit to online betting sites.

When suspicious activity is discovered, they can raise the alert right away. Additionally, it can immediately halt all correspondence with the current player and send the proper responses, such as an email, account blocking, or the dispatch of a representative to assess the matter personally. Every owner of an online betting site should be aware that disabling security and monitoring features is a crucial component of a thorough cybersecurity engineering approach.

Quickness and security

High-security startup costs would be included in a typical online betting site’s budget. Operators connect with various game suppliers and select from those that have undergone a rigorous review. In Pre-match bets online kabaddi the game application works really well and maximize the security in-game.

Independent reviews of online bookmakers are in their advanced stages and complement the engineering teams. Operators of online betting sites must undergo independent audits in every jurisdiction to avoid paying hefty fines for failing to protect their customers’ data.

These measures will reassure gamblers that their money is secure from cybersecurity concerns and will give them peace of mind. Additionally, this will result in better business for the operators and additional gaming options for the players.

Conclusion

Casinos and online bookmakers are taking every precaution to avoid client loss and cybersecurity threats. The possibility of these cybersecurity developers also grows as business owners attempt to invest extensively in their cybersecurity policies and safeguards. They must constantly remain vigilant and update their systems to reflect the most recent advancements in cybercrime.

These professional cybersecurity companies supply their services to preserve the worldwide reputation of online casinos and sportsbooks. They can also offer their services to other institutions targeted by cybercriminals, like banks, schools, and other governmental bodies.

HTTrack — Make any Website Offline

HTTrack is a free tool that can clone an entire website. HTTrack allows to download any website in local folder. It comes pre-installed in Kali Linux.

HTTrack copies all the website including HTML pages, images, directories, links, structures from the server to our system’s drive. It make a page by page copy of an website. That we can visit the website offline. This helps penetration testers a lot. When we don’t have to study a a website’s content in short time then we can save it on our local drive for reading in future.

httrack copy website in kali linux

HTTrack has two versions one is command line (CLI) another is graphical based (GUI). In our this detailed post we will talk about these both.

HTTrack

HTTrack comes with Kali Linux full version or we can install it on Kali or other Debian based distro by using following command:

sudo apt-get install httrack

After the installation process done we can copy an website to copy a website we use following command:

httrack https://site_ur -O /home/user/directory

The above command will clone the example website on our required directory. Then we can browse it’s index page from our local disk.

Otherwise we can just use httrack command to run it on interactive mode:

httrack

Then it will as us the project name as we can see in the following screenshot:

httrack run and project name

Here we can enter our project name as we wish. Then we press return or enter key and it will ask for path to save the cloned offline website. We can choose any path on our system or simply press Enter key to use default path i.e /home/kali/websites

choosing path for httrack

Here we need to put the URL of websites. We can clone multiple websites by entering their URL’s separated by comma or blank space. For an example we are going to clone the blog of re4son and we put the URL as we can see in the following screenshot:

making offline copy of a website

We press return and we get some other options.

  1. Mirror Web Site(s)
  2. Mirror Web Site(s) with Wizard
  3. Just Get Files Indicated
  4. Mirror ALL links in URLs (Multiple Mirror)
  5. Test Links In URLs (Bookmark Test)

We can choose any number as per our requirements here for an example we just mirror a website so we choose 1 and press Enter .

Then we need to set a proxy we don’t using any proxy here so we simply hit Enter.

Now it will ask for define wildcards we also don’t need any special wildcards so we press Enter again for none.

Then we can choose manual options here we can type help for options but we hit Enter again to skip it.

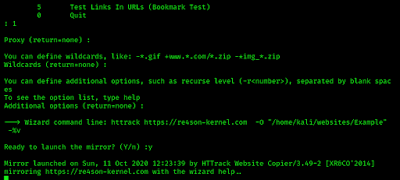
Now we are ready to mirror or clone the website. HTTrack asks that we are ready or not to lunch the mirror process here we press y for yes and hit Enter.

Then our cloning process will started as we can in the following screenshot:

Mirror a website

Here it will take some time depending how big website we have chosen and our network speed.

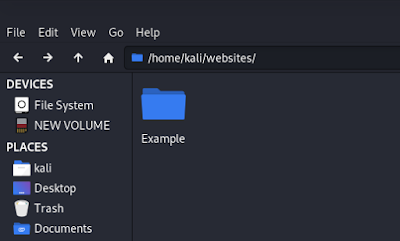
After completing the process we can see offline copy of our website in our local directory /home/kali/websites

httrack offline copy

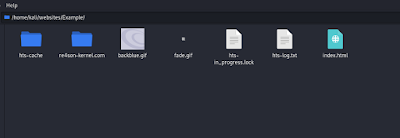
Then inside of our project directory (Example was our project name) we got the website’s offline copy.

offline copy of our website

We can open the index.html file on any browser to access the offline website.

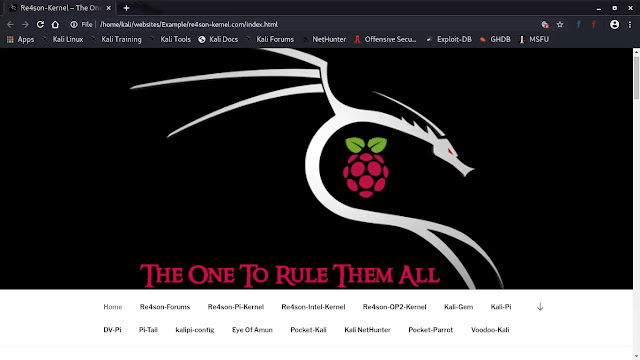
In the following screenshot we can see the offline website is opened in chromium web browser and check the URL section to be sure that it is offline.

cloned wesite using httrack

Now this is not end. HTTrack have a GUI version let’s talk about it.

WebHTTrack

WebHTTrack is a web-based Graphical User Interface version of HTTrack. We can install it by using following command:

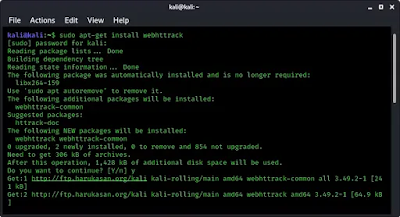
sudo apt-get install webhttrack
webhttrack installation

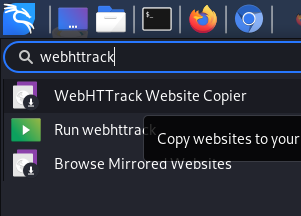
Now we can launch it by simply using webhttrack command on our terminal. Also we can start it from application menu.

webhttrack in application menu

After launching it we can see that it opens in our browser. As we told it is a web based tool. We can see it is opened in our browser in the following screenshot:

Here default language is English or we can change the language. We are alright with English so we click on “Next” Then we got something like following screenshot:

webhttrack filling details

Here we can fill the projects name, paths etc and click on next.

webhttrack url input

Here we can fill the inputs like URLs for cloning and other parameters then we click on “Next”.

Then we will be on the Start Page. Here we got the “Start” button and we press it.

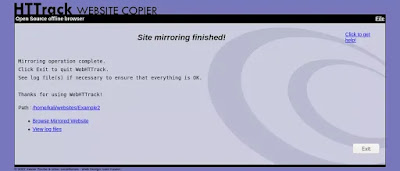
Then it will start downloading the website on our defined storage location.

completed mirroring website

From here we can see the mirrored website. This GUI based tool is very easy to use.

Now the point has came where we are going to request you to follow our social media. Like our articles? Make sure to follow us on Twitter and GitHub, we post article updates there. To join our KaliLinuxIn family, join our Telegram Group. We are trying to build a community for Linux and Cybersecurity. For anything we always happy to help everyone on the comment section. As we know our comment section is always open to everyone. We read each and every comment and we always reply.

MobSF — Mobile Security Framework on Kali Linux

In today’s detailed article we are going to install and use MobSF aka Mobile Security Framework on Kali Linux. After that we can run digital forensics test on any mobile application (Android, iPhone & Windows) and know much more about it. This will be very beneficial for digital forensics experts and ethical hackers.

Mobile Security Framework on Kali Linux

Needless to say that we are living on digital era, and attacks on our digital life comes from everywhere. Mobile devices are very responsible for that. Attackers and bad guys maximum time tries to attack on our mobile devices.

They are creating malicious applications, bind payloads on our favorite applications and creating modded applications (those are juicy) and insert spyware codes inside it.

We need to be very careful before downloading any application from a third-party websites. Sometime even we can’t trust on application stores. Apps like Stalkerware was banned from Google Play Store for spying on users.

We uses lots of mobile applications on our Android and iPhone devices. It is not possible to check every line of every third-party application we use. Sometimes we might counter with unknown application and we need to know “Is it safe ?”

In that case we can use MobSF. MobSF stands for Mobile Security Framework. We can analysis mobile applications of Android, iOS and Windows using mobile Security Framework. This automated open-source tool is created using Python3 language.

Mobile Security Framework has a Web-Based GUI (Graphical User Interface) that makes it so handy and easy. Let’s see how we can install and run it on our Kali Linux system.

First of all we need to clone it from it’s GitHub repository by using following command:

git clone https://github.com/MobSF/Mobile-Security-Framework-MobSF --depth=1

After applying this command Mobile Security Framework will be cloned on our system. It is a big tool (around 300MB) so it will take time depending on our internet speed.

Moblie Security Framework cloning github

After cloning the tool we just navigate inside it’s directory by using cd command:

cd Mobile-Security-Framework-MobSF

Now we can see the files by using ls command:

Moblile Security Framework files Kali Linux

This tool is available for Windows, Mac and Linux. Windows have setup.bat and run.bat files but Mac and Linux user can follow our article. We need to run setup.sh file.

To run the setup.sh file we run following command:

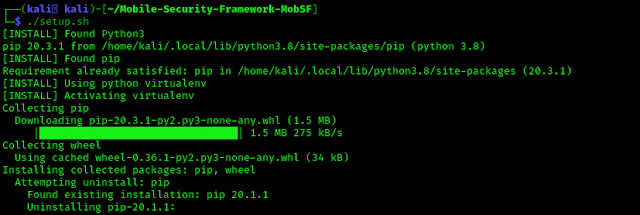
./setup.sh

This command will install all the required dependencies to run Mobile Security Framework, as we can see in the following screenshot.

Mobile Security Framework setup.sh setting up

This setting up also might take some minutes depending on our internet speed.

After the installation complete we can use this tool by using run.sh command. As we previously told that this is a web based tool so we need to run it on our localhost server. To run it on our localhost with port 8000 (we can use any other port) by using following command:

./run.sh 127.0.0.1:8000

And Mobile Security Framework will started on 127.0.0.1:8080 as we can see in the following screenshot:

Mobile Security Framework running on Kali Linux

If we run only ./run.sh command without any localhost IP and port then it will start on 0.0.0.0:8000 by default.

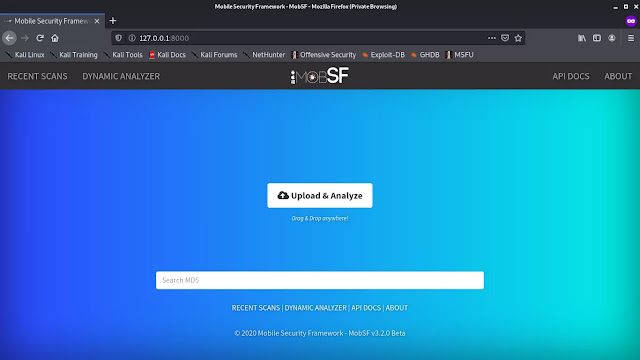
Now we can navigate to the localhost link with our browser and we can see in the following screenshot that Mobile Security Framework is running. We like the color theme of main screen.

Mobile Security Framework Home Screen on Kali Linux

Here we upload any application for mobile (APK, IPA & APPX). To upload file we can use drag & drop or click and select.

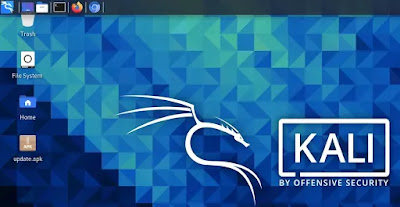
Here for an example we have an malicious APK file on our Desktop.

Malicious mobile application

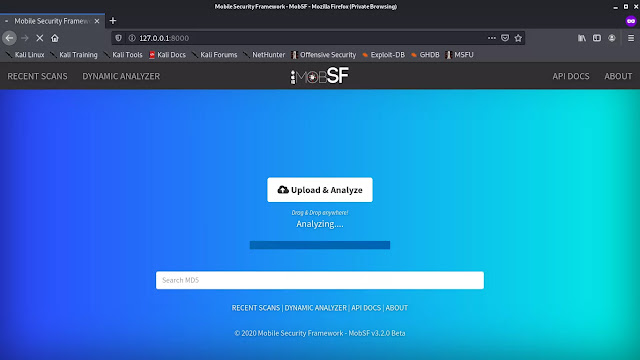
Now we drag & drop this on Mobile Security Framework and the toolkit started analy our APK file as we can see in the following screenshot:

Analysis of APK files in Mobile Security Framework on Kali Linux

It will take less then couple of minutes to analyze the application. After the analysis complete it will show us the result in front of us, as We can see in the following screenshot:

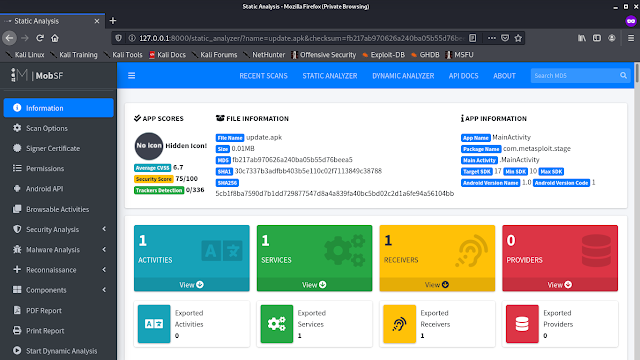
Mobile Security Framework Analysis Result

Now we can see all the results of scanning. Here we can see various scan results. We can see the file information and application information on the top & lots of other things.

We also can see de-compiled codes by using MobSF (Mobile Security Framework), as shown in the following screenshot:

De-compile section of MobSF

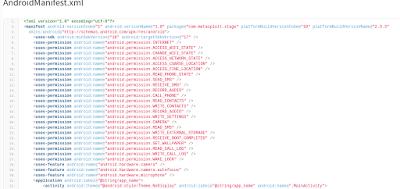
From the AndroidMainfest.xml we can see the permissions required by the application.

Mainfest.xml contains app permissions

Inside the source code we may got the Payload.java file and we have a chance to get attacker IP address from this.

These are the basics, there are lots of things to explore on this Mobile Security Framework. If we invest some time we can explore more in this awesome framework.

Mobile Security Framework is a grate tool for digital forensics on mobile applications. This is updated and very much popular among digital forensics experts and ethical hackers.

Like our articles? Make sure to follow us on Twitter and GitHub, we post article updates there. To join our KaliLinuxIn family, join our Telegram Group. We are trying to build a community for Linux and Cybersecurity. For anything we always happy to help everyone on the comment section. As we know our comment section is always open to everyone. We read each and every comment and we always reply.

Find Potential Malware on Android Apps

Android is the most popular mobile operating system in our world. It is open-source. But there are numerous malware, spyware etc available for Android. Google still have very easy policy to list any application on Play Store so we can’t trust play store blindly. Many times Google banned various applications from play store due to using malicious activities. We can’t blindly trust any brand, to be totally safe we need check every app our self before installing it on our phone.

Droid Detective Find Potential Malware on Android Apps

That’s what DroidDetective does. It’s a machine learning malware analysis framework for Android apps. DroidDetective written in Python and it is used for analyzing Android applications (APKs) for potential malware related behavior and configurations. When provided with a path to an application (APK file) Droid Detective will make a prediction (using it’s ML model) of if the application is malicious.

Key Features of DroidDetective:

Some main features of DroidDetective is following:

  • Analysing which of ~330 permissions are specified in the application’s AndroidManifest.xml file.
  • Analysing the number of standard and proprietary permissions in use in the application’s AndroidManifest.xml file.
  • Using a RandomForest machine learning classifier, trained off the above data, from ~14 malware families and ~100 Google Play Store applications.

Install DroidDetective on Kali Linux

Now without wasting much time we are going to install DroidDetective on our Kali Linux system. First of all we need to clone DroidDetective’s GitHub repository by using following command:

git clone https://github.com/user1342/DroidDetective

In the following screenshot we can see the output of the above command:

clonning droiddetective from github

After that we need to go inside the DroidDetective directory by using following command:

cd DroidDetective

Now we need to fill up all the requirements to run this tool by using following command:

pip3 install -r REQUIREMENTS.txt

The following screenshot shows output of the above commands:

installing requirements for droiddetective

Now our installation process is done. It’s time to find potential malwares our Android applications.

Using DroidDetective on Kali Linux

First we need to have a APK file to test using DroidDetective. We have an APK file named browser.apk on our Desktop directory so we need to apply following command to start analyzing it:

python3 DroidDetective.py /home/kali/Desktop/browser.apk

We can see the output for the above command in the following screenshot:

droiddetective detects android malware

That was a malware and DroidDetective found that there is some suspicious things within this malware. We can also saves the output in a json file by usng following command:

python3 DroidDetective.py /home/kali/Desktop/browser.apk output.json

This is how we can find if there is any malware or other malicious things inside an APK file.

Something More

During the testing we noticed that some APK which doesn’t contain malicious things also get detected by this tool due to misconfiguration or for some permission requirements. We need to take care of this. Someone familiar with Android development can easily figure out what’s wrong using DroidDetective, they doesn’t need to read the whole program.

To know more about how DroidDdetective’s pre-trained model works to find malware we can go to ashisdb’s repository. More information we can see at DroidDetective GitHub repository.

Love our articles? Make sure to follow us on Twitter and GitHub, we post article updates there. To join our KaliLinuxIn family, join our Telegram Group. We are trying to build a community for Linux and Cybersecurity. For anything we always happy to help everyone on the comment section. As we know our comment section is always open to everyone. We read each and every comment and we always reply.

Lynis — Security Audit on Unix or Linux System

Lynis is a free open-source security auditing tool for systems based on UNIX like Linux, macOS, BSD, and others. It performs a security scan and runs on the system itself.

In this tutorial we learn how we can scan our Linux (read Kali Linux) system to fix it’s vulnerability and know is there any malware in our system.

Lynis is created by Michael Boelen, Michael Boelen is the creator of Rkhunter.

Lynis on Kali Linux

Lynis is created for in-depth security scan on internal system and give tips and suggestion. This tool is very useful for auditors, security specialists, penetration testers, and sometimes system/network administrators.

Key Features of Lynis

The main goals are:

  • Automated security auditing
  • Compliance testing (e.g. ISO27001, PCI-DSS, HIPAA)
  • Vulnerability detection

Lynis (also) assists with:

  • Configuration and asset management
  • Software patch management
  • System hardening
  • Penetration testing (privilege escalation)
  • Intrusion detection

Install & Update Lynis in Kali Linux

Lynis comes pre-installed with Kali Linux full version or we can install/update it by using following command:

sudo apt-get install lynis

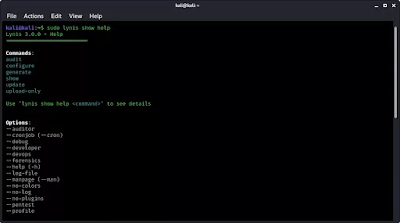
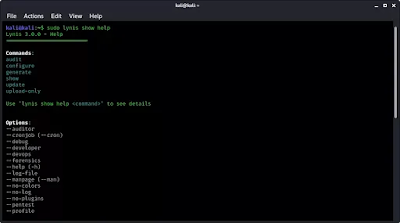
After this we can see help options of lynis by using following command:

sudo lynis show help

We can see lynis help menu in the following screenshot:

lynis help menu

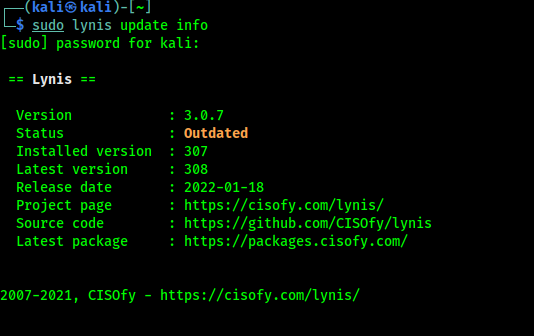
Now we can check if our Lynis is updated or not? To do that we use following command:

sudo lynis update info

The output of the command in following screenshot:

lynis update information on Kali Linux

In the above screenshot we can see that our Lynis (version 3.0.7) comes with Kali Linux is outdated. So we clone it directly from it’s GitHub repository by using following command:

git clone https://github.com/CISOfy/lynis

After the cloning process complete we go to lynis directory by using cd command:

cd lynis

From here we can run lynis. We check the update information here by using following command:

./lynis update info

In the following screenshot we can that we got the updated Lynis.

lynis updated information

Yes, now we got the latest version 3.0.8. Now let’s use it.

Using Lynis in Kali Linux

We can use Lynis to audit our local system and remote system. We also can analyze Docker files using Lynis. For an example we just scan our Kali Linux system for now. 

Before starting the audit to get better result we run some services on our system.

Here we start our Apache web server, Mysql databases and ssh services. To start them we need to run following three commands on terminal:

sudo service apache2 start
sudo service mysql start
sudo service ssh start
Starting services in Kali Linux

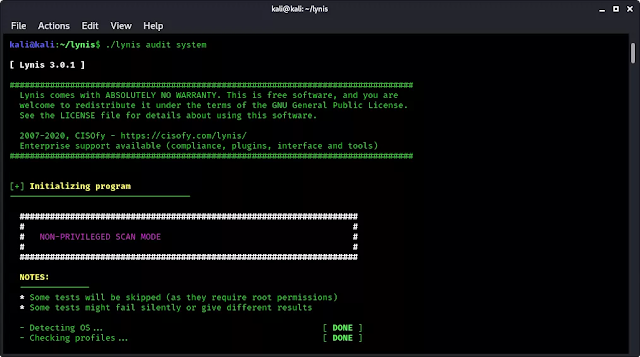
Now we are ready to run audit on our system. To perform a scan/audit we need to run following command:

./lynis audit system

After this the auditing will run. This will take just around a minute depending on system’s performance.

lynis system audit

Now our above audit was a non-privileged scan. Means we don’t give it root permission. But whenever we scan without root permission the auditing process will not scan the root system. So if we need we can perform the audit with root by using following command:

sudo ./lynis audit system

Then it will ask us the sudo password and then we need to confirm the process by pressing “Enter”.

To scan a remote host we can use following command:

./lynis audit system remote <ip of host>

Analyzing Results

Now we analyze the results of our auditing. So our report-data is shown in our terminal and also it stored in /var/log/lynis-report.dat file.

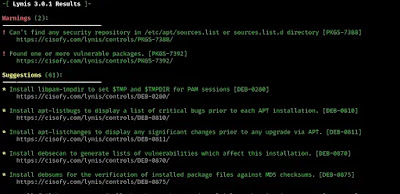
The following screenshot shows the results of Lynis audit:

lynis result

In the above screenshot we can see Lynis gives us some warnings and lots of suggestions to make our system safer and secure.

All the issues carries a ID like we took a PHP error warning’s ID is [PHP-2376].

lynis found a PHP error

Now to know more about this warning and how to fix it we can the given web link or see this ID’s details by using following command:

./lynis show details PHP-2376

Here Lynis gives us the solution how we can fix this error, we can see the highlighted area in the following screenshot:

lynis php error solved

When Lynis starts scanning our system, it will perform auditing in a number of categories:

  • System tools: system binaries
  • Boot and services: boot loaders, startup services
  • Kernel: run level, loaded modules, kernel configuration, core dumps
  • Memory and processes: zombie processes, IO waiting processes
  • Users, groups and authentication: group IDs, sudoers, PAM configuration, password aging, default mask
  • Shells
  • File systems: mount points, /tmp files, root file system
  • Storage: usb-storage, firewire ohci
  • NFS
  • Software: name services: DNS search domain, BIND
  • Ports and packages: vulnerable/upgradable packages, security repository
  • Networking: nameservers, promiscuous interfaces, connections
  • Printers and spools: cups configuration
  • Software: e-mail and messaging
  • Software: firewalls: iptables, pf
  • Software: webserver: Apache, nginx
  • SSH support: SSH configuration
  • SNMP support
  • Databases: MySQL root password
  • LDAP services
  • Software: php: php options
  • Squid support
  • Logging and files: Syslog daemon, log directories
  • Insecure services: inetd
  • Banners and identification
  • Scheduled tasks: crontab/cronjob, atd
  • Accounting: sysstat data, auditd
  • Time and synchronization: ntp daemon
  • Cryptography: SSL certificate expiration
  • Virtualization
  • Security frameworks: AppArmor, SELinux, security status
  • Software: file integrity
  • Software: malware scanners
  • Home directories: shell history files

Conclusion

We can check the configuration flaws in above wide categories. Many tests are part of common security guidelines and standards, with on top additional security tests. After the scan a report will be displayed with all discovered findings.

Lynis also have a more useful paid version. To know pricing and more please check here.

Here we can see how we can fix issues with our system. Lynis also able to find malwares in our system. This tool is very useful for protecting a Unix based system. This is how we can do a security audit on Kali Linux using Lynis & make our system secure.A safer system for a safer world.

Liked our tutorial then follow our blog from the right-sidebar using e-mail id. Also we are in GitHub and Twitter. We post updates there.

For any problem or question please feel free to comment down below we always reply.

AnonX — Anonymous and Encrypted File Sharing

There are many ways to share files anonymously. Previously we talked about Utopia (P2P file share and encrypted mail). But here AnonX is bash & Python script to share files anonymously in an encrypted way (AES-256-CBC encryption).

AES-256 is a very strong & advanced encryption method, cracking this encryption using advanced computers would take billions of years to break.

AnonX is an encrypted file uploader and downloader. The uploaded archive lasts for one week and shall remove from the server. AnonX encrypts (AES-256-CBC encryption) the directory before uploading it to the server. The download function requires the download ID and AES password to successfully download and decrypt the archive. Maximum upload size in AnonX is 2 GB.

anonymous file sharing using anonx

AnonX is created by Suleman Malik and it is inspired from transferwee. This script is hosted on GitHub, so we clone it by using following command on our Kali Linux terminal:

git clone https://github.com/samhaxr/AnonX

It will be cloned on our system, as we can see in the following screenshot:

anonx clonning from github

Then we go to the directory by using cd command:

cd AnonX

Here we get our bash script called Anonx.sh. Before run it we need to give it executable permission by using following command:

chmod +x Anonx.sh
anonx exetuable permission

Now we can run this tool by using following command:

./Anonx.sh

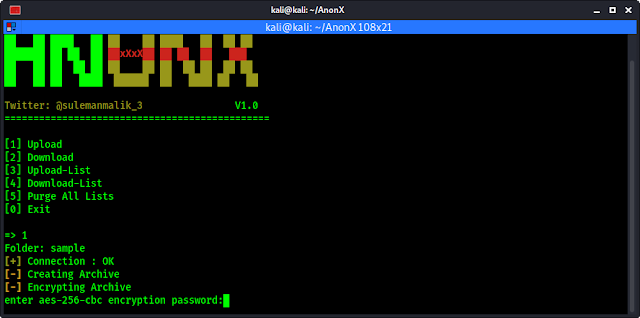
Then the main menu of this tool will come front in us, as we can see in the following screenshot:

Anonx main menu

Here we can see options for Download and Upload files. We also got options to see the lists of download and upload.

First we upload a file using upload. To do that we choose “1” and press Enter ⤷.

Anonx prompt for folder name

We can see that AnonX prompt for folder name, before putting folder’s name here we need to move our folder to the AnonX directory, in the following screenshot we can see that we have put our folder in the tool’s directory.

Anonx directory containing folder to be upload

We have a put a folder called sample for just showing an example. Here we need to remember that all files in the folder will be archived, so larger files may took some time. Then we type the name of the folder in the AnonX where it asked us for the folder name.

Anonx prompted for password to encrypt the folder

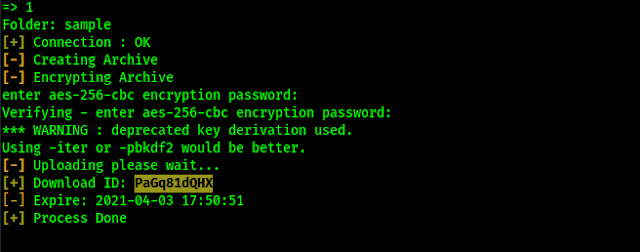
Then it will process the files (archive it) and encrypt them. We need to put a password to encrypt the folder. We can choose our password as we wish and re-type it to verify the password.

After that folder will be uploaded and we got a download ID (PaGq81dQHX, in our case) for this file. We can use this ID when we want to download the file or we can send this ID to that person who wants to receive this file.

Anonx folder uploaded

We can send sensitive data this way to anyone. The receiver just need the Download ID to download the file and the password we set to decrypt the encrypted file.

We can see our upload list by pressing 3 and Enter ⤷ in the main menu of AnonX.

anonx upload list

In the upload list we can see our uploaded folders with download ID, upload date, expire date and folder name.

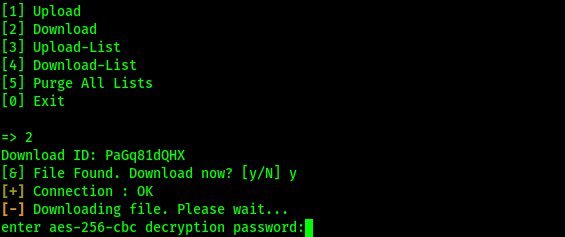
When we are going to download it we need to choose option 2 and press ⤷.

Here we will be asked to put the download ID for the file.

Anonx download ID for the file

Then it prompts for download file. We need to press y for yes.

anonx prompts for download

After that AnonX will download the folder and when the will be complete it asks for the password we used when we encrypted the file.

anonx prompts encryption password to decrypt it
AnonX prompts for encryption password to decrypt it

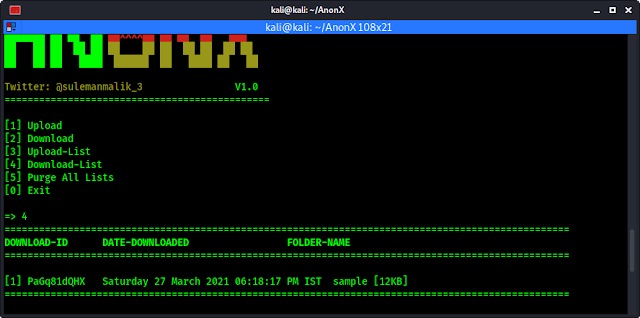
After putting the encryption password we got the folder. In the following screenshot we can see the download list that we have downloaded the folder.

anonx downloaded the folder

The download folder also stored in the AnonX directory.

In this way we can share encrypted files and folders anonymously. For a batter security we need to choose a complex & non-dictionary password. Although AES 256 is a very strong encryption.

AES 256 is virtually impenetrable using brute-force methods. While a 56-bit DES key can be cracked in less than a day, AES encryption would take billions of years to break using current computing technology.

Official Video Tutorial for AnonX


Love our articles? Then, make sure to follow us on Twitter and GitHub, we post article updates there. To join our KaliLinuxIn family, join our Telegram Group. We are trying to build a community for Linux and Cybersecurity. For anything we always happy to help everyone on the comment section. As we know our comment section is always open to everyone. We read each and every comment and we always reply.

Open Whatsapp chat
Whatsapp Us
Chat with us for faster replies.