CyberArk

How To Secure Our Kali Linux System To Ensure Our Protection

Kali Linux is an open-source Debian based Linux distribution which mostly used for offensive security. Previously known as Backtrack Linux this Linux distribution is a symbol of security itself. Kali Linux used by penetration testers around the world. It also used by cybersecurity students to practicing penetration testing and stuff. But to run Kali Linux with the default settings may be a bad idea.

Why? Because default settings are easy to crack and Kali Linux is not a privacy focused distribution (like Tails OS), Kali is created for attacking not for defending. Security is a huge concept. Most people use Kali to test security, but it’s also very important to secure the Kali itself. Because it is based on Debian we got good security. But what if we need more security?

How To Secure Our Kali Linux System

In this article we are going to discuss how we can improve the security of our Kali Linux system. Running Kali Linux with the default settings is not be a good idea.

Change the Default Password

If we are using older Kali Linux versions (older then 2020.1) then our default credential is “root” “toor“. If we have newer Kali Linux versions then the default credential is “Kali” “Kali“. We need to change it ASAP. It’s easy. We need to run following command on our Kali Linux terminal:

passwd

This simple command will ask us the current user’s password (default if we don’t change it already). Then it will prompt for a new password and again it will verify it. A good password should contain both uppercase and lowercase letters with scrambles of symbols and numbers. After verifying the password our password will be changed. We can see it on the following screenshot:

password change in Kali

We need to remember that our typed password will not displayed for security reasons.

Unprivileged User Account

Previously root user was Kali’s default user. Now things are changed after Kali Linux 2020.1 update. Now Kali’s default user is non-root user account.

An unprivileged user stands directly below the main admin user which have all the root permissions. Similarly to family and parental accounts.

We can even use a root user directly on our system, but it will not good for security reasons. We must not use root user always.

Updating Kali Linux Frequently

There are lots of versions of Kali Linux. Kali Developers releases a new version in every quarter. Updated versions of Kali comes with upgraded kernels. For being a rolling distro Kali Linux doesn’t need to be download ISO image and again install it during update. We just need to apply some commands to install the update. Follow us to get notified when the update comes.

Also we must update and upgrade our Kali Linux after some days by using following command:

sudo apt update -y && sudo apt upgrade -y

The conclusion is we need to update & upgrade Kali Linux frequently and update the distribution whenever it release.

Changing the Default SSH Keys

Secure Shell or SSH is a network protocol. It uses to communicate computers securely. As we’re on this page via web, we are already using some kind of SSH. There are no way around it but to fix present or upcoming security issues. Even for distros we use, there are SSH keys that let us verify authentic files from a source.

It may looks everything is fine and cool but the problem is for everyone there are the same keys. Let’s understand it on this way. If we download a software from a website, it is the same distribution copy that everyone downloads it. Later we use our accounts with the software for a personalized way, and the service provider gives adequate power according to the subscription under those accounts. SSH keys have quite same fundamentals but those are used to verify files.

If a bad guy did a Man-in-the-middle (MITM) attack or a social engineering campaign it may drain our security.

SSH gives us capability to authenticate without inputting passwords every single time. There are two types of SSH keys. One is public and the other one is private. We need to change the our public SSH keys, because every distro have the same, and generate a private key will make sure only authenticated users can access it.

SSH keys are located in /etc/ssh directory by default. This list view will shows all the keys inside. Instead of deleting them from the database, we are going to store them some secure place. We use following commands to do this:

cd /etc/ssh
sudo mkdir old_keys
sudo mv ssh_host_* old_keys

Now our all old SSH keys moved to a directory named old_keys.

backup of ssh keys on old_keys directory

 Now we generate new keys by using following command:

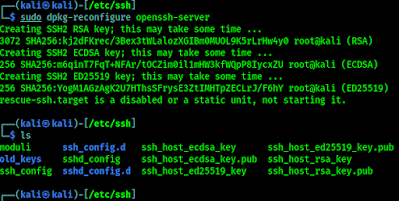
sudo dpkg-reconfigure openssh-server

This command will generate new SSH keys for us. As we can see in the following screenshot.

New SSH keys are generated

If we faced any problem then we can use our backed up SSH keys.

Save our Identity

During surfing the internet with a Kali Linux machine, we can use the “NIPE” or “kalitorify” tools to browse safely and anonymously. Even though “macchanger” is recommended to spoof our Mac address. We also advice to change our hostname from Kali to a nameserver, and add a host similar to 8.8.8.8.

Monitoring Logs

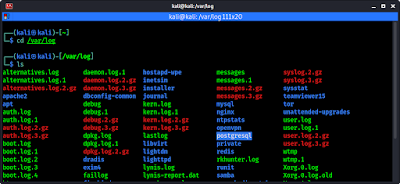
Analyzing the logcheck program can be a real life saver. It can send logged messages directly to admin’s email. Log files are locally stored inside “/var/log” by default.

logs in Kali Linux

Using top (built right into the system) or htop (sudo apt install htop) tool shows us real-time monitoring activity. Even the xfce4-taskmanager graphical tool can perform similar actions.

htop on Kali Linux

Scanning for Malware and Rootkits

We also need to scan our system frequently for malwares and rootkits. We can run the scan by using “Chkrootkit” or “Rkhunter” tool kits. We have discussed about this topic some days ago in details (Find & remove rootkits from Linux). So we don’t think we have to repeat it. These tools are like anti-malwares for Linux systems.

Extra Talks

Although Kali Linux is created for attacking purpose it is quite secure environment itself. But advanced users goes above and beyond for daily tasks and it is necessary to follow proper procedures. New users coming from other operating systems like Windows may think just running Kali Linux inside VMWare or VirtualBox is the safest process. It is quite true but certain steps must be taken.

Hope this article helps our fellow Kali Linux users. Love our articles? Make sure to follow us on Twitter and GitHub, we post article updates there. To join our KaliLinuxIn family, join our Telegram Group. We are trying to build a community for Linux and Cybersecurity. For anything we always happy to help everyone on the comment section. As we know our comment section is always open to everyone. We read each and every comment and we always reply.

How to change Lock Screen Background on Kali Linux XFCE

Linux is powerful and open-source and build for customization. It means we can change everything on Linux as per our need. In this article we are going to change our Kali Linux (XFCE4) lock screen background and give it a personal touch. This will be very interesting so stay with us to the end.

Change login screen of Kali Linux

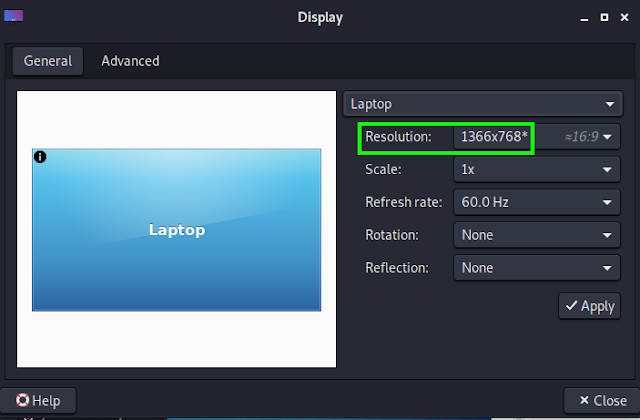
First we need to know what is our display resolution. Various PC have various resolutions. We can easily find ours by navigating in the App Menu > Settings > Display.

Display Settings on Kali Linux Menu

After opening the display settings we can easily see resolution of our display. As we can see in the following screenshot:

Display resolution on settings

We can see that our display resolution is 1366×768 pixels. So our background screen also need to be in the same resolution.

Here we need to create an image with 1366×768 size. Or We can find it on Google, or other websites.

1366x768 images on Google

We can choose one from them as our lock screen background. We always check the property of image by right clicking on it and check it’s resolution.

image properties

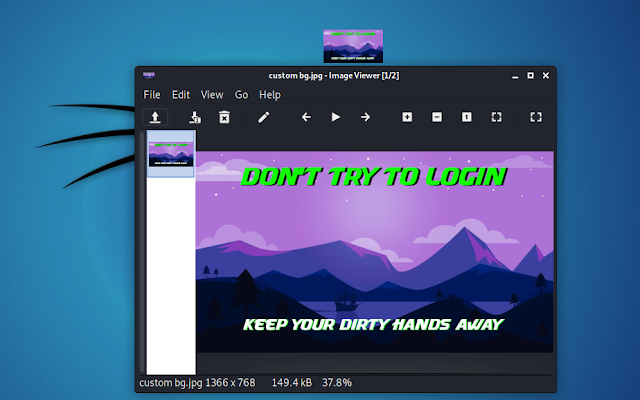
For making it more attractive and personalized we added a text on the image by using GIMP image editor (Photoshop alternative for Linux, sudo apt install gimp), Shown in the following screenshot:

customized image for lock screen background

All set now we need to set this 1366×768 image as our Kali Linux background. Here we need to know the location of this image, means the full path of the image. We can see it on image properties again.

path of the image

We can see the location of the image is /home/kali/Desktop (We stored it on Desktop for example we can choose any location to save it). So the images full path will be /home/kali/Desktop/custom-bg.jpg . Now we need to open our terminal window and type following command to save our previous background image in a different name:

sudo mv /usr/share/desktop-base/kali-theme/login/background /usr/share/desktop-base/kali-theme/login/backgroundcopy

This command will rename our current lock screen background. Then we can set our customized image as a lock screen image by applying following command:

sudo ln -s <image_full_path> /usr/share/desktop-base/kali-theme/login/background

In our case our <image_full_path> is /home/kali/Desktop/custom-bg.jpg, so we use this on our terminal, as we can see in the following screenshot:

Kali Linux Lockscreen background changed

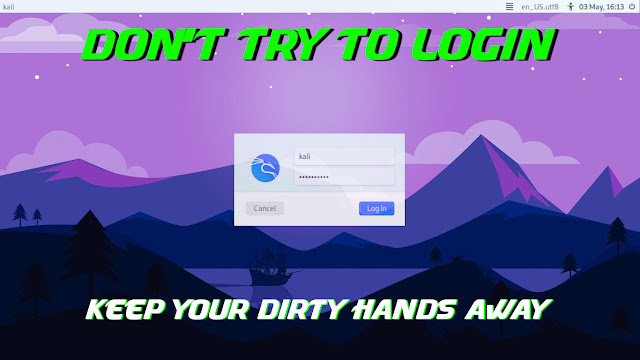
That’s it ?. We had successfully changed our lockscreen image or locj screen background on our Kali Linux system, we can do the same for any XFCE based Linux distro. To see the effect we just need a reboot or log out. In the lock screen we can see our edited and customized login screen image in the background.

Kali Linux customized Login Screen

Here we got our customized login screen. We can do anything if we have a little image editing knowledge, we just need to keep in mind that our background screen must need to be in our Display Size (1366×768 in our case).

Here if we want then we can change the user image (Kali Linux logo on above screenshot). To do this we need to go to Kali Linux settings.

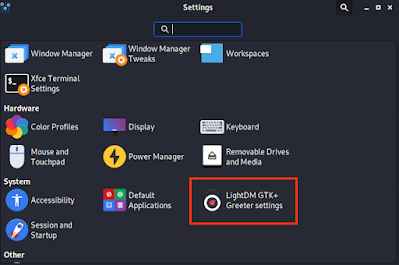
Kali Linux settings

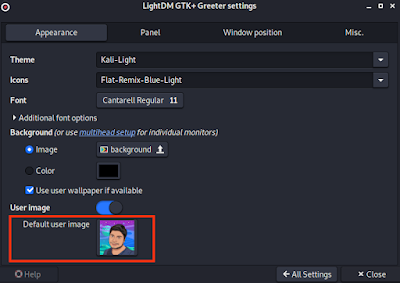
Then we need to navigate into LightDM GTK+ Greeter Settings options (marked in above screenshot). Then in the next window we can change our user image, shown in the following screenshot:

Changing User Image
For better results we should use a square PNG image

This is how we can change the login screen background on our Kali Linux or any other XFCE based Linux Distro.

This article is written by Koushik Pal.

Love our articles? Make sure to follow us on Twitter and GitHub, we post article updates there. To join our KaliLinuxIn family, join our Telegram Group. We are trying to build a community for Linux and Cybersecurity. For anything we always happy to help everyone on the comment section. As we know our comment section is always open to everyone. We read each and every comment and we always reply.

Rootkits

Searching for Rootkits on Kali Linux using Chrootkit & Rkhunter

What is Rootkit ?

Rootkit is a malicious software that allows an unauthorized user (read attacker) to get access to a system and to its restricted software. Basically, rootkits are a type of malware that designed to be hidden on our computer. We didn’t notice it, but it will be active. Rootkits give the ability to remotely control our computer to cyber criminals.

Rootkits may contain a number of tools, malicious programs that allow attackers to steal our passwords to modules that make it easy for them to get our credit card information or online banking information or even our secretly stored data. It also contain keyloggers, credential stealers etc.

remove rootkits using rkhunter and chkrootkit on Kali Linux

“Rootkit” is combined from of two words – “root” and “kit”. Here “root” refers to the administrative account with full privileges on the computer system and “kit” refers to the program/code that allows the attacker to obtain unauthorized access.

In our Kali Linux, we can install various open-source tools to avert our systems from rootkits. Here we talk about two most famous open-source software “chkrootkit” and “rkhunter”. We can install them our our Kali Linux or any other Linux distro and checks for rootkits on our computer (If we are working on Virtual environment on Linux then it only can detect rootkits only in the virtual system).

Chkrootkit

Chkrootkit can be run on Linux systems to determine if rootkits exist on the system, based on signatures and processes. Think of it as antivirus or anti-malware for Linux systems.

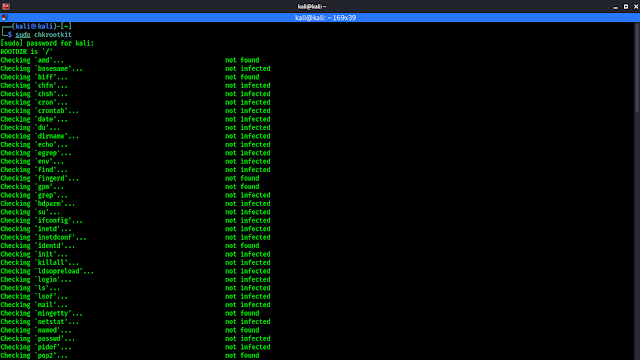
Chkrootkit is a simple program that can ensure our Kali Linux has not been infected. We can also run chkrootkit on other Linux distributions by installing it on those systems, it usually comes with almost every Linux distributions including Kali Linux. On our Kali Linux system we need to run following command to start the chkrootkit and scan for rootkits.

sudo chkrootkit

It will prompt for our sudo password then will start scan on our system, as we can see in the following screenshot:

chkrootkit

We can see it scans permissions of programs (most specifically third party programs), and we can see the infection status on the left table.

Rkhunter (Rootkit Hunter)

Rkhunter (Rootkit Hunter) is a Linux/Unix based tool to scan possible rootkits, backdoors and local exploits.

It does this by comparing SHA-1 hashes of important files with known good ones in online databases, searching for default directories (of rootkits), wrong permissions, hidden files, suspicious strings in kernel modules, and special tests for Linux. (Wikipedia).

According to our team members “rkhunter” is the best open-source rootkit checker for Linux, because of it’s additional functionality and also the other tools like chkrootkit is an old tool so there are many known exploits for that.

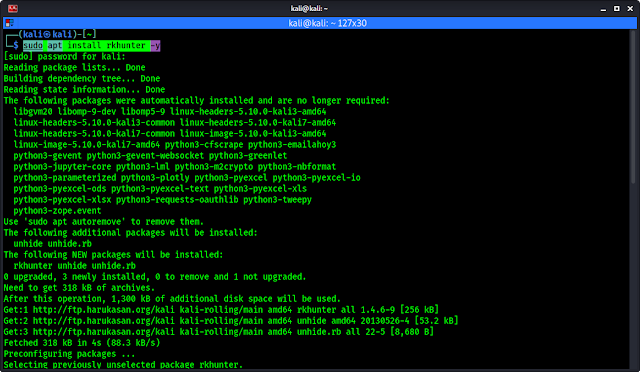
It doesn’t comes pre-installed with Kali Linux but we can install it by applying simple following command:

sudo apt install rkhunter -y

The following screenshot shows the output of the above command;

installing rkhunter on kali linux

After the installation process is complete we can run it to scan our entire system by using following command:

sudo rkhunter -c

After this it will scan our entire system in some categories, like various malware scan, known rootkit scan, suspicious port scans etc. Also, it will go through all the system files as well as third party programs in order to look for the rootkits, we can see following screenshot:

rkhunter scan on Kali Linux

We need to type “Enter”⤶ to scan next category. It will also summarize the report at the end of scanning. Also saves the output log file in /var/log/rkhunter.log.

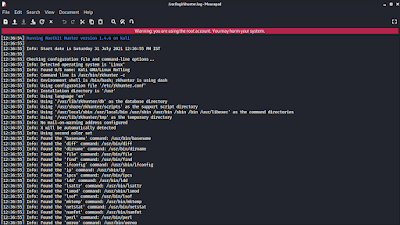
We can see the log file by entering following command:

sudo mousepad /var/log/rkhunter.log

In the following screenshot we can see the log file on mousepad text editor (we can use cat, nano, vim also to view/edit this file).

rkhunter log file on Kali Linux

This is how we can check for rootkits on our Linux system. It is very easier to scan for it.

How to Remove Rootkits / Security Warings from Linux

Well, we know that how we can check for rootkits on our Linux (Kali Linux) system. But what if we got a rootkit inside our system? How we can remove it?

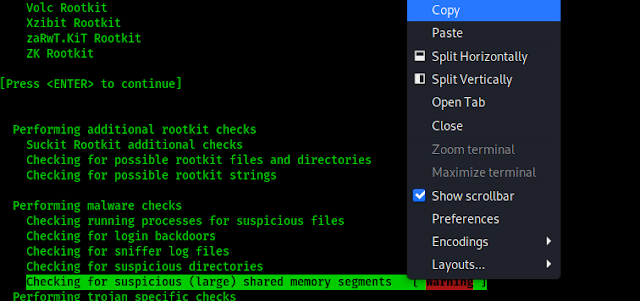
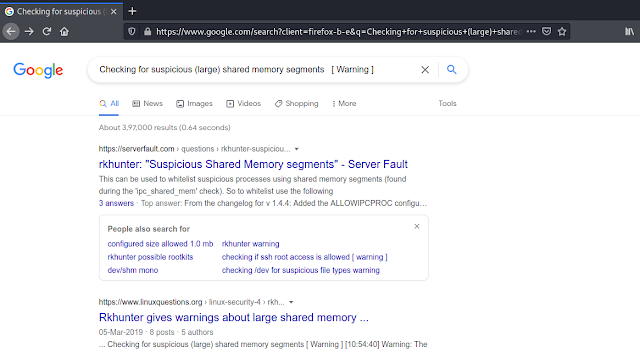
There are different methods to fix different warnings. So it is impossible cover all in one place. Here search engines can easily help us. In the following screenshot we got an warning we had copied the line.

warning on rkhunter

We just select the line and copy it. Then just press it on search engine and search it. In the following screenshot we can see that we need got some articles and forums we got about our warning. This will help us to improve our security on Linux system.

rkhunter warning remove

That’s it for today. Hope our Linux system will be more stronger now.

Love our articles? Make sure to follow us on Twitter and GitHub, we post article updates there. To join our KaliLinuxIn family, join our Telegram Group. We are trying to build a community for Linux and Cybersecurity. For anything we always happy to help everyone on the comment section. As we know our comment section is always open to everyone. We read each and every comment and we always reply.

TIDos Web Application Penetration Testing Framework

August 28, 2021 TIDos Web Application Penetration Testing Framework Tidos Framework is an open source toolkit that performs all major web application tests, such as: B. Enlightenment, scanning, enumeration, and vulnerability analysis. All tasks are performed in phases with the integrated modules. The total number of modules exceeds 100, most of which are used for …

TIDos Web Application Penetration Testing Framework Read More »

pyfiscan – web application vulnerability

August 28, 2021 pyfiscan – web application vulnerability The Pyfiscan web application vulnerability scanner can be used to locate outdated versions of popular web applications on Linux servers. For example, hosting providers monitor their users’ facilities to keep up with security updates. Fingerprints are easy to create and modify because the user can write them …

pyfiscan – web application vulnerability Read More »

Sitadel – Web Application Security Scanner

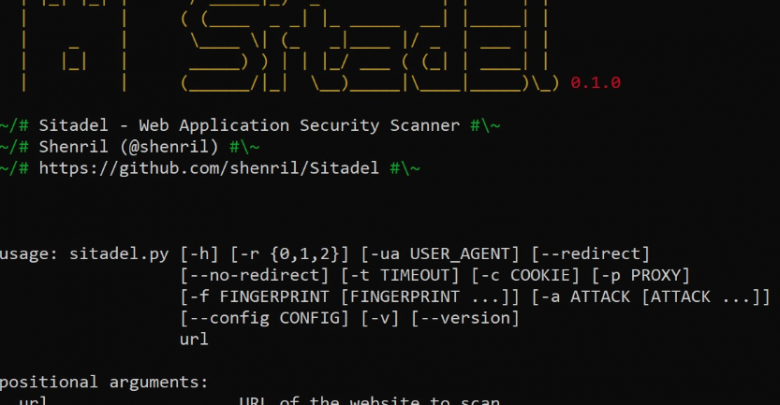
August 28, 2021 Sitadel – Web Application Security Scanner Sitadel Web Application Security Scanner is basically an update for WAScan making it compatible for python it allows more flexibility for you to write new modules and implement new features : Frontend framework detection Content Delivery Network detection Define Risk Level to allow for scans Plugin …

Sitadel – Web Application Security Scanner Read More »

Open Whatsapp chat
Whatsapp Us
Chat with us for faster replies.