Search Results for: penetration testing

Ethical Hacking: Understanding the Basics

Ethical Hacking: Understanding the Basics Cybercrime continues to grow at an astounding and devastating rate; more than 93% of organizations in the healthcare field alone experienced a data breach in the past few years (Sobers, 2021). While most people with any degree of tech acumen are familiar with criminal hackers, fewer are familiar with the…

The post Ethical Hacking: Understanding the Basics appeared first on Cybersecurity Exchange.

Manage Files using Terminal

In our previous short article we learned about the File system of Linux. In this article we are going to learn about how we can deal with files directly from our terminal window.

But did we must have to learn this? Because Kali Linux and other most popular Linux distributions comes with good graphical user interface (GUI), so why we need to learn how to something with a file from command line where we can do it just like we do on Windows system?

manage files from terminal

Well in our opinion when we are reading this on this website then we have interest on cybersecurity field. When we are dealing with an remote system (read compromising a system) we have to do it on terminal. We need to break the privileges and get into it. There are lots of things with file we need to do here (from modifying system file data to uploading shells). So we need to have at-least a basic idea to dealing with files from terminal.

Creating a File using Terminal

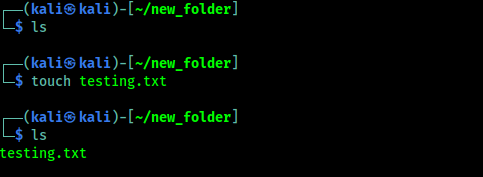
First we will learn how we can create a file on Linux terminal. We will going to use touch command. We just need to run touch filename command to create a file. As shown in the following screenshot:

creating files on Linux

Copy Files using Terminal

We can copy files/directory from a directory to another one by using terminal window. To do that we need to use cp command. Suppose we have a file on our /home/kali/desktop directory. We need to copy this file to /home/kali/new_folder directory. We use following command for that:

cp full/path/file destination/path

As we can see in the following screenshot:

copy files uding linux terminal

In the following screenshot we can see that our file is copied to our destination directory. We did this for a file only we can do the same for a folder/directory.

Moving Files using Terminal

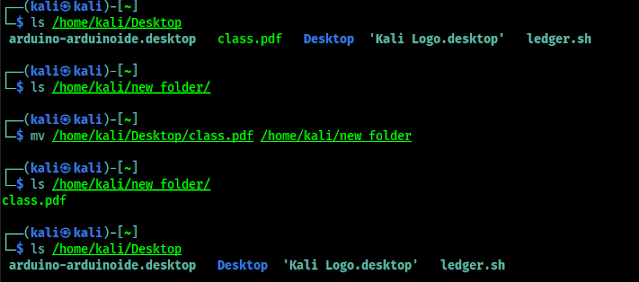
We can move a file from a directory to another directory to other directory by using mv command. This is very similar like cp command. mv full/path/of/file destination/path as we can see in the following screenshot:

moving files using terminal
Our file is moved from source directory

Renaming Files using Terminal

Basically we move a file/directory on the same directory and change the name. That is what renaming do. The mv command to change the name of a file without moving it to another directory.

renaming files on terminal
We can see that we renamed the file

Deleting Files using Terminal

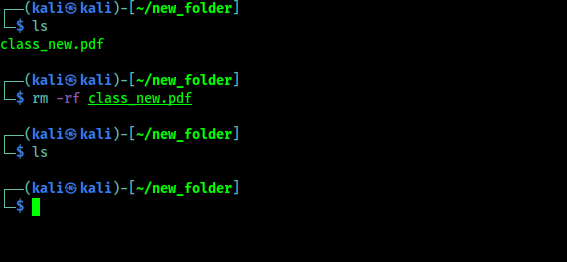
We also can delete a file directly from terminal by simply using rm command. We just need to rm filename command to delete any file. To delete a file forcefully we need to use -f flag -r flag used to remove contents recursively.

deleting file using terminal
Deleting files using Terminal

Editing Files using Terminal

Let we have take look at file editing in terminal. As we told that this is too much important to have Linux skill, especially during the pen-testing if we need access to a Linux or UNIX based OS or server.

There are some cool text editors like gedit, leafpad and mousepad, they may looks far better than command line text editors for their graphical user interface, but we will focus on terminal based text editors. Everyone might have their own favorite text editors, but here we are going to cover two most common options, Nano and Vi.

Nano

Nano is the most user friendly and simplest text editors. To open a file and start editing we simply run nano <file name>.

nano filename.txt

After the file opened we can start editing the text as we can do on any graphical user interface using keyboard. As we can see in the following screenshot:

editing text using nano text editor on terminal
Editing text using nano text editor on terminal

If we see in the bottom of following screenshot, we can see the command menu there. We need to memorize some widely used keyboard shortcuts like:

  • CTRL+O – Write changes to the file.
  • CTRL+K – Cut to Current Line.
  • CTRL+U – Uncut a line, and paste it at the cursor location.
  • CTRL+W – Search
  • CTRL+X – Exit

To know more about nano, we need to see it’s official documentation.

vi

vi is very powerful text editor with it’s lightning speed, especially  when it comes to automated repetitive tasks. However, it has a relatively sleep learning curve and is nowhere near as simple to use as Nano. It is so much complex so we cover the basis only. Similar to nano, to edit a we need to run vi filename command.

After the file is opened, we need to enable the insert-text mode to begin typing. To do this, we need to press I key and start typing and editing file.

To disable insert-text mode and go back to command mode, we need to press Esc key. In command mode we can use following command to use it.

  • dd    – Delete the current line.
  • yy    – Copy the current line.
  • p     – Paste from clipboard.
  • x     – Delete the current character.
  • :w    – Write the current file to disk and stay in vi.
  • :q!    – Quit without saving.
  • :wq   – Save and Quit.
vi text editor

Frankly speaking, vi is very absurd to use, many users avoid it. However as a penetration tester’s point of view learning vi is very good so, have some time to exploring it. vi is installed on every POSIX-complaint system. vi lovers considered as ultra-pro Linux user in the community.

vi is extremely powerful, Want to explore vi ? The following sources have very good manual to learn vi.

  1. Learning the vi Editor
  2. vi Debian Manual

Comparing Files using Terminal

Comparing files may seems irrelevant for normal users, but system admins, network engineers, penetration testes and other IT related professionals rely on this skill widely.

In this section, we’ll take a look at a couple of tool that can easily help us during file comparing.

comm

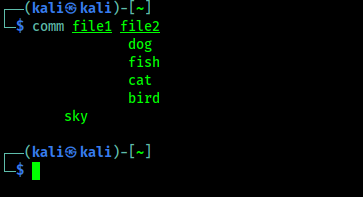
The comm utility compares between two text files then displays the lines that are unique to each one, also shows the lines they have in common. comm outputs three space-offset columns. The first column will be the output unique lines of the first file. The second column will contain unique lines of the second file, and the third column contains lines that are shared by both files.

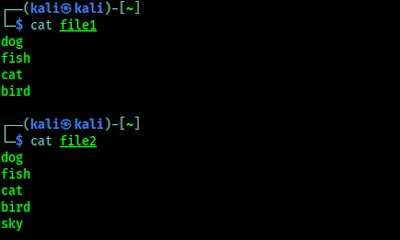
For an example here we have two files “file1” and “file2“, these files contains some words, as we can see in the following screenshot:

two similar files

Now we are going to compare these two files using comm command. So we are going use following command:

comm file1 file2

The output of the above command shown in the following screenshot:

comparing two files

In the above screenshot, we can see that it compares both files.

Vimiff

The vimdiff command opens with multiple files, on in each window. It also shows the differences between files by highlighting them. Which makes easier to find the differences between files. So we run the command as following:

vimdiff file1 file2

We can see the output in the following screenshot:

vimdiff comparing files
We can notice the differences easily for highlighted area.

We can use some shortcuts which will be helpful for us, those are following:

  • do: Get changes from the other window to current window.
  • dp: Sends the changes from current window to another window.
  • ]c: Jumps to the next difference.
  • [c: Jumps to the previous difference.
  • CTRL+W: Switches to the other split window.

Downloading Files using Terminal

Now we are going to take a look on downloading files using terminal. For downloading files we are going to use wget and curl.

wget

The wget command, which we will use extensively, downloads files using the HTTP/HTTPS and FTP protocols. We can use wget url/of/file to download a file.

wget file download

In the above screenshot we had download a file using wget and -o flag to make a copy of the downloaded file our chosen name.

curl

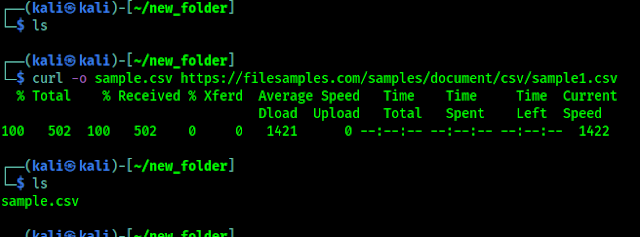
curl is a tool for transferring data to a server or from a server using host protocols including IMAP/S, POP3, SCP, SFTP, SMB/S, SMTP/S, TELNET, TFTP and others. A penetration tester can use curl to upload things (read payload) on server, or download things from server, and build complex requests. Basic use of curl is very similar to wget.

curl download using terminal

axel

axel is a download accelerator that transfers a file from a FTP or HTTP server through multiple connections. axel has a vast array of features, but the most common feature is almost similar to wget and curl. We also can use -n flag, which is used to specify the number of multiple connections to use.

axel download files

This is how we can manage files directly from Linux terminal. In this article, we learnt how we can copy, move, rename, delete, edit, compare and download files on Linux or UNIX like system. We don’t need GUI for this. Learning these things are very important for cybersecurity students.

Love our articles? Make sure to follow us on Twitter and GitHub, we post article updates there. To join our KaliLinuxIn family, join our Telegram Group. We are trying to build a community for Linux and Cybersecurity. For anything we always happy to help everyone on the comment section. As we know our comment section is always open to everyone. We read each and every comment and we always reply.

Kali Linux – Basic Terminal Uses

In our this article we are going to cover the basic uses of Terminal window on Kali Linux. Hence Kali Linux comes with GUI, but terminal is the most powerful thing on Linux systems. There are lots of terminal tools we need to use during security testing, so we need to learn at least the basics of terminal.

As a Penetration tester we use a lot of commands on our daily basis. In our previous articles we have used a lot of commands. But here we will learn basic uses of terminal and some basic commands that will help a lot on our penetration tester journey.

Basics of Kali Linux Terminal

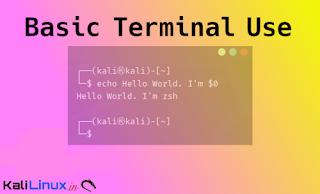
First of all we need top open our terminal window from our Kali Linux desktop. We also can use CTRL+ALT+T key combination to open the terminal window directly from our keyboard. Kali Linux default terminal window looks like following screenshot:

kali linux terminal
Kali Linux default terminal

Let’s learn some basics of terminal. We can work on text based things using terminal window. We can write commands, then press Enter ⤶ key to run/execute the command. Sometime things are messed up then we need to clear the terminal using clear command or CTRL+L to clear the terminal. To open a new terminal window from our current terminal session CTRL+SHIFT+T.

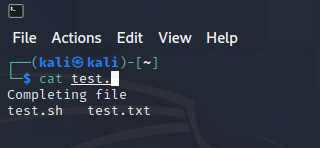
To complete the command or the filename on terminal we can press the TAB key. If there are some files starting with same name then whenever we press TAB key it will display all the options in place. We should open our terminal window and practice these things while reading this article.

For an example we have two files with same name at starting test.sh and test.txt on our home directory. When we press the TAB key then we can see that we got the both options, as we can see in the following screenshot:

tab key to complete the command

If we run a command and then we need to stop it’s execution we need to press CTRL+C key combination. To close the terminal window we can press CTRL+D key combo or use exit command.

We can also shut down and restart our system using terminal window. To shut down our system we need to use poweroff and for restart we need to use reboot command with root privilege.

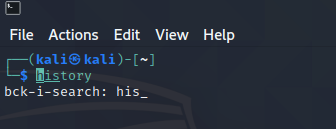
To check our recently used commands on terminal we can use history command, and to use any command used before (reverse command search) we can use CRTL+R and then type the part of the command then terminal will suggest the command. As we can see in the following screenshot:

reverse command search
CTRL+R, then we just type his and it suggest history

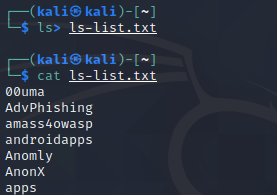
Not only in Kali Linux, Linux in general we need to understand there are lots of redirections in terminal window. For an example we have to write our file list (ls) output on a text (txt) file e need to run following command:

ls> ls-list.txt

We can see the output in the following command:

ls list file

Using the above command we save the output of ls command on a text file and provide the text file a name (ls-list.txt), and we redirected the output by using a > (grater than) character.

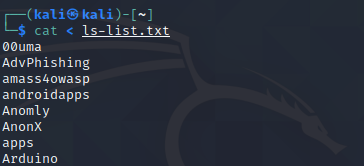
We also do the opposite by redirecting (printing using cat) the text file contents into the terminal window by using the < (less than) character.

cat < ls-list.txt
printing on terminal using less than

There is another redirection we need to know is the command pipe. In short, we can combine the output of each command and use it on next command using | character.

command 1 | command 2 | command 3

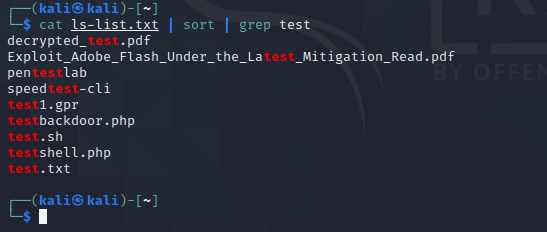
For an example we need to read a file then short the results and finally use grep command to filter out some text strings. Here we are going to extract files starting with ‘test.‘. So we need to use following commands combining with |

cat ls-list.txt | sort | grep test

We can see in the output in the following screenshot:

combining commands

Basic Kali Linux Commands

Now, let’s drive into Kali Linux usage and explore some basic Kali Linux (Linux, in general) commands.

Man Pages

Most of the executable programs on the Linux command line contains a formal piece of documentation is called manual pages or man pages. A special program called man is used to view these pages. Man pages generally have a name, a synopsis, a description of the command’s purpose, and the corresponding options, parameters, or switches. Let’s look at the man page for the ls (list) command:

man ls

This will show us the manual of ls command, as we can see in the following screenshot:

Exploring the manuals for the ls command using man

We can see in the top of the above screenshot that ls is ‘User Command’. Man pages are organized by dividing into various sections as following:

  1. User commands.
  2. System administration commands.
  3. Programming interfaces for kernel system calls.
  4. Programming interfaces to the C library.
  5. Special files such as device nodes and drivers.
  6. File formats.
  7. Games and amusements such as screen-savers.
  8. Miscellaneous.

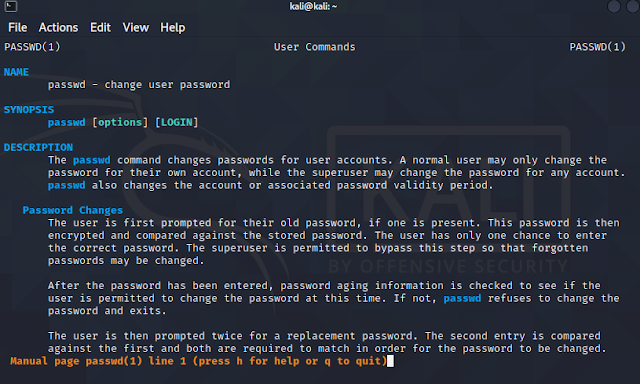
To know more about a command we can search a keyword. For example, we need to learn about the file format of /etc/passwd file. We can apply following command to learn more about this:

man passwd

The above command will show information about passwd command as we can see in the following screenshot:

manulas for passwd command

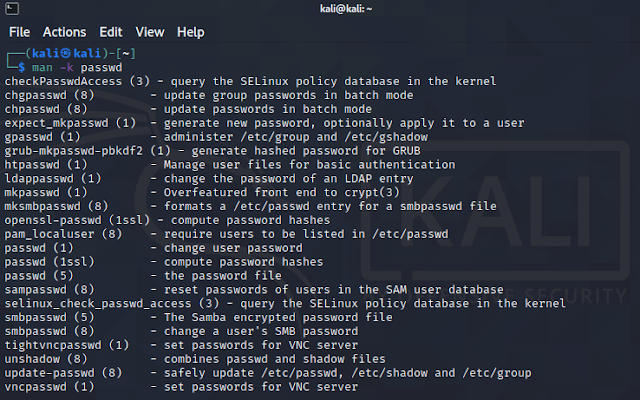
Also we can use -k flag with man to do a keyword search.

man -k passwd

We can see the output on the following screenshot:

manual options for passwd command

We also can filter out the search by using regular expression.

man -k '^passwd$'

In the above command, the regular expression is enclosed by a caret (^) and dollar sign ($), to match the entire line and avoid sub-string matches. The output shows in the following screenshot:

filtering man page search results

We can now look at the exact passwd manual page (5) we are interested in by referencing the appropriate section:

man 5 passwd
man options of passwd command

Man pages are usually the quickest way to learn more about a Linux command. So we need to take some time and explore the man pages.

Apropos

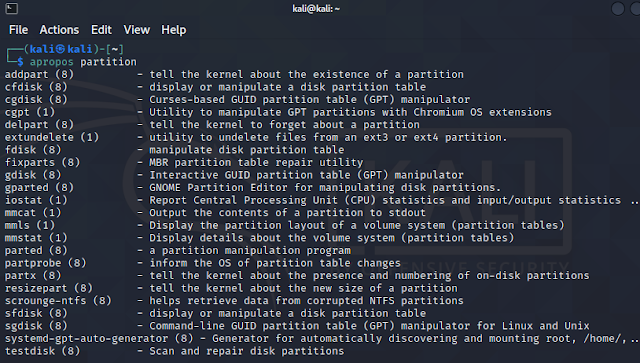
By using apropos command we can see a list of all topics in the man pages. Although this is a bit raw, it’s often helpful for finding a specific command based on the description. For an example , we want to partition a hard drive but can’t remember the name of the command. We can figure this out with an apropos search for “partition”.

apropos partition

We can see the commands list with description in the following screenshot:

apropos

Check that apropos have similar output like man -k, in fact both are the same.

List

The ls command prints a basic file listing on the directory to the terminal window. We can modify the output results with various flags. Like -a flag is used to display all files (including hidden files) and the -1 option displays each file on a single line, which is very useful for automatic scripts.

ls command

Change Directories

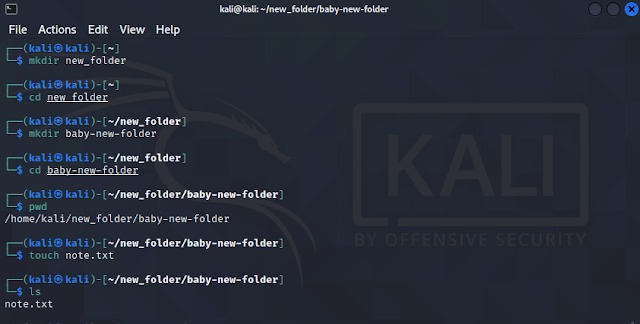
Linux does not use Windows-style drive letters (C:). Here, all files, folders, and devices are baby of the root directory, represented by the / character (see our Kali Linux file system article). In our terminal can use the cd command followed by a path to change to the specified directory. The pwd command will print our current directory (which is helpful if we get lost inside files) and running cd will return to the home directory (/home/username). To understand this we need to check the following screenshot and practice it by our own.

changing directories

To return back from a directory to it’s parent/previous directory we can use cd .. command.

Creating Directories

We can use mkdir command followed by the name of our new directory to create a new directory. Directory names can be contains space in middle, but when we are using command line interface it will be easier to work with directory names using underscores or hyphens instead.

To create a new file we can use touch command followed by the name of our new file. Example of mkdir and touch command is shown in the following screenshot:

creating directories

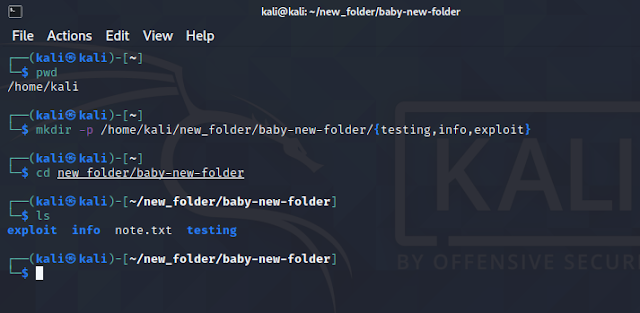
We also can create multiple directories at a same time using -p flag. -p is capable to create directories inside parent directory. Suppose we need to add 2 directories inside our newly created (above example) directory (which is /home/kali/new_folder/baby-new-folder). We can do it from our home by using -p as shown in the following command:

mkdir -p /home/kali/new_folder/baby-new-folder/{testing,info,exploit}

We can see the output in following screenshot:

Creating diirectories advanced way

Searching for Files

There are three most common Linux commands for searching files on terminal, those are which, locate and find. Utilities of these commands are similar but work and output of these utilities are different.

Which

which command searches between the directories that are defined in the $PATH environment variable for a given file name. This variable contains a listing of all the directories that Kali Linux searches when a command is applied without its path. If a match is found, which returns the full path of the file as shown below:

which command

Locate

The locate command is the quickest way to find the locations of files and directories in Kali Linux. To do the search on a much shorter search time, locate searches a built-in database named locate.db rather than checking the entire hard disk. This database is automatically updated on a regular basis by the cron scheduler. To manually update the locate.db database, we can use the sudo updatedb command.

locate command

Find

The find command is the most complex and flexible tool in these three. Understanding it’s syntax sometimes very hard, but it is very powerful than a normal search. In the following screenshot we did the most basic search using find command, where we start our search from root directory (/) and look for the filename starts with sbd.

find command

Where which and locate command searches files by using their names, find can search files by it’s name, type, size, time, permissions etc. find is an complex yet very powerful search tool. We can know more about it here.

In our this part we just covered the basics terminal uses and some basic Linux commands. We will about more commands on our upcoming parts. Hope this article was enjoyable and informative.

Love our articles? Make sure to follow us on Twitter and GitHub, we post article updates there. To join our KaliLinuxIn family, join our Telegram Group. We are trying to build a community for Linux and Cybersecurity. For anything we always happy to help everyone on the comment section. As we know our comment section is always open to everyone. We read each and every comment and we always reply.

Top 7 Trends in IoT to Look Out for in 2021

Top 7 Trends in IoT to Look Out for in 2021

Digital transformation speeds up rapidly, and with higher connectivity, thanks to the fastest WiFi and amazing 5G and improvements in ML and AI. The Internet of Things looks set to deepen its roots in our industries and lives. With more than 30 billion connected devices, the IoT has primarily changed the model of interaction between intelligent solutions, real-life objects like home appliances, and electronic gadgets, assisting us to improve our daily life. As technology is in its golden age, more and more companies will see IoT as a beneficial tool; this will result in mass adoption.

‘Market Snapshot- The Internet of Things’

• The Internet of Things tests market scenario was valued at $ 1107.2 billion in 2020 and projected to hit $ 6042.45 b by 2026 & rise at a CAGR of 32.34 percent over the prediction period (2021–2026). The usage of IoT tests using modern technologies has led to the highest use of distinct kinds of test tools for distinct purposes, and the market is projected to grow at a speedy rate during the period time.

Microsoft market research says, approx. 94 percent of companies will use some sort of the Internet of Things by 2021. Core IoT verticals like retail, government, manufacturing, healthcare and transportation continue to launch new IoT solutions and apps to their everyday operations.

• As per Statista, the total dollars spent on IoT solutions globally is anticipated to almost double in 2021, up to $418b from $248b. Surprisingly, by the year 2025, that number is projected to be USD 1,567 billion. The international market for IoT end-user solutions is projected to raise to 212 b U.S. dollars in size by 2019. The technology hit USD 100 billion in market revenue for the first time in 2017, and predictions proposed that this figure will rise to about 1.6 trillion by 2025.

Fortune Business Insights report says IoT technology holds important potential in the ICT segment with the worldwide market valued at $190 b in 2018 and hitting $1.1 trillion by 2026. The report projects that the international market will grow at a surprising CAGR of 24.7% all through the estimated years.

Progressively more organizations will recognize this potential this year, assuring development for this trend. Let us dive a little deeper and explore the IoT-related trends that will shape the digital transformation approach for businesses in 2021.

7 Biggest IoT Trends to Watch Out for 2021

1. Focus on Security to meet the Complex Challenges

Security has become a foreseeable matter nowadays, and with up-and-coming technologies, companies need to make certain the data security to retain their customer’s interest. Hence, IoT is expected to concentrate on security to meet the complicated challenges in the coming decade. With various devices, IT administrators are hostile to know how many gadgets are usually connected to their networks leaving them susceptible to attacks. Besides, connected devices remain susceptible owing to exposure to cyber-attacks. The amount of Internet-linked gadgets has shown a notable rise, and they will keep mounting in the coming decade. Therefore, extra cautions of network operators can easily stop intruders to enter the network making IoT security the most modern IoT trend.

In 2021, we would likely see an increase in the security-centric smart gadgets, counting AI-driven, automatic capacity to scan networks for IoT gadgets. Big tech enterprises are expected to lead the way in this arena. Big giants like Amazon recently announced a chain of new traits that allow users to take control of privacy and data settings. Apple and Google are also in the same race to follow suit in 2021 with a focal point around the security features marketing in IoT-centric devices.

2. Artificial Intelligence meets IoT

In addition to security, the focus is also moving to the holistic improvement of production procedures. In simple words, the combination of advanced technologies into an “Artificial IoT” mainly reduces deviations from the optimum in the manufacturing procedure and therefore ensures high performance, lower costs, and less waste. Through AI, production processes can be continuously and automatically optimized with the assistance of ML methods. Besides, AI-driven analytical solutions have the control to aggregate huge amounts of sufficient high-quality data and information; process it in real-time and draw effectual insights. Moreover, close integration of AI, smart devices, and Big Data will also contribute appreciably to give protection against security risks. So far, merely a few businesses have deployed AI Internet of Things. That will change this year.

3. Enhanced Role of Data Analytics

Data analytics plays a crucial role in well-organized and effectual business management to make a significant decision based on a detailed analysis of the gathered data. The modern AI-centric data analytics solutions, powered by Big Data technology and AI algorithms, can collect a huge chunk of information, examine it in real-time, and derive valuable insights from it. This powerful incorporation of Big Data, Artificial Intelligence, and IoT devices will allow users to make important and effectual business decisions with ease based on the information & insights collected by the data analytics. IoT not only aids in examining behavior and spit out data; it is also about rapid data processing and giving proposals based on those findings.

Leveraging data analytics will complement the data scrutiny produce and process by the internet of things solutions. When executed correctly, data analytics will allow users to pick up on trends or patterns within the information gathered by their devices. Consequently, the insight acquired by the data analysis confirms a business is well equipped with the data required to make

4. Blockchain Technology

IoT devices very often are susceptible to security breaches that make them target for DDoS attacks. Blockchain technology or distributed ledger technology emerges as a suitable tool to guarantee data safety during encryption techniques plus peer-to-peer contact without intermediaries. It is amongst the top-most IoT trends that address major IoT scalability and security challenges. Credited to its exceptional capacities and advantages, Blockchain is an information game-changer, giving a means for data to be recorded and shared by a user’s community. It is more often looked upon in the context of IoT data security.

It has become the norm for banking or financial institutions to guard their operations with the aid of Blockchain technology. Similarly, blockchain is at present amongst the top IoT trends due to its capability to confirm data protection through encryption techniques without intermediaries.

5. Emerging IoT Apps

Apps and use cases of the Internet of Things solutions are evolving at a fast pace. Presently, its apps surround smart homes, smart grids, wearable, smart cities, industrial settings, etc. With the rise and development of this technology in the upcoming future, the Internet of Things will reach more business and industry settings, leading the globe towards more digital. Knowing the Internet of Things use cases will assist companies to integrate the Internet of Things technologies into their upcoming investment decisions.

6. Edge Computing

What is edge computing? With this a distributed computing paradigm, rather than the Internet of Things devices sending all the information they gather to the cloud for investigation and extraction of insights, this work is performed straight on the devices themselves. Adoption of edge computing will become more significant for the Internet of Things devices to conquer the cloud computing drawbacks such as latency issues and low bandwidth faced in real-time data processing. Edge computing is an accurate data processing and cost-efficient method for IoT devices.

Companies should make decisions based on IoT information speedier than ever before to appreciate the true devices value on the network. With the union of 5G networks, an increase in IIoT and IoT devices, and a striking increase in the data amount we are collecting, edge computing can be turned up as significant as ever in this year.

7. Investment in IoT App Testing

Smart sensors, wearables, and connected devices will continue to alter the way healthcare is delivered, from automated homes to telemedicine help for the disabled and elderly. Besides, in situations where the risk of virus infection is strong, it will also be used to minimize unnecessary contact.

The IoT testing is all set to incorporate with other technology to make life smart and easy. If we speak about the IoT role in the banking industry or its penetration into healthcare services, growth in this technology will continue to bring great deeds across the globe. The IoT trends would bring the world together and make it victorious in every way.

As time changes, the future of IoT app tests will continue to grow. We would have the Internet of Things attached to more or less in all inventions. Let’s get ready to observe this year the creativity of automatic urban societies working with each other with zero contact.

Final words

2021 promises to be another year of trouble and uncertainty around the globe and IoT technology will undoubtedly deliver practical solutions to various complexities and challenges faced by people working tenuously.


Top 7 Trends in IoT to Look Out for in 2021 was originally published in Dev Genius on Medium, where people are continuing the conversation by highlighting and responding to this story.

EC-Council and Wissen Sponsor Awards for Winners of the ASEAN Student Contest on Information Security (ASCIS)

Asean-01Vietnam, October 9, 2021 – EC-Council co-sponsors the awards for the winners of ASEAN Student Contest on Information Security (ASCIS) along with Wissen. The contest is an integral activity of the annual event, “Vietnam Information Security Day” organized by VNISA under the sponsorship of the Ministry of Information and Communications (MIC) and the Ministry of Education and Training (MoET) of Vietnam. ASCIS is a Capture the Flag contest for students from institutes of higher education in ASEAN. The warm-up round of […]

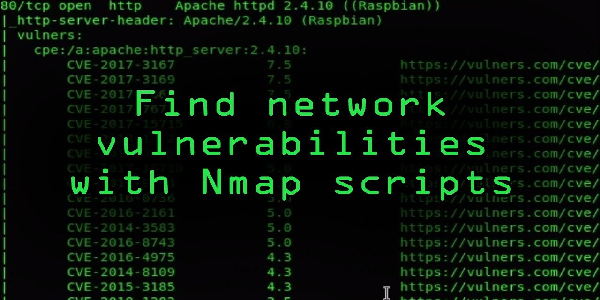
Find Vulnerabilities using NMAP Scripts (NSE)

Nmap comes pre-installed with Kali Linux. Not just Kali Linux Nmap comes pre-installed with every security focused operating system. We have already discussed how to use Nmap for active reconnaissance in our previous article “NMAP — The Network Mapper“.

But cybersecurity experts don’t just use Nmap for scanning ports and services running on the target system, Nmap also can be used for vulnerability assessment and much more using NSE (Nmap Scripting Engine).

Vulnerability scanning using nmap scripts

The Nmap Scripting Engine (NSE) has revolutionized the possibilities of a port scanner by allowing users to write scripts that perform custom tasks using the host information collected by Nmap. As of September 2021, when we are writing this article, Nmap has over 600+ scripts on Nmap version 7.91.

Nmap scripts for security testing

Penetration testers uses Nmap’s most powerful and flexible features, which allows them to to write their own scripts and automate various tasks. NSE (Nmap Scripting Engine) was developed for following reasons:

  • Network Discovery:- This is the primary purpose that most of the people utilize Nmap for network port discovery, which we had learned in our “Nmap – The Network Mapper” article.
  • Classier version detection of a service:- There are tons of services with multiple version details for the same service, so Nmap makes it more easy to identify the service.
  • Backdoor detection:- Some of the Nmap scripts are written to identify the pattern of backdoors. If there are any worms or malicious program infecting the network, it makes the attacker’s job easy to short down and focus on taking over the machine remotely.
  • Vulnerability Scanning:- Pen testers also uses Nmap for exploitation in combination with other tools such as Metasploit or write a custom reverse shell code and combine Nmap’s capability with them for exploitation.

Before jumping in to finding vulnerabilities using Nmap we must need to update the database of scripts, so newer scripts will be added on our database. Then we are ready to scan for vulnerabilities with all Nmap scripts. To update the Nmap scripts database we need to apply following command on our terminal window:

sudo nmap --script-updatedb

In the following screenshot we can see that we have an updated Nmap scripts database.

nmap script database update

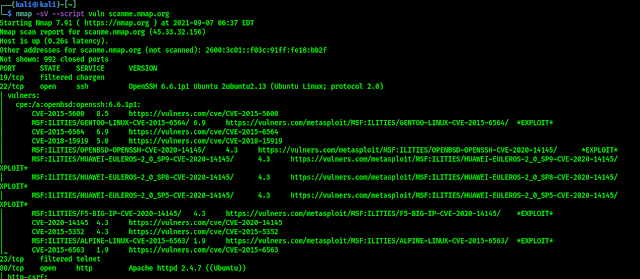
Now we are ready to scan any target for vulnerabilities. Well we can use following command to run all vulnerability scanning scripts against a target.

nmap -sV --script vuln <target>

As we can see in the following screenshot:

nmap vulnerability scripts

When we are talking about Nmap Scripts then we need to know that, not only vulnerability scanning (vuln) there are lots of categories of Nmap scripts those are following:

  • auth: This categorized scripts related to user authentication.
  • broadcast: This is a very interesting category of scripts that use broadcast petitions to gather information. 
  • brute: This category is for scripts that help conduct brute-force password auditing.
  • default: This category is for scripts that are executed when a script scan is executed ( -sC ).
  • discovery: This category is for scripts related to host and service discovery.
  • dos: This category is for scripts related to denial of service attacks.
  • exploit: This category is for scripts that exploit security vulnerabilities.
  • external: This category is for scripts that depend on a third-party service. 
  • fuzzer: This category is for Nmap scripts that are focused on fuzzing.
  • intrusive: These scripts might crash system by generate lot of network noise, sysadmins considers it intrusive.
  • malware: This category is for scripts related to malware detection.
  • safe: This category is for scripts that are considered safe in all situations.
  • version: This category is for NSE scripts that are used for advanced versioning.
  • vuln: This category is for scripts related to security vulnerabilities.

So we can see that we can do various tasks using Nmap using Nmap Scripting Engine scripts. When we need to run all the scripts against single target we can use following command:

nmap -sV --script all <target>

In the following screenshot we can see that all scripts are using against one target, but here every script will run so it will consume good amount of time.

nmap all scripts running at once

That is all for this article. We will back again with Nmap. Hope this article helps our fellow Kali Linux users. Love our articles? Make sure to follow us on Twitter and GitHub, we post article updates there. To join our KaliLinuxIn family, join our Telegram Group. We are trying to build a community for Linux and Cybersecurity. For anything we always happy to help everyone on the comment section. As we know our comment section is always open to everyone. We read each and every comment and we always reply.

What is Fuzzing? Why it is Important on Cybersecurity?

What is Fuzzing?

Fuzz testing or Fuzzing is a Black Box software testing technique, which basically consists in finding implementation bugs using malformed/semi-malformed data injection in an automated task.

This analysis is a software-testing technique used by developers and penetration testers to test their applications against unexpected, invalid, and random sets of data input. The response will then be noticed in terms of an exception or a crash thrown by the application. This activity shows us some of the major vulnerabilities in the application, which are not possible to discover otherwise. These covers buffer overflows, format strings, code injections, dangling pointers, race conditions, denial of service conditions, and many other types of vulnerabilities.

Fuzzy analysis is a relatively simple and effective solution that can be incorporated into the quality assurance and security testing processes. That’s why fuzzy analysis is also called robustness testing or negative testing sometimes.

History of Fuzzing

Classic fuzz testing was developed at the University of Wisconsin Madison in 1989 by Professor Barton Miller and students. Their (continued) work can be found here. It’s mostly oriented towards command-line and UI fuzzing, and shows that modern operating systems are vulnerable to even simple fuzzing.

Attack types in Fuzzing

Commonly a Fuzzer (program for fuzzing) would try combinations of attacks on:

  • numbers (signed/unsigned integers/float etc).
  • chars (urls, command-line inputs).
  • metadata : user-input text (id3 tag).
  • pure binary sequences.

A common approach to fuzzing is to define lists of “known-to-be-dangerous values” (fuzz vectors) for each type, and to inject them or re-combinations.

  • For integers: zero, possibly negative or very big numbers.
  • For chars: escaped, interpretable characters / instructions (ex: For SQL Requests, quotes / commands etc).
  • For binary: random ones.
  • For chars: escaped, interpretable characters / instructions (ex: For SQL Requests, quotes / commands etc).

There are different classes of fuzzers available in Kali Linux, which can be used to test the file formats, network protocols, command-line inputs, environmental variables, and web applications. Any non-trusted source of data input is considered to be insecure and inconsistent. For instance, a trust boundary between the application and the Internet user is unpredictable. Thus, all the data inputs should be fuzzed and verified against known and unknown vulnerabilities. In our some later article we are going to learn about Fuzzers on our Kali Linux system.

Why Fuzzing is important on Security Testing?

The purpose of fuzzing based on the assumption that there are bugs within every program, which are waiting to be discovered. Then, a systematic approach should find them sooner or later.

Fuzzing can add another perspective to classical software testing techniques (hand code review, debugging) because of it is non-human approach. It doesn’t replace them, but is a reasonable complement, thanks to the limited work needed to put the procedure in place.

References

Love our articles? Make sure to follow us on Twitter and GitHub, we post article updates there. To join our KaliLinuxIn family, join our Telegram Group. We are trying to build a community for Linux and Cybersecurity. For anything we always happy to help everyone on the comment section. As we know our comment section is always open to everyone. We read each and every comment and we always reply.

Kali Linux 2021.2 Update is Here !

The second update of Kali Linux in 2021 is live and reday to ROCK.

Say Welcome to Kali Linux 2021.2! This release welcomes a mixture of new items as well as enhancements of existing features, and is ready to be downloaded (from our updated page) or upgraded if you have an existing Kali Linux installation.

A quick summary of the change log since the 2021.1 release from February 2021 is:

Introducing Kaboxer v1.0

For developers, this is a great new tool in the arsenal. Users will, hopefully, not realise that they are using it, only noticing that previously problematic tools now work correctly!

Without repeating what has already been posted, this technology allows us to correctly package up programs that were previously difficult, with items such as complex dependencies or legacy programs & libraries (such as Python 2 or dated SSL/TLS).

With Kaboxer’s launch, we have released 3 packages using it:

If you want to read more, please see either our blog post covering it, or our documentation around it.

Kaboxer is still in its infancy, so please be nice & patient with it.

Releasing Kali-Tweaks v1.0

Announcing Kali-Tweaks! This is our little helping hand for Kali users, with the idea to help customize Kali to your own personal taste quickly, simply, and the correct way. This should help you to stop doing repetitive tasks.
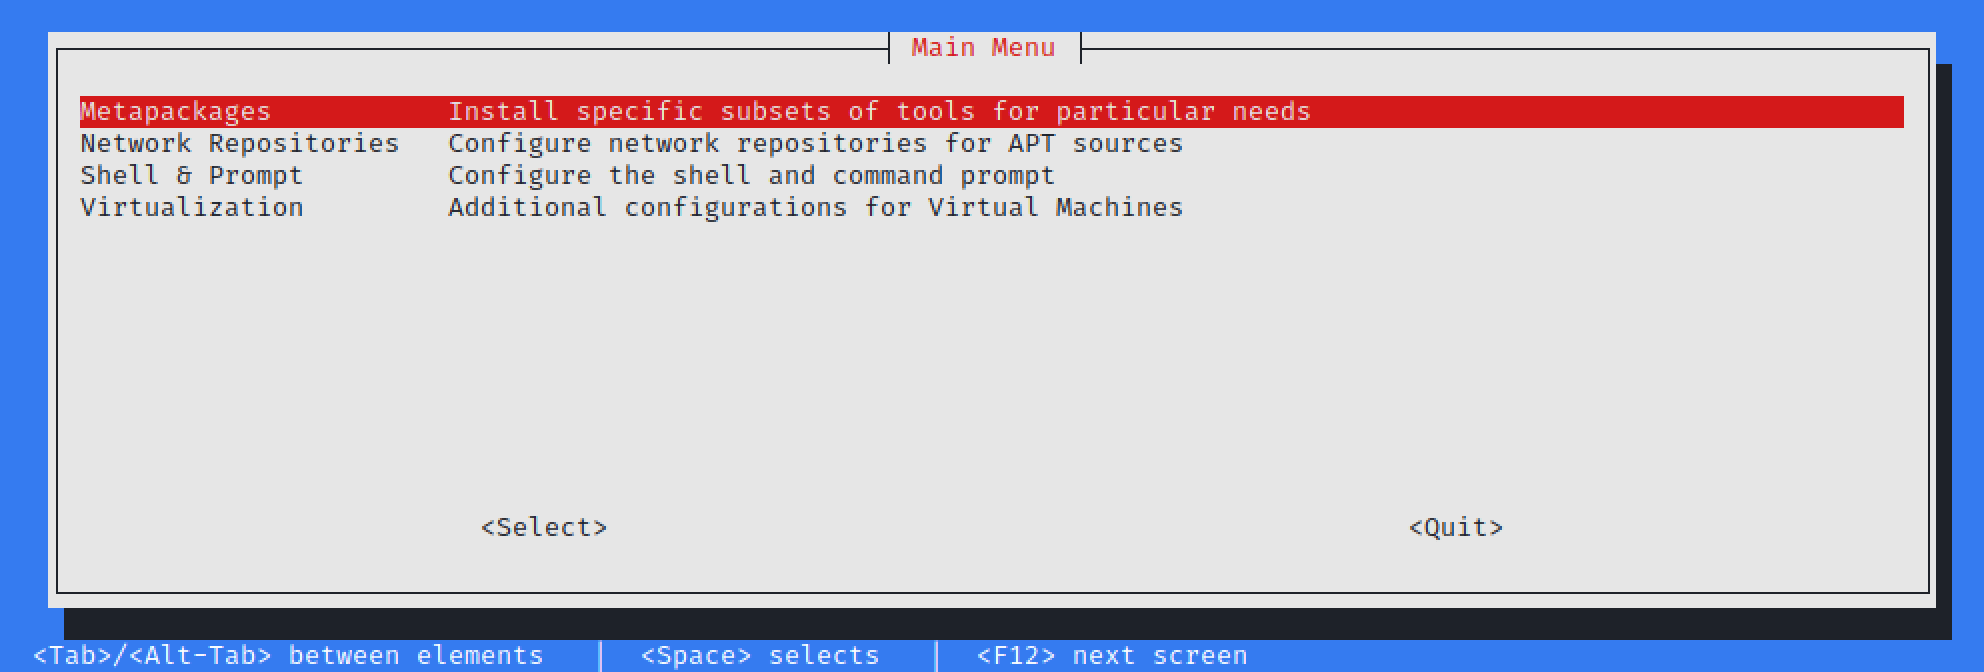
Kali-Tweaks 1.0

Currently Kali-Tweaks will help out with:

  • Metapackages – Installing/removing groups of tools, which may not have been available while installing Kali if you did not use the installer image
  • Network Repositories – Enabling/disabling “bleeding-edge” & “experimental” branches
  • Shell & Prompt – Switch between two or one line prompt, enable/disable the extra line before the prompt, or configure Bash or ZSH as the default shell
  • Virtualization – Using Kali as a guest VM? Do a few actions to make the experience easier!

Our philosophy is to always understand what you are running, before you run it. That way, it reduces the chances of any undesirable nasty surprises. Which is why we will always encourage anyone to do actions manually before automating it, so you get to understand what is happening under the hood. On the flip side, we also understand there is so much to remember. Then when you sprinkle in people’s bad habits, which often have long term implications and end up breaking Kali, there is room for improvement. So, we started developing Kali-Tweaks. Where possible, Kali-Tweaks will also display what commands are being executed to help educate users.

We do want to mention a few things:

  • kali-tweaks has been marked as “recommended” rather than “required”. As a result, if you are upgrading Kali, it may not be included. On the other hand, you can remove kali-tweaks without removing anything else
  • On the subject of upgrading; depending on how old your Kali installation is, you may need to reset your shell resource (e.g. .bashrc & .zshrc) before you can use the “configure prompt” section. This is because it will not have the necessary variables. Should you want to, make sure to backup, reset, and restore
  • The last thing to point out, when changing the default login shell; please log out and in again (either graphically or remote console) for it to have an effect

It is still early days with Kali-Tweaks, and we already have ideas of what to expand into, but we welcome any suggestions from you!

Kali-Tweaks is still in its infancy, so please be nice & patient with it.

Refreshed Bleeding-Edge Branch

Kali’s Bleeding-Edge branch has been around since March 2013, but we have recently completely restructured the backend.

For those not too familiar with Bleeding-Edge branch, here is a breakdown:

  • Kali by default opts to be stable where possible when packaging. This means some tools may appear to be “out-dated”
  • We do this by looking to see when the tool author(s) signals “everything up to to this point is good”, by doing a “point release(e.g. 1.0 or 2.1)
  • Developers often use source-code version control, allowing them to track any changes
  • How programmers use source-code version control depends on their work flow, experience, and team size
    • Developers can use a “tag” feature found in most source-code version control to signal when there is a new version (this is what Kali prefers)
    • However, some people may say if it makes it to “master” or “main” branch, then it is “production ready”
  • There are times where it has been “a while” (months or even years) since doing a tag for a stable release (aka point release), and people get frustrated that there are no updates (e.g. hashcat or impacket).

You may then end up skipping the Kali package and compiling your favorite tool’s source-code. This might then conflict with Kali’s packaging, and it is your responsibility to maintain the program. This is where bleeding-edge branch comes in.

Since moving over to GitLab, we have been able to create Kali-Bot to help with heavy lifting and automation

  • Automatically package tag’d releases to kali-experimental branch
  • Automatically package the last commit to kali-bleeding-edge branch

This is a fully automated procedure, as a result, the testing that goes into our packaging is automated as well (unlike anything that is in kali-rolling branch which has manual testing involved). If there has not been a unit test created, its not going to be tested for. This means there is a chance packages will be broken, and more trust goes into the tool author having correctly developed the tool.

If you want to give it a try, have a look at our kali-bleeding-edge documentation to learn how to enable the repository and how to tell apt to select a package from this repository. Once the repository has been enabled, it looks like this:

kali@kali:~$ dpkg -l 
| grep ffuf
ii ffuf 1.3.1-0kali1 amd64 
Fast web fuzzer written in Go (program)
kali@kali:~$
kali@kali:~$ sudo apt install -y ffuf/kali-bleeding-edge
...
kali@kali:~$
kali@kali:~$ dpkg -l
| grep ffuf
ii ffuf 1.3.1+git20210505.1.f032167-0kali1~jan+nus1 amd64 
Fast web fuzzer written in Go (program)
kali@kali:~$

Not every tool has made it to the new system yet as there are still many limitations to overcome, but to see what is supported and also how many:

kali@kali:~$ curl -s -L 'http://http.kali.org/kali/dists/kali-bleeding-edge/main/binary-amd64
/Packages' 
| awk -F ': ' '/^Package: /{print $2}'
...
kali@kali:~$
kali@kali:~$ curl -s -L 'http://http.kali.org/kali/dists/kali-bleeding-edge/main/binary-amd64/
Packages' 
| awk -F ': ' '/^Package: /{print $2}'
| wc -l
78
kali@kali:~$
kali@kali:~$ curl -s -L 'http://http.kali.org/kali/dists/kali-experimental/main/binary-amd64/
Packages' 
| awk -F ': ' '/^Package: /{print $2}'
| wc -l
192
kali@kali:~$
kali@kali:~$ curl -s -L 'http://http.kali.org/kali/dists/kali-rolling/main/binary-amd64/
Packages' 
| awk -F ': ' '/^Package: /{print $2}'
| wc -l
59518
kali@kali:~$

The numbers will only grow bigger and better as time goes on, with less bugs in the code and more unit tests in place!

If you are a tool author and want to get your software on the list, please chat to us, and we can show how to enable webhooks!

Disabled Privileged Ports

We have patched our kernel to remove the restriction of requiring privilege permission in order to use TCP & UDP ports under 1024 (meaning 0/TCP-UDP <= 1023/TCP-UDP). This was done because:

  • We see Kali as a desktop OS, rather than a server
  • This “well-known” privileged port range is reserved for server services (e.g. 80/TCP HTTP, 443/TCP HTTPS)
  • With the switch from Kali’s root to non-root user by default, rather than doing a port forward from outside the privilege ports to a restricted port, people were just running the program with super-user permissions instead
    • We get it. It’s quicker to run: $ sudo <program>,
    • Rather than remembering something like: $ sudo iptables -A PREROUTING -t nat -i eth0 -p tcp --dport 80 -j REDIRECT --to-port 8888
    • It also can get complex and confusing with a lot of redirects setup in place
    • Alternatively people were using authbind to allow certain users to use certain ports
  • This defeats the point of switching to non-root user!
    • Let’s reduce any possible attack surface!

Now, this change won’t appear in all instances as some flavors of Kali operate without our kernel. This depends on which platform you use (such as Cloud instances, Docker or WSL). If you are on a platform that does not use our customized Kernel, this change will not be applied. For example, the top one uses Kali’s kernel on a bare metal install, and below uses Kali in a docker container, so its using the host’s kernel:

kali@kali:~$ uname -r
5.10.0-kali7-amd64
kali@kali:~$

...vs...

$ docker run --rm --interactive --tty kalilinux/kali:latest uname -r
5.10.25-linuxkit
$

New Tools in Kali Linux 2021.2

It would not be a Kali release if there were not any new tools added! A quick run down of what’s been added (to Kali’s archive and network repositories):

  • CloudBrute – Find a company infrastructure, files, and apps on the top cloud providers
  • Dirsearch – Brute force directories and files in web servers
  • Feroxbuster – Simple, fast, recursive content discovery
  • Ghidra – Reverse engineering framework
  • Pacu – AWS exploitation framework
  • Peirates – Kubernetes penetration
  • Quark-Engine – Android malware scoring system
  • VSCode a.k.a. Visual Studio Code Open Source (“Code-OSS”) – Code editor

Ghidra and VSCode have been included into the kali-linux-large metapackage, so they are included on the installer image for people doing a fresh install. Otherwise you will need to upgrade Kali (if you already have the kali-linux-large install) or manually install them (if you want them!):

kali@kali:~$ sudo apt update && sudo apt install -y ghidra code-oss

A few notes about code-oss (aka VSCode):

  • We are compiling this from source, rather than using the pre-built binaries
    • The upside to this is that telemetry data is disabled by default
    • The downside is that some aspects of the marketplace may not work. If you find these limitations a problem, you may wish to uninstall the Kali package and switch to the VSCode pre-built binaries
  • You also may question why it was named code-oss, rather than code
    • Code-OSS is what the source-code calls itself, which is used as the base before the configurations are applied for the pre-compiled binaries that gets distributed as “code”
    • As we are using the source-code, we used the variables defined by it
    • The two different names help to distinguish the differences between them (also prevents any clashes and conflicts!)
    • We also included various aliases in our package to help bridge between the two different versions. Meaning, calling vscode and code will use our package, code-oss, with a friendly notice (when installed)
  • If you already have the pre-compiled version installed, upgrading Kali will not replace it
    • However, when manually installing code-oss, it will then replace it!

Theme Enhancement

Command Line

If you are using ZSH, with the latest Kali profile applied, you can toggle between the two-line prompt and one-line prompt by pressing: CTRL + p (at the same time). This will only have an effect for the current session. If you would like to set it permanently, see kali-tweaks.

XFCE 4

We have switched up the quick launch tray in the top left, by:

  • Dropping the screen recorder button (as a result package can also be removed, kazam)
  • Adding a text editor shortcut (this uses mousepad as it is a quick and light)_
    • If you are looking for something that is more substantial, try code-oss
  • Adding in a web browser icon, which starts the default browser (often FireFox)
  • Adding a drop-down menu to select the user for default terminal (terminal or root terminal & Kali’s default is QTerminal)

root terminal emulator

To give you an idea of how the toggling between the terminal user works:

Inside of Thunar (Xfce’s default file manager), if you right-click in the main window, you should have a new option, Open as Root:
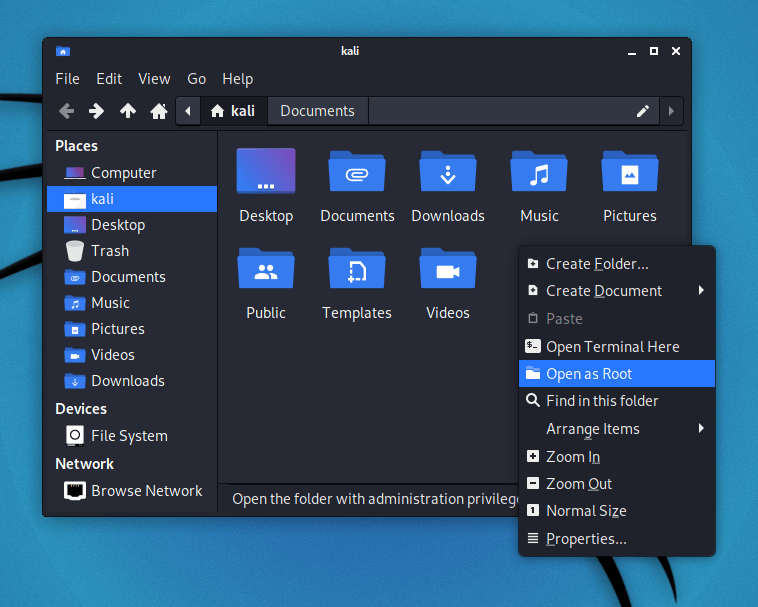
open as root on thuner file manager


With these theme changes, you may not get them if you upgrade Kali. This is because the theme settings are copied to your home folder when your user is first created. When you upgrade Kali, it is upgrading the operating system, so upgrading does not alter personal files (just system files). As a result, in order to get these theme tweaks, you need to either:

  • Do a fresh Kali install
  • Create a new user and switch to that
  • Delete your Xfce profile for the current user and relogin

Desktop Wallpaper & Login Background

People who have upgraded, you may have spotted that there is a new default login wallpaper and desktop background, but there are extras as well in this release:

Kali Linux Wallpapers

Whilst on the subject of wallpapers, if you have not noticed, previously we had been operating on an refresh cycle about every 6 months, where we would change the default login and desktop as well as included other art work if they were not to your taste. Going forwards, we are aiming to change the defaults at every 20xx.1 release (meaning it happens right at the start of every year). So it will still change again in 6 months, but this will be the last time! We will still aim to add extra wallpapers every 6 months, however, only change the defaults yearly.

Finally, we have updated kali-community-wallpapers & kali-wallpapers-legacy packages as well!

Raspberry Pi Recharged

Two new packages:

  • kalipi-config – “raspi-config on steroids” to assist in the initial setup of Kali Linux on a Raspberry Pi
  • kalipi-tft-config– assist in the initial setup of TFT displays on a Raspberry Pi

And other improvements:

  • Got built-in Bluetooth working on Raspberry Pi 4 & Raspberry Pi 400 (meaning all Raspberry Pi’s built-in bluetooth work!)
  • This is due to bluez, bluez-firmware , and pi-bluetooth packages forked and patched
  • Raspberry Pi kernel updated to 5.4.83
  • mt76 devices now work on Raspberry Pi 2 and 3 if you pass the option disable_usb_sg=1 when loading the mt76_usb module
  • 1500% performance improvement
  • First boot from 20 minutes to 15 seconds
  • Console scrolling working

Kali NetHunter Updates

Plenty of improvements under the hood, including:

  • Improved compatibility with dynamic partitions
  • Improvements to persistence of Magisk root
  • Improvements to Bluetooth and settings menus
  • Inclusion of rtl88xxau patches for older kernels in the kernel builder

And the highlight:

Android 11 support for:

  • Nokia 6.1
  • OnePlus One
  • OnePlus Nord
  • Xiaomi Poco F1
  • Xiaomi Mi A3
  • Samsung Galaxy S20 FE 5G

The Kali NetHunter repository now contains 179 kernels for 72 devices and 32 pre-built images are available on our download page

Huge thanks to @kim0coder, @yesimxev, @Svirusx, @Martinvlba, @CaliBerrr, @maade69 and the entire Kali NetHunter community for making this release happen. You absolutely rock!

More Docker support/Parallels support/Bug fixes

There are even more improvements to Kali, that are outside of the above text. Below are other note-worthy items:

  • Our Kali-Docker images are now available for arm64 and armhf as well as amd64
  • We have patched pkexec, so now Qt applications which have been ran as root will maintain the dark theme and the HiDPI setting
  • On a fresh Kali install, wireshark can now be run by unprivileged users
  • A couple of bugs were fixed in command-not-found, which is the terminal helper that helps you installing missing programs
  • Accessibility features were not installed by default (this was a mistake on our side that is now fixed)
  • Fixed a terminal font issue with special characters
  • Apple M1 users, Parallels is no longer in “Technical Preview” and as part of the release, they’ve fixed Kali image detection.
  • Win-KeX v2.10 has been released which now supports multiscreen
  • Kali’s logo is now included in the nerd-fonts project, so, with their next release you’ll be able to customize your terminal with the dragon. If you want to try it now, we’ve created a patched Fira-Code font with these new changes (the code for the logo is uF32B)

kali logo print

Download Kali Linux 2021.2

Fresh Images: So what are you waiting for? Start grabbing Kali already!

Seasoned Kali Linux users are already aware of this, but for the ones who are not, we do also produce weekly builds that you can use as well. If you cannot wait for our next release and you want the latest packages (or bug fixes) when you download the image, you can just use the weekly image instead.

This way you’ll have fewer updates to do.

Just know that these are automated builds that we do not QA like we do our standard release images. But we gladly take bug reports about those images because we want any issues to be fixed before our next release!

Existing Installs: If you already have an existing Kali Linux installation, remember you can always do a quick update:

echo "deb http://http.kali.org/kali kali-rolling main non-free contrib" | sudo tee /etc/apt/sources.list
sudo apt update && sudo apt -y full-upgrade
[ -f /var/run/reboot-required ] && sudo reboot -f

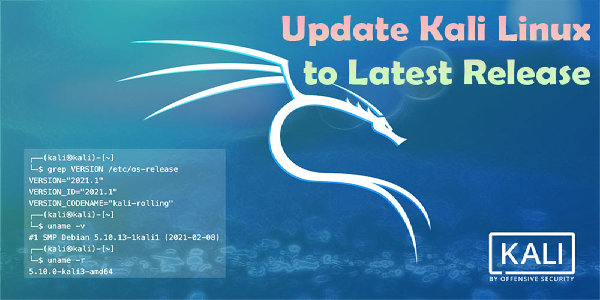
You should now be on Kali Linux 2021.2. We can do a quick check by doing:

┌──(kali㉿kali)-[~]
└─$ grep VERSION /etc/os-release
VERSION="2021.2"
VERSION_ID="2021.2"
VERSION_CODENAME="kali-rolling"

┌──(kali㉿kali)-[~]
└─$ uname -v
#1 SMP Debian 5.10.28-1kali1 (2021-04-12)

┌──(kali㉿kali)-[~]
└─$ uname -r
5.10.0-kali7-amd64

NOTE: The output of uname -r may be different depending on the system architecture.

As always, should you come across any bugs in Kali, please submit a report on our bug tracker. We’ll never be able to fix what we do not know is broken! And Twitter is not a Bug Tracker!
Open Whatsapp chat
Whatsapp Us
Chat with us for faster replies.