Everything about Cross-Site Scripting (XSS)

Everything about Cross-Site Scripting (XSS)

During surfing the web sometimes we welcomed with a pop-up, after entering a web page. Even on our website now have a pop-up for the very first time. Suppose our system can be attacked by these pop-ups, may be malicious payloads comes in to our system or our sensitive data is stolen.

xss cross site scripting kali linux thumbnail

Today in our this article we will going to cover the Cross-Site Scripting and we also learn how an attacker executes malicious JavaScript codes over at the input field and generates pop-us to deface the web-application or hijack user’s session.

Pop-up JavaScript’s relation to XSS

JavaScript is one of the most popular programming language of the web, more than 93% websites uses JavaScript. It is very flexible and easily mixes with the HTML codes.

A HTML webpage embedded with JavaScript shows it magic after the webpage loaded on the browser. JavaScript uses some functions to load an object over on a webpage. Functions like Onload, Onmouseover, Onclick etc. Then it prompts the alert as it coded. That’s why basically XSS payloads uses JavaScript codes.

Basics of Cross-Site Scripting (XSS)

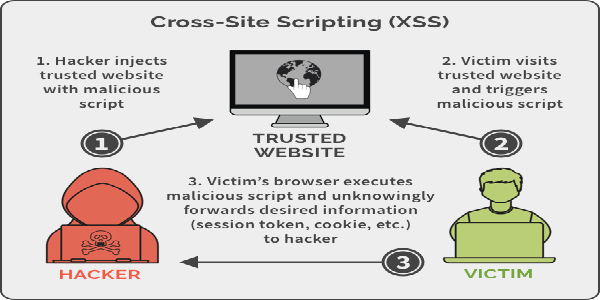
Cross-Site Scripting aka XSS is a client side code injection attack where attacker is able to execute malicious scripts into trusted websites. All the websites are not vulnerable to XSS, only those websites or web-applications are effected where the input-parameters are not properly validated. From there attacker can send malicious JavaScript codes, and the user of the web-application has no way to know that it is loading attacker scripts. That’s why XSS is too much dangerous.

Confused with what we are talking about? Don’t like too much theory? Let we come to practical examples. Before that we should know that XSS are mainly three types, those are following:

  1. Stored XSS
  2. Reflected XSS
  3. DOM-based XSS

Stored XSS

“Stored XSS” is also known as “Persistence XSS” or “Type I”, as we can know from the name that it will be stored, that means attacker’s malicious JavaScript codes will be “stored” on the web-applications database, and the server further drops it out back, when the client visits the perticular website.

Because this happens in a very legitimate way, like when the client/user clicks or hovers a particular infected section, the injected malicious JavaScript code will get executed by the browser as it was already saved into the web-application’s database. For that being reason this attack doesn’t requires any phishing technique to trap the user.

The most common example of “Stored XSS” is the comment section of the websites, which allow any user to write his comment as in the form for comments. Now lets have a look with an example:

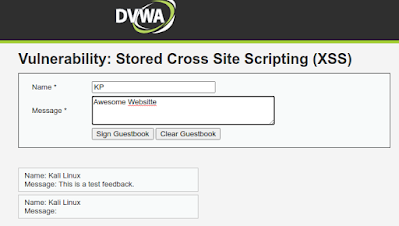
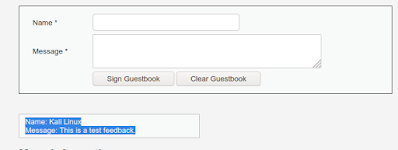
A web-application is asking to users to submit their feedback, in the following screenshot we can see the two fields one is for name and another is for the comment.

storage based XSS example

Now when we fill the form and hit “Sign Guestbook” button to leave our feedback, our entry gets stored into the database. We can see the database section highlighted in the following screenshot:

xss stored testing

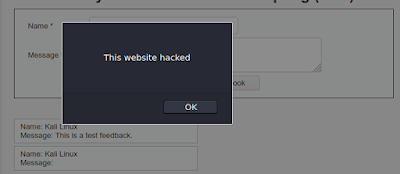
In this case the developer trusts us and hadn’t put any validator in the fields, or may be he forget to add validators. So this if this loophole found by an attacker, the attacker can take advantage of it. Without typing the comment in the Message section attacker may run any malicious script. The following script is given for an example:

<script>alert("This website is hacked")</script>

When we put the JavaScript code into the “Message” section, we can see the web-application reflects with an alert poop-up.

stored based xss

In the database section we can see that the database has been updated with name, but the message section is empty.

xss stored database

This is a clear indication that our/attacker’s script is successfully injected.

Now let’s check if it really submitted on the database or not? We open another browser (Chrome) and try to submit a genuine feedback.

xss stored comment

Here when we hit the “Sign Guestbook” button our this browser will execute the injected script, as we can see in the following screenshot:

We can see this also reflects our injected script, because it stored our input in the database. This is the stored based XSS.

Reflected XSS

Reflected XSS is also known as “Non-Persistence XSS” or “Type II”. When the web-application responds immediately on client’s input without validating what the client entered, this can lead an attacker to inject malicious browser executable code inside the single HTML response. This is also called “non-persistence”, because the malicious script doesn’t get stored inside the web-application’s database. That’s why the attacker needs to send the malicious link through phishing in order to trap the client.

Reflected XSS is the most common and it can be easily found on the “website’s search fields” where the attacker injects some malicious JavaScript codes in the text box/search box and, if the website is vulnerable, the web-page returns up the event described into the script.

Reflected XSS are mainly two types:

  • Reflected XSS GET
  • Reflected XSS POST

Lets check the concept of reflected XSS, we need to check the following scenario:

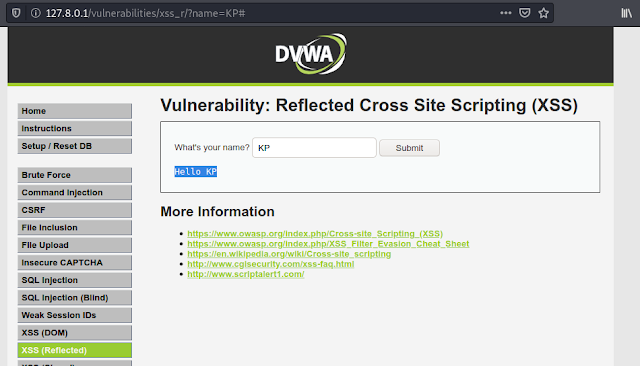
Here we have a webpage where we can enter our name and submit it. So, when we enter our name and submit it. A message prompts back over the screen, and say hello to us.

reflected xss reflecting name

If we look at the URL then we can see the “name” parameter in the URL shows up that, that means the data has been requested over through the GET method.

Now we are going to try to generate some pop-ups by injecting JavaScript codes over into this “name” parameter as:

<script>alert("This is reflected XSS, and you got hacked")</script>

We need to put this script on the URL where our name was,

example of reflected XSS

Now we can see that our JavaScript code is executed as an alert in the following screenshot:

reflected XSS

Actually the developer didn’t set up any input validation over the function, and our input simply get “echo“.

This is an example of reflected XSS using GET method, for reflected XSS POST method we can’t see the request on the URL, in that case we need to use Burpsuite or WebScarab like tools to change the request and inject our JavaScript codes.

DOM-Based XSS

DOM-Based XSS is the vulnerability which appears up in a Document Object Model rather than in the HTML pages. But before that we need to know what is Document Object Model.

DOM or Document Object Model describes up the different web-page segments like – title, headings, forms, tables etc, and even the hierarchical structure of an HTML page. That because this API increases the skill of the developers to produce and change HTML and XML documents as programming objects.

When an HTML document is loaded into a web browser, it becomes a “Document Object”.

DOM-based XSS vulnerabilities normally arise when JavaScript takes data from an attacker-controllable source, such as the URL, and passes it to a sink (a dangerous JavaScript function or DOM object as eval()) that supports dynamic code execution.

This attack is different from stored and reflected XSS attacks because over in this attack developer can’t find the dangerous script in the HTML source code as well as in the HTML response, it only can be observed during the execution time. Didn’t understand well, let’s check out a DOM-based XSS example.

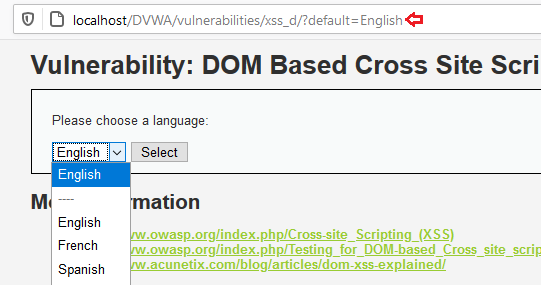
The following application permits us to opt a language shown in the following screenshot:

Dom-based XSS

If we choose our language then we can see it on the URL. like previous (Reflected XSS GET) we can manipulate the URL to get the alert.

#<script>alert("This is DOM XSS, and you got hacked")</script>

Then if we try to change the language we can see following:

alert for dom-based XSS

After the language we put a ‘#’, this is the major diffrence between DOM-BAsed XSS and Reflected or Stored XSS is that it can’t be stopped by server-side filters because anything written after the ‘#’ (hash) will never forward to the server.

XSS Exploitation

Haha ?, what the hell if we get an alert by doing these kind of stuffs, just this? nothing else? We click on the OK button and the pop-up alert is vanishing.

Wait, the pop-up speaks about a lot words. Let’s go back to the the first place, “We’ve come a long way from where we began”. Back to the Stored XSS section.

Here, in the stored XSS section, we know that our input is stored on the database of the web-application. In our previous example we created just an alert but we can do much more then it. For an example if we put any name in the name field and put the following JavaScript code on the message field.

<script>alert(document.cookie)</script>

And we captured the cookie as we can see in the following screenshot:

xss stored exploit coockie capture

Now, if we navigate away from this page, from another browser, then return to the XSS stored page, our code should run again and present a pop-up with the cookie for the current session. This can be expanded upon greatly, and with a bit more knowledge of JavaScript, an attacker can do a lot of damage.

To know more about exploitation of XSS we can go though this official PortSwigger documentation, this is well written.

Preventing XSS Attacks

As a cybersecurity expert we try to find bugs on various services, not only that fixing them or giving an idea to fix them is also our duty. Forestalling Cross-Site scripting or XSS is trivial some times however can be a lot harder relying upon the intricacy of the application and the manners in which it handles client controllable information.

Normally we can stop XSS by using following guide:

  • Validate input from user. At the point where user input is received, filter as strictly as possible based on what is expected or valid inputs.
  • Encode data on output from server. Where user-controllable data is output in HTTP responses, we should encode the output to prevent it from being interpreted as active content. Depending on the output context, this might require applying combinations of HTML, URL, JavaScript, and CSS encoding.
  • Using appropriate response headers. To stop XSS in HTTP responses that are not intended to contain any HTML or JavaScript, we can use the Content-Type and X-Content-Type-Options headers to ensure that browsers interpret the responses in the way we intend.
  • Content Security Policy. As the last line of our defense, we can use Content Security Policy (CSP) to reduce the severity of any XSS vulnerabilities that still come.

There are tons of more article on this we can get from the internet. We found a very detailed article on preventing XSS attacks.

Love our articles? Make sure to follow us on Twitter and GitHub, we post article updates there. To join our KaliLinuxIn family, join our Telegram Group. We are trying to build a community for Linux and Cybersecurity. For anything we always happy to help everyone on the comment section. As we know our comment section is always open to everyone. We read each and every comment and we always reply.
Right way to record and share our Terminal sessions

Right way to record and share our Terminal sessions

The Terminal, also known as the command line or a Terminal emulator, is an crusial component of any useful operating system. It is by far one of the most important applications on MacOS and Linux. The Terminal provides an efficient interface to access the true power of a computer better than any graphical user interface.

Sometimes we need to share our terminal or terminal commands to others to show or solve some issue. In that case we use screenshots which are not so satisfying. If we use a screen recorder apps but recording a screen and send the video file is annoying, here steps in asciinema.

Asciinema record and share terminal on Linux

Asciinema is a free and open source solution for recording terminal sessions and sharing them on the web in a easy way. Now this seems very interesting, lets try asciinema on our Kali Linux system. It also can be installed on various systems like MacOS, Linux, BSD even from source and pip.

To install it on our Kali Linux system we can run following command:

sudo apt install asciinema

After giving sudo password the installation process will start. In the following screenshot we can see that asciinema is installing.

asciinema installing on Kali Linux

This is very little tool should be installed on some seconds. After the installation process is complete we can run this tool and start record our terminal.

To start the recording we need to use the following command on our terminal.

asciinema rec

In the following screenshot we can see that it is started and we can see in the following screenshot:

asciinema started

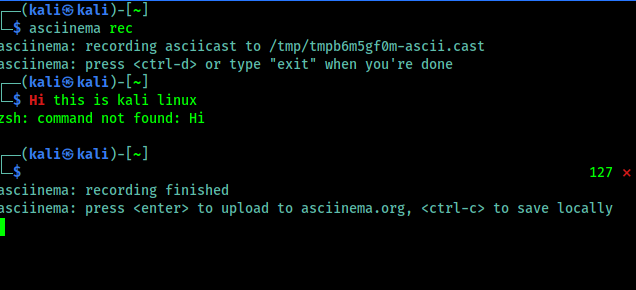
Now we can type any command and it will be recorded. Now we need to remember one thing that it records only the terminal, not other apps or the whole screen. When we feel that our recording is complete we can press CTRL+D or run exit command, shown in the following screenshot:

asciinema save options

Here it is clearly written that if we want to upload it on asciinema.org then we need to just press Enter⤶ and to save it on just our system we need to use CTRL+C.

We press Enter⤶ to upload it on asciinema.org and in the following screenshot we got the link of the recording.

asciinema uploaded

Now we can open this on our browser, here we might need an asciinema.org account. If it requires then we can easily create it by using mail id. Asciinema doesn’t requires any password they verify the mail address (?We can use temp-mail for a temporary mail id?), and we are ready to rock. We can see various options there as shown in the following screenshot.

asciinema website options

We can share it in various way. We can directly send someone the link. Asciinema also supports oEmbed/Open Graph/Twitter Card protocols, displaying a nice thumbnail where possible. We can also easily embedded an asciicast on any HTML page. If we want to put a recording in a blog post, project’s documentation or in a conference talk slides. As we embedded a asciinema terminal record, please check below:

We also can play our locally saved asciinema records (with *.cast file extension), by using following command:

asciinema play filename.cast

This is about record and share our terminal in a very easy way. Forget screen recording apps and blurry video. Enjoy a lightweight, purely text-based approach to terminal recording on our Kali Linus system.

Love our articles? Make sure to follow us on Twitter and GitHub, we post article updates there. To join our KaliLinuxIn family, join our Telegram Group. We are trying to build a community for Linux and Cybersecurity. For anything we always happy to help everyone on the comment section. As we know our comment section is always open to everyone. We read each and every comment and we always reply.

Basics of Digital Forensics

Basics of Digital Forensics

Forensics is the work of investigating the evidence and establishing the facts of interest that links to an incident. In this article we just discuss something about Digital Forensics. Here we try to give an introduction to digital forensics as we believe it is necessary to have a reaction plan when one of our assets, such as a server or web application, is compromised. We also recommend researching other sources for a more thorough training as this topic extends beyond the tools available in Kali Linux. Digital forensics is a faster growing area of interest in cyber security with very few people that know it well.

Basics of Digital Forensics Kali Linux

Before stepping into the world of Digital James Bond, we need to remember some rules. Not much, we believe these three rules must be followed by a digital forensics expert. If we failed to follow these rules then we may have failed to solve the case.

1. Never touch the evidence

Now it is not like the physical evidence touch. It means “never work on original data”,  always use a copy of evidence for forensics testing. We also need to ensure that we didn’t modify the data while creating a copy. The moment we touch or modify original data, our case becomes worthless. Tampered evidence can never be used in any legal proceeding regardless of what is found. The reason is once an original is modified, there is a possibility of identifying false evidence that can misrepresent the real incident. An example is making a change that adjusts the timestamp in the system logs. There would be no way to distinguish this change from an noob analyst’s mistake or attacker trying to cover his traces.
Most digital forensic analysts will use specialized devices to copy data bit for bit. There are also very reputable softwares that will do the same thing. It is important that our process be very well documented. Most digital copies in legal proceedings that have been thrown out were removed due to a hash of a storage medium, such as a hard drive, not matching copied data. The hash of a hard drive will not match a contaminated copy, even if only a single bit is modified. A hash match means it is extremely likely the original data including filesystem access logs, deleted data disk information, and metadata is an exact copy of the original data source.

2. Look for everything

The second vital rule for digital forensics is anything that can store data should be examined. In famous cases involving digital media, critical evidence has been found on a camera, DVR recorders, video game consoles, phones, iPods, and other random digital devices. If the device has any capability of storing user data, then it is possible that device could be used in a forensics investigation. Do not dismiss a device just because it is unlikely. A car navigation system that stores maps and music on SD cards could be used by culprits to hide data, as well provide evidence for Internet usage based on download music tags.

3. Well Documentation

This is the last crucial rule of digital forensics. Most of newcomers ignore it, but we MUST ensure documenting our findings. All evidence and steps used to reach a conclusion must be easy to understand for it to be credible. More importantly, our findings must be re-creatable. Independent investigators must arrive at the same conclusion as we using our documentation and techniques. It is also important that our documentation establishes a timeline  of events on when specifics occurred and how they occurred. All timeline conclusions must be documented.
A forensic investigation is all about the perception of being a security expert validating evidence linked to an incident. It is easy to get caught up looking for bad guys and drawing conclusions on what may have happened based on opinion. This is one of the fastest ways to discredit our work.

As a forensics specialist, we must only state the facts. Did the person Tony steal Steve’s files, or did the account that was logged on as the username Tony initiate a copy from the user account  Steve’s home directory to a USB drive with serial number XXX at the timestamp XXX on date XXX? See the difference? The real bad guy could have stolen Tony’s login credentials (using methods covered in this book) and steal Steve’s data while posing as Tony. The moment you jump to a conclusion is the moment your case becomes inconclusive based on personal interference. Remember, as a forensics specialist, we could be asked under oath to give testimony on exactly what happened. When anything outside of facts enters the record, our credibility will be questioned.

Extra Talks

These are the basic rules of digital forensics that we need to remember and follow all the time. Digital forensics is not so easy and it is very potential as a career option. As the basics we need to collect the information carefully and painstakingly analyzed with a view to extract evidence relating to the incident to help answer questions, as shown in the following diagram:

This is for today, if we follow the basics and use our brain and eyes then we can solve cases and become a digital James Bond. The world needs a hero.

Love our articles? Make sure to follow us on Twitter and GitHub, we post article updates there. To join our KaliLinuxIn family, join our Telegram Group. We are trying to build a community for Linux and Cybersecurity. For anything we always happy to help everyone on the comment section. As we know our comment section is always open to everyone. We read each and every comment and we always reply.
Best USB WiFi Adapter For Kali Linux 2021 [Updated August]

Best USB WiFi Adapter For Kali Linux 2021 [Updated August]

Best WiFi Adapter for Kali Linux

The all new Kali Linux 2021.1 was rolling out and we can simply use it as our primary operating system because of the non-root user. The main benefit of using Kali Linux as primary OS is we got the hardware support. Yes, we can do our all penetration testing jobs with this Kali Linux 2021, but to play with wireless networks or WiFi we need some special USB WiFi adapters in Kali.
Best WiFi Adapter for Kali Linux

Here we have listed some best USB Wireless adapters Kali Linux in 2021. These WiFi adapters are 100% compatible with Kali Linux and supports monitor mode and packet injection, which will help a lot in WiFi penetration testing.

Best WiFi Adapter for Kali Linux

Sl No.
WiFi Adapter
Chipset
Best for
Buy
1
AR9271
Good Old Friend
2
RT 3070
Best in it’s Price Range
3
RT 3070
Compact and Portable
4
RT 5572
Stylish for the Beginners
5
RTL8812AU
Smart Look & Advanced
6
RTL8814AU
Powerful & Premium
7
RT5372
Chip, Single Band

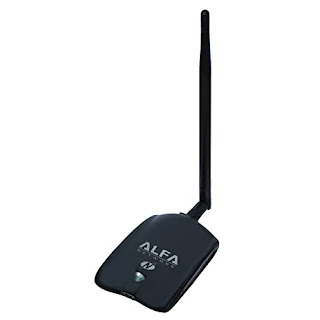
Alfa AWUS036NH

We are using this USB WiFi adapter from the BackTrack days (before releasing Kali Linux) and still we consider it as one of the best. For it’s long range signals we can do our penetration testing jobs from a long distance.

Alfa AWUS036NHA Kali Linux WiFi Adapter 2020

Alfa AWUS036NH is plug and play and compatible with any brand 802.11g or 802.11n router using 2.4 GHz wavelength and supports multi-stream & MIMO (multiple input multiple output) with high speed transfer TX data rate up to 150 MBPS. It also comes with a clip which can be used to attach this adapter on a laptop lid.

    1. Chipset: Atheros AR 9271.
    2. Compatible with any brand 802.11b, 802.11g or 802.11n router using 2.4 Ghz wave-length.
    3. Includes a 5 dBi omni directional antenna as well as a 7 dbi panel antenna.
    4. Supports security protocols: 64/128-bit WEP, WPA, WPA2, TKIP, AES.
    5. Compatible with Kali Linux RPi with monitor mode and packet injection.
    6. High transmitter power of 28 dBm – for long-rang and high gain WiFi.
      https://www.amazon.com/Alfa-AWUS036NH-802-11g-Wireless-Long-Range/dp/B003YIFHJY/ref=as_li_ss_tl?dchild=1&keywords=Alfa+AWUS036NHA&qid=1594882122&sr=8-6&linkCode=ll1&tag=adaptercart-20&linkId=2f09cf7cc9b84fcd2be61c590af1d25c&language=en_US

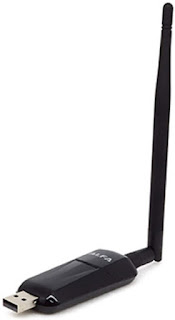
      Alfa AWUS036NHA

      Alfa again. Alfa provides the best WiFi adapters for Kali Linux. This adapter is the older version of Alfa AWUS036NH with Ralink RT3070 chipset. AWUS036NHA is the IEEE 802.11b/g/n Wireless USB adapter with 150 Mbps speed This is also compatible with IEEE 802.11b/g wireless devices at 54 Mbps.

      Alfa AWUS036NH Kali Linux WiFi Adapter 2020

      This plug and play WiFi adapter supports monitor mode and packet injection in any Linux distribution and Kali Linux. Alfa AWUS036NHA comes with a 4 inch 5 dBi screw-on swivel rubber antenna that can be removed and upgrade up to 9 dBi.

        1. Chipset: Ralink RT 3070.
        2. Comes with a 5 dBi omni directional antenna as well as a 7 dBi panel antenna.
        3. Supports security protocols: 64/128-bit wep, wpa, wpa2, tkip, aes
        4. Compatible with Kali Linux (Also in Raspberry Pi) with monitor mode and packet injection.
          https://www.amazon.com/Alfa-AWUS036NH-802-11g-Wireless-Long-Range/dp/B003YIFHJY/ref=as_li_ss_tl?dchild=1&keywords=Alfa+AWUS036NH&qid=1594870855&s=amazon-devices&sr=8-1&linkCode=ll1&tag=adaptercart-20&linkId=4c49c0097d6157190cf04122e27714ed&language=en_US

          Alfa AWUS036NEH

          This Alfa WiFi Adapter is compact and tiny, but it has a good range. It supports plug and play so connect it with Kali Linux machine and start playing with WiFi security. The antenna is detachable and makes it very portable. We have used this to build our portable hacking machine with Raspberry Pi and Kali Linux.

          Alfa AWUS036NEH Kali Linux WiFi Adpater 2020

          Alfa AWUS036NEH is the ultimate solution for going out and red teaming attacks. The long high gain WiFi antenna will give us enough range to capture even low signal wireless networks. This adapter is slim and doesn’t require a USB cable to use.

            1. Chipset: Ralink RT 3070.
            2. Supports monitor mode and packet injection on Kali Linux and Parrot Security on RPi.
            3. Compact and portable.
              https://www.amazon.com/AWUS036NEH-Range-WIRELESS-802-11b-USBAdapter/dp/B0035OCVO6/ref=as_li_ss_tl?dchild=1&keywords=Alfa+AWUS036NEH&qid=1594870918&sr=8-3&linkCode=ll1&tag=adaptercart-20&linkId=c6578f6fb090f86f9ee8917afba3199a&language=en_US

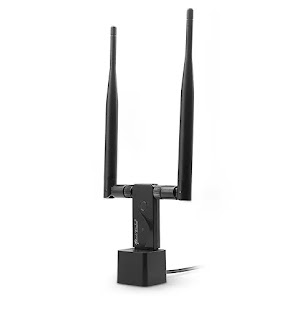
              Panda PAU09 N600

              Besides Alfa, Panda is also a good brand for WiFi adapters with monitor mode. Panda PAU09 is a good WiFi adapter to buy in 2020. This dual-band plug & play adapter is able to attack both 2.4 GHz as well as 5 GHz 802.11 ac/b/g/n WiFi networks.

              Panda PAU09 WiFi adapter for monitor mode

              This adapter comes with a USB docker and dual antennas, which looks really cool. It is also detachable into smaller parts. This adapter is reliable even on USB 3 and works great and fully supports both monitor mode and injection which is rare on a dual band wireless card out of the box.

                1. Chipset: Ralink RT5572.
                2. Supports monitor mode and packet injection on Kali Linux, Parrot Security even in RPi.
                3. 2 x 5dBi antenna.
                4. It comes with a USB stand with a 5 feet cable.
                5. Little bit of heating issue (not so much).
                  https://www.amazon.com/Panda-Wireless-PAU09-Adapter-Antennas/dp/B01LY35HGO/ref=as_li_ss_tl?dchild=1&keywords=Panda+PAU09&qid=1594870963&sr=8-1-spons&psc=1&spLa=ZW5jcnlwdGVkUXVhbGlmaWVyPUEzRUUwQjNVSkNGMEFIJmVuY3J5cHRlZElkPUEwODkwNzI3MkZHWUFNUTBRMlRTQSZlbmNyeXB0ZWRBZElkPUEwNzkxNzgzMTBaUEdDS05IUzdDTSZ3aWRnZXROYW1lPXNwX2F0ZiZhY3Rpb249Y2xpY2tSZWRpcmVjdCZkb05vdExvZ0NsaWNrPXRydWU=&linkCode=ll1&tag=adaptercart-20&linkId=d9d43db491c7cf14863cc99c1b8b7797&language=en_US

                  Alfa AWUS036ACH / AC1200

                  In Kali Linux 2017.1 update Kali Linux was released a significant update – support for RTL8812AU wireless chipset. Now Alfa AWUS036ACH is a BEAST. This is a premium WiFi adapter used by hackers and penetration testers. It comes with dual antennas and dual band technology (2.4 GHz 300 Mbps/5 GHz 867 Mbps) supports 802.11ac and a, b, g, n.

                  Alfa AWUS036ACH WiFi adapter for Kali Linux

                  These antennas are removable and if we require higher range, then we can connect an antenna with greater dbi value and use it as a long range WiFi link which makes this one of the best WiFi adapters. Also this adapter has an awesome look.

                  If budget is not an issue then this adapter is highly recommended.

                    1. Chipset: RealTek RTL8812AU.
                    2. Dual-band: 2.4 GHz and 5 GHz.
                    3. Supports both monitor mode & packet injection on dual band.
                    4. Premium quality with high price tag.
                      https://www.amazon.com/Alfa-Long-Range-Dual-Band-Wireless-External/dp/B00VEEBOPG/ref=as_li_ss_tl?dchild=1&keywords=Alfa+AWUS036ACH&qid=1594871102&sr=8-3&linkCode=ll1&tag=adaptercart-20&linkId=928256b6b245a63277f865d406f44c02&language=en_US

                      Alfa AWUS1900 / AC1900

                      Now this is the beast, then why is it at last? It is last because of its high price range. But the price is totally worth it for this USB WiFi adapter. If the previous adapter was a beast then it is a monster. Alfa AWUS1900 has high-gain quad antenna that covers a really long range (500 ft in an open area).

                      This is a dual band WiFi adapter with high speed capability 2.4GHz [up to 600Mbps] & 5GHz [up to 1300Mbps]. It also has a USB 3.0 interface.

                      Alfa AWUS036ACH The best wifi adapter for hacking in Kali Linux

                      Monitor mode and packet injection supported with both bands and it will be very useful for serious penetration testers. We also can attach this on our laptop display with it’s screen clip provided with the box.

                      What we got in the box?

                      • 1 x AWUS1900 Wi-Fi Adapter
                      • 4 x Dual-band antennas
                      • 1 x USB 3.0 cable
                      • 1 x Screen clip
                      • 1 x Installation DVD-Rom (doesn’t require on Kali Linux. Plug&Play)
                      • A consistent solution for network congestion!
                        1. Chipset: RealTek RTL8814AU.
                        2. Dual-band: 2.4 GHz and 5 GHz.
                        3. Supports both monitor mode & packet injection on dual band.
                        4. Premium quality with high price tag.
                        5. Very long range.
                          https://www.amazon.com/Alfa-AC1900-WiFi-Adapter-Long-Range/dp/B01MZD7Z76/ref=as_li_ss_tl?dchild=1&keywords=Alfa+AWUS036ACH&qid=1594871169&sr=8-4&linkCode=ll1&tag=adaptercart-20&linkId=d62c81825eace1b0f09d0762e84881c4&language=en_US

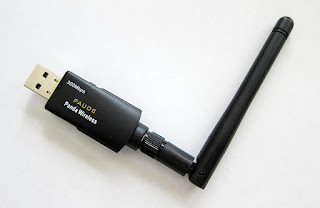
                          Panda PAU 06

                          Yes, This low cost Panda PAU 06 WiFi adapter supports Monitor Mode and Packet Injections. But we really don’t suggest to buy this adapter if budget is not an issue.
                          panda pau 06 wifi adapter for Kali Linux
                          The main reason is this WiFi adapter doesn’t supports dual-band frequency (only supports 2.4GHz), it doesn’t supports 5GHz frequency.
                          This WiFi adapter comes with Ralink RT5372 chipset inside it. 802.11n standards supports 300MB per second maximum speed.
                          This adapter takes less power from computer, but other adapters doesn’t took too much power from system (this point is negligible).
                          panda pau 06 order on amazon

                          Extras

                          There are some more WiFi adapters that we did not cover because we didn’t test them on our hands. These WiFi adapters were owned by us and some of our friends so we got a chance to test these products. We didn’t listed some WiFi adapters like following:

                          Be Careful to choose from these, because we don’t know that they surely support monitor mode & packet injection or not. As per our own experience Alfa cards are the best in the case of WiFi Hacking.

                          How to Choose Best Wireless Adapter for Kali Linux 2020

                          Before going through WiFi adapter brands let’s talk something about what kind of WiFi adapter is best for Kali Linux. There are some requirements to be a WiFi penetration testing wireless adapter.

                          • Should support Monitor mode.
                          • The ability to inject packets and capture packets simultaneously.

                          Here are the list of WiFi motherboards supports Monitor mode and Packet injection.

                          • Atheros AR9271 (only supports 2.4 GHz).
                          • Ralink RT3070.
                          • Ralink RT3572.
                          • Ralink RT5370N
                          • Ralink RT5372.
                          • Ralink RT5572.
                          • RealTek 8187L.
                          • RealTek RTL8812AU (RTL8812BU & Realtek8811AU doesn’t support monitor mode).
                          • RealTek RTL8814AU

                          So we need to choose WiFi Adapter for Kali Linux carefully. For an Example, on the Internet lots of old and misleading articles that describe TP Link N150 TL-WN722N is good for WiFi security testing. But it is not true. Actually it was.

                          TP Link N150 TL-WN722N newer models don't support Monitor Mode
                          TP Link N150 TL-WN722N newer models doesn’t work

                          The TP Link N150 TL-WN722N’s previous versions support monitor mode. The version 1 comes with Atheros AR9002U chipset and supports monitor mode. Version 2 has the Realtek RTL8188EUS chipset and doesn’t support monitor mode or packet injection. TP Link N150 TL-WN722N version 1 is not available in the market right now. So clear these things and don’t get trapped.

                          Which WiFi adapter is the best? Vote Please

                           
                          pollcode.com free polls

                          WiFi Hacking in Kali Linux

                          Kali Linux is the most widely used penetration testing operating system of all time. It comes with lots of tools pre-installed for cyber security experts and ethical hackers. We can perform web application penetration testing, network attack as well as wireless auditing or WiFi hacking. We have already posted some lots of tutorials on our website and some good WiFi auditing tutorials like AirCrack-Ng.

                          Why Do We Use External USB WiFi Adapters in Kali Linux?

                          A WiFi adapter is a device that can be connected to our system and allows us to communicate with other devices over a wireless network. It is the WiFi chipset that allows our mobile phone laptop or other devices which allows us to connect to our WiFi network and access the internet or nearby devices.

                          But most of the Laptops and mobile phones come with inbuilt WiFi chipset so why do we need to connect an external WiFi adapter on our system ? Well the simple answer is our in-built WiFi hardware is not much capable to perform security testing in WiFi networks.Usually inbuilt WiFi adapters are low budget and not made for WiFi hacking, they don’t support monitor mode or packet injection.

                          If we are running Kali Linux on Virtual Machine then also the inbuilt WiFi Adapter doesn’t work for us. Not even in bridge mode. In that case we also need an external WiFi adapter to play with WiFi networks. A good external WiFi adapter is a must have tool for everyone who has interest in the cyber security field.

                           
                          WSL2 installation of Kali Linux will not support any kind (Inbuilt or External) of Wi-Fi adapters.

                          Kali Linux Supported WiFi Adapters

                          Technically almost every WiFi adapter supports Kali Linux, but those are useless on WiFi hacking if they don’t support monitor mode and packet injection. Suppose, we buy a cheap WiFi adapter under $15 and use it to connect WiFi on Kali Linux. That will work for connecting to wireless networks but we can’t play with networks.

                          It doesn’t make sense, when we are using Kali Linux then we are penetration testers so a basic WiFi adapter can’t fulfill our requirements. That’s why we should have a special WiFi adapter that supports monitor mode and packet injection. So in this tutorial Kali Linux supported means not only supported it means the chipset has ability to support monitor mode and packet injection.

                          What is Monitor Mode

                          Network adapters, whether it is wired or wireless, are designed to only capture and process packets that are sent to them. When we want to sniff a wired connection and pick up all packets going over the wire, we put our wired network card in “promiscuous” mode.

                          In wireless technology, the equivalent is monitor mode. This enables us to see and manipulate all wireless traffic passing through the air around us. Without this ability, we are limited to using our WiFi adapter to only connect to wireless Access Points (APs) that accept and authenticate us. That is not what we are willing to settle for.
                          In the Aircrack-ng suite, we need to be able to use airodump-ng to collect or sniff data packets.

                          What is Packet Injection

                          Most WiFi attacks require that we are able to inject packets into the AP while, at the same time, capturing packets going over the air. Only a few WiFi adapters are capable of doing this.

                          WiFi adapter manufacturers are not looking to add extra features to their standard wireless adapters to suit penetration testers needs. Most wireless adapters built into your laptop are designed so that people can connect to WiFi and browse the web and send mails. We need something much more powerful and versatile than that.

                          If we can’t inject packets into the Access Point (in Aircrack-ng, this is the function of Aireplay-ng), then it really limits what we do.

                          If we are using Kali Linux and want to be a security tester or ethical hacker then a special WiFi adapter is a must have tool in our backpack. As per our own experience listed Alfa cards in this list are best USB wireless adapter for Kali Linux, going with them may be costly but they are really worth it. For more assistance comment below we reply each and every comment.

                          We are also in Twitter join us there. Our Telegram group also can help to choose the best WiFi adapter for hacking and Kali Linux.
                          Ping — Know the Target (Ping Pong)!

                          Ping — Know the Target (Ping Pong)!

                          Ping Pong! No we are not in wrong article. In this article we are going do discuss about the ping tool. Ping is the most famous tool that is used to check whether a particular host is available or not. tool works by sending an Internet Control Message Protocol (ICMP) echo request packet to the target host. If the target host is available and the firewall is not blocking the ICMP echo request packet, it will reply with the ICMP echo reply packet.

                          ping on Kali Linux

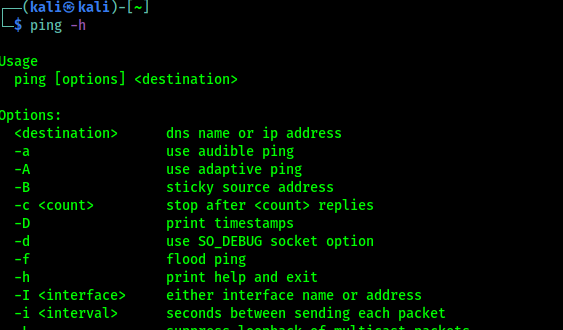
                          Although we can’t find the ping tool in Kali Linux application menu but in our terminal we can ping -h command to see the help section of the ping tool.

                          ping -h

                          In the following screenshot we can see the help of ping.

                          help of ping on Kali Linux

                          Now we run the ping with a destination address. For an example we use IP address of Facebook. We use following command:

                          ping 31.13.79.35

                          In the following screenshot we can see the output of the above command.

                          ping facebook ip from Kali Linux

                          By default, ping will run continuously until we press Ctrl + C and stop it.

                          We also can use a domain name to ping. Ping will automatically fetch the IP, if the target not behind a firewall.

                          ping facebook.com

                          In the following screenshot we can see that ping is started and it’s automatically find facebook’s IP address.

                          ping facebook.com from Kali Linux

                          This was the basic example, ping toll has lot of options inside it, but few of them are widely used. Those are following:

                          • -c count: This is the number of echo request packets to be sent.
                          • -I interface address: This is the network interface of the source address. The argument may be a numeric IP address (such as 192.168.0.108) or the name of the device (like eth0, wlan0). This option is required if we want to ping the IPv6 link-local address.
                          • -s packet size: This specifies the number of data bytes to be sent. The default is 56 bytes, which translates into 64 ICMP data bytes when combined with the 8 bytes of the ICMP header data.

                          We will discuss about these with example.

                          Assume that we are starting with internal penetration testing work. The customer gave us access to their network using a LAN cable. And, they also gave us the list of target servers’ IP addresses.

                          The first thing we would want to do before launching a full penetration testing arsenal is to check whether these servers are accessible from our machine. We can use ping for this task.

                          Our target server is located at 192.168.0.1, while our machine has an IP address of 192.168.0.108. To check the target server availability, we can give the following command:

                          ping -c 1 192.168.0.1

                          In the following screenshot is the result of the preceding ping command:

                          ping on local target

                          From the above screenshot, we know that there is one ICMP echo request packet sent to the destination (IP address: 192.168.0.1). Also, the sending host (IP address: 192.168.0.108) received one ICMP echo reply packet. The round-trip time required is 2.208 ms (millisecond), and there is no packet loss during the process.

                          Let’s see the network packets that are transmitted and received by our machine. We are going to use Wireshark, a network protocol analyzer, on our machine to capture these packets, as shown in the following screenshot:

                          ping network packets capturing on wireshark

                          From the above screenshot, we can see that our host (192.168.0.1) sent one ICMP echo request packet to the destination host (192.168.0.108). Since the destination is alive and allows the ICMP echo request packet, it will send the ICMP echo reply packet back to our machine.

                          If our target is using an IPv6 address, such as fe80::e82a:e363:100d:9b02, we can use the ping6 tool to check its availability. We need to give the -I option for the command to work against the link-local address:

                          ping6 -c 1 fe80::e82a:e363:100d:9b02 -I wlan0

                          The following screenshot shows the packets sent to complete the ping6 request:

                          ping6 for IPV6

                          Here ping6 is using the ICMPv6 request and reply.

                          To block the ping request, our firewall can be configured to only allow the ICMP echo request packet from a specific host and drop the packets sent from other hosts. This is how we can use ping and know things about our host. This is the primary thing for penetration testers.

                          That’s for today. Love our articles? Make sure to follow us on Twitter and GitHub, we post article updates there. To join our KaliLinuxIn family, join our Telegram Group. We are trying to build a community for Linux and Cybersecurity. For anything we always happy to help everyone on the comment section. As we know our comment section is always open to everyone. We read each and every comment and we always reply.
                          NIST CSF Success Story: University of Kansas Medical Center

                          NIST CSF Success Story: University of Kansas Medical Center

                           “The Information Security team at the University of Kansas Medical Center is using the Baldrige Cybersecurity Excellence Builder as a framework for self-assessment and program development. The BCEB is a powerful tool, especially when used in conjunction with the NIST Cybersecurity Framework. I don’t think that it’s overly dramatic to say that we’re going to …

                          NIST CSF Success Story: University of Kansas Medical Center Read More »

                          NIST CSF Success Story: University of Pittsburgh

                          NIST CSF Success Story: University of Pittsburgh

                           “We’re really happy with the NIST Cybersecurity Framework. Using NIST 800-171 assessments eases the grant proposal and submittal process—allowing us to focus on our passion for research.”  – Jonathan C. Silverstein, MD, MS, FACS, FACMI, Chief Research Informatics Officer, Department of Biomedical Informatics, University of Pittsburgh School of Medicine  Benefits from Using the Framework:  Situation: …

                          NIST CSF Success Story: University of Pittsburgh Read More »

                          NIST CSF Success Story: ISACA

                          NIST CSF Success Story: ISACA

                          “The value of the NIST Cybersecurity Framework cannot be overstated for our organization, as the Framework has provided a common language to organize and communicate about our events, cybersecurity certifications, and training offerings.” – Frank Downs, Director of Cybersecurity Practices, ISACA Benefits from Using the Framework: Situation: Drivers:  ISACA leverages multiple frameworks in development of its offerings. …

                          NIST CSF Success Story: ISACA Read More »

                          NIST CSF Success Story: University of Chicago Biological Sciences Division

                          NIST CSF Success Story: University of Chicago Biological Sciences Division

                          “There are many security frameworks, but we found that the Cybersecurity Framework University of Chicago was well-aligned with our main objective, which was to establish a common language for communicating cybersecurity risks across the Division,” – Plamen Martinov, BSD CISO Benefits from Using the Framework: Situation: Drivers: Process: UoC BSD Framework Implementation Overview: Results and …

                          NIST CSF Success Story: University of Chicago Biological Sciences Division Read More »

                          NIST CSF Success Stories: Government of Bermuda

                          NIST CSF Success Stories: Government of Bermuda

                          “NIST’s Cybersecurity Framework has provided us with a comprehensive roadmap to ensure effective cybersecurity practices are implemented across Government.” – Hon. Wayne M. Caines, JP, MP., Minister of National Security Benefits Received from Implementing the Framework: Situation Drivers Process Results and Impacts What’s Next ——————————————————————————————————————–Infocerts LLP, 5B 306 Riverside Greens, Panvel, Raigad 410206 Maharashtra, IndiaContact us …

                          NIST CSF Success Stories: Government of Bermuda Read More »

                          Open Whatsapp chat
                          Whatsapp Us
                          Chat with us for faster replies.