Kali Linux

Kali Linux is a Debian-derived Linux distribution designed for digital forensics and penetration testing. It is maintained and funded by Offensive Security.

Regular Updates and Cleaning Kali Linux System

Regular Updates and Cleaning Kali Linux System

Kali Linux is a rolling distribution, that means it continuously updates in all areas of the operating system, including the Linux kernel, the desktop environment, all utilities and all applications. So we need to update it frequently to stay updated always.

How to update and clean Kali Linux

Not only that, due to update regularly some old packages of applications are kept on our system as a junk. These older files are not so much harmful but they might slow down our system. So we need to clean them on regular basis.

Updating & Upgrading Kali Linux

There are various types of updates we can do like normal update, full upgrade, distribution upgrade.

Updating Kali Linux

Update can be simply done by following command:

sudo apt update -y

The above command will update the package lists for upgrades for packages that need upgrading, as well as new packages that have just come to the Kali Linux repositories. As we can see in the following screenshot:

update kali linux

In the above screenshot we can see that we have already updated our system. One thing to remember that this updates the list of available packages and their versions, but it does not install or upgrade any packages. We can actually install them by using upgrade.

Upgrading Kali Linux

Where update updates the list of available packages but didn’t install them, upgrade actually installs newer versions of the packages we have. After updating the lists, the package manager knows about available updates for the software you have installed. That’s why we need to run update before upgrading.

To upgrading Kali Linux we need to run following command on our Kali Linux system:

sudo apt upgrade -y

As we can see in the following screenshot:

upgrading Kali Linux

In the above screenshot we can see that the upgrade is running. It will take some time depending our internet connection and system performance. Unlike Windows we can cancel it anytime and resume it by applying the same command.

Where sudo apt upgrade -y command installs all and doesn’t remove any packages and skips upgrading old packages if removal is needed, sudo apt full-upgrade -y command removes old packages if needed to perform the upgrade of packages to their latest versions.

sudo apt full-upgrade -y

The output of the above command shown in the following screenshot:

full-upgrade kali linux

sudo apt full-upgrade can be run after sudo apt update -y command but sudo apt update -y is considered more safe then sudo apt full-upgrade -y command. But anyways don’t panic it doesn’t harm our system badly. To know the very detailed difference in these commands please read this article.

Similar to sudo apt-get upgrade command, the sudo apt-get dist-upgrade also upgrades the packages. In addition to this, it also handles changing dependencies with the latest versions of the package. It intelligently resolves the conflict among package dependencies and tries to upgrade the most significant packages at the expense of less significant ones, if required. Unlike sudo apt-get upgrade command, the sudo apt-get dist-upgrade is proactive and it installs new packages or removes existing ones on its own in order to complete the upgrade.

sudo apt dist-upgrade -y

The above command will upgrade our distribution totally.

Cleaning Kali Linux

We can clean our no-longer needed packages by using following command on our Kali Linux terminal:

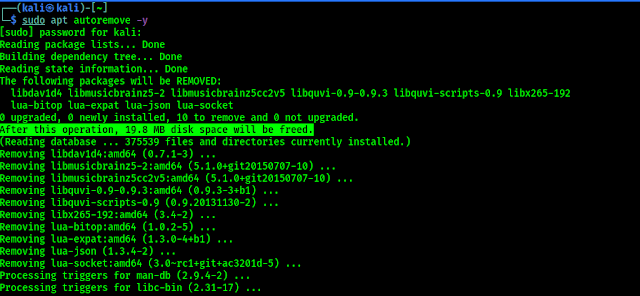
sudo apt autoremove -y

In the following screenshot we can see the output of this command.

autoclean

In the above screenshot we can see that 19 MB of our disk space is cleared and some packages are removed. Use of this command is safe and should not cause problems.

Each program update, package files are downloaded to the package cache. After the update, downloaded files (you can call them installation files) are not deleted, and gradually the package cache grows to large sizes. This was done intentionally with the idea that if after the next update you find that the new package has problems and the old version is no longer available in the online repository, then you can roll back to the old version by installing it from a file saved in the package cache.

For rolling distributions, the cache grows very quickly, and if we are not qualified enough to roll back to the old version using the installation package which is stored in the cache, then for you these hundreds of megabytes or even several gigabytes are a waste of space on our hard drive. Therefore, from time to time we can execute following commands:

sudo apt autoclean -y
sudo apt clean -y

The sudo apt clean -y command cleans the local repository from received package files. It removes everything except the lock file from /var/cache/apt/archives/ and /var/cache/apt/archives/partial/.

Like sudo apt clean -y command, sudo apt autoclean -y cleans downloaded package files from the local repository. The only difference is that it only removes package files that can no longer be downloaded and are largely useless.

This allows us to maintain the cache for a long period without growing too much.

The following command is not directly related to cleaning, but helps maintain our Kali Linux system health.

sudo apt install -f -y

The -f or –fix-broken flag tries to make normal a system by repairing broken dependencies. This option, when used with install/remove, may skip any packages to allow APT to find a likely solution. If packages are listed, this should completely fix the problem.

This is everything to this article, hope now we got a clear idea about “How to update Kali Linux” and “How to clean Kali Linux”.

Love our articles? Make sure to follow us on Twitter and GitHub, we post article updates there. To join our KaliLinuxIn family, join our Telegram Group. We are trying to build a community for Linux and Cybersecurity. For anything we always happy to help everyone on the comment section. As we know our comment section is always open to everyone. We read each and every comment and we always reply.

Best USB WiFi Adapter For Kali Linux 2021 [Updated October]

Best USB WiFi Adapter For Kali Linux 2021 [Updated October]

Best WiFi Adapter for Kali Linux

The all new Kali Linux 2021.1 was rolling out and we can simply use it as our primary operating system because of the non-root user. The main benefit of using Kali Linux as primary OS is we got the hardware support. Yes, we can do our all penetration testing jobs with this Kali Linux 2021, but to play with wireless networks or WiFi we need some special USB WiFi adapters in Kali.
Best WiFi Adapter for Kali Linux

Here we have listed some best USB Wireless adapters Kali Linux in 2021. These WiFi adapters are 100% compatible with Kali Linux and supports monitor mode and packet injection, which will help a lot in WiFi penetration testing.

Best WiFi Adapter for Kali Linux

Sl No.
WiFi Adapter
Chipset
Best for
Buy
1
AR9271
Good Old Friend
2
RT 3070
Best in it’s Price Range
3
RT 3070
Compact and Portable
4
RT 5572
Stylish for the Beginners
5
RTL8812AU
Smart Look & Advanced
6
RTL8814AU
Powerful & Premium
7
RT5372
Chip, Single Band


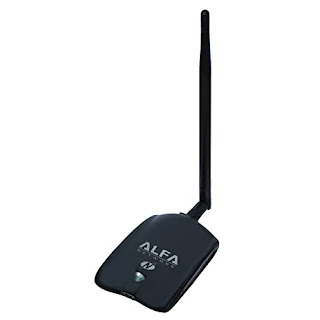
Alfa AWUS036NH

We are using this USB WiFi adapter from the BackTrack days (before releasing Kali Linux) and still we consider it as one of the best. For it’s long range signals we can do our penetration testing jobs from a long distance.

Alfa AWUS036NHA Kali Linux WiFi Adapter 2020

Alfa AWUS036NH is plug and play and compatible with any brand 802.11g or 802.11n router using 2.4 GHz wavelength and supports multi-stream & MIMO (multiple input multiple output) with high speed transfer TX data rate up to 150 MBPS. It also comes with a clip which can be used to attach this adapter on a laptop lid.

    1. Chipset: Atheros AR 9271.
    2. Compatible with any brand 802.11b, 802.11g or 802.11n router using 2.4 Ghz wave-length.
    3. Includes a 5 dBi omni directional antenna as well as a 7 dbi panel antenna.
    4. Supports security protocols: 64/128-bit WEP, WPA, WPA2, TKIP, AES.
    5. Compatible with Kali Linux RPi with monitor mode and packet injection.
    6. High transmitter power of 28 dBm – for long-rang and high gain WiFi.
      https://www.amazon.com/Alfa-AWUS036NH-802-11g-Wireless-Long-Range/dp/B003YIFHJY/ref=as_li_ss_tl?dchild=1&keywords=Alfa+AWUS036NHA&qid=1594882122&sr=8-6&linkCode=ll1&tag=adaptercart-20&linkId=2f09cf7cc9b84fcd2be61c590af1d25c&language=en_US

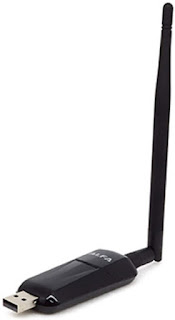
      Alfa AWUS036NHA

      Alfa again. Alfa provides the best WiFi adapters for Kali Linux. This adapter is the older version of Alfa AWUS036NH with Ralink RT3070 chipset. AWUS036NHA is the IEEE 802.11b/g/n Wireless USB adapter with 150 Mbps speed This is also compatible with IEEE 802.11b/g wireless devices at 54 Mbps.

      Alfa AWUS036NH Kali Linux WiFi Adapter 2020

      This plug and play WiFi adapter supports monitor mode and packet injection in any Linux distribution and Kali Linux. Alfa AWUS036NHA comes with a 4 inch 5 dBi screw-on swivel rubber antenna that can be removed and upgrade up to 9 dBi.

        1. Chipset: Ralink RT 3070.
        2. Comes with a 5 dBi omni directional antenna as well as a 7 dBi panel antenna.
        3. Supports security protocols: 64/128-bit wep, wpa, wpa2, tkip, aes
        4. Compatible with Kali Linux (Also in Raspberry Pi) with monitor mode and packet injection.
          https://www.amazon.com/Alfa-AWUS036NH-802-11g-Wireless-Long-Range/dp/B003YIFHJY/ref=as_li_ss_tl?dchild=1&keywords=Alfa+AWUS036NH&qid=1594870855&s=amazon-devices&sr=8-1&linkCode=ll1&tag=adaptercart-20&linkId=4c49c0097d6157190cf04122e27714ed&language=en_US

          Alfa AWUS036NEH

          This Alfa WiFi Adapter is compact and tiny, but it has a good range. It supports plug and play so connect it with Kali Linux machine and start playing with WiFi security. The antenna is detachable and makes it very portable. We have used this to build our portable hacking machine with Raspberry Pi and Kali Linux.

          Alfa AWUS036NEH Kali Linux WiFi Adpater 2020

          Alfa AWUS036NEH is the ultimate solution for going out and red teaming attacks. The long high gain WiFi antenna will give us enough range to capture even low signal wireless networks. This adapter is slim and doesn’t require a USB cable to use.

            1. Chipset: Ralink RT 3070.
            2. Supports monitor mode and packet injection on Kali Linux and Parrot Security on RPi.
            3. Compact and portable.
              https://www.amazon.com/AWUS036NEH-Range-WIRELESS-802-11b-USBAdapter/dp/B0035OCVO6/ref=as_li_ss_tl?dchild=1&keywords=Alfa+AWUS036NEH&qid=1594870918&sr=8-3&linkCode=ll1&tag=adaptercart-20&linkId=c6578f6fb090f86f9ee8917afba3199a&language=en_US

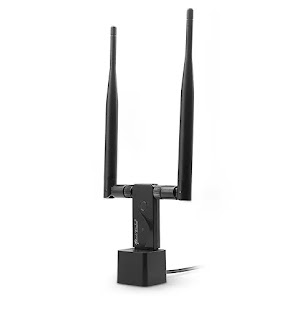
              Panda PAU09 N600

              Besides Alfa, Panda is also a good brand for WiFi adapters with monitor mode. Panda PAU09 is a good WiFi adapter to buy in 2020. This dual-band plug & play adapter is able to attack both 2.4 GHz as well as 5 GHz 802.11 ac/b/g/n WiFi networks.

              Panda PAU09 WiFi adapter for monitor mode

              This adapter comes with a USB docker and dual antennas, which looks really cool. It is also detachable into smaller parts. This adapter is reliable even on USB 3 and works great and fully supports both monitor mode and injection which is rare on a dual band wireless card out of the box.

                1. Chipset: Ralink RT5572.
                2. Supports monitor mode and packet injection on Kali Linux, Parrot Security even in RPi.
                3. 2 x 5dBi antenna.
                4. It comes with a USB stand with a 5 feet cable.
                5. Little bit of heating issue (not so much).
                  https://www.amazon.com/Panda-Wireless-PAU09-Adapter-Antennas/dp/B01LY35HGO/ref=as_li_ss_tl?dchild=1&keywords=Panda+PAU09&qid=1594870963&sr=8-1-spons&psc=1&spLa=ZW5jcnlwdGVkUXVhbGlmaWVyPUEzRUUwQjNVSkNGMEFIJmVuY3J5cHRlZElkPUEwODkwNzI3MkZHWUFNUTBRMlRTQSZlbmNyeXB0ZWRBZElkPUEwNzkxNzgzMTBaUEdDS05IUzdDTSZ3aWRnZXROYW1lPXNwX2F0ZiZhY3Rpb249Y2xpY2tSZWRpcmVjdCZkb05vdExvZ0NsaWNrPXRydWU=&linkCode=ll1&tag=adaptercart-20&linkId=d9d43db491c7cf14863cc99c1b8b7797&language=en_US

                  Alfa AWUS036ACH / AC1200

                  In Kali Linux 2017.1 update Kali Linux was released a significant update – support for RTL8812AU wireless chipset. Now Alfa AWUS036ACH is a BEAST. This is a premium WiFi adapter used by hackers and penetration testers. It comes with dual antennas and dual band technology (2.4 GHz 300 Mbps/5 GHz 867 Mbps) supports 802.11ac and a, b, g, n.

                  Alfa AWUS036ACH WiFi adapter for Kali Linux

                  These antennas are removable and if we require higher range, then we can connect an antenna with greater dbi value and use it as a long range WiFi link which makes this one of the best WiFi adapters. Also this adapter has an awesome look.

                  If budget is not an issue then this adapter is highly recommended.

                    1. Chipset: RealTek RTL8812AU.
                    2. Dual-band: 2.4 GHz and 5 GHz.
                    3. Supports both monitor mode & packet injection on dual band.
                    4. Premium quality with high price tag.
                      https://www.amazon.com/Alfa-Long-Range-Dual-Band-Wireless-External/dp/B00VEEBOPG/ref=as_li_ss_tl?dchild=1&keywords=Alfa+AWUS036ACH&qid=1594871102&sr=8-3&linkCode=ll1&tag=adaptercart-20&linkId=928256b6b245a63277f865d406f44c02&language=en_US

                      Alfa AWUS1900 / AC1900

                      Now this is the beast, then why is it at last? It is last because of its high price range. But the price is totally worth it for this USB WiFi adapter. If the previous adapter was a beast then it is a monster. Alfa AWUS1900 has high-gain quad antenna that covers a really long range (500 ft in an open area).

                      This is a dual band WiFi adapter with high speed capability 2.4GHz [up to 600Mbps] & 5GHz [up to 1300Mbps]. It also has a USB 3.0 interface.

                      Alfa AWUS036ACH The best wifi adapter for hacking in Kali Linux

                      Monitor mode and packet injection supported with both bands and it will be very useful for serious penetration testers. We also can attach this on our laptop display with it’s screen clip provided with the box.

                      What we got in the box?

                      • 1 x AWUS1900 Wi-Fi Adapter
                      • 4 x Dual-band antennas
                      • 1 x USB 3.0 cable
                      • 1 x Screen clip
                      • 1 x Installation DVD-Rom (doesn’t require on Kali Linux. Plug&Play)
                      • A consistent solution for network congestion!
                        1. Chipset: RealTek RTL8814AU.
                        2. Dual-band: 2.4 GHz and 5 GHz.
                        3. Supports both monitor mode & packet injection on dual band.
                        4. Premium quality with high price tag.
                        5. Very long range.
                          https://www.amazon.com/Alfa-AC1900-WiFi-Adapter-Long-Range/dp/B01MZD7Z76/ref=as_li_ss_tl?dchild=1&keywords=Alfa+AWUS036ACH&qid=1594871169&sr=8-4&linkCode=ll1&tag=adaptercart-20&linkId=d62c81825eace1b0f09d0762e84881c4&language=en_US

                          Panda PAU 06

                          Yes, This low cost Panda PAU 06 WiFi adapter supports Monitor Mode and Packet Injections. But we really don’t suggest to buy this adapter if budget is not an issue.
                          panda pau 06 wifi adapter for Kali Linux
                          The main reason is this WiFi adapter doesn’t supports dual-band frequency (only supports 2.4GHz), it doesn’t supports 5GHz frequency.
                          This WiFi adapter comes with Ralink RT5372 chipset inside it. 802.11n standards supports 300MB per second maximum speed.
                          This adapter takes less power from computer, but other adapters doesn’t took too much power from system (this point is negligible).
                          panda pau 06 order on amazon

                          Extras

                          There are some more WiFi adapters that we did not cover because we didn’t test them on our hands. These WiFi adapters were owned by us and some of our friends so we got a chance to test these products. We didn’t listed some WiFi adapters like following:

                          Be Careful to choose from these, because we don’t know that they surely support monitor mode & packet injection or not. As per our own experience Alfa cards are the best in the case of WiFi Hacking.

                          How to Choose Best Wireless Adapter for Kali Linux 2020

                          Before going through WiFi adapter brands let’s talk something about what kind of WiFi adapter is best for Kali Linux. There are some requirements to be a WiFi penetration testing wireless adapter.

                          • Should support Monitor mode.
                          • The ability to inject packets and capture packets simultaneously.

                          Here are the list of WiFi motherboards supports Monitor mode and Packet injection.

                          • Atheros AR9271 (only supports 2.4 GHz).
                          • Ralink RT3070.
                          • Ralink RT3572.
                          • Ralink RT5370N
                          • Ralink RT5372.
                          • Ralink RT5572.
                          • RealTek 8187L.
                          • RealTek RTL8812AU (RTL8812BU & Realtek8811AU doesn’t support monitor mode).
                          • RealTek RTL8814AU

                          So we need to choose WiFi Adapter for Kali Linux carefully. For an Example, on the Internet lots of old and misleading articles that describe TP Link N150 TL-WN722N is good for WiFi security testing. But it is not true. Actually it was.

                          TP Link N150 TL-WN722N newer models don't support Monitor Mode
                          TP Link N150 TL-WN722N newer models doesn’t work

                          The TP Link N150 TL-WN722N’s previous versions support monitor mode. The version 1 comes with Atheros AR9002U chipset and supports monitor mode. Version 2 has the Realtek RTL8188EUS chipset and doesn’t support monitor mode or packet injection. TP Link N150 TL-WN722N version 1 is not available in the market right now. So clear these things and don’t get trapped.

                          Which WiFi adapter is the best? Vote Please

                           
                          pollcode.com free polls

                          WiFi Hacking in Kali Linux

                          Kali Linux is the most widely used penetration testing operating system of all time. It comes with lots of tools pre-installed for cyber security experts and ethical hackers. We can perform web application penetration testing, network attack as well as wireless auditing or WiFi hacking. We have already posted some lots of tutorials on our website and some good WiFi auditing tutorials like AirCrack-Ng.

                          Why Do We Use External USB WiFi Adapters in Kali Linux?

                          A WiFi adapter is a device that can be connected to our system and allows us to communicate with other devices over a wireless network. It is the WiFi chipset that allows our mobile phone laptop or other devices which allows us to connect to our WiFi network and access the internet or nearby devices.

                          But most of the Laptops and mobile phones come with inbuilt WiFi chipset so why do we need to connect an external WiFi adapter on our system ? Well the simple answer is our in-built WiFi hardware is not much capable to perform security testing in WiFi networks.Usually inbuilt WiFi adapters are low budget and not made for WiFi hacking, they don’t support monitor mode or packet injection.

                          If we are running Kali Linux on Virtual Machine then also the inbuilt WiFi Adapter doesn’t work for us. Not even in bridge mode. In that case we also need an external WiFi adapter to play with WiFi networks. A good external WiFi adapter is a must have tool for everyone who has interest in the cyber security field.

                           
                          WSL2 installation of Kali Linux will not support any kind (Inbuilt or External) of Wi-Fi adapters.

                          Kali Linux Supported WiFi Adapters

                          Technically almost every WiFi adapter supports Kali Linux, but those are useless on WiFi hacking if they don’t support monitor mode and packet injection. Suppose, we buy a cheap WiFi adapter under $15 and use it to connect WiFi on Kali Linux. That will work for connecting to wireless networks but we can’t play with networks.

                          It doesn’t make sense, when we are using Kali Linux then we are penetration testers so a basic WiFi adapter can’t fulfill our requirements. That’s why we should have a special WiFi adapter that supports monitor mode and packet injection. So in this tutorial Kali Linux supported means not only supported it means the chipset has ability to support monitor mode and packet injection.

                          What is Monitor Mode

                          Network adapters, whether it is wired or wireless, are designed to only capture and process packets that are sent to them. When we want to sniff a wired connection and pick up all packets going over the wire, we put our wired network card in “promiscuous” mode.

                          In wireless technology, the equivalent is monitor mode. This enables us to see and manipulate all wireless traffic passing through the air around us. Without this ability, we are limited to using our WiFi adapter to only connect to wireless Access Points (APs) that accept and authenticate us. That is not what we are willing to settle for.
                          In the Aircrack-ng suite, we need to be able to use airodump-ng to collect or sniff data packets.

                          What is Packet Injection

                          Most WiFi attacks require that we are able to inject packets into the AP while, at the same time, capturing packets going over the air. Only a few WiFi adapters are capable of doing this.

                          WiFi adapter manufacturers are not looking to add extra features to their standard wireless adapters to suit penetration testers needs. Most wireless adapters built into your laptop are designed so that people can connect to WiFi and browse the web and send mails. We need something much more powerful and versatile than that.

                          If we can’t inject packets into the Access Point (in Aircrack-ng, this is the function of Aireplay-ng), then it really limits what we do.

                          If we are using Kali Linux and want to be a security tester or ethical hacker then a special WiFi adapter is a must have tool in our backpack. As per our own experience listed Alfa cards in this list are best USB wireless adapter for Kali Linux, going with them may be costly but they are really worth it. For more assistance comment below we reply each and every comment.

                          We are also in Twitter join us there. Our Telegram group also can help to choose the best WiFi adapter for hacking and Kali Linux.
                          How to Remove Metadata of Files on Kali Linux

                          How to Remove Metadata of Files on Kali Linux

                          In cybersecurity and digital forensics field metadata of files is very important. We can get various information from metadata in files. This metadata may help us to get much more insider information while we are doing forensics testing. Also if we think about our privacy then metadata can harm our privacy in that case we can remove our metadata also.

                          remove metadata from files on Kali Linux

                          In this detailed guide we are going to discuss about how we can read and remove metadata of any files using Kali Linux.

                          To view and remove metadata on Kali Linux (or any other Linux), we need to install mat2 program. Mat2 (Metadata Anonymisation Toolkit 2) is a command-line metadata removal tool, supporting a wide range of commonly used file formats, written in python3. To install it on our system we need to apply following command on our Terminal:

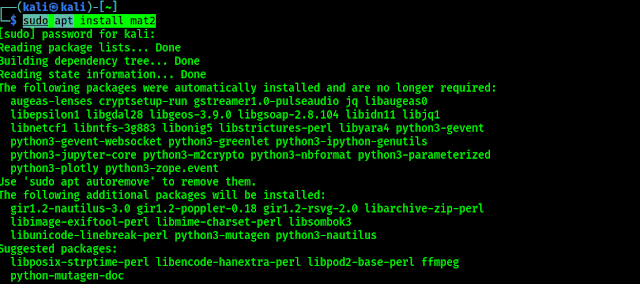
                          sudo apt install mat2

                          In the following screenshot we can see that mat2 is installing on our system. It is not so large (under 25MB) package and the installation time will depends on our internet connection speed and system performance.

                          installing mat2 on kali linux

                          After the installation is finished we can check the help of mat2 by using following command:

                          mat2 -h

                          In the following screenshot we can see the help of mat2.

                          mat2 help options

                          Now we can read the help options to know all the works of this tool. As we can see there is a -s flag, which can show us harmful metadata detectable by mat2 without removing them. Lets use it.

                          Mat2 can view and remove metadata from files so we need files to perform it. Here we have an downloaded image which contains metadata. We had saved the image on our Desktop (home/kali/Desktop/IMG_20201007_102037.jpg ).

                          To view it’s metadata we can use following command:

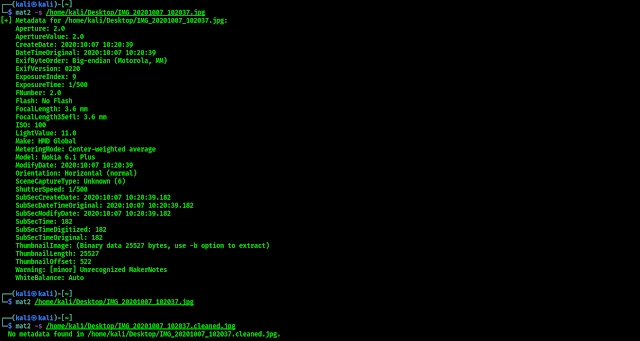
                          mat2 -s /home/kali/Desktop/IMG_20201007_102037.jpg

                          In the following screenshot we can see the metadata of this image with various useful information:

                          mat2 view metadata

                          Now if we want to remove these metadata this file we need to enter following command on our terminal:

                          mat2 <location/of/file>

                          In the following screenshot we can see that it is done.

                          metadata is removed

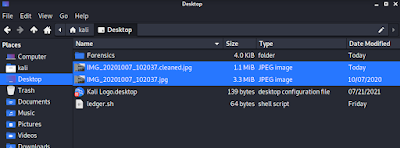
                          Here the old files will remain unchanged, but new files will be created with the string .cleaned in the name and completely cleared metadata. As we can see in the following screenshot.
                          Metadata cleaned files

                          Now we can check if the there any metadata in the new cleaned file by using following command:

                          mat2 -s /home/kali/Desktop/IMG_20201007_102037.cleaned.jpg

                          In the following screenshot we can see that the new file (.cleaned) did not contain any kind of metadata.

                          all metadata is removed
                          Total process of removing metadata

                          This is how we can remove metadata of any file (not only images), if we need to clear metadata of all files in any particular folder then we can simply enter following command:

                          mat2 /home/kali/Desktop/*

                          The above command will remove metadata from all files on our Desktop. If we want to clear metadata of files in other folders then we need put that directory with * . And it will create new .cleaned file for every old files, the .cleaned files will not contain any metadata.

                          This is all bout how we can clear or remove metadata from any files on our Kali Linux system.

                          Love our articles? Make sure to follow us on Twitter and GitHub, we post article updates there. To join our KaliLinuxIn family, join our Telegram Group. We are trying to build a community for Linux and Cybersecurity. For anything we always happy to help everyone on the comment section. As we know our comment section is always open to everyone. We read each and every comment and we always reply.

                          L3MON — Access Android Devices Remotely

                          L3MON — Access Android Devices Remotely

                          L3MON is a remote Android management suite, we can use it to gain access on any android smartphone. In easy words this is a Android RAT (Remote Administrative Tool).

                          In today’s detailed tutorial we learn how to install & configure L3MON on our Kali Linux system and use it. This l3MON tool has been archived by it’s owner. Seems it will not updated and may not work. We are also closing our support on this tools errors.

                          Using L3MON we can make an Android APK payload and send it to android device and after installing it on android device we can gain the access of Android device via L3MON’s web based interface, we can send commands from the easy web based interface and execute our commands on targeted devices.

                          L3mon Kali Linux Control Android device remotely

                          L3mon have lots of beautiful features they are following:

                          • GPS Logging
                          • Microphone Recording
                          • View Contacts
                          • SMS Logs
                          • Send SMS
                          • Call Logs
                          • View Installed Apps
                          • View Stub Permissions
                          • Live Clipboard Logging
                          • Live Notification Logging
                          • View WiFi Networks (logs previously seen)
                          • File Explorer & Downloader
                          • Command Queuing
                          • Built In APK Builder

                            Installing L3MON in Kali Linux

                          We need Java Runtime Environment 8 and nodejs installed in our machine to run L3mon.

                          First we install the JRE (Java Runtime Environment) on our system by applying following command:

                          sudo apt-get install nvidia-openjdk-8-jre

                          This command will install JRE version 8 on our system as shown in following screenshot:

                          Installing nvidia-openjdk-8-jre on Kali Linux
                          We already have installed OpenJDK-8-JRE

                          Then we need to install NodeJs on our system we apply the following commands to download nodejs in our system.

                          curl -sL https://deb.nodesource.com/setup_13.x | sudo bash -

                          Then we run following command to install it.

                          sudo apt-get install -y nodejs
                          installing nodejs in Kali

                          Then we install pm2 process manager by using following command:

                          sudo npm install pm2 -g
                          Now we are ready to install and configure L3MON.

                          We download it from it’s GitHub by using git clone command:

                          wget https://github.com/D3VL/L3MON/releases/download/1.1.2/L3MON-v1.1.2.zip

                          This command will download L3MON in our system. Now we create a new folder in our Desktop named L3MON and copy the downloaded zip file there.

                          Then extract it by right clicking on the zip file and choosing “extract here”.

                          unziping l3mon

                          Then we open a terminal window and navigate to L3MON in our Desktop by simply using cd command:

                          cd /Desktop/L3MON

                          Here we install all the dependencies by using following command:

                          npm install
                          It will install the dependencies now as we can see the the following screenshot:
                           installing dependencies of l3mon

                          Let start the server by using following command:

                          pm2 start index.js
                          starting the instance

                          Now we can see our server in our browser http://localhost:22533 there will be a login page as following screenshot:

                          l3mon login

                          We create a login for our server here. But we cant login because we did not created a password to login. To create a password we stop our serve by using following command:

                          pm2 stop index.js

                           Now we need to edit maindb.json file using our favorite text editor mousepad.

                          mousepad maindb.json


                          Here we edit the username if we want it. But in the password field, we need to give our password’s md5 hash. Means if we fill here the password as plain text, will not work. We must need to put password’s md5 hash.

                          How to create a md5 hash of a password? Suppose our password is qwerty (This is for an example we shouldn’t choose easy passwords for security reasons). To convert it on md5 we need to use following command in another terminal window.

                          echo -n "qwerty" | md5sum | cut -d" " -f 1

                          Here we got the MD5 hash of our password as we can see in the following screenshot.

                          creating md5 hash

                          Then we fill our username and password in maindb.json file then save and close this file.

                          modify and save the maindb.json file

                          Now we again start the server by using following command :

                          pm2 start index.js

                          Then again open our localhost in browser with 22533 port.

                          As we set our username kali and password qwerty we fill it and click on login.

                          We are successfully logged in.


                          Now we are in control. We need to open the APK builder tab.

                          APK builder

                          Here we put our IP address (local or public) and leave the port as default and click on build.

                          Note: If we want to control android device on our local network (same WiFi) then we can use our local IP and to connect devices through internet we need to put our Public IP (Static IP is preferred for a long time use).

                          After clicking on build we got an error like this.

                          we got error

                          We solved this error by configuring JAVA in another terminal by running following command:

                          update-alternatives --config java

                          Here we can select Java versions. We need Java version 8 to run L3MON tool. In out case it is on number 2, as we can see in the following screenshot.

                          Java version 8 selecting on Kali Linux

                          So we type 2 and hit “Enter”.


                          Then we restart our running L3MON server by using following command:

                          pm2 restart all

                          Bingo, the error goes now the build is ready to download.

                          l3mon apk download

                          Now we can download the L3MON.apk in our system, and send it to our targeted device anyway and make a successful installation.

                          After a successful installation it on targeted device and the phone user tries to open this L3MON will asks all the permission of devices and automatically hide itself from the app drawer.

                          After this we got the connection with the device. We can check it on our Devices tab.

                          Now we can control this phone from the manage button. Here in the following screenshot we are in the file manager of the phone. Now we can spy on this phone.

                          File manager accessing by L3MON
                          We are in the file manager of victim device

                          Our downloaded data and recorded audio clips will be saved under assets/webpublic/client_downloads/ directory.

                          Our discussed method is for local network. To connect a device from internet we prefer to have a static IP address and forward our default port 22533 in our router settings or we can change the default port by changing these lines (inside includes/const.js).

                          Using this method we can control phones connected in our same network. We also can control devices through internet by using ngrok services. Configuring L3MON on VPS will make it portable and useful.

                          Disclaimer

                          Provides no warranty with this software and will not be responsible for any direct or indirect damage caused due to the usage of this tool or this tutorial.
                          L3MON is built and our article is documented for both Educational and Internal use ONLY
                          .

                          Getting any problem during installing or configuring L3MON ? This l3MON tool has been archived by it’s owner. Seems it will not updated and may not work. We are also closing our comment support on this tool’s errors. For more tutorials like this subscribe our newsletter to get updated. Also we post updates on our Twitter and GitHub.

                          Where to hire react programmer and 3 essential skills to look for

                          Where to hire react programmer and 3 essential skills to look for

                          Hiring React.js developers for your tech project can be a tough job because it’s one of the most popular JavaScript frameworks in the world. Facebook, Uber, Airbnb, Netflix, PwC, Amazon, Twitter, Udemy, and nearly 9,000 others worldwide use it for web, desktop, and mobile apps. To hire React programmer, you need to challenge the competition, and as you can imagine, the talent pool isn’t infinite. In this article, we will show you where to hire React js developer for your business.

                          hire react js developer

                          React js is popular, and it is here to stay

                          When the latest StackOverflow survey appeared, the statistics were more than clear: React js has conquered the category “Web Frameworks”. React is a high-performance JavaScript framework. Its simple, component-based architecture allows developers to be more productive and code faster. The framework’s minimal API is focused on solving performance issues, enabling lightning-fast rendering speeds with a small overall footprint.

                          Where to find React js developers for hire

                          There are many ways to hire React js developers. Some of them are cheaper, others – more efficient. After all, it all depends on the project size and the budget.

                          Job sites

                          You can hire React js developers from a job site. When hiring React developers, know that the job seekers who want to work in the office are often eligible to receive better benefits. However, this isn’t always the case when hiring remotely. Remote staff members typically don’t have access to company benefits like healthcare, which is why they’re typically less expensive to hire.

                          Freelance platforms

                          Freelance platforms provide a great way to find a large pool of React JS developers at a low cost. Freelancers might not have the same company loyalty as full-time employees, but most will be able to produce results that meet or exceed hiring a full-time employee. Finding a quality freelancer on any of these platforms takes time and effort — make sure you browse all of your options before hiring anyone! When you employ someone, remember they’re working for money — and if they think they’ll get more elsewhere, they’ll leave.

                          Hire React programmer for an outstaffing agency

                          Outstaffing agencies are the best of both worlds. They have all the resources of a full-fledge company while cutting down on other expenses that would take a toll on your budget. Their big talent pools, excellent management, and other resources help companies achieve their goals without breaking the bank.

                          Skills that you should look for when hiring React js developer

                          • Ability to work on other Javascript libraries — You have various options when hiring React developers, but what you want is someone with experience in the Javascript ecosystem. That way, they won’t need to spend time and energy learning all of the intricacies of your library — they can dive right in and start delivering value.
                          • In-depth knowledge of React Js framework — One of the must-haves for developers is understanding React js concepts. Using JSX, understanding the component lifecycle, and working with the virtual DOM are necessary skills that every good developer should have. These abilities will get you started quickly on your projects.
                          • Ability to write good code — React js developers who want to create polished products should be familiar with the Google JavaScript Style Guide so they can follow the correct standard. This will help keep code readable, consistent, and scalable on large projects.

                          While a React js developer might have the skillset to build a functional prototype, a good React js developer will be able to collect business requirements and turn them into a set of technical specs. Communication skills are important for this, as well as their ability to work in a team. In addition to creativity and the desire to learn, any success in this role will also depend on their problem-solving skills.

                          In conclusion

                          It is not an easy task to hire React programmer. Finding a great React js developer takes a lot of time and effort — but you don’t have to work with a remote freelancer or a company, or a person from a different part of the world. A trusted technology partner knows everyone in the development community, so they can help you find your ideal hire.

                          How to Setup SQLi Penetration Testing Lab on Kali Linux

                          How to Setup SQLi Penetration Testing Lab on Kali Linux

                          In our some previous articles we discussed about some penetration testing labs, like PentestLab , DVWA where we can practice and improve our attacking skills. In today’s article we are going to discuss about how to set SQLi lab on Kali Linux to test our SQL Injection skills. Advanced SQL Injection is still a major bug can be found on various sites. That because still learning and growing SQL Injection skills are profitable for cybersecurity experts and bug bounty hunters.

                          install sqli lab on Kali Linux

                          For this lab setup we are going to use SQLi_Edited, this is a upgraded fork of sqli-labs (Dhakkan Labs). Before cloning it from GitHub let we move to our /var/www/html directory, we are going to clone it there to make things easy.

                          cd /var/www/html

                          Here we need to clone the repository from GitHub by using following command:

                          sudo git clone https://github.com/Rinkish/Sqli_Edited_Version

                          In the following screenshot we can see that this repository is successfully cloned to the directory.

                          SQLi Lab  git clonning

                          Now we can go inside this directory by using following command:

                          cd Sqli_Edited_Version

                          Here we use ls command to see all the files, as we can see in the following screenshot:

                          SQLi labs git clonned

                          Here we can see the directory named “sqlilabs“, Now we move it on the previous directory and rename it for easy to open by applying following command:

                          sudo mv sqlilabs/ ../sqli

                          Then we back to our previous directory by using following command:

                          cd ..

                          We can see the process in the following screenshot:

                          moving sqlilabs directory

                          Now we need to edit database credential file named “db-creds.inc“, which is located under “sqli/sql-connections/db-creds.inc” and put our user name and password for database. To edit it we are going to use infamous Linux text editor nano.

                          sudo nano sqli/sql-connections/db-creds.inc

                          In the following screenshot we can see the default configuration of it, where the database user is root and database password is blank.

                          sqlilabs databse username and password changing

                          Now we modify this as per our Kali Linux system user, here we are using user “kali” and we can also choose a password as we want, as shown in the following screenshot:

                          sql injection lab setup

                          Now we save and close it by typing CTRL+X, then Y, then Enter ↲.

                          Now we need to setup our mySQL database for our Kali Linux system. MySQL comes preloaded with Kali Linux. We need to open up our MariaDB as root user by using following command:

                          sudo mysql -u root

                          Then we need to create our user with password, in our case our user will be ‘kali‘ and password will be ‘1234‘. So the command for us will be following:

                          CREATE USER 'kali'@'localhost' IDENTIFIED BY '1234';

                          Now our user is created as we can see in the following screenshot:

                          creating user on mysql Kali Linux

                          Now we need to grant all permission to user ‘kali‘ by using following command:

                          GRANT ALL PRIVILEGES ON *.* TO 'kali'@'localhost';

                          The screenshot of the above command is following:

                          grant permission for mysql database user on Kali Linux

                          Database setup is done, now we can exit from MariaDB by using CTRL+C keys and run following command to start our MySQL services:

                          sudo service mysql start

                          Our setup is almost complete now we need to run our apache2 server (comes pre-loaded with Kali). We start our Apache2 web server by using following command:

                          sudo service apache2 start

                          Now our web server is running, we can see it by navigating to localhost/sqli URL from our browser. Our SQL Injection lab will open in front of us as we can see in the following screenshot:

                          sqli lab challanges

                          Here for the very first time we need to ‘Setup/reset database for labs’. After clicking there our database setup will start as we can see in the following screenshot:

                          SQLi labs database connecting

                          Now a page will open up in our browser which is an indication that we can access different kinds of Sqli challenges, as we can see in the following screenshot:

                          SQLi labs on Kali Linux

                          Here we can solve various types of SQL injection challenges, by solving them our SQL Injection skill will be improved. For an example, to start the basic SQL Injection challenge we need to click on Lesson 1.

                          SQLi Labs basic challenge 1

                          This is all for this article. We had learnt how we can set up SQL Injection labs on our Kali Linux system and practice our SQL Injection skills from basics to advance.

                          Love our articles? Make sure to follow us on Twitter and GitHub, we post article updates there. To join our KaliLinuxIn family, join our Telegram Group. We are trying to build a community for Linux and Cybersecurity. For anything we always happy to help everyone on the comment section. As we know our comment section is always open to everyone. We read each and every comment and we always reply.

                          Hashcat — Crack Passwords in Minutes

                          Hashcat — Crack Passwords in Minutes

                          Hashcat is an advanced free (License: MIT) multi-threaded password recovery tool and it is world’s fastest password cracker and recovery utility, which supports multiple unique attack modes of attacks for more than 200 highly optimized hashing algorithms. Hashcat currently supports CPUs and GPUs and other hardware accelerators on Linux, Windows, and OSX, and has facilities to help enable distributed password cracking.

                          hashcat on Kali Linux

                          Hashcat comes pre-installed on our Kali Linux system, So we don’t need to install it, but if installation is required we can use sudo apt install hashcat command.

                          Features of Hashcat

                          • World’s fastest password cracker.
                          • World’s first and only in-kernel rule engine.
                          • Free and open source.
                          • Multi-OS (Linux, Windows and macOS).
                          • Multi-Platform (CPU, GPU, APU, etc., everything that comes with an OpenCL runtime).
                          • Multi-Hash (Cracking multiple hashes at the same time).
                          • Multi-Devices (Utilizing multiple devices in same system).
                          • Multi-Device-Types (Utilizing mixed device types in same system).
                          • Supports password candidate brain functionality.
                          • Supports distributed cracking networks (using overlay).
                          • Supports interactive pause / resume.
                          • Supports sessions.
                          • Supports restore.
                          • Supports reading password candidates from file and stdin.
                          • Supports hex-salt and hex-charset.
                          • Supports automatic performance tuning.
                          • Supports automatic keyspace ordering markov-chains.
                          • Built-in benchmarking system.
                          • Integrated thermal watchdog.
                          • 350+ Hash-types implemented with performance in mind.
                          • … and much more.

                          Hashcat offers multiple unique attack modes for cracking passwords. Those are following: 

                          • Brute-Force attack
                          • Combinator attack
                          • Dictionary attack
                          • Fingerprint attack
                          • Hybrid attack
                          • Mask attack
                          • Permutation attack
                          • Rule-based attack
                          • Table-Lookup attack
                          • Toggle-Case attack
                          • PRINCE attack

                          Now without wasting any more time lets dive into Hashcat.

                          Hashcat on Kali Linux

                          As we told Hashcat comes pre-installed with a Kali Linux and it is multi-threaded so first let we benchmark our system by using following command:

                          hashcat -b

                          In the following screenshot we can see the benchmark of our system and get an idea how it can perform while cracking various types of hashes.

                          benchmark of hashcat

                          Here we can get an idea about the performance of our system. Let’s run this tool to crack some hashes. Here we have collected some hashed on a text file. For educational purposes we just generated these hashed not collected from any website’s database.

                          hashes list on our system

                          Now we can crack these using Hashcat, and store the output in a craced.txt file by applying following command:

                          hashcat -m 0 -a 0 -o cracked.txt hashes.txt /usr/share/seclists/Passwords/Common-Credentials/10k-most-common.txt

                          Let’s discuss about the above command, in this command we have used -m flag to specify the hash type, -a for attack mode and -o for output file, here we named our output file ‘cracked.txt’, then we give the target hash file to crack named ‘hashes.txt’, at last we specify the wordlist file to be used. In the following screenshot we can see that hashcat finishes the cracking job.

                          hashcat finishes cracking passwords

                          Let’s see our output file (cracked.txt).

                          hashcat password recovered

                          In the above screenshot we can see that hashcat cracked the hashes. Here for the new readers, in this attack mode we can crack those password hashes if the plaintext of the hashes is available in the wordlist file. Using bigger wordlist file will increase the chance to crack hashes.

                          Hashcat & Type of Hashes & Attacks

                          In the above we saw that we need to specify our attack modes and type of hashes we want to crack. These attack modes and hashes are refereed by numbers. Here we are giving hashcat supported all numbers that referees to the attack modes and the type of hashes (as Sep 2021, update of Hashcat tool may include some new things).

                          Attack Types of Hashcat

                            0 | Straight
                            1 | Combination
                            3 | Brute-force
                            6 | Hybrid Wordlist + Mask
                            7 | Hybrid Mask + Wordlist

                          Hash types in Hashcat

                          Hashcat supports so much types of hashes if we include all them here then this article will very lengthy. We encourage to use hashcat – h command on our Kali Linux system to get all the numbers corresponding to the hash type (Uff.. It’s really large ?).

                          types of hashes on hashcat

                          Whenever we are trying to crack a hash we have to know the type of the hash. We can use hash-id tool to know the type of hash. Then we need to choose our attack type and wordlist. That’s all it’s not hard.

                          This is all about Hashcat, and how we can use Hashcat to crack passwords on our Kali Linux. Hashcat (#?) is really a very widely used tool for cracking passwords.

                          Love our articles? Make sure to follow us on Twitter and GitHub, we post article updates there. To join our KaliLinuxIn family, join our Telegram Group. We are trying to build a community for Linux and Cybersecurity. For anything we always happy to help everyone on the comment section. As we know our comment section is always open to everyone. We read each and every comment and we always reply.

                          How to Install & Use Ngrok on Kali Linux

                          How to Install & Use Ngrok on Kali Linux

                          What is Ngrok ?

                          Ngrok is a multi-platform application that provides us to forward our local development server to the internet without port forwarding. Ngrok hosts our locally hosted web server in to a subdomain of ngrok.com. That means we can easily show our localhost in the internet without owning domain names/static IP or port forwarding.

                          Ngrok is a very good tool for the developers to check and show the projects to the clients before launching the project. But as everything it also be misused by the bad guys. They always trying to host their localhost phishing page on Ngrok to capture victims on the internet. So as a cybersecurity expert we need to look up on this Ngrok.

                          How to install ngrok on Kali  Linux

                          Warning:- Learning is the most beneficial way to protect everyone in the cybersecurity field, so our this article will focus on educational things. Ngrok is like a knife, knife is created for helping people to cut vegetables, but bad guys misuse it. Same for Ngrok also, it is created to help developers but bad guys misuse it. So don’t try to misuse it against anyone. We will not responsible for that.

                          Download & Configure Ngrok on Kali Linux

                          To install Ngrok on our Kali Linux system we need to open our browser and navigate to the official Ngrok’s download page. Then we can see the webpage like the following screenshot:

                          ngrok download page

                          Here we need to click on “Download for Linux”, because we are using Linux. For other OS we can go on the “More Options”. After clicking on download we can see that download is started.

                          download ngrok

                          After download the starting it may not take much time with decent internet. The ZIP file will be downloaded on our “Downloads” directory. We need to go to the “Downloads” directory and decompress the compressed file.

                          We open the terminal and use following command to go to our “Downloads” directory.

                          cd Downloads

                          Then we unzip the downloaded ZIP file by using following command:

                          unzip ngrok-stable*zip

                          In the following screenshot we can see that our zip compressed file is extracted.

                          ngrok zip extracting

                          Now our ngrok file is decompressed. Before running it we need to give it executable permission by using following command:

                          chmod +x ngrok

                          executable permission ngrok

                          Now we are all set to run. But wait, we need to setup Ngrok before running. We need to set authentication with Ngrok API token. Where I can get my token? Well for that we need to sign up on Ngrok website. Lets navigate to Ngrok signup page on our browser.

                          ngrok signup page

                          Here we need to fill up our name and email and choose a password. If we want we can use disposable mail address to login and verify our mail address we don’t need to give our own mail address.

                          logged in on ngrok

                          After verifying our mail address we can get the API token on the “Your Authentication” area on the sidebar, as we can see in the following screenshot:

                          ngrok authentication command

                          In the above screenshot we can see our Ngrok authentication API key and the command to set it up. For security we had hided a part of our API keys. So we run the command with API key to set up the Ngrok.

                          ./ngrok authtoken 1xyqb*****************25PTTHqMpHqB

                          In the above command again we hided our the same API key with *. In the following screenshot we can see the output of the command:

                          ngrok authentication command

                          Now we are all set to run Ngrok. For an example we forward a locally hosted demo website to the internet.

                          Using Ngrok on Kali Linux

                          Ngrok’s work is simple it just host our local website to internet. So first we need a local website. Here we have a demo html page on our desktop, and we had opened it on Firefox browser.

                          website demo

                          But it is just a html page we need to host it locally. For that, we need to run a localhost server on our desktop. We open another terminal and go to the directory where our html page is stored. Then run python localhost server there to host the html page on our localhost by using following command:

                          sudo python3 -m http.server 80

                          In the following screenshot we can see that our local web server is started:

                          python3 http server

                          Now we can check it by opening our localhost IP on our browser 127.0.0.1. In the following screenshot we can see that page is now accessible by using our local host IP (127.0.0.1).

                          localhost server is started

                          Now this is accessible from our computer by using localhost IP (127.0.0.1), and from devices on the same network by using our Local IP (IP assigned by router for our Kali Linux system). But it isn’t available for other network, because this web server isn’t hosted on internet.

                          Now we leave our web host terminal as it is, and back to our previous terminal window (where we setup Ngrok), and run the following command to run Ngrok:

                          ./ngrok http 80

                          Here we run the Ngrok script on http with port number 80, because our localhost server is running on port 80. (If we can’t use the localhost port 80 then we can use other ports like 8080 or 8888, in that case we need to specify our that port on Ngrok).

                          After that we can see our Ngrok is started as we can see in the following screenshot:

                          ngrok is running

                          In the above screenshot we can see our forwarding link. Using that forwarding link (in actual links both http and https) we can see our that page from our browser.

                          ngrok forwards our localhost site on the internet

                          Not only from our browser we can access it from anywhere on the internet by the link provided by Ngrok.

                          Ngrok site on Mobile

                          We can see that page on our mobile which is connected to mobile data (not in our WiFi network). This link will be active until we don’t close the Ngrok tunnel, but in real life uses Ngrok can’t run this for a long time in their free plan. It can be a temporary solution.

                          This is how we can use Ngrok on Kali Linux, this is the solution for hosting our local website or web server on the internet. Here we don’t need a static IP address neither requires port forwarding.

                          Love our articles? Make sure to follow us on Twitter and GitHub, we post article updates there. To join our KaliLinuxIn family, join our Telegram Group. We are trying to build a community for Linux and Cybersecurity. For anything we always happy to help everyone on the comment section. As we know our comment section is always open to everyone. We read each and every comment and we always reply.
                          Find Vulnerabilities using NMAP Scripts (NSE)

                          Find Vulnerabilities using NMAP Scripts (NSE)

                          Nmap comes pre-installed with Kali Linux. Not just Kali Linux Nmap comes pre-installed with every security focused operating system. We have already discussed how to use Nmap for active reconnaissance in our previous article “NMAP — The Network Mapper“.

                          But cybersecurity experts don’t just use Nmap for scanning ports and services running on the target system, Nmap also can be used for vulnerability assessment and much more using NSE (Nmap Scripting Engine).

                          Vulnerability scanning using nmap scripts

                          The Nmap Scripting Engine (NSE) has revolutionized the possibilities of a port scanner by allowing users to write scripts that perform custom tasks using the host information collected by Nmap. As of September 2021, when we are writing this article, Nmap has over 600+ scripts on Nmap version 7.91.

                          Nmap scripts for security testing

                          Penetration testers uses Nmap’s most powerful and flexible features, which allows them to to write their own scripts and automate various tasks. NSE (Nmap Scripting Engine) was developed for following reasons:

                          • Network Discovery:- This is the primary purpose that most of the people utilize Nmap for network port discovery, which we had learned in our “Nmap – The Network Mapper” article.
                          • Classier version detection of a service:- There are tons of services with multiple version details for the same service, so Nmap makes it more easy to identify the service.
                          • Backdoor detection:- Some of the Nmap scripts are written to identify the pattern of backdoors. If there are any worms or malicious program infecting the network, it makes the attacker’s job easy to short down and focus on taking over the machine remotely.
                          • Vulnerability Scanning:- Pen testers also uses Nmap for exploitation in combination with other tools such as Metasploit or write a custom reverse shell code and combine Nmap’s capability with them for exploitation.

                          Before jumping in to finding vulnerabilities using Nmap we must need to update the database of scripts, so newer scripts will be added on our database. Then we are ready to scan for vulnerabilities with all Nmap scripts. To update the Nmap scripts database we need to apply following command on our terminal window:

                          sudo nmap --script-updatedb

                          In the following screenshot we can see that we have an updated Nmap scripts database.

                          nmap script database update

                          Now we are ready to scan any target for vulnerabilities. Well we can use following command to run all vulnerability scanning scripts against a target.

                          nmap -sV --script vuln <target>

                          As we can see in the following screenshot:

                          nmap vulnerability scripts

                          When we are talking about Nmap Scripts then we need to know that, not only vulnerability scanning (vuln) there are lots of categories of Nmap scripts those are following:

                          • auth: This categorized scripts related to user authentication.
                          • broadcast: This is a very interesting category of scripts that use broadcast petitions to gather information. 
                          • brute: This category is for scripts that help conduct brute-force password auditing.
                          • default: This category is for scripts that are executed when a script scan is executed ( -sC ).
                          • discovery: This category is for scripts related to host and service discovery.
                          • dos: This category is for scripts related to denial of service attacks.
                          • exploit: This category is for scripts that exploit security vulnerabilities.
                          • external: This category is for scripts that depend on a third-party service. 
                          • fuzzer: This category is for Nmap scripts that are focused on fuzzing.
                          • intrusive: These scripts might crash system by generate lot of network noise, sysadmins considers it intrusive.
                          • malware: This category is for scripts related to malware detection.
                          • safe: This category is for scripts that are considered safe in all situations.
                          • version: This category is for NSE scripts that are used for advanced versioning.
                          • vuln: This category is for scripts related to security vulnerabilities.

                          So we can see that we can do various tasks using Nmap using Nmap Scripting Engine scripts. When we need to run all the scripts against single target we can use following command:

                          nmap -sV --script all <target>

                          In the following screenshot we can see that all scripts are using against one target, but here every script will run so it will consume good amount of time.

                          nmap all scripts running at once

                          That is all for this article. We will back again with Nmap. Hope this article helps our fellow Kali Linux users. Love our articles? Make sure to follow us on Twitter and GitHub, we post article updates there. To join our KaliLinuxIn family, join our Telegram Group. We are trying to build a community for Linux and Cybersecurity. For anything we always happy to help everyone on the comment section. As we know our comment section is always open to everyone. We read each and every comment and we always reply.

                          How Port Scanning Works ? Port Scanning TCP & UDP Explained

                          How Port Scanning Works ? Port Scanning TCP & UDP Explained

                          Identifying open ports on a target system is extremely important step to defining the attack surface of a target system. Open ports correspond to the networked services that are running on a system. Programming errors or implementation flaws can make these services susceptible to security and it also may cause compromise entire system. to work out the possible attack vectors, we must first enumerate the open ports on all of the remote systems.

                          port scanning explained

                          These open ports correspond to services which will be addressed with either UDP or TCP traffic. Both TCP and UDP are transport protocols. Transmission Control Protocol (TCP) is that the more widely used of the 2 and provides connection-oriented communication. User Datagram Protocol (UDP) may be a non connection-oriented protocol that’s sometimes used with services that speed of transmission is more important than data integrity.

                          The penetration testing method used to determine these services is called port scanning. In our this article we are going to cover some basic theory about the port scanning then we can easily understand the work methodology of any port scanner tools.

                          UDP Port Scanning

                          Because TCP may be a more widely used transport layer protocol, services that operate over UDP are frequently forgotten. Despite the natural tendency to overlook UDP services, it’s absolutely critical that these services are enumerated to accumulate an entire understanding of the attack surface of any given target. UDP scanning can often be challenging, tedious, and time consuming. within the next article we’ll cover the way to perform a UDP port scan in Kali Linux. to know how these tools work, it’s important to know the 2 different approaches to UDP scanning which will be used.

                          In the first method, is to rely exclusively on ICMP port-unreachable responses. this sort of scanning relies on the idea that any UDP ports that aren’t related to a live service will return an ICMP port-unreachable response, and a scarcity of response is interpreted as a sign of a live service. While this approach are often effective in some circumstances, it also can return inaccurate leads to cases where the host isn’t generating port-unreachable responses, or the port-unreachable replies are rate limited or they’re filtered by a firewall.
                          In the second method, which is addressed within the second and third recipes, is to use service-specific probes to aim to solicit a response, which might indicate that the expected service is running on the targeted port. While this approach are often highly effective, it also can be very time consuming.

                          TCP Port Scanning

                          In this article, many different methods to TCP scanning will be covered. These methods include stealth scanning, connect scanning, and zombie scanning. To understand how these scanning techniques work, it is important to understand how TCP connections are established and worded. TCP is a connection-oriented protocol, and data is only transported over TCP after a connection has been established between two systems. The process associated with establishing a TCP connection is often referred to as the three-way handshake. This name alludes to the three steps involved in the connection process. The following diagram shows this process in a graphical form:

                          threeway handshake

                          From the above picture we can see that a TCP SYN packet is sent from the device that wishes to establish a connection with a port of the device that it desires to connect with. If the service associated with the receiving port grants the connection, it will reply to the requesting system with a TCP packet that has both the SYN and ACK bits activated. The connection is established that time when the requesting system responds with a TCP ACK response. This three-step process (three-way handshake) establishes a TCP session between the two systems. All of the TCP port scanning techniques will perform some varieties of this process to identify live services on remote hosts.

                          Connect scanning and stealth scanning both are quite easy to know . Connect scanning wont to establish a full TCP connection for each port that’s scanned. that’s to mention , for each port that’s scanned, the complete three-way handshake is completed. If a connection is successfully established, the port is then seems to be open.
                          In the case of stealth scanning doesn’t establish a full connection. Stealth scanning is additionally referred as SYN scanning or half-open scanning. for every port that’s scanned, one SYN packet is shipped to the destination port, and every one ports that reply with a SYN+ACK packet are assumed to be running live services. Since no final ACK is shipped from the initiating system, the connection is left half-open. this is often mentioned as stealth scanning because logging solutions that only record established connections won’t record any evidence of the scan. the ultimate method of TCP scanning which will be discussed during this chapter may be a technique called zombie scanning. the aim of zombie scanning is to map open ports on a foreign system without producing any evidence that you simply have interacted thereupon system. The principles behind how zombie scanning works are somewhat complex. perform the method of zombie scanning with the subsequent steps:

                          • Identify a remote system for our zombie host. The system should have the some characteristics, they are following:
                          1. The system need to be idle and does not communicate actively with other systems over the network.
                          2. The system need to use an incremental IPID sequence.
                          • Send a SYN+ACK packet to this zombie host and record the initial IPID value.
                          • Send a SYN packet with a spoofed source IP address of the zombie system to the scan target system.
                          • Depending on the status of the port on the scan target, one of the following two things will happen:
                          1. If the port is open, the scan target will return a SYN+ACK packet to the zombie host, which it believes sent the original SYN request. In this case, the zombie host will respond to this unsolicited SYN+ACK packet with an RST packet and thereby increment its IPID value by one.
                          2. If the port is closed, the scan target will return an RST response to the zombie host, which it believes sent the original SYN request. This RST packet will solicit no response from the zombie, and the IPID will not be incremented.
                          • Send another SYN+ACK packet to the zombie host, and evaluate the final IPID value of the returned RST response. If this value has incremented by one, then the port on the scan target is closed, and if the value has incremented by two, then the port on the scan target is open.

                          The following image shows the interactions that take place when we use a zombie host to scan an open port:

                          Zombie port scanning process

                          To perform a zombie scan, an initial SYN+ACK request should be sent to the zombie system to work out the present IPID value within the returned RST packet. Then, a spoofed SYN packet is shipped to the scan target with a source IP address of the zombie system. If the port is open, the scan target will send a SYN+ACK response back to the zombie. Since the zombie didn’t actually send the initial SYN request, it’ll interpret the SYN+ACK response as unsolicited and send an RST packet back to the target, thereby incrementing its IPID by one.

                          Finally, another SYN+ACK packet should be sent to the zombie, which can return an RST packet and increment the IPID another time. An IPID that has incremented by two from the initial response is indicative of the very fact that each one of those events have transpired which the destination port on the scanned system is open. Alternatively, if the port on the scan target is closed, a special series of events will transpire, which can only cause the ultimate RST response IPID value to increment by one.
                          The following picture is an demo of the sequence of events comes with the zombie scan of a closed port:

                          Zombie scan port close

                          If the destination port on the scan target is closed, an RST packet are going to be sent to the zombie system in response to the initially spoofed SYN packet. Since the RST packet solicits no response, the IPID value of the zombie system won’t be incremented. As a result, the ultimate RST packet returned to the scanning system in response to the SYN+ACK packet will have the IPID incremented by just one .

                          This process are often performed for every port that’s to be scanned, and it are often wont to map open ports on a remote system without leaving any evidence that a scan was performed by the scanning system.

                          This is how port scanning methods works. In this article we tried to do something different, this is not about any tool but if we are using Kali Linux or we are in cybersecurity field then we should have some technical knowledge. Hope this article also get love. This is all for today.

                          Love our articles? Make sure to follow us on Twitter and GitHub, we post article updates there. To join our KaliLinuxIn family, join our Telegram Group. We are trying to build a community for Linux and Cybersecurity. For anything we always happy to help everyone on the comment section. As we know our comment section is always open to everyone. We read each and every comment and we always reply.

                          Open Whatsapp chat
                          Whatsapp Us
                          Chat with us for faster replies.