CyberArk

NIST CSF Success Stories: Government of Bermuda

NIST CSF Success Stories: Government of Bermuda

“NIST’s Cybersecurity Framework has provided us with a comprehensive roadmap to ensure effective cybersecurity practices are implemented across Government.” – Hon. Wayne M. Caines, JP, MP., Minister of National Security Benefits Received from Implementing the Framework: Situation Drivers Process Results and Impacts What’s Next ——————————————————————————————————————–Infocerts LLP, 5B 306 Riverside Greens, Panvel, Raigad 410206 Maharashtra, IndiaContact us …

NIST CSF Success Stories: Government of Bermuda Read More »

Relationship Between the NIST CSF Framework and Other Approaches and Initiatives

Relationship Between the NIST CSF Framework and Other Approaches and Initiatives

What is the relationship between the Cybersecurity Framework and the NICE Cybersecurity Workforce Framework? Workforce plays a critical role in managing cybersecurity, and many of the Cybersecurity Framework outcomes are focused on people and the processes those people perform. While some outcomes speak directly about the workforce itself (e.g., roles, communications, training), each of the …

Relationship Between the NIST CSF Framework and Other Approaches and Initiatives Read More »

NIST CSF FAQs: Using, Adopting and Implementing NIST

NIST CSF FAQs: Using, Adopting and Implementing NIST

Using The Framework What is the difference between ‘using’, ‘adopting’, and ‘implementing’ the Framework? In a strict sense, these words are fairly interchangeable. They can mean an organization’s use of the Framework as a part of its internal processes. NIST generally refers to “using” the Framework. Would the Framework have prevented recent highly publicized attacks? …

NIST CSF FAQs: Using, Adopting and Implementing NIST Read More »

NIST Cyber Security Framework Components

NIST Cyber Security Framework Components

What is the Framework Core and how is it used? The Framework Core is a set of cyber security activities, desired outcomes, and applicable references that are common across critical infrastructure sectors. An example of Framework outcome language is, “physical devices and systems within the organization are inventoried.” The Core presents industry standards, guidelines, and …

NIST Cyber Security Framework Components Read More »

NIST CSF Framework Users

NIST CSF Framework Users

What critical infrastructure does the Framework address? Critical infrastructure (for the purposes of this NIST Framework) is defined in Presidential Policy Directive (PPD) 21 as: “Systems and assets, whether physical or virtual, so vital to the United States that the incapacity or destruction of such systems and assets would have a debilitating impact on security, national economic …

NIST CSF Framework Users Read More »

NIST CSF Framework Basics

NIST CSF Framework Basics

What is the Framework, and what is it designed to accomplish? The NIST Framework is voluntary guidance, based on existing standards, guidelines, and practices for organizations to better manage and reduce cybersecurity risk. In addition to helping organizations manage and reduce risks, it was designed to foster risk and cybersecurity management communications amongst both internal and external …

NIST CSF Framework Basics Read More »

Maltego — Powerful OSINT Reconnaissance Framework

Maltego — Powerful OSINT Reconnaissance Framework

Maltego is one of the most famous OSINT frameworks for personal and organizational reconnaissance. It is a GUI tool that provides the capability of gathering information on any individuals, by extracting the information that is publicly available on the internet by diffrent methods. Maltego is also capable of enumerating the DNS, brute-forcing the normal DNS and collecting the data from social media in an easily readable format.

How are we going to use the Maltego in our goal-based penetration testing or red teaming exercise? We can utilize this tool in developing a visualization of data that we gathered. The community edition of Maltego comes with Kali Linux.

Maltego Kali Linux

The tasks in Maltego are named as transforms. Transforms come built into the tool and are defined as being scripts of code that execute specific tasks. There are also multiple plugins available in Maltego, such as the SensePost toolset, Shodan, VirusTotal, ThreatMiner, and so on. Maltego offers the user with unprecedented information. Information is leverage. Information is power. Information is Maltego.

What does Maltego do?

Maltego is a program that can be used to determine the relationships and real world links between:

  • People
  • Groups of people (social networks)
  • Companies
  • Organizations
  • Web sites
  • Internet infrastructure such as:
  • Domains
  • DNS names
  • Netblocks
  • IP addresses
  • Phrases
  • Affiliations
  • Documents and files
  • These entities are linked using open source intelligence.
  • Maltego is easy and quick to install – it uses Java, so it runs on Windows, Mac and Linux.
  • Maltego provides you with a graphical interface that makes seeing these relationships instant and accurate – making it possible to see hidden connections.
  • Using the graphical user interface (GUI) you can see relationships easily – even if they are three or four degrees of separation away.
  • Maltego is unique because it uses a powerful, flexible framework that makes customizing possible. As such, Maltego can be adapted to your own, unique requirements.

 What can Maltego do for us?

  • Maltego can be used for the information gathering phase of all security related work. It will save our time and will allow you to work more accurately and smarter.
  • Maltego aids us in your thinking process by visually demonstrating interconnected links between searched items.
  • Maltego provide us with a much more powerful search, giving you smarter results.
  • If access to “hidden” information determines your success, Maltego can help us discover it.

Setting Up Maltego on Kali Linux

The easiest way to access this application is to type maltego in our Terminal, also, we can open it from Kali Linux Application menu.

maltego

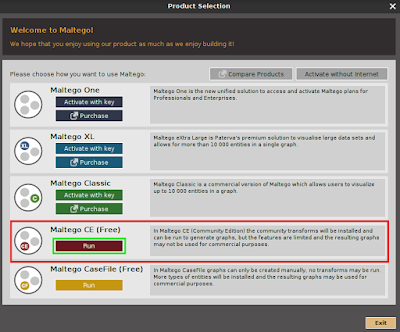
After first time we opened Maltego it will show us the product selection page, where we can buy various versions of Maltego, but the community edition of Maltego is free for everyone so we choose it (Maltego CE) and click on run, as shown in the following screenshot:

Selecting Maltego CE Community Edition

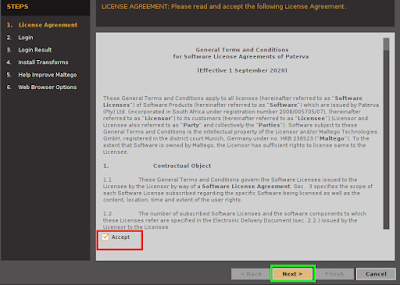
After clicking on “RUN”, we will got the configuring Maltego window. Here  we need to login and setup our Maltego for the very first time. First we need to accept the terms and conditions of Maltego as we can see in the following screenshot:

Accept terms and conditions and move next

On the above screenshot we can see that we check ✅ the “Accept” box and click on “Next”.

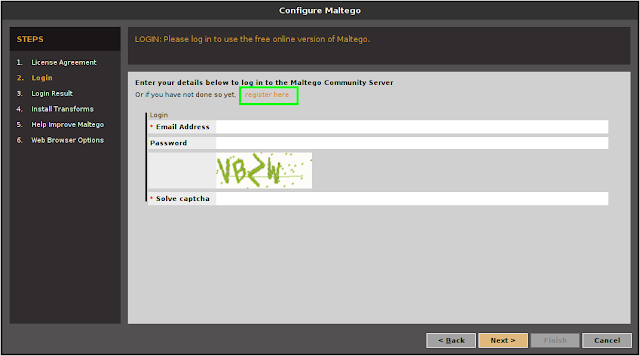
After that we got a login screen a we can see in the following screenshot:

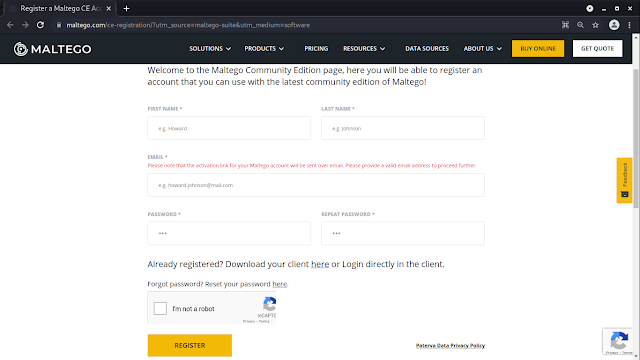
On the above screenshot we can see that note “LOGIN: Please log in to use the free online version of Maltego.” So, we need to log in here. But before that we need to Register to create our credential. We need to click on “Register”, and register page will open on our browser, or we can click here to go to the same page for register.

Maltego Registration

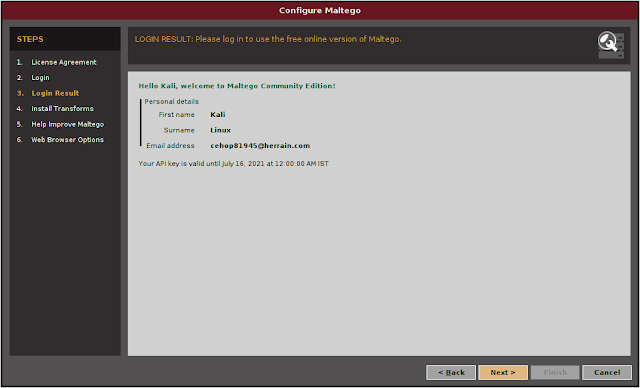
Here we need to fill up everything then they send activation link on our given mail address. For security reasons we are using temp-mail services, and we got our activation mail and activate it. After activating it we need to login from Maltego.

Maltego sucessfully logged in

Then we just need to click “Next”, “Next”, “Next”, and our Maltego will open in front of us, as we can see in the following screenshot.

Maltego on kali Linux

Running Maltego on Kali Linux

Now we are ready to use Maltego and run the machine, by navigating to “Machines” in the Menu folder and clicking on “Run Machine”; and then, we will be able to start an instance of the Maltego engine. Shown in the following screenshot:

Starting Maltego intence

After that we got a list of available options in Maltego public machines:

Maltego machines list

Usually, when we select Maltego Public Servers, we will have the following machine selections:

  • Company Stalker: To get all email addresses at a domain and then see which one resolves on social networks. It also downloads and extracts metadata of the published documents on the internet.
  • Find Wikipedia edits: This transform looks for the alias from the Wikipedia edits and searches for the same across all social media platforms.
  • Footprint L1: Performs basic footprints of a domain.
  • Footprint L2: Performs medium-level footprints of a domain.
  • Footprint L3: Intense deep dive into a domain, typically used with care since it eats up all the resources.
  • Footprint XXL: This works on the large targets such as a company hosting its own data centers, and tries to obtain the footprint by looking at sender policy framework (SPF) records hoping for netblocks, as well as reverse delegated DNS to their name servers.
  • Person – Email Address: To obtain someone’s email address and see where it’s used on the internet. Input is not a domain, but rather a full email address.
  • URL to Network and Domain Information: This transform will identify the domain information of other TLDs. For example, if we provide www.google.com, it will identify www.google.us, google.co.in, and so on and so forth.

Cybersecurity experts usually begin with “Footprint L1” to get a basic understanding of the domain and it’s potentially available sub-domains and relevant IP addresses. It is quite good to begin with this information as part of information gathering, however, pentesters can also utilize all the other machines as mentioned previously to achieve their goal.

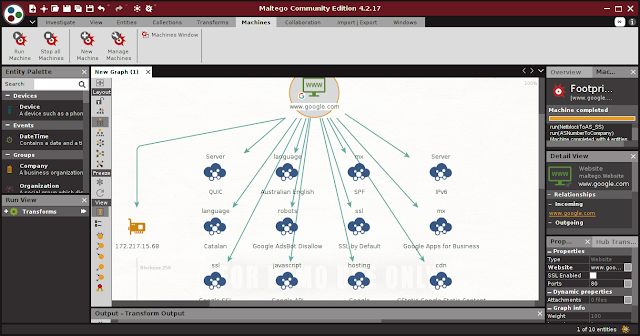
Once the machine is selected, we need to click on “Next” and specify a domain, for example google.com. The following screenshot provides the overview of google.com.

google on maltego
Footprint L1 with Maltego on Google.com

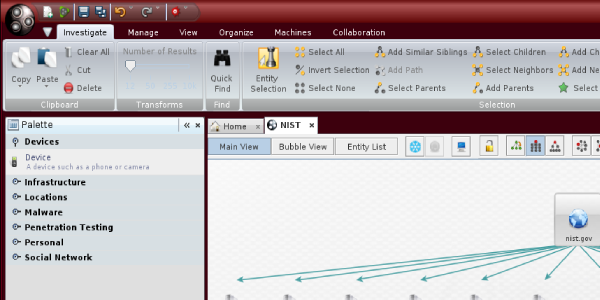
On the top-left side of the above screenshot, we will see the Palette window. In the Palette window, we can choose the entity type for which you want to gather the information. Maltego divides the entities into six groups as follows:

  • Devices such as phone or camera.
  • Infrastructure such as AS, DNS name, domain, IPv4 address, MX record, NS record, netblock, URL, and website.
  • Locations on Earth.
  • Penetration testing such as built with technology.
  • Personal such as alias, document, e-mail address, image, person, phone number, and phrase.
  • Social Network such as Facebook object, Twitter entity, Facebook affiliation, and Twitter affiliation.

If we right-click on the domain name, we will see all of the transforms that can be done to the domain name:

Maltego all transform

  • DNS from domain.
  • Domain owner’s details.
  • E-mail addresses from domain.
  • Files and documents from domain.
  • Other transforms, such as To Person, To Phone numbers, and To Website.
  • All transforms.

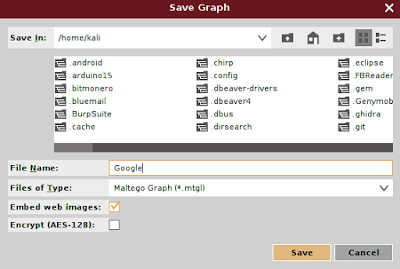
If we want to change the domain, you need to save the current graph first. To save the graph, click on the Maltego icon, and then select Save. The graph will be saved in the Maltego graph file format ( .mtgx ).

Saving maltego output

Then to change the domain, just double-click on the existing domain and change the domain name.

maltego against KaliLinuxIn

This is how Maltego works on our Kali Linux system. This is a very strong GUI based information gathering tool which comes loaded with Kali Linux.

Love our articles? Make sure to follow us on Twitter and GitHub, we post article updates there. To join our KaliLinuxIn family, join our Telegram Group. We are trying to build a community for Linux and Cybersecurity. For anything we always happy to help everyone on the comment section. As we know our comment section is always open to everyone. We read each and every comment and we always reply.

Guide to Check & Remove Pegasus Spyware from Mobile

Guide to Check & Remove Pegasus Spyware from Mobile

Table of Contents

  1. Pegasus Spyware
  2. What is MVT ?
  3. Installation of MVT on Linux and Mac
  4. Checking for Pegasus Spyware on Android Device
  5. Checking for Pegasus Spyware on iPhone
  6. How to Remove Pegasus Spyware from Mobile Phone

Pegasus Spyware

Pegasus Spyware is a very trending topic in the world media now. It is really debatable whether, it is abused for spying on people like activists, or journalists etc or not. Without making our article controversial we directly jump into the topic. How can we find out if our phone is infected with this Pegasus Spyware or not?

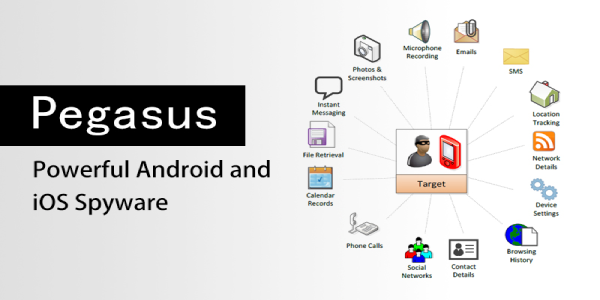
Pegasus is a spyware developed by the Israeli infosec firm NSO Group that can be covertly installed on mobile phones (and other devices) running most versions of iOS and Android. The 2021 Project Pegasus revelations suggest that current Pegasus software is able to exploit all recent iOS versions up to iOS 14.6. According to the Washington Post and other prominent media sources, Pegasus not only enables the keystroke monitoring of all communications from a phone (texts, emails, web searches) but it also enables phone call and location tracking, while also permitting NSO Group to hijack both the mobile phone’s microphone and camera, thus turning our phone into a constant surveillance device. 

Pegasus on Kali Linux

First of all we don’t know exactly how this malware comes into our devices and uses which vulnerability. But when it is on our device it can spy on us, by reading SMS, tracking our GPS locations, using our microphone and camera and downloading our files from our phones. Here to do everything it requires permissions from our Android or iOS. So it can be detected from there, but we need to perform some forensics test to detect it. Don’t worry it will be very easy when we are here. We are going to use MVT or Mobile Verification Toolkit on our system to detect this Pegasus Spyware. MVT was created by Amnesty International Security Lab in July 2021.

What is MVT ?

Mobile Verification Toolkit aka MVT is a collection of tools designed to facilitate the consensual forensic testing of Android and iOS devices for the purpose of identifying any signs of compromise even it can identify Pegasus. MVT’s capabilities are continuously evolving, but some of its key features include: 

  • Decrypt encrypted iOS backups.
  • Process and parse records from numerous iOS system and apps databases, logs and system analytics.
  • Extract installed applications from Android devices.
  • Extract diagnostic information from Android devices through the adb protocol.
  • Compare extracted records to a provided list of malicious indicators in STIX2 format.
  • Generate JSON logs of extracted records, and separate JSON logs of all detected malicious traces.
  • Generate a unified chronological timeline of extracted records, along with a timeline of all detected malicious traces.

Installation of MVT on Linux and Mac

Before going to install MVT we need to have Python 3.6 installed on our computer. Python is available for most of the desktop operating systems.

Installing MVT on Linux

To install MVT on Linux we need to install some dependencies, to install them we need to run following commands on our terminal window:

sudo apt install python3 python3-pip libusb-1.0-0

libusb-1.0-0 is not required if you intend to only use mvt-ios and not mvt-android, coming to these things later.

Then we need to run the following command to install MVT on our system:

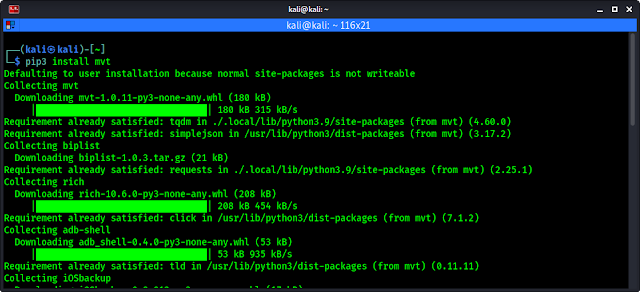
pip3 install mvt

MVT will start downloading on our system, as we can see in the following screenshot:

mvt installing on Linux

After a couple of minutes (time will depend on our system performance and internet speed) MVT will be installed on our Linux system.

Installing MVT on MAC

To install MVT on MAC requires Xcode and homebrew to be installed. Further the process is almost the same. We need to install dependencies to run MVP on MAC by using following command on the terminal:

brew install python3 libusb

Then we need to install MVT by using following command:

pip3 install mvt

Path correction after installation

After installing MVT on our system we can run it to check Pegasus on our mobile device, but before running it we need to fix our path to easily run this. This step sometimes already comes with some operating system. We suggest to skipping this and forward to the next step if that doesn’t work then try this.

We need to open our .bash or .zshrc (depending which shell we are using BASH or ZSH) on nano editor by using following command:

nano .zshrc

Then we need to add the following line at the end of the code (in a new line), then save and close it (by pressing ctrl+x, then Y, then Enter).

export PATH=$PATH:~/.local/bin

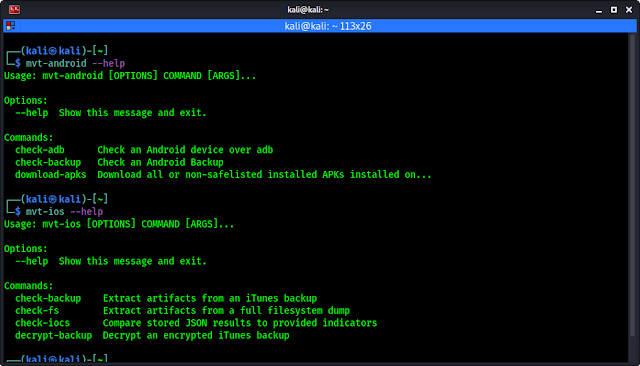
So we had installed MVT to run a forensics scan on our Mobile phones to check if our device is infected by Pegasus spyware or not. Firstly we check the help/options of this tool by applying two commands on our terminal. Two commands ? Yes one help menu is for Android another is for iOS. Both are in following:

mvt-android --help
mvt-ios --help

In the following screenshot we can see the output of above commands.

options to run MVT aginst pegasys spyware

Checking for Pegasus Spyware on Android Device

If we have a suspected android device then we need to connect our Android device via ADB (Android Debug Bridge). So ADB needs to be in our system. On Linux systems we can use sudo apt install adb android-tools-adb, We can install it also on Mac. The phone’s ADB connection must be allowed inside developer options, details about ADB can be found here.

Then we need to connect our android device via USB with our computer and check that ADB is working and our mobile device is connected properly.

adb device connected

In the above screenshot we can see that our device is properly connected with ADB. Now we also can check the connection using MVT by using following command:

mvt-android check-adb

We may got some error like the following screenshot:

mvt adb error may comes

If we get this common error (already adb-server is running, we need to kill it) then we need to run the following command to solve it and check-adb again.

adb kill-server

Now here there are two type of scans we can perform on our Android devices:

  • Check APKs: We can scan all installed apps.
  • Check Android Backup: Create a backup of the device and scan it.

Check APKs

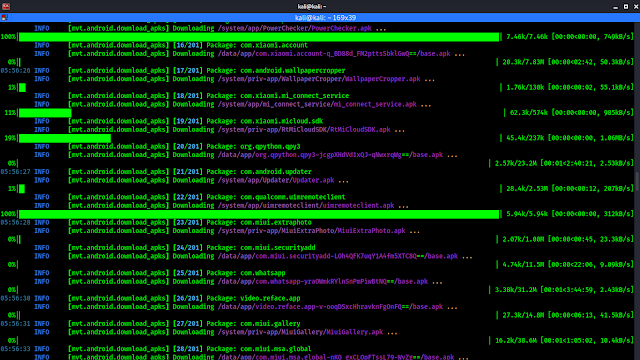
We can run the following command to start downloading all our Android applications on our PC and scan them.

mvt-android download-apks --output androidapps --all-checks

The above command will start the work and save our all applications on a folder called androidapps, then start all checks as we commanded it.

downloading apk files on PC

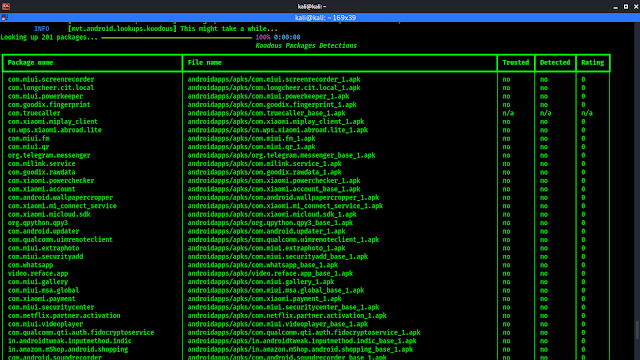
In the above screenshot we can see that we are extracting all the installed applications on our PC. After the download complete MVT will start scanning every applications, after scan it will show us a result as we can see in the following screenshot:

Scan result on MVT

Here in a chart we can see MVT didn’t detect any spyware on our phone.

Check Android Backup

Some attacks against Android phones are done by sending malicious links by SMS. The Android backup feature does not allow to gather much information that can be interesting for a forensic analysis, but it can be used to extract SMSs and check them with MVT. To do so, we need to connect our Android device to our computer. We will then need to enable USB debugging on the Android device.

If this is the first time we connect to this device, we will need to approve the authentication keys through a prompt that will appear on our Android device. Then we can use adb to extract the backup for SMS only with the following command:

adb backup com.android.providers.telephony

We need to approve the backup on the phone and potentially enter a password to encrypt the backup. The backup will then be stored in a file named backup.ab on our working directory on PC.

We need to use Android Backup Extractor and download abe.jar file to convert it to a readable file format. Make sure that java is installed on our system (mostly Linux comes with it) and use the following command:

java -jar ~/Downloads/abe.jar unpack backup.ab backup.tar

We can see the output in the following screenshot:

backup in a readable format

Now we extract it by using following command:

tar xvf backup.tar

Screenshot shows the output of the above command.

extracting backup

Then we can extract SMSs containing links with MVT:

mvt-android check-backup --output sms .

The output will be saved in a folder named “sms”. In the screenshot we can see our device has lots of SMS with links, which may be dangerous.

sms checks by MVT

This is how we can test an Android device to find Pegasus or any other potential spyware.

Checking for Pegasus Spyware on iPhone

Before jumping into acquiring and analyzing data from an iOS device, we should evaluate what is our precise plan of action. Because multiple options are available to us, We should define and familiarize with the most effective forensic methodology in each case.

Filesystem Dump

We will need to decide whether to attempt to jailbreak the device and obtain a full filesystem dump, or not.

While access to the full file system allows to extract data that would otherwise be unavailable, it might not always be possible to jailbreak a certain iPhone model or version of iOS. In addition, depending on the type of jailbreak available, doing so might compromise some important records, pollute others, or potentially cause unintended malfunctioning of the device later in case it is used again.

If we are not expected to return the phone, we might want to consider to attempting a jailbreak after having exhausted all other options, including a backup.

iTunes Backup

An alternative option is to generate an iTunes backup (in the most recent version of mac OS, they are no longer launched from iTunes, but directly from Finder). While backups only provide a subset of the files stored on the device, in many cases it might be sufficient to at least detect some suspicious artifacts. Backups encrypted with a password will have some additional interesting records not available in unencrypted ones, such as Safari history, Safari state, etc.

The use of MVT is almost the same here. If we read the android part then we can easily get the point, but iOS forensics and backup has some little bit different. Here we suggest to going with the Official Documentation of MVT. This is detailed enough to follow easily.

How to Remove Pegasus Spyware from Mobile Phone

OK we got this. We know that we can check for Pegasus on our mobile phone, but what if our phone is affected? In that case we suggest the following methods.

  • If our Android or iPhone is not rooted (Jailbroken term used for iPhones), then we can easily remove it by doing a factory reset or hard reset to remove Pegasus. Keep the backup aside. Backing them up again on the mobile is not recommended, because we don’t know which loophole used by Pegasus (It can be media files or something can be stored).
  • If we have a rooted Android device then full format or factory reset will not work here, because on rooted devices spywares are installed as default applications. Updating the Android version also doesn’t work here. Best solution can be to install a custom ROM. That can remove the entire OS with the spyware.
  • If we are on a Jailbroken iPhone then we already violated Apple’s policy, they will not be going to help us. Because iOS is not open-source and uses different kernels it don’t have any practical custom ROM. In this case we can suggest a full reset of the device and check again. If Pegasus was still there we would need to buy a new phone.
  • Using a feature phone may be a solution, but in this digital era this is next to impossible, so we can use some Linux phones (Smart phones comes with Linux operating system).

This is how we can find and remove if our mobile phone device is infected with Pegasus Spyware using MVT. Pegasus has been called the most sophisticated hacking software available today to intrude phones. NSO Group has, time and again, claimed that it does not hold responsibility in case of misuse of the Pegasus software. The NSO group claims that it only sells the tool to vetted governments and not individuals or any other entities.

Love our articles? Make sure to follow us on Twitter and GitHub, we post updates there. To join our KaliLinuxIn family, join our Telegram Group. We are trying to build a community for Linux and Cybersecurity. For anything we are always happy to help everyone in the comment section. As we know our comment section is always open to everyone. We read each and every comment and we always reply.

BED — Bruteforce Exploit Detector

BED — Bruteforce Exploit Detector

In our previous article we discussed about “what is fuzzing ?” In our this article we are going to try a fuzzer (tool for fuzzing).

BED is a plain-text protocol fuzzer which stands for Bruteforce Exploit Detector. Bed checks software for common vulnerabilities like buffer overflows, format string bugs, integer overflows, etc.

It automatically tests the implementation of a chosen protocol by sending different combinations of commands with problematic strings to confuse the target. The protocols supported by this tool are: finger, ftp, http, imap, irc, lpd, pjl, pop, smtp, socks4 and socks5.

bed bruteforce exploit detector kali linux

BED comes pre-installed with our Kali Linux system. It is too easy to use so our article will be brief. So lets start:

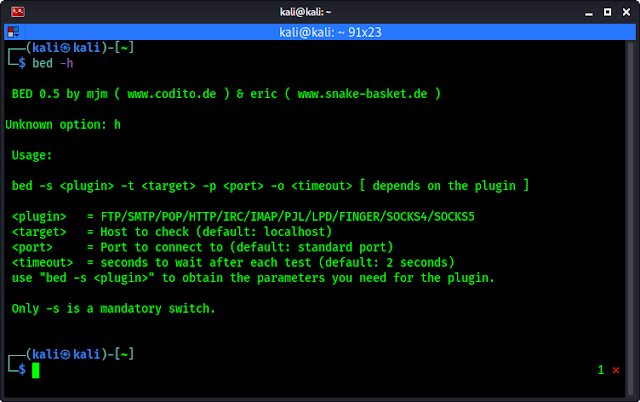
As we mentioned BED comes pre-installed with Kali Linux so check with the help of BED. To do so we need to run following command on our terminal:

bed -h

After that we can see the help of BED tool, as we can see on the screenshot below.

help of bed tool in kali linux

In the help section (above screenshot) we clearly can see the basic use example of BED. We need to use -s flag to scan, then we need to choose <plugin>, then we need to specify our target (IP address) by using -t flag, then we need to specify our port using -p flag, at last we need to set our timeout by using -o flag.

Let’s see an example of this, we have an localhost http server on port 80 we try to find vulnerabilities on it by using BED. So our command will be as following:

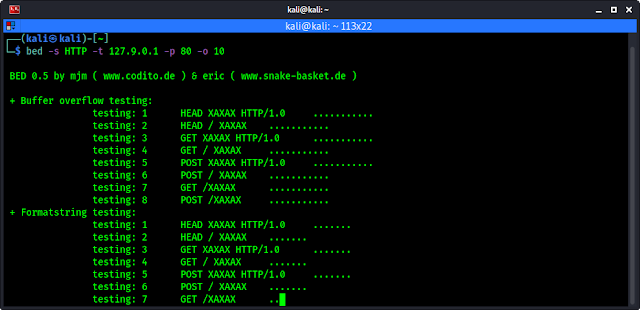
bed -s HTTP -t 127.9.0.1 -p 80 -o 10

The above command will start testing for vulnerabilities on our target (127.9.0.1) as we can see in the following screenshot:

Bed fuzzer testing for vulnerabilities

If it got any vulnerability then it will show us by showing errors.

This is how we can use BED fuzzer on our Kali Linux system. Here we need to find IP address of our target.

Love our articles? Make sure to follow us on Twitter and GitHub, we post updates there. To join our KaliLinuxIn family, join our Telegram Group. We are trying to build a community for Linux and Cybersecurity. For anything we always happy to help everyone on the comment section. As we know our comment section is always open to everyone. We read each and every comment and we always reply.

Ghost Framework — Control Android Devices Remotely

Ghost Framework — Control Android Devices Remotely

Ghost Framework is an Android post-exploitation framework that uses an Android Debug Bridge to remotely access and control Android device. Ghost Framework 7.0 gives us the power and convenience of remote Android device administration.

Ghost Framework Remotely control Android on Kali Linux

We can use this framework to control old Android devices which have turn on the debug bridge in the “Developer options”. Now this becomes very harmful because an attacker gets the full admin control on the vulnerable Android device.
In our this detailed tutorial we will practically learn how we can use the Ghost Framework to take control of Android device from our Kali Linux system. So we start from cloning the Ghost Framework from GitHub by using following command:

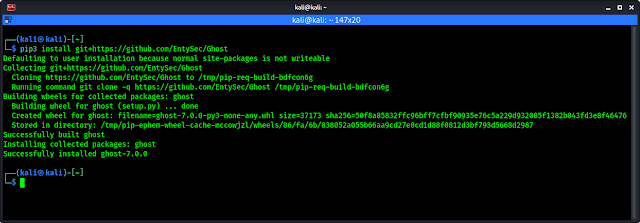
pip3 install git+https://github.com/EntySec/Ghost

In the following screenshot we can see that Ghost is downloaded on our system.

installing ghost from github

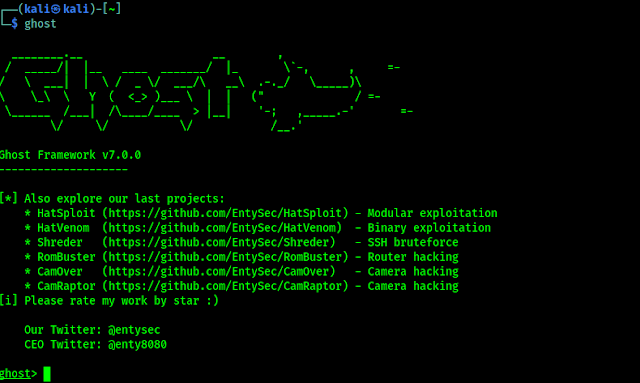
Now ghost framework is ready to use on our system, we can run it from any where in our terminal by only the ghost command:

ghost

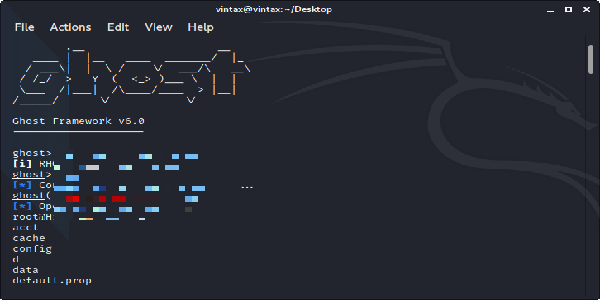
The following screenshot shows ghost console is up on our system and it is successfully running.

Ghost framework on Kali Linux

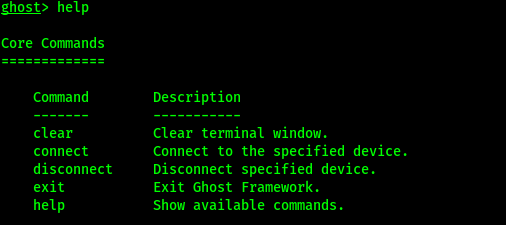
Now we can see the help options of ghost framework by simply running help command on the console.

help

The help option will be like following screenshot:

Ghost help menu

Now we can connect it with vulnerable Android devices. Now how we get a IP address of an old vulnerable Android devices? Shodan is here. Shodan is a grate search engine for searching the devices connected to internet. We already have a tutorial on Shodan.

In Shodan search engine we have to search for “Android Debug Bridge“, as we have shown in following screenshot:

Shodan Android Debug Bridge

Here we can see over 2.5k search results. Every device is vulnerable for ghost and those devices are connected to internet. If ghost shows failed to connect then Shodan is showing us an offline device. We also can try this with our Android device.

From here we can pick any IP address and use with connect command. For an example we select the highlighted IP address and connect it with ghost by using following command:

connect 168.70.49.186

In some seconds it will be connected as we can see in the following screenshot.

Ghost connected to target

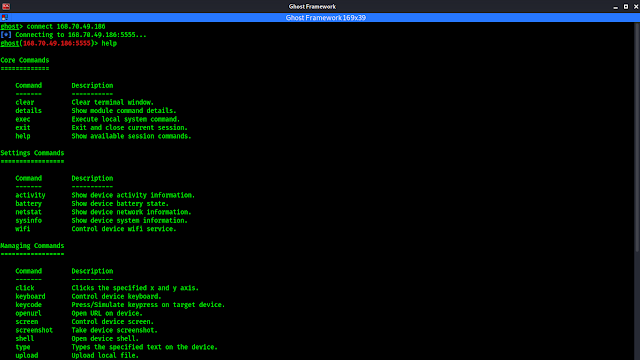
Here we can see we are connected with the IP address. Now we can run anything from Ghost Framework. We can see the commands we can run after connecting by using help command here.

help

In the following screenshot we can see a lot of things that we can do with this device.

ghost commands

Now we can do almost everything with this device.

What we can do with Ghost Framework

  • See device activity information.
  • See device battery state.
  • See device network information.
  • See device system information.
  • See device system information.
  • Clicks the specified x and y axis.
  • Control device keyboard.
  • Press/Simulate key-press on target device.
  • Open URL on device.
  • Control device screen.
  • Take device screenshot.
  • Open device shell.
  • Types the specified text on the device.
  • Upload local file.
  • Download remote file.
  • Show Contacts Saved on Device.
  • Reboot device.

Ghost Framework has a simple and clear UX/UI. It is easy to understand. Ghost Framework can be used to remove the remote Android device password if it was forgotten. It is also can be used to access the remote Android device shell without using OpenSSH or other protocols.

Love our articles? Make sure to follow us on Twitter and GitHub, we post article updates there. To join our KaliLinuxIn family, join our Telegram Group. We are trying to build a community for Linux and Cybersecurity. For anything we always happy to help everyone on the comment section. As we know our comment section is always open to everyone. We read each and every comment and we always reply.
Open Whatsapp chat
Whatsapp Us
Chat with us for faster replies.