CyberArk

How to install Arduino Software (IDE) on Kali Linux

How to install Arduino Software (IDE) on Kali Linux

Arduino is an open-source electronics platform that can be used for various tasks. In cybersecurity it is also used to perform various attacks. But to code any type of Arduino boards we need the Arduino IDE installed our system, where we can write our codes and upload the program in our Arduino board.

In our this detailed guide we are going to learn how to install Arduino software aka Arduino IDE on our Kali Linux system. This guide can be followed to install Arduino IDE on any Debian-based Linux system.

How to install Arduino IDE on Kali Linux

Install Arduino IDE on Kali Linux

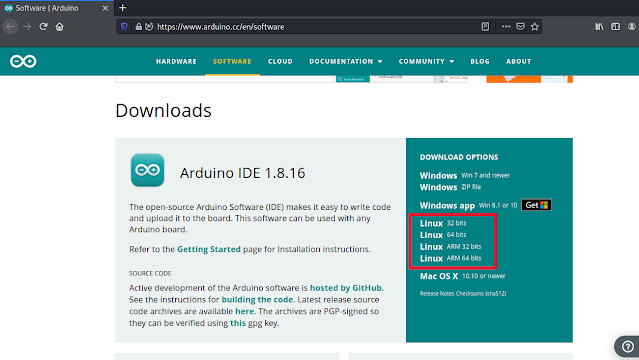
To install Arduino IDE on our Kali Linux system first of all we need to navigate to the official Arduino download page from our browser. We can see various types of Linux downloads there as we can highlighted on the following screenshot:

Arduino IDE download for Kali LInux

Here we are using Linux 64 bits, so we choose Linux 64 bits. On the next page we can see it is requesting for donation, although we can download it by clicking on “Just download” as shown in the following screenshot:

arduino download page

Now the download window will open in front of us. Here we need to save our file.

arduino download starting

After this our download of our tar compressed file will be started. After the download is finished we need to open our terminal window then navigate to our Downloads directory where we just downloaded the Arduino IDE’s compressed file by using following command:

cd Downloads

Here we need to extract our compressed file by using following command:

tar -xvf arduino*.tar.xz

In the following screenshot we can see the output of the applied command:

arduino extracting
We highlighted the output folder

After the process is complete we need to move to the extracted directory (highlighted on the above screenshot) by using following command:

cd arduino-1.8.16

Here if we want we can see the files by using ls command. There we got install.sh file, which can be used to install Arduino IDE on our Kali Linux. To do so our command will be following:

sudo ./install.sh

In the following screenshot we can see that Arduino IDE is successfully installed on our system (it might prompt for the root password).

arduino IDE installed on Kali Linux

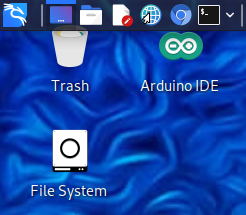
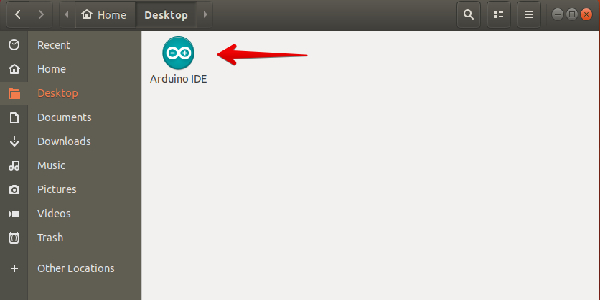
Now we can close terminal, we can see shortcut of Arduino IDE Desktop Icon on our Desktop.

arduino shortcut on Desktop

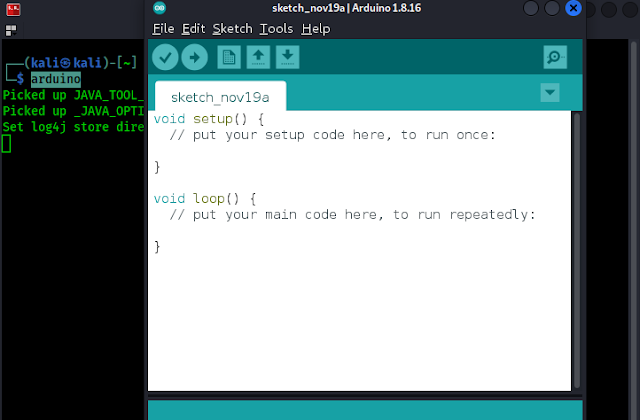
Now we can open Arduino from our Desktop (simple double click) or we can also open Arduino IDE from our our terminal by simply applying arduino command:

arduino

As we can see in the following screenshot, we successfully installed Arduino IDE on our system.

Arduino installed on Kali Linux
Arduino IDE successfully installed on our Kali Linux system

This is how we can install Arduino Software or Arduino IDE on Kali Linux.

Love our articles? Make sure to follow us on Twitter and GitHub, we post article updates there. To join our KaliLinuxIn family, join our Telegram Group. We are trying to build a community for Linux and Cybersecurity. For anything we always happy to help everyone on the comment section. As we know our comment section is always open to everyone. We read each and every comment and we always reply.

Beginners Guide of RTL SDR (Software Defined Radio) on Kali Linux

Beginners Guide of RTL SDR (Software Defined Radio) on Kali Linux

SDR stands for Software defined Radio which is a radio communication system where components that have been traditionally implemented in hardware. We can use a SDR device as our super ear like Daredevil.

What is a RTL SDR?

In February 2012 the first FM radio signal was received with an RTL2832U chipset (Created for Digital HD TV), and RTL-SDR dongle using custom SDR drivers, After then tons of security researchers, hackers, makers, students and electronics lovers bought the RTL-SDR devices.

Basically RTL SDR device is a software defined radio signal receiver, wait a minute! Did we just say Radio signal receiver? Isn’t it actually my grandfather’s FM radio does? Not like that actually The FM radios signals used to carry commercial radio signals between 88 and 108 MHz. An RTL SDR can go through a very wide range (22-2200 MHz, depending on tuner model). We had mentioned this device on our Hardware for Hackers article. A RTL SDR device is looks like following:

RTL SDR Software Defined Radio on Kali Linux

We can buy this device from Amazon.

buy rtlsdr on amazon

What we can do with RTL SDR?

We can do a lot of things with a RTL-SDR device they are following:

  • Listening to FM radio.
  • Tracking aircraft positions like a radar with ADS-B decoding.
  • Listening to unencrypted Police/Ambulance/Fire/EMS conversations.
  • Listening to aircraft traffic control conversations.
  • Decoding aircraft ACARS short messages.
  • Scanning trunking radio conversations.
  • Decoding unencrypted digital voice transmissions.
  • Tracking maritime boat positions like a radar with AIS decoding.
  • Decoding POCSAG/FLEX pager traffic.
  • Scanning for cordless phones and baby monitors.
  • Tracking & receiving meteorological agency launched weather balloon data.
  • Tracking our own self launched high altitude balloon for payload recovery.
  • Receiving wireless temperature sensors and wireless power meter sensors.
  • Listening to VHF amateur radio.
  • Decoding ham radio APRS packets.
  • Watching analogue broadcast TV.
  • Sniffing GSM signals.
  • Using RTL-SDR on your Android device as a portable radio scanner.
  • Receiving GPS signals and decoding them.
  • Using RTL-SDR as a spectrum analyzer.
  • Receiving NOAA weather satellite images.
  • Listening to satellites and the ISS.
  • Listening to unencrypted military communications.
  • Radio astronomy.
  • Monitoring meteor scatter.
  • Listening to DAB broadcast radio.
  • Use RTL-SDR as a panadapter for your traditional hardware radio.
  • Decoding taxi mobile data terminal signals.
  • Use RTL-SDR as a true random number generator.
  • Listening to amateur radio hams on SSB with LSB/USB modulation.
  • Decoding digital amateur radio ham communications such as CW/PSK/RTTY/SSTV.
  • Receiving HF weatherfax.
  • Receiving digital radio mondiale shortwave radio (DRM).
  • Listening to international shortwave radio.
  • Looking for RADAR signals like over the horizon (OTH) radar, and HAARP signals.

We can see there are tons of work can be done with the RTL-SDR device.

Requirements to use RTL-SDR?

  1. First of all we need a RTL-SDR device, We got our RTL-SDR device from NooElec for testing, a special thanks to them. We can buy this model on Amazon. It comes with three type of antennas, a coax cable and obviously a RTL-SDR device with RTL2832U chipset.
  2. We also need a Kali Linux desktop/laptop or a Raspberry Pi, any other OS like other Linux distros, Mac even Windows also works with RTL-SDR. But here we are going to do our stuffs with our most loved Kali Linux.
  3. We need a RTL-SDR software (Most of which is free and open-source).

Setting up RTL-SDR on Kali Linux

In this article we are going to set up and RTL-SDR device on our Kali Linux system and test it with it’s a basic use.

First of all we need to make ready our RTL-SDR device, connect it with the coax cable and attach antenna. Then plug it to our system’s USB port. After plugging it in we need to check if our system is recognizing it by using following command:

sudo lsusb

In the following screenshot we can see our RTL2831U chipset, in the highlighted area.

rtl sdr is connected

It’s fine, our RTL-SDR device is connected to our system. But here is a problem, as we told this RTL2832U chipset is created for TV so default Debian driver may think it as a TV Tuner. We need to fix it at first. We have to blacklist those drivers to do so.

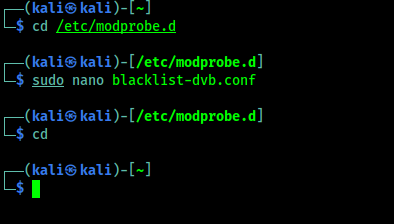
We need to go to the /etc/modprob.d directory by using following command:

cd /etc/modprobe.d

Here we need to use the following command:

sudo nano blacklist-dvb.conf

Then nano will open in front of us as we can see in the following screenshot:

nano for creating configuration file

Here we need to type following lines:

blacklist dvb_usb_rtl28xxu

We did it, shown in the following screenshot:

blacklisting default debian drivers

Then we press CTRL+X then we press Y then we need to press Enter ⤶ to save this file and exit.

Debian default drivers and exit
We had used cd command to get back to our home directory.

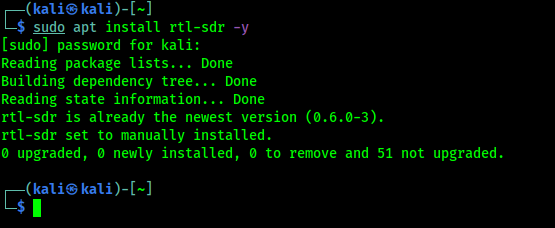
Now we need to test our RTL-SDR device if it is working perfectly. To do that we need to install rtl-sdr package on our system by using following command:

sudo apt install rtl-sdr -y

In the following screenshot we can see the output of above command:

installing rtlsdr packages on Kali Linux
It is already installed on our system

Now to check if our RTL-SDR is working perfectly we need to run following command on our terminal window:

rtl_test

After some seconds we can cancel it and check for data losses (after the initial one). If we didn’t see ant packet losses message then it is working fine.

rtl sdr device testing

Now we had almost completed our RTL-SDR setup on our Kali Linux we just need to install an RTL-SDR software to tune.

Installing and Using GQRX on Kali Linux

We are going to install an open-source software called GQRX.

GQRX is an open-source software-defined radio (SDR) receiver powered by the GNU radio and the Qt graphical toolkit.

GQRX has many features such as:

  • Discovering devices connected to a computer.
  • Processing I/Q data.
  • AM, SSB, CW, FM-N and FM-W (mono and stereo) de-modulators.
  • Recording and playing back audio to/from WAV file.
  • Recording and playing back raw baseband data.
  • Streaming audio output over UDP.

GQRX comes with Kali Linux repository so we just need to apply following command on our terminal to install it:

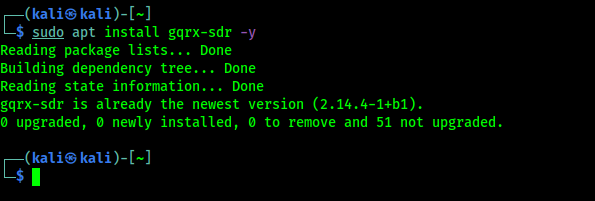
sudo apt install gqrx-sdr -y

In the following screenshot we can see that gqrx is already installed on our system. The installation process will take some time depending on our system performance and internet speed.

GQRX installed on Kali Linux

Now we can just run the gqrx command on our terminal to start the gqrx.

gqrx

For the very first time we are running gqrx we got a configuration window. In the following screenshot we shows our working settings (mostly default).

gqrx first time configuration

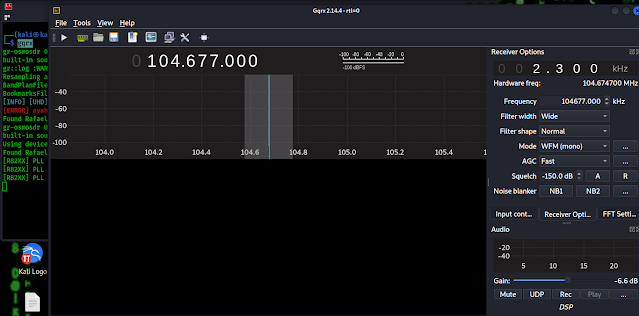
After clicking on “OK” we will be in the gqrx main screen, In the following screenshot we can see that we had successfully running GQRX on our Kali Linux system.

running GQRX on Kali Linux

We can see the interface. On the Top left corner we can see the Play button (▶) which can be used to play and pause. In the left-hand side we can see the Receiver options box, where we can set various type of settings, like Frequency, width, mode etc.

Tuning FM Stations on Kali Linux

Let we set the frequency to our local FM Radio station. Here we need to remember one thing as we told previously that commercial radio stations only can use 88 to 108 MHZ. Here we can put the frequencies on KHz.

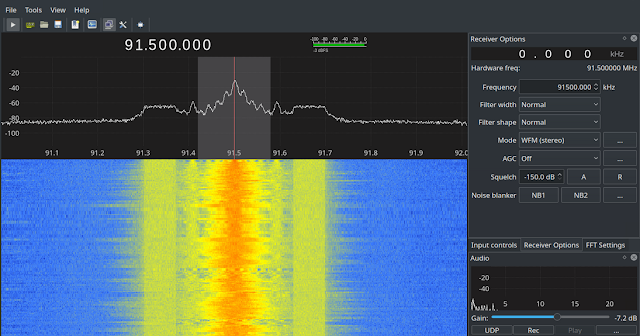
That means we need to x100 on our MHz frequencies to make it KHz. A simple math. If our local radio station transmitting frequency on 91.5 that means it;s in MHz we need to make it 91500 KHz, and set it to our Frequency on Receiver Options. Then we need to click on the Play ▶ Button. We also need to set the mode to WFM (mono/stereo which sounds good). Now we can listen our radio as we can see in the following screenshot:

listing radio on Kali Linux
Listening can’t be captured on a image but we can see the clear radio signals

YA. We did it! We can learn more on GQRX on GQRX tips and tricks and Decoding off keying.

Wait A Minute

Wait a minute. What just we did? We listen Radio on our computer? Why? We can do it on a little FM/Radio Player. People did the same thing since 40’s era. What is new here?

OK then, we can say we learnt installations and the basic use of GQRX (very powerful tool), we also had setup RTL-SDR on our system. Not only that, Now we can listen radio (no more commercial radio stations, please) conversation on emergency services like fire services, polices/cops etc.

Emergency services doesn’t uses commercial radio frequencies (88-108 MHZ), In different countries they use different frequencies. If we want to learn about their frequencies we can Google it. We can get the USA database of frequencies here.

FAQ

Can we transmit Radio signals using RTL-SDR?

No. We can’t. RTL-SDR is just a receiver, it can’t transmit radio signals. Transmitting long range signals without proper permission is illegal in various countries. We can check the laws of our respective country to know more on it.

Is It Legal to listen Emergency services radio?

This is totally different in various countries. Listening some emergency is not illegal. There are specific laws in all countries we need to know about them by simple Google search. But using a RTL-SDR device is not illegal, misusing it will be illegal. So we can’t show anything on our this article which is illegal to any country.

Can we listen GSM (2G) calls using RTL-SDR?

That’s tricky. We know that GSM calls are not end-to-end encrypted, but but they are encrypted at many steps along their path, so we can’t just tune into the GSM frequency and listen phone calls over the air like radio stations. We can capture and analyze GSM signals (not directly phone calls) using RTL-SDR. We will cover these things in our future article.

Hope this will cover the basics of RTL-SDR and it’s uses on Kali Linux. We are going to publish more articles and cover much more things on Software Defined Radio.

Love our articles? Make sure to follow us on Twitter and GitHub, we post article updates there. To join our KaliLinuxIn family, join our Telegram Group. We are trying to build a community for Linux and Cybersecurity. For anything we always happy to help everyone on the comment section. As we know our comment section is always open to everyone. We read each and every comment and we always reply.

[Easy] How to Install Brave Browser on Kali Linux

[Easy] How to Install Brave Browser on Kali Linux

Brave Browser is really a good privacy & safety focused browser, which have advanced features like less memory per tab compared to Firefox and Chrome which make is very fast and lightweight, it comes with crypto wallet, private window through TOR network and many more. There are lots of good reason to use Brave Browser. But in this brief article we are not going to cover all the reasons to use Brave Browser.

Install Brave Browser on Kali Linux

Here in this article we just cover how we can install Brave Browser on Kali Linux system in short. Not only Kali, we can use this method to install Brave Browser on any other Debian based Linux Distribution (Like Ubuntu 16.04, Linux Mint 18, Elementary OS etc).

Installing Brave Browser on Kali Linux

First of all we need to open the Terminal, then we run the following command to install some packages.

sudo apt install apt-transport-https curl -y

It may prompt for the root password of our system before installing these packages. In the following screenshot we can see that these packages are installing:

bravebrowser packages

In the above screenshot we can see that these packages are installed. Now we need to run following command on our terminal for keyrings:

sudo curl -fsSLo /usr/share/keyrings/brave-browser-archive-keyring.gpg https://brave-browser-apt-release.s3.brave.com/brave-browser-archive-keyring.gpg

We can see what happens after applying the above command in the following screenshot:

brave browser keyring on Kali Linux

Now we need to add Brave Browser in our repository by using following command:

echo "deb [signed-by=/usr/share/keyrings/brave-browser-archive-keyring.gpg arch=amd64] https://brave-browser-apt-release.s3.brave.com/ stable main"|sudo tee /etc/apt/sources.list.d/brave-browser-release.list

We can see the output on the following screenshot:

brave browser repository on Kali Linux

Now we are almost ready to install Brave Browser on our Kali Linux system. We need to run a update to update our repository by using following command:

sudo apt update

After the update process is complete we can easily install Brave Browser by applying following command:

sudo apt install brave-browser

The installation of Brave Browser requires 96 MB to download and will take 300 MB disk space to install at this time (Updates changes the size), so the installation time will depend on our system performance and internet speed. We can see that Brave Browser is installed on our system in the following screenshot:

brave browser installation sucessful on Kali Linux

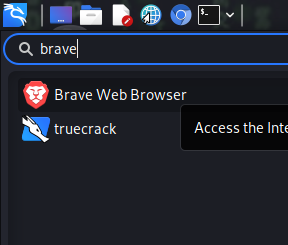
Now we can see Brave Browser on our application menu.

Brave Browser on Kali Linux

We can open the Brave Browser from here. We have opened it as we can see in the following screenshot:

brave browser opened on our system

In the above screenshot we can see that Brave Browser is running successfully. This is how we can install Brave Browser on our Kai Linux or any other Debian based Linux distribution.

Love our articles? Make sure to follow us on Twitter and GitHub, we post article updates there. To join our KaliLinuxIn family, join our Telegram Group. We are trying to build a community for Linux and Cybersecurity. For anything we always happy to help everyone on the comment section. As we know our comment section is always open to everyone. We read each and every comment and we always reply.

SUB404 — Easily Find Sub-Domain Takeover Vulnerability

SUB404 — Easily Find Sub-Domain Takeover Vulnerability

In our recent articles we learned how we can find subdomains and what is subdomain takeover vulnerability. In our this article we are going to learn how we can find potential subdomain takeover vulnerability. Subdomain takeover vulnerability is a very serious issue in cybersecurity and may lead to a good bounty to bug bounty hunters.

sub 404 on Kali Linux to check subdomain takeover vulnerability

In today’s article we are going to discuss about an automated tool which will help us to discover potential subdomain that we can takeover. The tool is named Sub404. Sub404 is a tool created with Python3 and it is very fast as it is asynchronous.

After information gathering, during recon process we may found a lot of subdomains(for an example more than 10k ?). It is not possible to test each manually or with traditional requests or urllib method, because it is very slow. Using Sub 404 we can automate this task in much faster way. Sub 404 uses aiohttp/asyncio which makes this tool asynchronous and faster.

How Sub404 Works?

Sub404 uses subdomains list from text file (check our this article) and checks for URL of 404 Not Found status code and in addition it fetches CNAME (Canonical name) and removes those URL which have target domain name in CNAME. It also combines result from SubFinder and Sublist3r (subdomain discovery tool). If we don’t have target subdomains as two is better than one. But for this sublist3r and SubFinder tools must be installed in your system. Sub404 is very fast as we told, the creator of this tool claims that it is able to check 7K subdomains in less than 5 minutes.

Key Features of Sub404

  • Fast (as it is asynchronous).
  • Uses two more tools to increase efficiency.
  • Saves result in a text file for future reference.

Install & Use Sub404 on Kali Linux

To install Sub404 on our Kali Linux system we need to clone it from it’s GitHub repository by using following command:

git clone https://github.com/r3curs1v3-pr0xy/sub404

After applying the above command Sub404 will be downloaded on our current working directory. As we can see in the following screenshot:

sub404 clonning from github

Now we need to install two other tool on our Kali Linux system, because as we said Sub404 didn’t like to work alone. It requires two more subdomain discovery tools with it to increase efficiency. They are SubFinder and Sublist3r. In our recent article we talked about SubFinder. Anyways, we need to install both of these tools by simply using following command:

sudo apt install subfinder sublist3r -y

In the following screenshot we can see that both tools are successfully installed on our system.

installing subfinder and sublist3r on Kali Linux

Now we need to navigate inside the sub404 directory which we cloned by using following command:

cd sub404

Now we need to install requirements for Sub404 by applying following command:

pip install -r requirements.txt

The following screenshot shows the output of the above command:

installing requirements for sub404

Now we are ready to run. In our this (sub404) directory we got a python script named sub404.py, we need to use this script to run this tool. Let we check the help options for Sub404 by applying following command:

python3 sub404.py -h

In the following screenshot we can see the help options of Sub404:

sub404 help options on Kali Linux

We can directly provide Sub404 a domain to scan all the subdomains then check for subdomain takeover vulnerabilities on those subdomains automatically by using -d flag. Or we can provide Sub404 a list of subdomains (in txt format) to analyze them for subdomain takeover vulnerabilities by using -f flag. By using -p flag we can specify the protocol (HTTP or HTTPS), the default protocol s HTTPS.

Lets run it against a live website (everyone have the permission to hack this site) i.e hackthissite.org. To test on a domain we need to use following command:

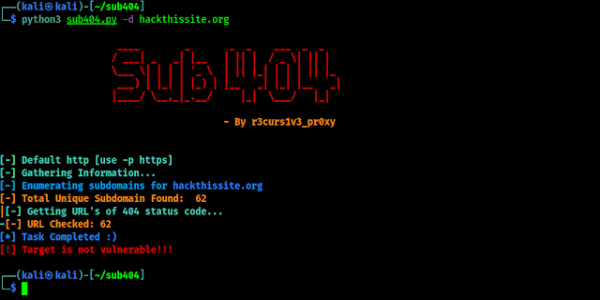
python3 sub404.py -d hackthissite.org

Then Sub404 will start scanning on it and find the subdomains then check for 404 status. Then check the CNAME of 404 subdomains. Is they are pointing to any 3rd party services. Then show us the results as we can see in the following screenshot:

sub404 live testing on Kali Linux

As we can see in the screenshot that our target isn’t vulnerable. That’s fine. This was our example target.

Now if we already have a list of subdomains (as we did in our SubFinder article), we can check on them also by applying following command:

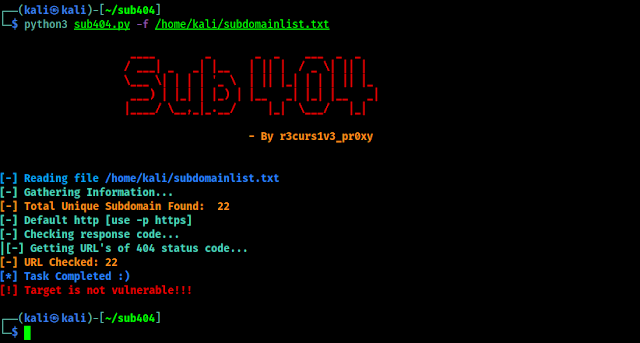
python3 sub404.py -f /home/kali/subdomainlist.txt

In the following screenshot we can see the output of the above command:

List of subdoamins checking

Seems we got no luck, this is also not vulnerable ??.

This is how we can check for subdomain takeover vulnerability on any website. But before that:

Waring: This tutorial is for educational and research purposes only. Hacking a subdomain without proper permission is a serious crime. If anyone does any illegal activity then we are not responsible for that.

That is all for today. Today we learnt how we can find subdomain takeover vulnerability very easily using Sub404 tool on our Kali Linux system. Also we learnt to not harm anyone using our super powers, “With great power comes great responsibility“.

Love our articles? Make sure to follow us on Twitter and GitHub, we post article updates there. To join our KaliLinuxIn family, join our Telegram Group. We are trying to build a community for Linux and Cybersecurity. For anything we always happy to help everyone on the comment section. As we know our comment section is always open to everyone. We read each and every comment and we always reply.

What is Subdomain Takeover Vulnerability in Easy Language

What is Subdomain Takeover Vulnerability in Easy Language

Subdomain takeover vulnerability is not new in cybersecurity space but it’s pretty much effective today’s time also. In the bug bounty field subdomain takeover vulnerability reports are rapidly growing.

subdomain takeover vunerability

The basic premise of a subdomain takeover is a host that points to a particular service not currently in use, which an adversary can use to serve content on the vulnerable subdomain by setting up an account on the third-party service. As an ethical hacker and a security analyst, We deal with this type of issue on a regularly.

What is Subdomain Takeover Vulnerability

For beginners subdomain takeover idea may not clear, so we are explaining it in very easy way.

Suppose our target is example.com and they are running a bug bounty program, because we just can’t go and takeover any other’s subdomain because it will be unethical. So we assume that example.com is running bug bounty program and we find a subdomain named subdomain.example.com, this subdomain shows 404 error.

subdomain 404 error

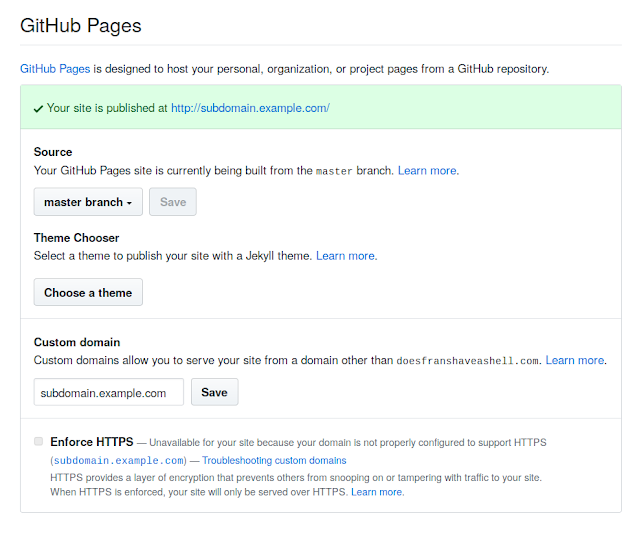
Now this subdomain is pointing to some another services. For an example we assume that this subdomain is pointing to GitHub Pages.

How do we know that it is pointing to GitHub Pages? Well, here we need to look on it’s DNS settings (in this case we can see GitHub clearly, but may be in other cases we need to check DNS).

We can run following command to check the host of subdomains:

host subdomain.example.com

Here we will get the IP address of the subdomain then we can check from where this IP address belongs by using following command:

whois <IP Address>|grep "OrgName"

Most of cybersecurity experts starts senses start tingling at this point. This 404 subdomain page indicates that no content is being served under the top-level directory and that we should attempt to add this subdomain to oue personal GitHub repository.

subdomain takeover on GitHub Pages

Broken Link Hijacking

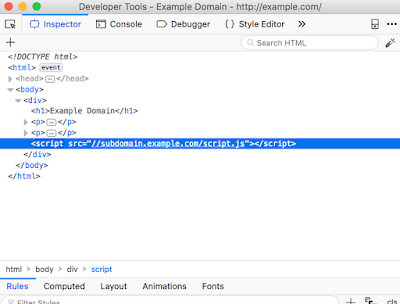
There are another way to takeover subdomains. It is referred as ‘Broken Link hijacking‘. These are vulnerable subdomains which do not necessarily belong to the target but they are used to serve content on the target’s website. This means that a resource is being imported on the target page, for an example, via a little fault in JavaScript code and the cybersecurity expert can claim the subdomain from which the resource is being imported.

Hijacking a host that is used somewhere on the page can ultimately lead to stored cross-site scripting (XSS), since the adversary can load arbitrary client-side code on the target page. The reason why we wanted to list this issue in this article, is to highlight the fact that, as a cybersecurity expert, We don’t want to only restrict ourselves to subdomains on our target host. We can easily expand our scope by inspecting source code and mapping out all the hosts that the target relies on.

broken link hijack

These are the basic principal of “Subdomain Takeover Vulnerability“. This is very important for Bug-Bounty hunters. We tried to explain this in very easy language.

Not only GitHub Pages we can do it if the 404 subdomain is pointed to AWS, Heroku, Readme and other services. We got a very informative article about subdomain takeover.

Love our articles? Make sure to follow us on Twitter and GitHub, we post article updates there. To join our KaliLinuxIn family, join our Telegram Group. We are trying to build a community for Linux and Cybersecurity. For anything we always happy to help everyone on the comment section. As we know our comment section is always open to everyone. We read each and every comment and we always reply.

SubFinder — Discover Hidden Sub-Domains

SubFinder — Discover Hidden Sub-Domains

During web penetration testing we need to collect a lot of information related to our target website/webapp. There are lot of things to to in our some previous articles we mention them. Sub-domain finding is one of them. There are many subdomains may contains some valuable/juicy information for us.

subfinder find subdomains on kali linux

In our some previous articles we already discussed about some subdomain discovery tools, but in this article are going to use an faster sub-domain finder tool named SubFinder. SubFinder is a subdomain discovery tool that discovers valid subdomains for websites by using passive online sources. It has a simple modular architecture and is optimized for speed. SubFinder is built for doing one thing only – passive subdomain enumeration, and it does that very well.

SubFinder is written in Go Language and comes with Kali Linux repository. We can easily install it by using following command:

sudo apt install subfinder

The above command may prompt for sudo password, after providing our sudo password it will start downloading SubFinder. The tool is not large can be installed in some seconds with a decent internet connection, as we can see in the following screenshot:

installing sunfinder on Kali Linux

In the above screenshot we can see our required tool SubFinder is installed successfully. Let we check it’s helps by simply using following command:

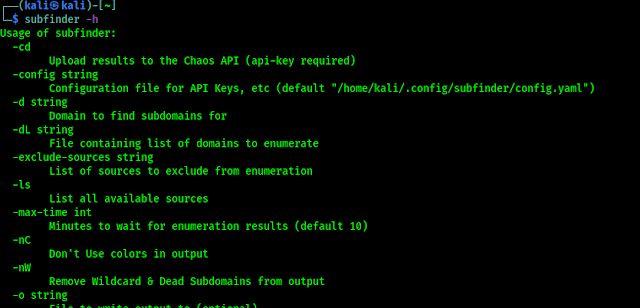
subfinder -h

In the following screenshot we can see the help options of SubFinder.

subfinder help options

We can start discovering subdomains of our target website by using SubFinder. For an example we are going to check the subdomains of hackerone.com, so we will use the following command:

subfinder -d hackerone.com

In the following screenshot we can see that SubFinder is collecting subdomains of hackerone.com.

subdomain finder on kali linux

There are lots of options in the SubFinder tool, as we have seen on the help option. To save the output on a file we can use -o flag.

subfinder -d hackerone.com -o hackerone.txt

The above command will save our list of discovered subdomains on our mentioned file, as we can see in the following screenshot:

subdomains on a file

We can also use –all flag to use all sources, but it will be slow for enumeration.

This is very helpful for cybersecurity researchers because sometimes the website developers just not show the older and not using subdomains, as we know older things have a good chance to be vulnerable.

This is how we can discover hidden subdomains of a website using SubFinder on our Kali Linux system.

Love our articles? Make sure to follow us on Twitter and GitHub, we post article updates there. To join our KaliLinuxIn family, join our Telegram Group. We are trying to build a community for Linux and Cybersecurity. For anything we always happy to help everyone on the comment section. As we know our comment section is always open to everyone. We read each and every comment and we always reply.

MaskProcessor — Advanced Password-List for Bruteforce

MaskProcessor — Advanced Password-List for Bruteforce

We all know that cracking passwords are very important in cybersecurity field. Then ever we thinks for password cracking we either need to do dictionary attack or brute-force. But, if the password didn’t in our password list dictionary attack will not work and brute-force takes too much time to crack a password (sometimes even more than a decade).

Maskprocessor on Kali LInux

Trying to solve this problem of brute-force password generator a tool is there by the makers of HashCat (well known password cracking tool). This tool named as MaskProcessor. Now what MaskProcessor do? It is a high-performance word generator with a per-position configurable charset, which tries all combinations from a given keyspace just like in Brute-Force attack, but more specific. Then how it is different from brute-force attack?

MaskProcessor is Faster Than Brute-Force

The reason for doing this and not to stick to the traditional Brute-Force is that we want to reduce the password candidate keyspace to a more efficient one.

Here is a single example. We want to crack the password: Julia1984

In traditional Brute-Force attack we require a charset that contains all upper-case letters, all lower-case letters and all digits (aka “mixalpha-numeric”). The Password length is 9, so we have to iterate through 62^9 (13,537,086,546,263,552) combinations. Lets suppose we crack with a rate of 100M/s, this requires more than 4 years to complete.

In Mask attack we know about humans and how they design passwords. The above password matches a simple but common pattern. A name and year appended to it. We can also configure the attack to try the upper-case letters only on the first position. It is very uncommon to see an upper-case letter only in the second or the third position. To make it short, with Mask attack we can reduce the keyspace to 522626262610101010 (237,627,520,000) combinations. With the same cracking rate of 100M/s, this requires just 40 minutes to complete.

We can see the difference that how MaskProcessor can reduce our efforts. It just guessing the pattern of password and make a very shorter list for a quick job. There are some disadvantages are there also.

Disadvantage of MaskProcessor Compared to Brute-Force

There is none. We can argue that the above example is very specific but this does not matter. Even in mask attack we can configure our mask to use exactly the same keyspace as the Brute-Force attack does. The thing is just that this cannot work vice versa.

What are the Masks

For each position of the generated password candidates we need to configure a placeholder. If a password we want to crack has the length 8, our mask must consist of 8 placeholders.

  1. A mask is a simple string that configures the keyspace of the password candidate engine using placeholders.
  2. A placeholder can be either a custom charset variable, a built-in charset variable or a static letter.
  3. A variable is indicated by the ? letter followed by one of the built-in charset (l, u, d, s, a) or one of the custom charset variable names (1, 2, 3, 4).
  4. A static letter is not indicated by a letter. An exception is if we want the static letter ? itself, which must be written as ??.

Built-in character encoding

In MaskProcessor there are some built-in charsets. They are following:

  • ?l = abcdefghijklmnopqrstuvwxyz
  • ?u = ABCDEFGHIJKLMNOPQRSTUVWXYZ
  • ?d = 0123456789
  • ?a = ?l?u?d?s
  • ?b = 0x00 – 0xff

Not only these as we told in above that we can set custom charset in MaskProcessor.

Custom Charsets

There are four command-line-parameters to configure four custom charsets.

  • –custom-charset1=CS
  • –custom-charset2=CS
  • –custom-charset3=CS
  • –custom-charset4=CS

These command-line-parameters have four analogue shortcuts called -1, -2, -3 and -4. You can specify the chars directly on the command line.

Password Length Increment

A Mask attack is always specific to a password length. For example, if we use the mask ”?l?l?l?l?l?l?l?l” we can only crack a password of the length 8. But if the password we try to crack has the length 7 we will not find it. That’s why we have to repeat the attack several times, each time with one placeholder added to the mask. This is transparently automated by using the –increment flag.

  • ?l
  • ?l?l
  • ?l?l?l
  • ?l?l?l?l
  • ?l?l?l?l?l
  • ?l?l?l?l?l?l
  • ?l?l?l?l?l?l?l
  • ?l?l?l?l?l?l?l?l

Installing MaskProcessor on Kali Linux

We can install a minimum version of MaskProcessor on our Kali Linux by using sudo apt install maskprocessor command. But there are some issue with this Kali Linux repository version. Like we had installed it but it is also saying ‘command not found’, as we can see in the following screenshot.
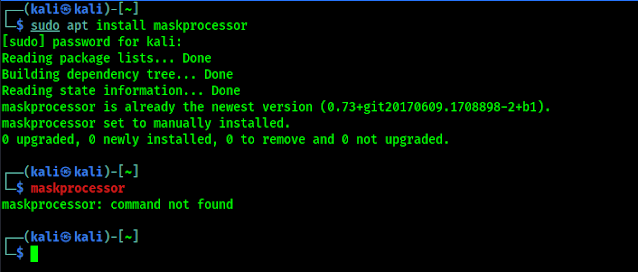
maskprocessor is installed but not working
MaskProcessor is installed but “command not found”

In this case we are going to uninstall this by using sudo apt remove maskprocessor command, and install it from scratch.

First we download it from it’s GitHub repository by using following command:

git clone https://github.com/hashcat/maskprocessor

Now MaskProcessor will be cloned on our system as we can see in the following screenshot:

maskprocessor git cloned

Now we need to navigate into the maskprocessor/src directory by using following command:

cd maskprocessor/src

Here we build the program files by using the make command:

make

In the following screenshot we can see the output of the used command:

building program files of maskprocessor

Now we move the mp64.bin file to /usr/bin directory and name it maskprocessor that it can be used as default tools. We can easily do it by using following command:

sudo mv ./mp64.bin /usr/bin/maskprocessor

Now our installation is complete. We can use MaskProcessor on our Kali Linux system. We can now use maskprocessor command to run it on our terminal.

Using MaskProcessor on Kali Linux

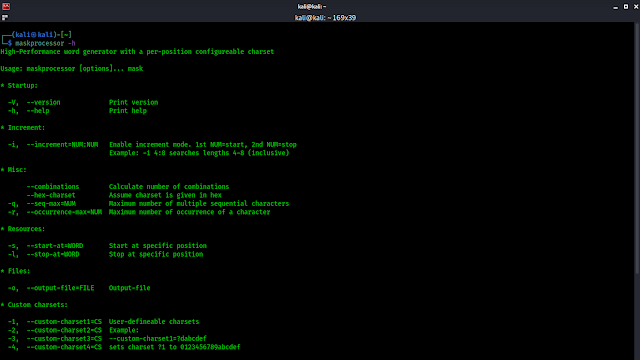
As we do always lets check MaskProcessor’s help options by applying following command on our terminal window:

maskprocessor -h

In the following screenshot we can see what we can do using MaskProcessor:

Maskprocessor help

Now we learn how we can generate a specific wordlist in MaskProcessor. Here we need to know about the default charset as we told about in previous section, again mentioning here.

?l = abcdefghijklmnopqrstuvwxyz
?u = ABCDEFGHIJKLMNOPQRSTUVWXYZ
?d = 0123456789
?s =  !”#$%&'()*+,-./:;<=>?@[]^_`{|}~
?a = ?l?u?d?s
?b = 0x00 – 0xff

All characters, except for those that stand for the set (?l, ?u, ?d, etc.), are included in the password unchanged. If we want to compose a dictionary that contains six-digit passwords we need to use maskprocessor ?d?d?d?d?d?d command but we also save the directory using -o flag. So our command will be as following:

maskprocessor ?d?d?d?d?d?d -o directory.txt

This will create a password directory named “directory.txt” which can break a six-digit password by brute-forcing attack.

Not only this. Almost every password-list creator tool can do this but MaskProcessor can do something better. Now we come into this point.

What if we know someone using a password which starts with voro followed by 4 numbers and then two capital letters. In this case we can easily create a password-list using MaskProcessor. We need to use following command:

maskprocessor voro?d?d?d?d?u?u -o passlist.txt

In the above command we have used voro then four ?d for four digits then two ?u for two capital letters, and bang it will create our required very special password list, as we can see in the following screenshot:

passlist created in MaskProcessor

Bang!! Here is our special password list for cracking the specific password.

Now we can use MaskProcessor for creating special type of password lists. We can easily use MaskProcessor on our Kali Linux system.

HashCat vs MaskProcessor

Although, in general, MaskProcessor & Hashcat both are interchangeable to generate passwords, we need to remember that the -a 3 option must be specified to select the brute-force/mask attack mode (since Hashcat supports various attack modes, not only mask). We also need to use the –stdout option, which means to show the password candidates (without cracking the hash).

Hashcat (Mask attack) doesn’t allow us to set the maximum number of identical repeated characters, the maximum number of occurrences of one character, start or end at a specific position. But such a result can be obtained using a Rule-based attack.

Running Hashcat on Linux systems can be problematic due to the need to have proprietary drivers.

Love our articles? Make sure to follow us on Twitter and GitHub, we post article updates there. To join our KaliLinuxIn family, join our Telegram Group. We are trying to build a community for Linux and Cybersecurity. For anything we always happy to help everyone on the comment section. As we know our comment section is always open to everyone. We read each and every comment and we always reply.

Linux Staff Monitoring

Linux Staff Monitoring

Linux Staff Monitoring: When Demand Means Supply / Hubr

Monitask Employee Monitoring Software for Linux

Studying today’s market of our potential customers we, to our own surprise, came to the conclusion that the majority of large companies, which need personnel monitoring and time tracking in Linux. As it turned out, small and medium businesses prefer Linux systems for one simple reason – it is much cheaper. And since businesses are moving to Linux, HR tools should be supported and widely used in this environment.

Effective HR management requires a clear understanding of what each individual employee and the department as a whole is doing. This is especially evident in the example of one of our clients. His company includes several large departments, namely: All three of these departments do their work using Linux-based computers.

However, the specifics of the work are so different that it is difficult to perform a quality analysis of the work without using additional tools. Choosing our Linux-based employee monitoring product Monitask, our client was able to solve this issue for all the departments.Let us remember how timekeeping and productivity measurement used to be performed. At the entrance to the plant, there was a method of carding the time when an employee came in for his shift and the time when he left the workplace.

Productivity, on the other hand, was measured by the amount of output. But those times are gone, and now the working day begins with turning on the computer, and the result of the work is not always a finished and tangible product that can be measured in pieces. That is why tasks and methods of their solution today are completely different from what they used to be. Flexibility of settings, a wide range of possibilities and informative reports are required. And most importantly, it all should be automated and should not distract manager and subordinates from their main work. All possibilities of personnel monitoring software in Linux can be adjusted individually, so the final report is as informative and correct as possible. Regardless of the overall activity of the company and its size, the functionality of the employee monitoring system in Linux allows you to solve personnel management issues for any type of departments, including the above mentioned as well as the marketing, design, technical support, customer service departments, etc. For example, the accounting department is the link in the company that knows everything about everybody. Personal data of all employees, the money turnover, details of each transaction.

In general, all that, if it gets to third parties, can cause damage to the company and its employees. To solve this issue, we offer a permanent record of visited web-sites, screenshots with the name of the running application and recording from web-cameras, so you can track exactly who was using the computer at what time you are interested.Software Development Department also requires a certain record. To analyze each employee’s productivity, we offer features to assign and record the use of productive and unproductive programs. Also, to maintain discipline in the department you should activate the accounting of working hours and breaks. By the way, the employee can view his productivity report himself, so he can adjust his work.To monitor the call center in Linux, we have created an additional tool – Lockscreen. Thanks to this feature, there is no need to “bind” a computer to an employee. It is enough to assign each employee his own account and the corresponding password. Depending on who is using the computer at the moment, the account will be kept and data will be sent to their profile. This is very convenient if operators work in Linux in shifts or there is a large turnover of staff in the office.

Depending on the size of the company, its needs and capabilities, you can choose one of the solutions: a cloud service with the possibility of separately purchasing additional functions or a server version, which includes all possible elements of monitoring and accounting.

Cybersecurity Trends To Be Aware Of In 2022

Cybersecurity Trends To Be Aware Of In 2022

6 trillion dollars – What can be done with such a massive amount? Eradicate Covid-19? Control global warming?

This is the amount necessary to control cybercrime damages for businesses around the world. It is hard to believe an unorganized group of hackers doing petty crime can cost the world such a huge amount.

Cybersecurity Trends To Be Aware Of In 2022

More dangerous than any virus in history, simple forms of cyber attacks like ransomware, malware and phishing attacks can bring a process to a standstill completely, causing an enormous loss for business organizations. It is important to know the current trends in cybersecurity to keep your business safe and invest cleverly to avoid losses.

Trend #1: Major Shortage of Experts

There is a huge demand for talented cybersecurity experts who can safeguard a company from various hacker attacks. In fact, it is one of the top 5 skills which will soar in demand for the next decade. Companies are ready to pay exceptionally high if a cybersecurity expert is capable of avoiding immediate losses, fixing ransomware issues and providing optimum protection against cyberattacks.

Resuming work after a cyberattack or threat is not an easy task requiring a clear scan of the network to ensure it is safe, patching up the loopholes in the software, updating the system, etc. Cybersecurity experts protect the system, create awareness among the employees and repair the system in case of cyber attacks as a part of the recovery plan. It is wise to invest in a team of cyber experts in 2022 as the demand for people with such talent will skyrocket in the upcoming years.

Additionally, some people with poor knowledge and questionable intentions will take advantage of this demand and will pose as experts. It’s advisable to do proper research before hiring cybersecurity experts to see if they really know what they are doing. As company data is not something to take chances with, use background checking companies, conduct proper interviews and use Nuwber to see if the information the experts provide about themselves is really true.

Trend # 2: Employee Training and Awareness

In addition to hiring cyber security experts, allow them to teach the trends and rules to be followed to other employees. Data security is a matter of collective implementation by all the employees. Even the carelessness of one single person can totally compromise the entire security of the company.

The efforts taken by cyber security experts to protect valuable company data will be fruitful only with the cooperation of all the other employees. Good training, knowledge about handling different scenarios and awareness regarding different types of cybercrimes are necessary for the employees to understand the depth of the issue.

The cyber security team can create this awareness with their knowledge and provide enough practice and workshops for the employees in staying safe. Regular practice in using multi-factor authentication, VPNs and password managers prevents over 60% chances of business data leakage.

Many businesses have realized there is no “if there is an attack” in 2022 and are preparing their employees genuinely to stay shielded from the attacks with the help of their cyber security team and training experts.

Trend # 3:  Role-Based Access Control Software

RBAC allows workers to access or view only the absolutely essential files with multi-level authentication. There are multi-level restrictions and many degrees of access and only the most trusted and important employees are allowed to access the core data. Saving, copying or sharing business-related data is highly restricted while using RBAC.

Employees are able to access data only based on their designation and under strict monitoring. RBAC is considered the most budget-friendly and secure way for small and medium-level businesses to keep their data safe in 2022. 

Trend # 4: Custom Security Software

It is important for modern businesses to understand the nature of the threats that await them in their industry. If it is a manufacturing unit, they might need to pay extra attention to automation services. If it is an IT industry, they need to take measures to implement on-premise level security for remote working employees too.

Every business should invest in creating custom security software to meet its unique needs. Popularly known as Commercial off-the-shelf (COTS) software, several companies are expected to invest in such a type of software in 2022. The major advantage of COTS is they are able to analyze and fill in every loophole for your own business, providing fool-proof support.

Hiring an expert team to create such software and train employees to keep it running might take some time and effort. But, it is worth every penny and minute invested as it highly nullifies the chances of cyberattacks.

Trend # 5: Mitigation Measures

Mitigation is a serious issue and requires good investment and clear planning from the company side. The most common mitigation measures taken by business organizations are maintaining an automatic data backup and recovery system and having a contingency plan, re-assigning priority jobs to maintain the process running.

The mitigation measures should aim at maintaining uninterrupted service for the customers and resuming the affected process as quickly as possible. Huge businesses often have contingency teams who take overwork or route it to other teams quickly. Small and medium-level businesses who cannot afford major investment often rely on secure data backup and recovery.

Conclusion

There are five major cybersecurity trends in 2022. There is a huge need for cybersecurity experts and companies to invest in technologies like role-based access and custom security software. Businesses of all sizes, small, medium and huge are targeted by hackers and every company should be taking steps to train its employees about cyber security.

They should strive hard to create awareness about the dangers of a data breach or leakage and cyberattacks. Last but not the least, every company should be investing money to trace the hackers causing the issue, and in contingency plans that help them to recover from cyber-attacks quickly. All these five trends are here to stay for a while and are expected to define the face of the internet in the next decade.

Protecting Our Testing Web Server on Kali Linux

Protecting Our Testing Web Server on Kali Linux

For being cybersecurity researcher we need to practice with buggy web servers, NO not actual servers, we are talking about some intentionally buggy web servers for practicing security testing. We host various vulnerable web applications like Damn Vulnerable Web Application (DVWA), BWAPP (Buggy Web App), OWASP Mutillidae etc on our system. Do we know about the potential risks on this?

there is no place like 127.0.0.1 linux

These type of buggy web applications have various vulnerabilities, some of them allow shell uploading (backdoors) and SQL injection. Such scripts can lead to complete compromise of our the web server as well as the entire computer. We can say that we had hosted it on localhost, that also can harm our system by the attackers. Attacker just need to access our local network (read WiFi) to break into it and damage us. Even they can do it remotely if we had forwarded our system ports.

How to Protect Testing Web Servers on Kali Linux

Malicious Port Closing

First of all we need to check our port forwarding options in our router settings. We should check that we don’t have any port forwarded. Port forwarding allows us to enter in our network remotely, but there is a flaw that if we can enter then anyone else also can. That is why we should not disclose our public IP address.

What if we need to access our network from outside (in our case, we always use our home PC files from our office). In that case the best option to protect our web server shown in following chapter.

IP Filtering

We can filter which IP address is allowed to open our web server. If we apply it then other IP address can’t access our web server. to do this we need to configure our .htaccess file. By default .htaccess file is disabled. We need to enable it from Apache2 configuration. Lets open Apache2 configuration file by using following command:

sudo nano /etc/apache2/apache2.conf

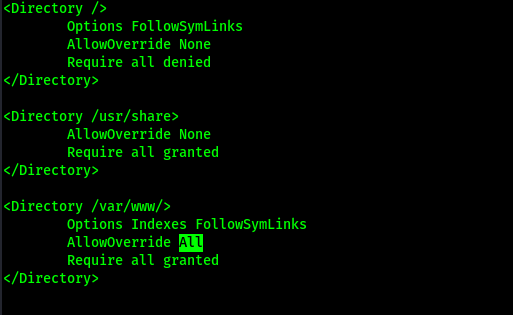
In the following screenshot we can see that where we need to change:

apache2 configuration file

In the <Directory /var/www/> section we need to change the AllowOverride value from None to All. We did the change in the following screenshot:

apache2 config file changed

Then we save and close the file by pressing CTRL+X, then Y, then Enter⤶ key.

Now we need to restart our web server for the changes to take effect:

sudo service apache2 restart

The default directory for Linux web server is /var/www/html. Now here we can edit our .htaccess file by applying following command:

sudo nano /var/www/html/.htaccess

Here our .htaccess file will open we need to just type Require local here, as shown in the following screenshot:

editing .htaccess file

Then we save and close it. Now if we did it then what happens? The name “local” only give access to the same computer. Please note only connections from the same computer (localhost) are allowed and any other remote connections are prohibited, even from the local network. This will be safest option for us.

If we do this and then we try to open this webpage from other devices on our local network it shows like following screenshot:

access denied for other localhost devices
Access denied for other localhost devices

In this way we can safe our localhost websites form other attackers. It is so simple and easy, yet powerful.

If we want we can allow a single IP or network ranges can access this webpage, instead of accessing from same computer only. We need to do following changes on .htaccess file to do so.

Require ip 10.1.2.3
# OR
Require ip 10.1
# OR
Require ip 10.1.0.0/16
# OR
Require ip 10.1.0.0/255.255.0.0
# OR
Require ip ::1

It is allowed multiple use of Require ip directive.

Some Vulnerable Web Server for Practice

This is how we can keep safe our localhost website from bad attackers on our Kali Linux system and enjoy our penetration testing practicing all the day.

Love our articles? Make sure to follow us on Twitter and GitHub, we post article updates there. To join our KaliLinuxIn family, join our Telegram Group. We are trying to build a community for Linux and Cybersecurity. For anything we always happy to help everyone on the comment section. As we know our comment section is always open to everyone. We read each and every comment and we always reply.
Open Whatsapp chat
Whatsapp Us
Chat with us for faster replies.