Securing Your EC2 Instance
You are responsible for configuring appropriate and effective access controls to protect your EC2 instances from unauthorized use. Broadly speaking, AWS provides four tools to help you with this task: security groups, Identity and Access Management (IAM) roles, network address translation (NAT) instances, and key pairs.
Security Groups
An EC2 security group plays the role of a firewall. By default, a security group will deny all incoming traffic. You defi ne group behavior by setting policy rules that will either block or allow specified traffic types. From that point on, any data packet coming into or leaving the perimeter will be measured against those rules and processed accordingly. Traffic is assessed by examining its source and destination, the network port it’s targeting, and the protocol it’s set to use. A packet that’s using TCP on the SSH port 22 could, for instance, only be allowed access to a particular instance if its source IP address matches the local public IP used by computers in your office. This lets you open up SSH access on your instance without having to worry about anyone from outside your company getting in.
Using security groups, you can easily create sophisticated rule sets to finely manage access to your services. You could, say, open up a website to the whole world while blocking your backend servers to everyone besides members of your team. If necessary, you can update your security group rules or apply them to multiple instances.
IAM Roles
You can also control access to AWS resources—including EC2 instances—through the use of IAM roles. You define an IAM role by giving it permissions to perform actions on specified services or resources within your AWS account. When a particular role is assigned to a user or resource, they’ll gain access to whichever resources were included in the role policies.
Using roles, you can give a limited number of entities (other resources or users) exclusive access to resources like your EC2 instances. But you can also assign an IAM role to an EC2 instance so that processes running within it can access the external tools—like an RDS database instance—it needs to do its work. You’ll learn more about IAM in Chapter 6, “Authentication and Authorization—AWS Identity and Access Management.”
NAT Devices
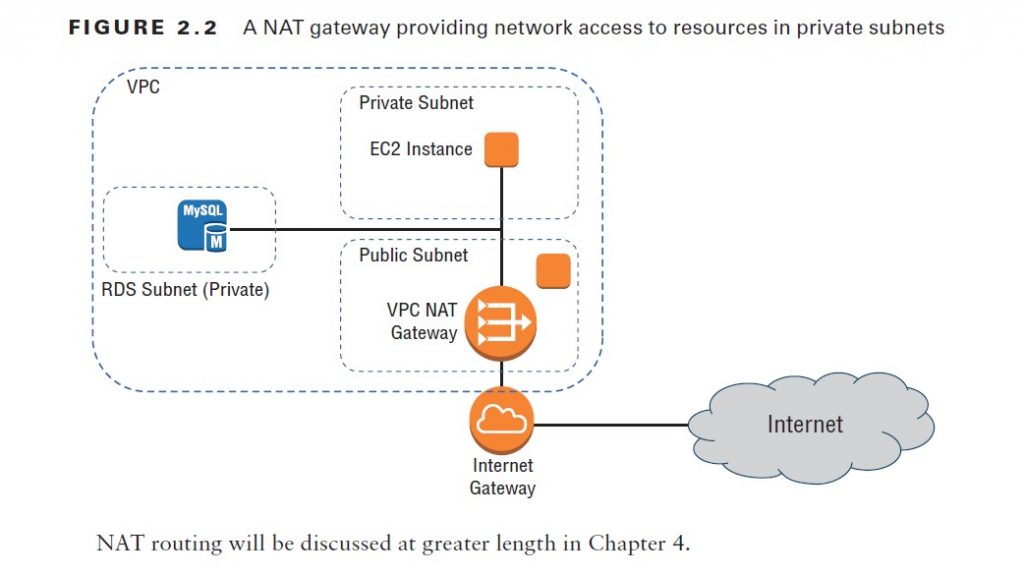
Sometimes you’ll need to configure an EC2 instance without a public IP address to limit its exposure to the network. Naturally, that means it won’t have any Internet connectivity. But that can present a problem because you’ll probably still need to give it limited Internet access so it can receive security patches and software updates. One solution is to route traffic between your private instance and the Internet through a special device. AWS gives you two ways to do that: a NAT instance and a NAT gateway (see Figure 2.2). They’ll both do the job, but since a NAT gateway is a managed service, it doesn’t require that you manually launch and maintain an instance. Both approaches will incur monthly charges.
Also read this topic: Introduction to Cloud Computing and AWS -1
Key Pairs
As any professional administrator will know, remote login sessions on your running instances should never be initiated over unencrypted plain-text connections. To ensure properly secured sessions, you’ll need to generate a key pair, save the public key to your EC2 server, and save its private half to your local machine. If you’re working with a Windows AMI, you’ll use the private key file to retrieve the password you’ll need to authenticate into your instance. For a Linux AMI, the private key will allow you to open an SSH session. Each key pair that AWS generates for you will remain installed within its original region
and available for use with newly launched instances until you delete it. You should delete the AWS copy in the event your public key is lost or exposed. Just be careful before you mess with your keys: your access to an instance might depend on it.
Other EC2-Related Services
This section will briefly introduce you to a few more EC2 features. Some of these features won’t necessarily play a large role in the solutions architect exam but could definitely come in handy for you in your work at some point. Others are only touched on here but will be examined in greater detail later in the book.
AWS Systems Manager
Systems Manager Services (available through the AWS console) is a collection of tools for monitoring and managing the resources you have running in the AWS cloud and in your own on-premises infrastructure. Through the Systems Manager portal, you can organize your AWS resources into resource groups, mine various visualization tools for insights into the health
and behavior of your operations, directly execute commands or launch tasks remotely without having to log on, automate patching and other lifecycle events, and manage service parameters and access secrets.
Placement Groups
Placement groups are useful for multiple EC2 instances that require especially low-latency network interconnectivity. There are two placement group strategies.
■■ Cluster groups launch each associated instance within a single availability zone within close physical proximity to each other.
■■ Spread groups separate instances physically across hardware to reduce the risk of failure-related data or service loss.
AWS Elastic Beanstalk
Elastic Beanstalk lets you upload your application code and define a few parameters, and AWS will configure, launch, and maintain all the infrastructure necessary to keep it running. That might include EC2 load-balanced and auto scaled instances, RDS database instances, and all the network plumbing you would otherwise have had to build yourself. Compatible languages and platforms include .NET, Java, Node.js, Python, and Docker. Elastic Beanstalk adds no charges beyond the cost of the running infrastructure itself.
Amazon Elastic Container Service and AWS Faregate
Running Docker container-based applications at scale is the kind of thing that’s a natural fit for a cloud platform like AWS. Once upon a time, if you wanted to get that done, you’d have to fire up one or more robust EC2 instances and then manually provision them as your Docker hosts. With Amazon Elastic Container Service (ECS), however, AWS lets you launch a prebuilt
Docker host instance and define the way you want your Docker containers to behave (called a task), and ECS will make it all happen. The containers will exist within an infrastructure that’s automated and fully integrated with your AWS resources.
The more recently released Faregate tool further abstracts the ECS configuration process, removing the need for you to run and configure instances for your containers. With Faregate, all you do is package your application and set your environment requirements.
AWS Lambda
“Serverless” applications are powered by programming code that’s run on servers—just not servers under the control of the application owners. Instead, code can be configured to run when AWS’s Lambda servers are triggered by preset events.
Lambda allows you to instantly perform almost any operation on demand at almost any time but without having to provision and pay for always-on servers.
VM Import/Export
VM Import/Export allows you to easily move virtual machine images back and forth between your on-premises VMware environment and your AWS account (via an S3 bucket). This can make it much simpler to manage hybrid environments and to efficiently migrate workloads up to the AWS cloud.
Elastic Load Balancing and Auto Scaling
A load balancer directs external user requests between multiple EC2 instances to more efficiently distribute server resources and improve user experience. Autoscaling will react to preset performance thresholds by automatically increasing or decreasing the number of EC2 instances you have running to match demand. Both Elastic Load Balancing (ELB) and Auto Scaling can be closely integrated with your EC2 infrastructure, making for simple and seamless operation.
AWS CLI Example
The following example code shows how you can use an AWS CLI command to deploy an EC2 instance that includes many of the features you learned about in this chapter. Naturally, the image-id, security-group-ids, and subnet-id values are not real. Those you would replace with actual IDs that fit your account and region.
aws ec2 run-instances –image-id ami-xxxxxxxx –count 1 \
–instance-type t2.micro –key-name MyKeyPair \
–security-group-ids sg-xxxxxxxx –subnet-id subnet-xxxxxxxx \
–user-data file://my_script.sh \
–tag-specifications \ ‘ResourceType=instance,Tags=[{Key=webserver,Value=production}]’ \
‘ResourceType=volume,Tags=[{Key=cost-center,Value=cc123}]’
This example launches a single (–count 1) instance that’s based on the specified AMI. The desired instance type, key name, security group, and subnet are all identified. A script file (that must exist locally so it can be read) is added using the user-data argument, and two tags are associated with the instance (webserver:production and cost-center:cc123).
