CyberSecurity Updates

Computer security, cybersecurity or information technology security is the protection of computer systems and networks from information disclosure, theft of or damage to their hardware, software, or electronic data, as well as from the disruption or misdirection of the services they provide.

Basics of Digital Forensics

Basics of Digital Forensics

Forensics is the work of investigating the evidence and establishing the facts of interest that links to an incident. In this article we just discuss something about Digital Forensics. Here we try to give an introduction to digital forensics as we believe it is necessary to have a reaction plan when one of our assets, such as a server or web application, is compromised. We also recommend researching other sources for a more thorough training as this topic extends beyond the tools available in Kali Linux. Digital forensics is a faster growing area of interest in cyber security with very few people that know it well.

Basics of Digital Forensics Kali Linux

Before stepping into the world of Digital James Bond, we need to remember some rules. Not much, we believe these three rules must be followed by a digital forensics expert. If we failed to follow these rules then we may have failed to solve the case.

1. Never touch the evidence

Now it is not like the physical evidence touch. It means “never work on original data”,  always use a copy of evidence for forensics testing. We also need to ensure that we didn’t modify the data while creating a copy. The moment we touch or modify original data, our case becomes worthless. Tampered evidence can never be used in any legal proceeding regardless of what is found. The reason is once an original is modified, there is a possibility of identifying false evidence that can misrepresent the real incident. An example is making a change that adjusts the timestamp in the system logs. There would be no way to distinguish this change from an noob analyst’s mistake or attacker trying to cover his traces.
Most digital forensic analysts will use specialized devices to copy data bit for bit. There are also very reputable softwares that will do the same thing. It is important that our process be very well documented. Most digital copies in legal proceedings that have been thrown out were removed due to a hash of a storage medium, such as a hard drive, not matching copied data. The hash of a hard drive will not match a contaminated copy, even if only a single bit is modified. A hash match means it is extremely likely the original data including filesystem access logs, deleted data disk information, and metadata is an exact copy of the original data source.

2. Look for everything

The second vital rule for digital forensics is anything that can store data should be examined. In famous cases involving digital media, critical evidence has been found on a camera, DVR recorders, video game consoles, phones, iPods, and other random digital devices. If the device has any capability of storing user data, then it is possible that device could be used in a forensics investigation. Do not dismiss a device just because it is unlikely. A car navigation system that stores maps and music on SD cards could be used by culprits to hide data, as well provide evidence for Internet usage based on download music tags.

3. Well Documentation

This is the last crucial rule of digital forensics. Most of newcomers ignore it, but we MUST ensure documenting our findings. All evidence and steps used to reach a conclusion must be easy to understand for it to be credible. More importantly, our findings must be re-creatable. Independent investigators must arrive at the same conclusion as we using our documentation and techniques. It is also important that our documentation establishes a timeline  of events on when specifics occurred and how they occurred. All timeline conclusions must be documented.
A forensic investigation is all about the perception of being a security expert validating evidence linked to an incident. It is easy to get caught up looking for bad guys and drawing conclusions on what may have happened based on opinion. This is one of the fastest ways to discredit our work.

As a forensics specialist, we must only state the facts. Did the person Tony steal Steve’s files, or did the account that was logged on as the username Tony initiate a copy from the user account  Steve’s home directory to a USB drive with serial number XXX at the timestamp XXX on date XXX? See the difference? The real bad guy could have stolen Tony’s login credentials (using methods covered in this book) and steal Steve’s data while posing as Tony. The moment you jump to a conclusion is the moment your case becomes inconclusive based on personal interference. Remember, as a forensics specialist, we could be asked under oath to give testimony on exactly what happened. When anything outside of facts enters the record, our credibility will be questioned.

Extra Talks

These are the basic rules of digital forensics that we need to remember and follow all the time. Digital forensics is not so easy and it is very potential as a career option. As the basics we need to collect the information carefully and painstakingly analyzed with a view to extract evidence relating to the incident to help answer questions, as shown in the following diagram:

This is for today, if we follow the basics and use our brain and eyes then we can solve cases and become a digital James Bond. The world needs a hero.

Love our articles? Make sure to follow us on Twitter and GitHub, we post article updates there. To join our KaliLinuxIn family, join our Telegram Group. We are trying to build a community for Linux and Cybersecurity. For anything we always happy to help everyone on the comment section. As we know our comment section is always open to everyone. We read each and every comment and we always reply.

Best USB WiFi Adapter For Kali Linux 2021 [Updated August]

Best USB WiFi Adapter For Kali Linux 2021 [Updated August]

Best WiFi Adapter for Kali Linux

The all new Kali Linux 2021.1 was rolling out and we can simply use it as our primary operating system because of the non-root user. The main benefit of using Kali Linux as primary OS is we got the hardware support. Yes, we can do our all penetration testing jobs with this Kali Linux 2021, but to play with wireless networks or WiFi we need some special USB WiFi adapters in Kali.
Best WiFi Adapter for Kali Linux

Here we have listed some best USB Wireless adapters Kali Linux in 2021. These WiFi adapters are 100% compatible with Kali Linux and supports monitor mode and packet injection, which will help a lot in WiFi penetration testing.

Best WiFi Adapter for Kali Linux

Sl No.
WiFi Adapter
Chipset
Best for
Buy
1
AR9271
Good Old Friend
2
RT 3070
Best in it’s Price Range
3
RT 3070
Compact and Portable
4
RT 5572
Stylish for the Beginners
5
RTL8812AU
Smart Look & Advanced
6
RTL8814AU
Powerful & Premium
7
RT5372
Chip, Single Band

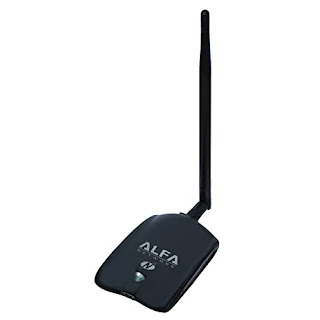
Alfa AWUS036NH

We are using this USB WiFi adapter from the BackTrack days (before releasing Kali Linux) and still we consider it as one of the best. For it’s long range signals we can do our penetration testing jobs from a long distance.

Alfa AWUS036NHA Kali Linux WiFi Adapter 2020

Alfa AWUS036NH is plug and play and compatible with any brand 802.11g or 802.11n router using 2.4 GHz wavelength and supports multi-stream & MIMO (multiple input multiple output) with high speed transfer TX data rate up to 150 MBPS. It also comes with a clip which can be used to attach this adapter on a laptop lid.

    1. Chipset: Atheros AR 9271.
    2. Compatible with any brand 802.11b, 802.11g or 802.11n router using 2.4 Ghz wave-length.
    3. Includes a 5 dBi omni directional antenna as well as a 7 dbi panel antenna.
    4. Supports security protocols: 64/128-bit WEP, WPA, WPA2, TKIP, AES.
    5. Compatible with Kali Linux RPi with monitor mode and packet injection.
    6. High transmitter power of 28 dBm – for long-rang and high gain WiFi.
      https://www.amazon.com/Alfa-AWUS036NH-802-11g-Wireless-Long-Range/dp/B003YIFHJY/ref=as_li_ss_tl?dchild=1&keywords=Alfa+AWUS036NHA&qid=1594882122&sr=8-6&linkCode=ll1&tag=adaptercart-20&linkId=2f09cf7cc9b84fcd2be61c590af1d25c&language=en_US

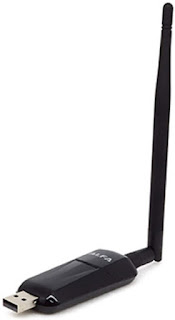
      Alfa AWUS036NHA

      Alfa again. Alfa provides the best WiFi adapters for Kali Linux. This adapter is the older version of Alfa AWUS036NH with Ralink RT3070 chipset. AWUS036NHA is the IEEE 802.11b/g/n Wireless USB adapter with 150 Mbps speed This is also compatible with IEEE 802.11b/g wireless devices at 54 Mbps.

      Alfa AWUS036NH Kali Linux WiFi Adapter 2020

      This plug and play WiFi adapter supports monitor mode and packet injection in any Linux distribution and Kali Linux. Alfa AWUS036NHA comes with a 4 inch 5 dBi screw-on swivel rubber antenna that can be removed and upgrade up to 9 dBi.

        1. Chipset: Ralink RT 3070.
        2. Comes with a 5 dBi omni directional antenna as well as a 7 dBi panel antenna.
        3. Supports security protocols: 64/128-bit wep, wpa, wpa2, tkip, aes
        4. Compatible with Kali Linux (Also in Raspberry Pi) with monitor mode and packet injection.
          https://www.amazon.com/Alfa-AWUS036NH-802-11g-Wireless-Long-Range/dp/B003YIFHJY/ref=as_li_ss_tl?dchild=1&keywords=Alfa+AWUS036NH&qid=1594870855&s=amazon-devices&sr=8-1&linkCode=ll1&tag=adaptercart-20&linkId=4c49c0097d6157190cf04122e27714ed&language=en_US

          Alfa AWUS036NEH

          This Alfa WiFi Adapter is compact and tiny, but it has a good range. It supports plug and play so connect it with Kali Linux machine and start playing with WiFi security. The antenna is detachable and makes it very portable. We have used this to build our portable hacking machine with Raspberry Pi and Kali Linux.

          Alfa AWUS036NEH Kali Linux WiFi Adpater 2020

          Alfa AWUS036NEH is the ultimate solution for going out and red teaming attacks. The long high gain WiFi antenna will give us enough range to capture even low signal wireless networks. This adapter is slim and doesn’t require a USB cable to use.

            1. Chipset: Ralink RT 3070.
            2. Supports monitor mode and packet injection on Kali Linux and Parrot Security on RPi.
            3. Compact and portable.
              https://www.amazon.com/AWUS036NEH-Range-WIRELESS-802-11b-USBAdapter/dp/B0035OCVO6/ref=as_li_ss_tl?dchild=1&keywords=Alfa+AWUS036NEH&qid=1594870918&sr=8-3&linkCode=ll1&tag=adaptercart-20&linkId=c6578f6fb090f86f9ee8917afba3199a&language=en_US

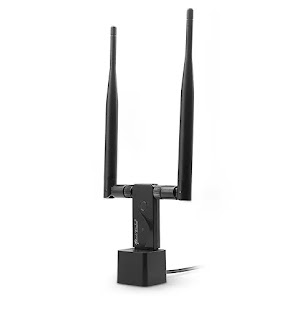
              Panda PAU09 N600

              Besides Alfa, Panda is also a good brand for WiFi adapters with monitor mode. Panda PAU09 is a good WiFi adapter to buy in 2020. This dual-band plug & play adapter is able to attack both 2.4 GHz as well as 5 GHz 802.11 ac/b/g/n WiFi networks.

              Panda PAU09 WiFi adapter for monitor mode

              This adapter comes with a USB docker and dual antennas, which looks really cool. It is also detachable into smaller parts. This adapter is reliable even on USB 3 and works great and fully supports both monitor mode and injection which is rare on a dual band wireless card out of the box.

                1. Chipset: Ralink RT5572.
                2. Supports monitor mode and packet injection on Kali Linux, Parrot Security even in RPi.
                3. 2 x 5dBi antenna.
                4. It comes with a USB stand with a 5 feet cable.
                5. Little bit of heating issue (not so much).
                  https://www.amazon.com/Panda-Wireless-PAU09-Adapter-Antennas/dp/B01LY35HGO/ref=as_li_ss_tl?dchild=1&keywords=Panda+PAU09&qid=1594870963&sr=8-1-spons&psc=1&spLa=ZW5jcnlwdGVkUXVhbGlmaWVyPUEzRUUwQjNVSkNGMEFIJmVuY3J5cHRlZElkPUEwODkwNzI3MkZHWUFNUTBRMlRTQSZlbmNyeXB0ZWRBZElkPUEwNzkxNzgzMTBaUEdDS05IUzdDTSZ3aWRnZXROYW1lPXNwX2F0ZiZhY3Rpb249Y2xpY2tSZWRpcmVjdCZkb05vdExvZ0NsaWNrPXRydWU=&linkCode=ll1&tag=adaptercart-20&linkId=d9d43db491c7cf14863cc99c1b8b7797&language=en_US

                  Alfa AWUS036ACH / AC1200

                  In Kali Linux 2017.1 update Kali Linux was released a significant update – support for RTL8812AU wireless chipset. Now Alfa AWUS036ACH is a BEAST. This is a premium WiFi adapter used by hackers and penetration testers. It comes with dual antennas and dual band technology (2.4 GHz 300 Mbps/5 GHz 867 Mbps) supports 802.11ac and a, b, g, n.

                  Alfa AWUS036ACH WiFi adapter for Kali Linux

                  These antennas are removable and if we require higher range, then we can connect an antenna with greater dbi value and use it as a long range WiFi link which makes this one of the best WiFi adapters. Also this adapter has an awesome look.

                  If budget is not an issue then this adapter is highly recommended.

                    1. Chipset: RealTek RTL8812AU.
                    2. Dual-band: 2.4 GHz and 5 GHz.
                    3. Supports both monitor mode & packet injection on dual band.
                    4. Premium quality with high price tag.
                      https://www.amazon.com/Alfa-Long-Range-Dual-Band-Wireless-External/dp/B00VEEBOPG/ref=as_li_ss_tl?dchild=1&keywords=Alfa+AWUS036ACH&qid=1594871102&sr=8-3&linkCode=ll1&tag=adaptercart-20&linkId=928256b6b245a63277f865d406f44c02&language=en_US

                      Alfa AWUS1900 / AC1900

                      Now this is the beast, then why is it at last? It is last because of its high price range. But the price is totally worth it for this USB WiFi adapter. If the previous adapter was a beast then it is a monster. Alfa AWUS1900 has high-gain quad antenna that covers a really long range (500 ft in an open area).

                      This is a dual band WiFi adapter with high speed capability 2.4GHz [up to 600Mbps] & 5GHz [up to 1300Mbps]. It also has a USB 3.0 interface.

                      Alfa AWUS036ACH The best wifi adapter for hacking in Kali Linux

                      Monitor mode and packet injection supported with both bands and it will be very useful for serious penetration testers. We also can attach this on our laptop display with it’s screen clip provided with the box.

                      What we got in the box?

                      • 1 x AWUS1900 Wi-Fi Adapter
                      • 4 x Dual-band antennas
                      • 1 x USB 3.0 cable
                      • 1 x Screen clip
                      • 1 x Installation DVD-Rom (doesn’t require on Kali Linux. Plug&Play)
                      • A consistent solution for network congestion!
                        1. Chipset: RealTek RTL8814AU.
                        2. Dual-band: 2.4 GHz and 5 GHz.
                        3. Supports both monitor mode & packet injection on dual band.
                        4. Premium quality with high price tag.
                        5. Very long range.
                          https://www.amazon.com/Alfa-AC1900-WiFi-Adapter-Long-Range/dp/B01MZD7Z76/ref=as_li_ss_tl?dchild=1&keywords=Alfa+AWUS036ACH&qid=1594871169&sr=8-4&linkCode=ll1&tag=adaptercart-20&linkId=d62c81825eace1b0f09d0762e84881c4&language=en_US

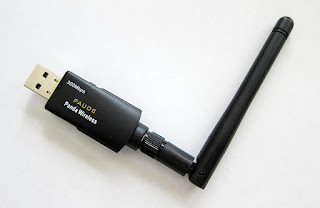
                          Panda PAU 06

                          Yes, This low cost Panda PAU 06 WiFi adapter supports Monitor Mode and Packet Injections. But we really don’t suggest to buy this adapter if budget is not an issue.
                          panda pau 06 wifi adapter for Kali Linux
                          The main reason is this WiFi adapter doesn’t supports dual-band frequency (only supports 2.4GHz), it doesn’t supports 5GHz frequency.
                          This WiFi adapter comes with Ralink RT5372 chipset inside it. 802.11n standards supports 300MB per second maximum speed.
                          This adapter takes less power from computer, but other adapters doesn’t took too much power from system (this point is negligible).
                          panda pau 06 order on amazon

                          Extras

                          There are some more WiFi adapters that we did not cover because we didn’t test them on our hands. These WiFi adapters were owned by us and some of our friends so we got a chance to test these products. We didn’t listed some WiFi adapters like following:

                          Be Careful to choose from these, because we don’t know that they surely support monitor mode & packet injection or not. As per our own experience Alfa cards are the best in the case of WiFi Hacking.

                          How to Choose Best Wireless Adapter for Kali Linux 2020

                          Before going through WiFi adapter brands let’s talk something about what kind of WiFi adapter is best for Kali Linux. There are some requirements to be a WiFi penetration testing wireless adapter.

                          • Should support Monitor mode.
                          • The ability to inject packets and capture packets simultaneously.

                          Here are the list of WiFi motherboards supports Monitor mode and Packet injection.

                          • Atheros AR9271 (only supports 2.4 GHz).
                          • Ralink RT3070.
                          • Ralink RT3572.
                          • Ralink RT5370N
                          • Ralink RT5372.
                          • Ralink RT5572.
                          • RealTek 8187L.
                          • RealTek RTL8812AU (RTL8812BU & Realtek8811AU doesn’t support monitor mode).
                          • RealTek RTL8814AU

                          So we need to choose WiFi Adapter for Kali Linux carefully. For an Example, on the Internet lots of old and misleading articles that describe TP Link N150 TL-WN722N is good for WiFi security testing. But it is not true. Actually it was.

                          TP Link N150 TL-WN722N newer models don't support Monitor Mode
                          TP Link N150 TL-WN722N newer models doesn’t work

                          The TP Link N150 TL-WN722N’s previous versions support monitor mode. The version 1 comes with Atheros AR9002U chipset and supports monitor mode. Version 2 has the Realtek RTL8188EUS chipset and doesn’t support monitor mode or packet injection. TP Link N150 TL-WN722N version 1 is not available in the market right now. So clear these things and don’t get trapped.

                          Which WiFi adapter is the best? Vote Please

                           
                          pollcode.com free polls

                          WiFi Hacking in Kali Linux

                          Kali Linux is the most widely used penetration testing operating system of all time. It comes with lots of tools pre-installed for cyber security experts and ethical hackers. We can perform web application penetration testing, network attack as well as wireless auditing or WiFi hacking. We have already posted some lots of tutorials on our website and some good WiFi auditing tutorials like AirCrack-Ng.

                          Why Do We Use External USB WiFi Adapters in Kali Linux?

                          A WiFi adapter is a device that can be connected to our system and allows us to communicate with other devices over a wireless network. It is the WiFi chipset that allows our mobile phone laptop or other devices which allows us to connect to our WiFi network and access the internet or nearby devices.

                          But most of the Laptops and mobile phones come with inbuilt WiFi chipset so why do we need to connect an external WiFi adapter on our system ? Well the simple answer is our in-built WiFi hardware is not much capable to perform security testing in WiFi networks.Usually inbuilt WiFi adapters are low budget and not made for WiFi hacking, they don’t support monitor mode or packet injection.

                          If we are running Kali Linux on Virtual Machine then also the inbuilt WiFi Adapter doesn’t work for us. Not even in bridge mode. In that case we also need an external WiFi adapter to play with WiFi networks. A good external WiFi adapter is a must have tool for everyone who has interest in the cyber security field.

                           
                          WSL2 installation of Kali Linux will not support any kind (Inbuilt or External) of Wi-Fi adapters.

                          Kali Linux Supported WiFi Adapters

                          Technically almost every WiFi adapter supports Kali Linux, but those are useless on WiFi hacking if they don’t support monitor mode and packet injection. Suppose, we buy a cheap WiFi adapter under $15 and use it to connect WiFi on Kali Linux. That will work for connecting to wireless networks but we can’t play with networks.

                          It doesn’t make sense, when we are using Kali Linux then we are penetration testers so a basic WiFi adapter can’t fulfill our requirements. That’s why we should have a special WiFi adapter that supports monitor mode and packet injection. So in this tutorial Kali Linux supported means not only supported it means the chipset has ability to support monitor mode and packet injection.

                          What is Monitor Mode

                          Network adapters, whether it is wired or wireless, are designed to only capture and process packets that are sent to them. When we want to sniff a wired connection and pick up all packets going over the wire, we put our wired network card in “promiscuous” mode.

                          In wireless technology, the equivalent is monitor mode. This enables us to see and manipulate all wireless traffic passing through the air around us. Without this ability, we are limited to using our WiFi adapter to only connect to wireless Access Points (APs) that accept and authenticate us. That is not what we are willing to settle for.
                          In the Aircrack-ng suite, we need to be able to use airodump-ng to collect or sniff data packets.

                          What is Packet Injection

                          Most WiFi attacks require that we are able to inject packets into the AP while, at the same time, capturing packets going over the air. Only a few WiFi adapters are capable of doing this.

                          WiFi adapter manufacturers are not looking to add extra features to their standard wireless adapters to suit penetration testers needs. Most wireless adapters built into your laptop are designed so that people can connect to WiFi and browse the web and send mails. We need something much more powerful and versatile than that.

                          If we can’t inject packets into the Access Point (in Aircrack-ng, this is the function of Aireplay-ng), then it really limits what we do.

                          If we are using Kali Linux and want to be a security tester or ethical hacker then a special WiFi adapter is a must have tool in our backpack. As per our own experience listed Alfa cards in this list are best USB wireless adapter for Kali Linux, going with them may be costly but they are really worth it. For more assistance comment below we reply each and every comment.

                          We are also in Twitter join us there. Our Telegram group also can help to choose the best WiFi adapter for hacking and Kali Linux.
                          Ping — Know the Target (Ping Pong)!

                          Ping — Know the Target (Ping Pong)!

                          Ping Pong! No we are not in wrong article. In this article we are going do discuss about the ping tool. Ping is the most famous tool that is used to check whether a particular host is available or not. tool works by sending an Internet Control Message Protocol (ICMP) echo request packet to the target host. If the target host is available and the firewall is not blocking the ICMP echo request packet, it will reply with the ICMP echo reply packet.

                          ping on Kali Linux

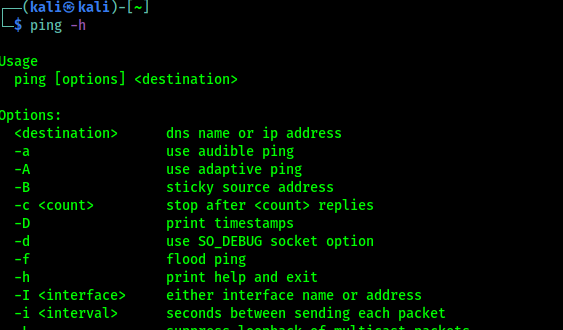
                          Although we can’t find the ping tool in Kali Linux application menu but in our terminal we can ping -h command to see the help section of the ping tool.

                          ping -h

                          In the following screenshot we can see the help of ping.

                          help of ping on Kali Linux

                          Now we run the ping with a destination address. For an example we use IP address of Facebook. We use following command:

                          ping 31.13.79.35

                          In the following screenshot we can see the output of the above command.

                          ping facebook ip from Kali Linux

                          By default, ping will run continuously until we press Ctrl + C and stop it.

                          We also can use a domain name to ping. Ping will automatically fetch the IP, if the target not behind a firewall.

                          ping facebook.com

                          In the following screenshot we can see that ping is started and it’s automatically find facebook’s IP address.

                          ping facebook.com from Kali Linux

                          This was the basic example, ping toll has lot of options inside it, but few of them are widely used. Those are following:

                          • -c count: This is the number of echo request packets to be sent.
                          • -I interface address: This is the network interface of the source address. The argument may be a numeric IP address (such as 192.168.0.108) or the name of the device (like eth0, wlan0). This option is required if we want to ping the IPv6 link-local address.
                          • -s packet size: This specifies the number of data bytes to be sent. The default is 56 bytes, which translates into 64 ICMP data bytes when combined with the 8 bytes of the ICMP header data.

                          We will discuss about these with example.

                          Assume that we are starting with internal penetration testing work. The customer gave us access to their network using a LAN cable. And, they also gave us the list of target servers’ IP addresses.

                          The first thing we would want to do before launching a full penetration testing arsenal is to check whether these servers are accessible from our machine. We can use ping for this task.

                          Our target server is located at 192.168.0.1, while our machine has an IP address of 192.168.0.108. To check the target server availability, we can give the following command:

                          ping -c 1 192.168.0.1

                          In the following screenshot is the result of the preceding ping command:

                          ping on local target

                          From the above screenshot, we know that there is one ICMP echo request packet sent to the destination (IP address: 192.168.0.1). Also, the sending host (IP address: 192.168.0.108) received one ICMP echo reply packet. The round-trip time required is 2.208 ms (millisecond), and there is no packet loss during the process.

                          Let’s see the network packets that are transmitted and received by our machine. We are going to use Wireshark, a network protocol analyzer, on our machine to capture these packets, as shown in the following screenshot:

                          ping network packets capturing on wireshark

                          From the above screenshot, we can see that our host (192.168.0.1) sent one ICMP echo request packet to the destination host (192.168.0.108). Since the destination is alive and allows the ICMP echo request packet, it will send the ICMP echo reply packet back to our machine.

                          If our target is using an IPv6 address, such as fe80::e82a:e363:100d:9b02, we can use the ping6 tool to check its availability. We need to give the -I option for the command to work against the link-local address:

                          ping6 -c 1 fe80::e82a:e363:100d:9b02 -I wlan0

                          The following screenshot shows the packets sent to complete the ping6 request:

                          ping6 for IPV6

                          Here ping6 is using the ICMPv6 request and reply.

                          To block the ping request, our firewall can be configured to only allow the ICMP echo request packet from a specific host and drop the packets sent from other hosts. This is how we can use ping and know things about our host. This is the primary thing for penetration testers.

                          That’s for today. Love our articles? Make sure to follow us on Twitter and GitHub, we post article updates there. To join our KaliLinuxIn family, join our Telegram Group. We are trying to build a community for Linux and Cybersecurity. For anything we always happy to help everyone on the comment section. As we know our comment section is always open to everyone. We read each and every comment and we always reply.

                          Maltego — Powerful OSINT Reconnaissance Framework

                          Maltego — Powerful OSINT Reconnaissance Framework

                          Maltego is one of the most famous OSINT frameworks for personal and organizational reconnaissance. It is a GUI tool that provides the capability of gathering information on any individuals, by extracting the information that is publicly available on the internet by diffrent methods. Maltego is also capable of enumerating the DNS, brute-forcing the normal DNS and collecting the data from social media in an easily readable format.

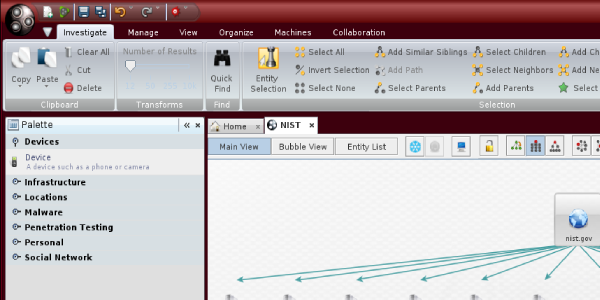
                          How are we going to use the Maltego in our goal-based penetration testing or red teaming exercise? We can utilize this tool in developing a visualization of data that we gathered. The community edition of Maltego comes with Kali Linux.

                          Maltego Kali Linux

                          The tasks in Maltego are named as transforms. Transforms come built into the tool and are defined as being scripts of code that execute specific tasks. There are also multiple plugins available in Maltego, such as the SensePost toolset, Shodan, VirusTotal, ThreatMiner, and so on. Maltego offers the user with unprecedented information. Information is leverage. Information is power. Information is Maltego.

                          What does Maltego do?

                          Maltego is a program that can be used to determine the relationships and real world links between:

                          • People
                          • Groups of people (social networks)
                          • Companies
                          • Organizations
                          • Web sites
                          • Internet infrastructure such as:
                          • Domains
                          • DNS names
                          • Netblocks
                          • IP addresses
                          • Phrases
                          • Affiliations
                          • Documents and files
                          • These entities are linked using open source intelligence.
                          • Maltego is easy and quick to install – it uses Java, so it runs on Windows, Mac and Linux.
                          • Maltego provides you with a graphical interface that makes seeing these relationships instant and accurate – making it possible to see hidden connections.
                          • Using the graphical user interface (GUI) you can see relationships easily – even if they are three or four degrees of separation away.
                          • Maltego is unique because it uses a powerful, flexible framework that makes customizing possible. As such, Maltego can be adapted to your own, unique requirements.

                           What can Maltego do for us?

                          • Maltego can be used for the information gathering phase of all security related work. It will save our time and will allow you to work more accurately and smarter.
                          • Maltego aids us in your thinking process by visually demonstrating interconnected links between searched items.
                          • Maltego provide us with a much more powerful search, giving you smarter results.
                          • If access to “hidden” information determines your success, Maltego can help us discover it.

                          Setting Up Maltego on Kali Linux

                          The easiest way to access this application is to type maltego in our Terminal, also, we can open it from Kali Linux Application menu.

                          maltego

                          After first time we opened Maltego it will show us the product selection page, where we can buy various versions of Maltego, but the community edition of Maltego is free for everyone so we choose it (Maltego CE) and click on run, as shown in the following screenshot:

                          Selecting Maltego CE Community Edition

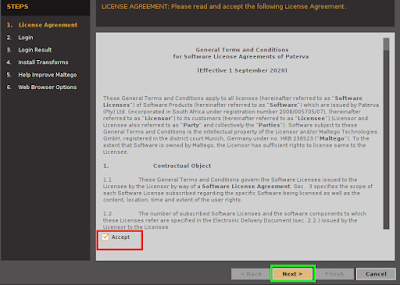
                          After clicking on “RUN”, we will got the configuring Maltego window. Here  we need to login and setup our Maltego for the very first time. First we need to accept the terms and conditions of Maltego as we can see in the following screenshot:

                          Accept terms and conditions and move next

                          On the above screenshot we can see that we check ✅ the “Accept” box and click on “Next”.

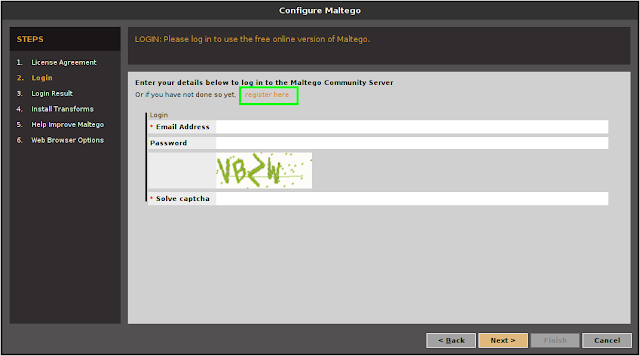
                          After that we got a login screen a we can see in the following screenshot:

                          On the above screenshot we can see that note “LOGIN: Please log in to use the free online version of Maltego.” So, we need to log in here. But before that we need to Register to create our credential. We need to click on “Register”, and register page will open on our browser, or we can click here to go to the same page for register.

                          Maltego Registration

                          Here we need to fill up everything then they send activation link on our given mail address. For security reasons we are using temp-mail services, and we got our activation mail and activate it. After activating it we need to login from Maltego.

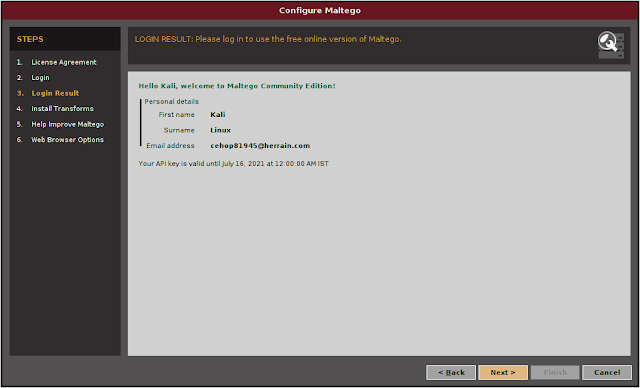
                          Maltego sucessfully logged in

                          Then we just need to click “Next”, “Next”, “Next”, and our Maltego will open in front of us, as we can see in the following screenshot.

                          Maltego on kali Linux

                          Running Maltego on Kali Linux

                          Now we are ready to use Maltego and run the machine, by navigating to “Machines” in the Menu folder and clicking on “Run Machine”; and then, we will be able to start an instance of the Maltego engine. Shown in the following screenshot:

                          Starting Maltego intence

                          After that we got a list of available options in Maltego public machines:

                          Maltego machines list

                          Usually, when we select Maltego Public Servers, we will have the following machine selections:

                          • Company Stalker: To get all email addresses at a domain and then see which one resolves on social networks. It also downloads and extracts metadata of the published documents on the internet.
                          • Find Wikipedia edits: This transform looks for the alias from the Wikipedia edits and searches for the same across all social media platforms.
                          • Footprint L1: Performs basic footprints of a domain.
                          • Footprint L2: Performs medium-level footprints of a domain.
                          • Footprint L3: Intense deep dive into a domain, typically used with care since it eats up all the resources.
                          • Footprint XXL: This works on the large targets such as a company hosting its own data centers, and tries to obtain the footprint by looking at sender policy framework (SPF) records hoping for netblocks, as well as reverse delegated DNS to their name servers.
                          • Person – Email Address: To obtain someone’s email address and see where it’s used on the internet. Input is not a domain, but rather a full email address.
                          • URL to Network and Domain Information: This transform will identify the domain information of other TLDs. For example, if we provide www.google.com, it will identify www.google.us, google.co.in, and so on and so forth.

                          Cybersecurity experts usually begin with “Footprint L1” to get a basic understanding of the domain and it’s potentially available sub-domains and relevant IP addresses. It is quite good to begin with this information as part of information gathering, however, pentesters can also utilize all the other machines as mentioned previously to achieve their goal.

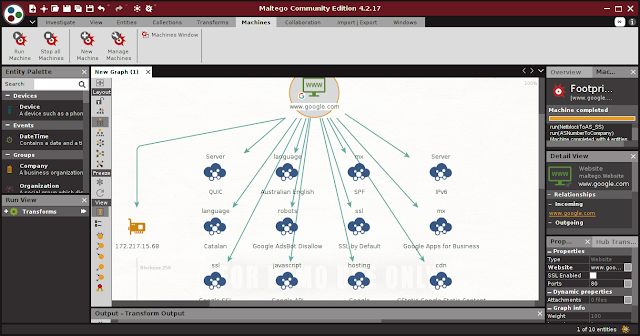
                          Once the machine is selected, we need to click on “Next” and specify a domain, for example google.com. The following screenshot provides the overview of google.com.

                          google on maltego
                          Footprint L1 with Maltego on Google.com

                          On the top-left side of the above screenshot, we will see the Palette window. In the Palette window, we can choose the entity type for which you want to gather the information. Maltego divides the entities into six groups as follows:

                          • Devices such as phone or camera.
                          • Infrastructure such as AS, DNS name, domain, IPv4 address, MX record, NS record, netblock, URL, and website.
                          • Locations on Earth.
                          • Penetration testing such as built with technology.
                          • Personal such as alias, document, e-mail address, image, person, phone number, and phrase.
                          • Social Network such as Facebook object, Twitter entity, Facebook affiliation, and Twitter affiliation.

                          If we right-click on the domain name, we will see all of the transforms that can be done to the domain name:

                          Maltego all transform

                          • DNS from domain.
                          • Domain owner’s details.
                          • E-mail addresses from domain.
                          • Files and documents from domain.
                          • Other transforms, such as To Person, To Phone numbers, and To Website.
                          • All transforms.

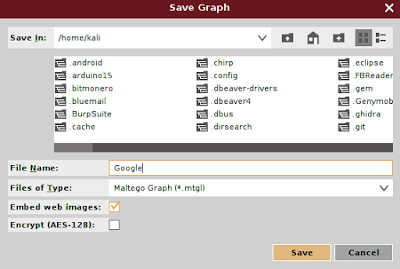
                          If we want to change the domain, you need to save the current graph first. To save the graph, click on the Maltego icon, and then select Save. The graph will be saved in the Maltego graph file format ( .mtgx ).

                          Saving maltego output

                          Then to change the domain, just double-click on the existing domain and change the domain name.

                          maltego against KaliLinuxIn

                          This is how Maltego works on our Kali Linux system. This is a very strong GUI based information gathering tool which comes loaded with Kali Linux.

                          Love our articles? Make sure to follow us on Twitter and GitHub, we post article updates there. To join our KaliLinuxIn family, join our Telegram Group. We are trying to build a community for Linux and Cybersecurity. For anything we always happy to help everyone on the comment section. As we know our comment section is always open to everyone. We read each and every comment and we always reply.

                          Guide to Check & Remove Pegasus Spyware from Mobile

                          Guide to Check & Remove Pegasus Spyware from Mobile

                          Table of Contents

                          1. Pegasus Spyware
                          2. What is MVT ?
                          3. Installation of MVT on Linux and Mac
                          4. Checking for Pegasus Spyware on Android Device
                          5. Checking for Pegasus Spyware on iPhone
                          6. How to Remove Pegasus Spyware from Mobile Phone

                          Pegasus Spyware

                          Pegasus Spyware is a very trending topic in the world media now. It is really debatable whether, it is abused for spying on people like activists, or journalists etc or not. Without making our article controversial we directly jump into the topic. How can we find out if our phone is infected with this Pegasus Spyware or not?

                          Pegasus is a spyware developed by the Israeli infosec firm NSO Group that can be covertly installed on mobile phones (and other devices) running most versions of iOS and Android. The 2021 Project Pegasus revelations suggest that current Pegasus software is able to exploit all recent iOS versions up to iOS 14.6. According to the Washington Post and other prominent media sources, Pegasus not only enables the keystroke monitoring of all communications from a phone (texts, emails, web searches) but it also enables phone call and location tracking, while also permitting NSO Group to hijack both the mobile phone’s microphone and camera, thus turning our phone into a constant surveillance device. 

                          Pegasus on Kali Linux

                          First of all we don’t know exactly how this malware comes into our devices and uses which vulnerability. But when it is on our device it can spy on us, by reading SMS, tracking our GPS locations, using our microphone and camera and downloading our files from our phones. Here to do everything it requires permissions from our Android or iOS. So it can be detected from there, but we need to perform some forensics test to detect it. Don’t worry it will be very easy when we are here. We are going to use MVT or Mobile Verification Toolkit on our system to detect this Pegasus Spyware. MVT was created by Amnesty International Security Lab in July 2021.

                          What is MVT ?

                          Mobile Verification Toolkit aka MVT is a collection of tools designed to facilitate the consensual forensic testing of Android and iOS devices for the purpose of identifying any signs of compromise even it can identify Pegasus. MVT’s capabilities are continuously evolving, but some of its key features include: 

                          • Decrypt encrypted iOS backups.
                          • Process and parse records from numerous iOS system and apps databases, logs and system analytics.
                          • Extract installed applications from Android devices.
                          • Extract diagnostic information from Android devices through the adb protocol.
                          • Compare extracted records to a provided list of malicious indicators in STIX2 format.
                          • Generate JSON logs of extracted records, and separate JSON logs of all detected malicious traces.
                          • Generate a unified chronological timeline of extracted records, along with a timeline of all detected malicious traces.

                          Installation of MVT on Linux and Mac

                          Before going to install MVT we need to have Python 3.6 installed on our computer. Python is available for most of the desktop operating systems.

                          Installing MVT on Linux

                          To install MVT on Linux we need to install some dependencies, to install them we need to run following commands on our terminal window:

                          sudo apt install python3 python3-pip libusb-1.0-0

                          libusb-1.0-0 is not required if you intend to only use mvt-ios and not mvt-android, coming to these things later.

                          Then we need to run the following command to install MVT on our system:

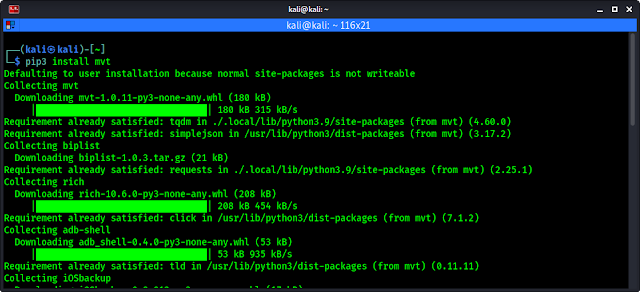
                          pip3 install mvt

                          MVT will start downloading on our system, as we can see in the following screenshot:

                          mvt installing on Linux

                          After a couple of minutes (time will depend on our system performance and internet speed) MVT will be installed on our Linux system.

                          Installing MVT on MAC

                          To install MVT on MAC requires Xcode and homebrew to be installed. Further the process is almost the same. We need to install dependencies to run MVP on MAC by using following command on the terminal:

                          brew install python3 libusb

                          Then we need to install MVT by using following command:

                          pip3 install mvt

                          Path correction after installation

                          After installing MVT on our system we can run it to check Pegasus on our mobile device, but before running it we need to fix our path to easily run this. This step sometimes already comes with some operating system. We suggest to skipping this and forward to the next step if that doesn’t work then try this.

                          We need to open our .bash or .zshrc (depending which shell we are using BASH or ZSH) on nano editor by using following command:

                          nano .zshrc

                          Then we need to add the following line at the end of the code (in a new line), then save and close it (by pressing ctrl+x, then Y, then Enter).

                          export PATH=$PATH:~/.local/bin

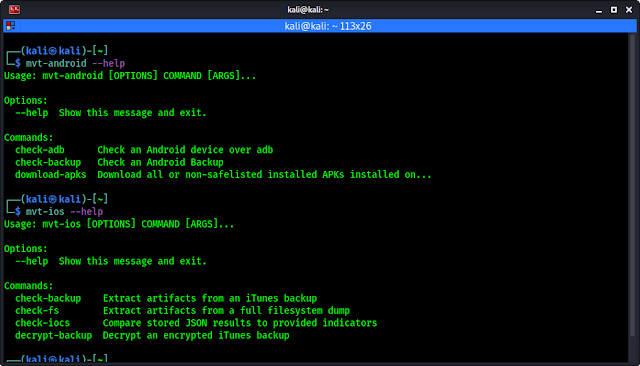
                          So we had installed MVT to run a forensics scan on our Mobile phones to check if our device is infected by Pegasus spyware or not. Firstly we check the help/options of this tool by applying two commands on our terminal. Two commands ? Yes one help menu is for Android another is for iOS. Both are in following:

                          mvt-android --help
                          mvt-ios --help

                          In the following screenshot we can see the output of above commands.

                          options to run MVT aginst pegasys spyware

                          Checking for Pegasus Spyware on Android Device

                          If we have a suspected android device then we need to connect our Android device via ADB (Android Debug Bridge). So ADB needs to be in our system. On Linux systems we can use sudo apt install adb android-tools-adb, We can install it also on Mac. The phone’s ADB connection must be allowed inside developer options, details about ADB can be found here.

                          Then we need to connect our android device via USB with our computer and check that ADB is working and our mobile device is connected properly.

                          adb device connected

                          In the above screenshot we can see that our device is properly connected with ADB. Now we also can check the connection using MVT by using following command:

                          mvt-android check-adb

                          We may got some error like the following screenshot:

                          mvt adb error may comes

                          If we get this common error (already adb-server is running, we need to kill it) then we need to run the following command to solve it and check-adb again.

                          adb kill-server

                          Now here there are two type of scans we can perform on our Android devices:

                          • Check APKs: We can scan all installed apps.
                          • Check Android Backup: Create a backup of the device and scan it.

                          Check APKs

                          We can run the following command to start downloading all our Android applications on our PC and scan them.

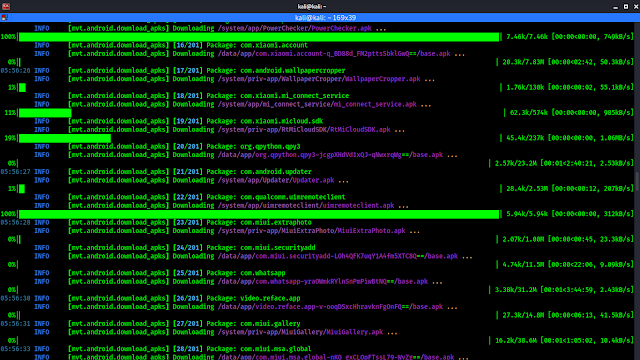
                          mvt-android download-apks --output androidapps --all-checks

                          The above command will start the work and save our all applications on a folder called androidapps, then start all checks as we commanded it.

                          downloading apk files on PC

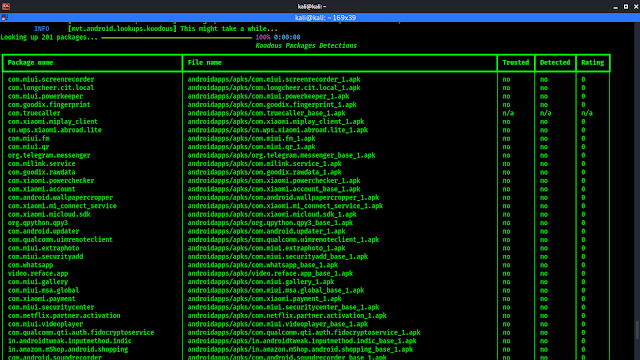
                          In the above screenshot we can see that we are extracting all the installed applications on our PC. After the download complete MVT will start scanning every applications, after scan it will show us a result as we can see in the following screenshot:

                          Scan result on MVT

                          Here in a chart we can see MVT didn’t detect any spyware on our phone.

                          Check Android Backup

                          Some attacks against Android phones are done by sending malicious links by SMS. The Android backup feature does not allow to gather much information that can be interesting for a forensic analysis, but it can be used to extract SMSs and check them with MVT. To do so, we need to connect our Android device to our computer. We will then need to enable USB debugging on the Android device.

                          If this is the first time we connect to this device, we will need to approve the authentication keys through a prompt that will appear on our Android device. Then we can use adb to extract the backup for SMS only with the following command:

                          adb backup com.android.providers.telephony

                          We need to approve the backup on the phone and potentially enter a password to encrypt the backup. The backup will then be stored in a file named backup.ab on our working directory on PC.

                          We need to use Android Backup Extractor and download abe.jar file to convert it to a readable file format. Make sure that java is installed on our system (mostly Linux comes with it) and use the following command:

                          java -jar ~/Downloads/abe.jar unpack backup.ab backup.tar

                          We can see the output in the following screenshot:

                          backup in a readable format

                          Now we extract it by using following command:

                          tar xvf backup.tar

                          Screenshot shows the output of the above command.

                          extracting backup

                          Then we can extract SMSs containing links with MVT:

                          mvt-android check-backup --output sms .

                          The output will be saved in a folder named “sms”. In the screenshot we can see our device has lots of SMS with links, which may be dangerous.

                          sms checks by MVT

                          This is how we can test an Android device to find Pegasus or any other potential spyware.

                          Checking for Pegasus Spyware on iPhone

                          Before jumping into acquiring and analyzing data from an iOS device, we should evaluate what is our precise plan of action. Because multiple options are available to us, We should define and familiarize with the most effective forensic methodology in each case.

                          Filesystem Dump

                          We will need to decide whether to attempt to jailbreak the device and obtain a full filesystem dump, or not.

                          While access to the full file system allows to extract data that would otherwise be unavailable, it might not always be possible to jailbreak a certain iPhone model or version of iOS. In addition, depending on the type of jailbreak available, doing so might compromise some important records, pollute others, or potentially cause unintended malfunctioning of the device later in case it is used again.

                          If we are not expected to return the phone, we might want to consider to attempting a jailbreak after having exhausted all other options, including a backup.

                          iTunes Backup

                          An alternative option is to generate an iTunes backup (in the most recent version of mac OS, they are no longer launched from iTunes, but directly from Finder). While backups only provide a subset of the files stored on the device, in many cases it might be sufficient to at least detect some suspicious artifacts. Backups encrypted with a password will have some additional interesting records not available in unencrypted ones, such as Safari history, Safari state, etc.

                          The use of MVT is almost the same here. If we read the android part then we can easily get the point, but iOS forensics and backup has some little bit different. Here we suggest to going with the Official Documentation of MVT. This is detailed enough to follow easily.

                          How to Remove Pegasus Spyware from Mobile Phone

                          OK we got this. We know that we can check for Pegasus on our mobile phone, but what if our phone is affected? In that case we suggest the following methods.

                          • If our Android or iPhone is not rooted (Jailbroken term used for iPhones), then we can easily remove it by doing a factory reset or hard reset to remove Pegasus. Keep the backup aside. Backing them up again on the mobile is not recommended, because we don’t know which loophole used by Pegasus (It can be media files or something can be stored).
                          • If we have a rooted Android device then full format or factory reset will not work here, because on rooted devices spywares are installed as default applications. Updating the Android version also doesn’t work here. Best solution can be to install a custom ROM. That can remove the entire OS with the spyware.
                          • If we are on a Jailbroken iPhone then we already violated Apple’s policy, they will not be going to help us. Because iOS is not open-source and uses different kernels it don’t have any practical custom ROM. In this case we can suggest a full reset of the device and check again. If Pegasus was still there we would need to buy a new phone.
                          • Using a feature phone may be a solution, but in this digital era this is next to impossible, so we can use some Linux phones (Smart phones comes with Linux operating system).

                          This is how we can find and remove if our mobile phone device is infected with Pegasus Spyware using MVT. Pegasus has been called the most sophisticated hacking software available today to intrude phones. NSO Group has, time and again, claimed that it does not hold responsibility in case of misuse of the Pegasus software. The NSO group claims that it only sells the tool to vetted governments and not individuals or any other entities.

                          Love our articles? Make sure to follow us on Twitter and GitHub, we post updates there. To join our KaliLinuxIn family, join our Telegram Group. We are trying to build a community for Linux and Cybersecurity. For anything we are always happy to help everyone in the comment section. As we know our comment section is always open to everyone. We read each and every comment and we always reply.

                          BED — Bruteforce Exploit Detector

                          BED — Bruteforce Exploit Detector

                          In our previous article we discussed about “what is fuzzing ?” In our this article we are going to try a fuzzer (tool for fuzzing).

                          BED is a plain-text protocol fuzzer which stands for Bruteforce Exploit Detector. Bed checks software for common vulnerabilities like buffer overflows, format string bugs, integer overflows, etc.

                          It automatically tests the implementation of a chosen protocol by sending different combinations of commands with problematic strings to confuse the target. The protocols supported by this tool are: finger, ftp, http, imap, irc, lpd, pjl, pop, smtp, socks4 and socks5.

                          bed bruteforce exploit detector kali linux

                          BED comes pre-installed with our Kali Linux system. It is too easy to use so our article will be brief. So lets start:

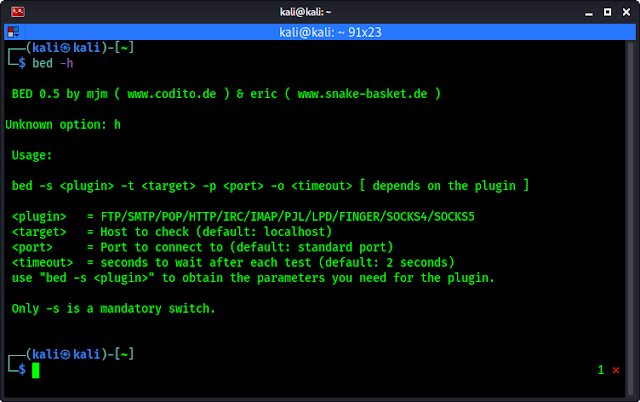
                          As we mentioned BED comes pre-installed with Kali Linux so check with the help of BED. To do so we need to run following command on our terminal:

                          bed -h

                          After that we can see the help of BED tool, as we can see on the screenshot below.

                          help of bed tool in kali linux

                          In the help section (above screenshot) we clearly can see the basic use example of BED. We need to use -s flag to scan, then we need to choose <plugin>, then we need to specify our target (IP address) by using -t flag, then we need to specify our port using -p flag, at last we need to set our timeout by using -o flag.

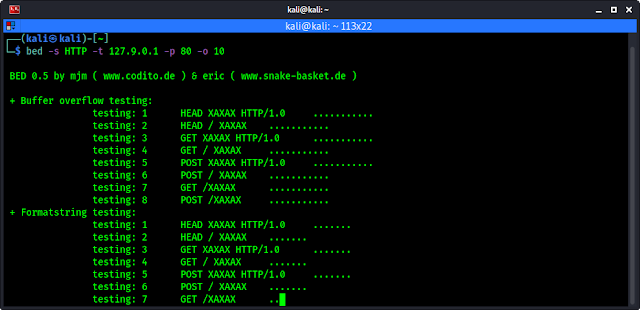
                          Let’s see an example of this, we have an localhost http server on port 80 we try to find vulnerabilities on it by using BED. So our command will be as following:

                          bed -s HTTP -t 127.9.0.1 -p 80 -o 10

                          The above command will start testing for vulnerabilities on our target (127.9.0.1) as we can see in the following screenshot:

                          Bed fuzzer testing for vulnerabilities

                          If it got any vulnerability then it will show us by showing errors.

                          This is how we can use BED fuzzer on our Kali Linux system. Here we need to find IP address of our target.

                          Love our articles? Make sure to follow us on Twitter and GitHub, we post updates there. To join our KaliLinuxIn family, join our Telegram Group. We are trying to build a community for Linux and Cybersecurity. For anything we always happy to help everyone on the comment section. As we know our comment section is always open to everyone. We read each and every comment and we always reply.

                          Ghost Framework — Control Android Devices Remotely

                          Ghost Framework — Control Android Devices Remotely

                          Ghost Framework is an Android post-exploitation framework that uses an Android Debug Bridge to remotely access and control Android device. Ghost Framework 7.0 gives us the power and convenience of remote Android device administration.

                          Ghost Framework Remotely control Android on Kali Linux

                          We can use this framework to control old Android devices which have turn on the debug bridge in the “Developer options”. Now this becomes very harmful because an attacker gets the full admin control on the vulnerable Android device.
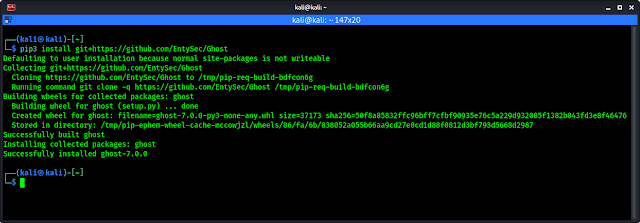
                          In our this detailed tutorial we will practically learn how we can use the Ghost Framework to take control of Android device from our Kali Linux system. So we start from cloning the Ghost Framework from GitHub by using following command:

                          pip3 install git+https://github.com/EntySec/Ghost

                          In the following screenshot we can see that Ghost is downloaded on our system.

                          installing ghost from github

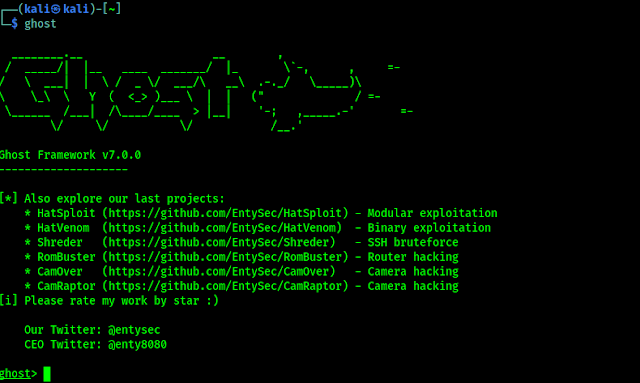
                          Now ghost framework is ready to use on our system, we can run it from any where in our terminal by only the ghost command:

                          ghost

                          The following screenshot shows ghost console is up on our system and it is successfully running.

                          Ghost framework on Kali Linux

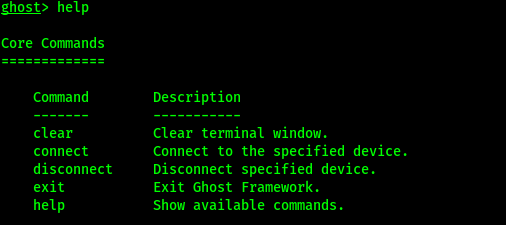
                          Now we can see the help options of ghost framework by simply running help command on the console.

                          help

                          The help option will be like following screenshot:

                          Ghost help menu

                          Now we can connect it with vulnerable Android devices. Now how we get a IP address of an old vulnerable Android devices? Shodan is here. Shodan is a grate search engine for searching the devices connected to internet. We already have a tutorial on Shodan.

                          In Shodan search engine we have to search for “Android Debug Bridge“, as we have shown in following screenshot:

                          Shodan Android Debug Bridge

                          Here we can see over 2.5k search results. Every device is vulnerable for ghost and those devices are connected to internet. If ghost shows failed to connect then Shodan is showing us an offline device. We also can try this with our Android device.

                          From here we can pick any IP address and use with connect command. For an example we select the highlighted IP address and connect it with ghost by using following command:

                          connect 168.70.49.186

                          In some seconds it will be connected as we can see in the following screenshot.

                          Ghost connected to target

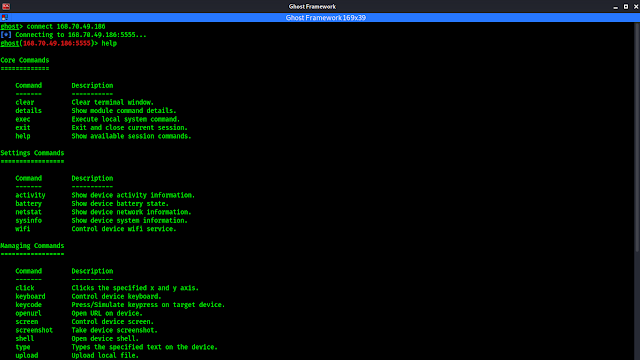
                          Here we can see we are connected with the IP address. Now we can run anything from Ghost Framework. We can see the commands we can run after connecting by using help command here.

                          help

                          In the following screenshot we can see a lot of things that we can do with this device.

                          ghost commands

                          Now we can do almost everything with this device.

                          What we can do with Ghost Framework

                          • See device activity information.
                          • See device battery state.
                          • See device network information.
                          • See device system information.
                          • See device system information.
                          • Clicks the specified x and y axis.
                          • Control device keyboard.
                          • Press/Simulate key-press on target device.
                          • Open URL on device.
                          • Control device screen.
                          • Take device screenshot.
                          • Open device shell.
                          • Types the specified text on the device.
                          • Upload local file.
                          • Download remote file.
                          • Show Contacts Saved on Device.
                          • Reboot device.

                          Ghost Framework has a simple and clear UX/UI. It is easy to understand. Ghost Framework can be used to remove the remote Android device password if it was forgotten. It is also can be used to access the remote Android device shell without using OpenSSH or other protocols.

                          Love our articles? Make sure to follow us on Twitter and GitHub, we post article updates there. To join our KaliLinuxIn family, join our Telegram Group. We are trying to build a community for Linux and Cybersecurity. For anything we always happy to help everyone on the comment section. As we know our comment section is always open to everyone. We read each and every comment and we always reply.

                          Black Widow — Web Ripper Tool

                          Black Widow — Web Ripper Tool

                          Website security auditing is always on demand in the cybersecurity field. Web application hacking is the main priority of every penetration testing student. We have learned in our many previous articles how we can gather information about a target. After information gathering the next process in finding the vulnerabilities or loopholes on a target website. Manually doing this requires a lot of experience and time, but some tools make it easier.
                          Black widow is a website ripper tool, this will help us to mapping or scanning targeted websites and Black widow works automatically.
                          Black Widow Kali Linux
                          Black Widow is written in Python3. This tool scans on target websites to gather subdomains, URL’s, dynamic parameters, email addresses and phone numbers from a target website. Black Widow also includes Inject-X fuzzer to scan dynamic URLs for common OWASP vulnerabilities.

                          Key features of Black Widow:

                          • Automatically collect all URLs from a target website.
                          • Automatically collect all dynamic URLs & parameters from a target website.
                          • Automatically collect all subdomains from a target website.
                          • Automatically collect all phone numbers from a target website.
                          • Automatically collect all email addresses from a target website.
                          • Automatically collect all form URLs from a target website.
                          • Automatically scan/fuzz for common OWASP TOP vulnerabilities.
                          • Automatically saves all data into sorted text files.

                          Installing Black Widow on Kali Linux

                          To install Black Widow in our Kali Linux system we need to clone it from it’s GitHub repository by using following command:

                          git clone https://github.com/1N3/BlackWidow

                          The screenshot of the command is following:

                          clonning blackwidow from github

                          Now we need to navigate in to the BlackWidow directory by applying following command:

                          cd BlackWidow
                          We are now inside the blackwidow directory. Here if we want we can check the files using ls command, shown in the following screenshot,
                          files blackwidow
                          Now we can install this tool by using the following command:
                          sudo ./install.sh
                          Installing black widow on kali linux
                          In the above screenshot we can see that Black Widow started installing, after the installation is complete we can run this tool. We use the following command to crawl our target with 3 levels of depth.
                          blackwidow -u http://192.168.122.244
                          As we can see in the following screenshot:
                          Scanning with black widow

                          To crawl our target with 5 levels of depth and fuzz all unique parameters for OWASP vulnerabilities we apply the following command.

                          blackwidow -d https://test.com/uers.php?user=1&admin=true -v y

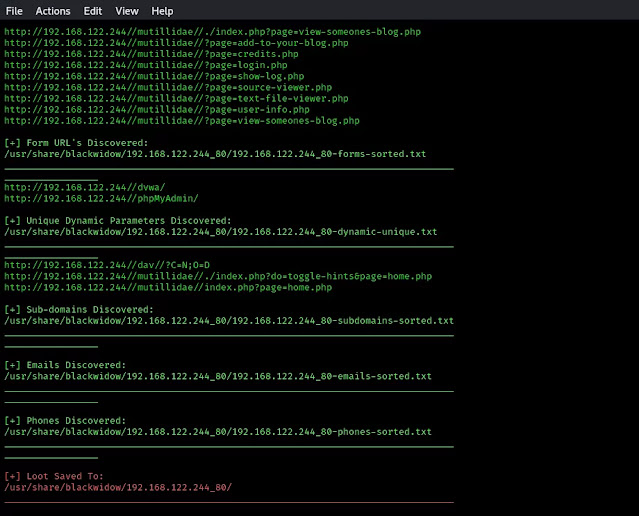
                          It automatically saves the output data on usr/share/BlackWidow directory, as we can see in the following screenshot:

                          Blackwidow saved output

                          Not only these there are lots of things we can do for more information we can check the help options of BlackWidow by using following command:

                          blackwidow -h
                          BlackWidow help menu on Kali Linux
                          BlackWidow help menu
                          We even can use BlackWidow in docker. To install it we need to run following command inside BlackWidow directory:
                          sudo docker build -t blackwidow

                          To start BlackWidow on docker we can apply following command:

                          sudo docker run -it blackwidow

                          Disclaimer: Using BlackWidow on others without proper mutual agreement is considered as crime. This tool is built for educational purposes and to increase safety. If anyone brakes the federal laws then creators are not responsible.
                          This is how we can use the BlackWidow tool to scan a target and gain much more information and we also tested for some vulnerabilities using this tool on our Kali Linux. Isn’t it powerful as Marvel’s one?
                          Love our articles? Make sure to follow us on Twitter and GitHub, we post article updates there. To join our KaliLinuxIn family, join our Telegram Group. We are trying to build a community for Linux and Cybersecurity. For anything we always happy to help everyone on the comment section. As we know our comment section is always open to everyone. We read each and every comment and we always reply.

                          15 Powerful Gadgets For Ethical Hackers | Hardware Tools for Hackers in 2021

                          15 Powerful Gadgets For Ethical Hackers | Hardware Tools for Hackers in 2021

                          Our in this platform we usually talk about various applications and their uses to check loopholes on systems. But penetration testers not only uses software applications, they also need some hardware to perform the tasks. In this detailed article we are going to cover hardware devices & gadgets used by an ethical hacker. Let’s start with a warning.

                          Warning:- This article is written for educational purpose only. To make it more ethical, we just only talk about the hardware devices publicly available in Amazon. Using these devices on our own for educational purpose isn’t crime, but using these devices against others without proper permission is illegal. So use these devices responsibly, we and Amazon will not be responsible for talking and selling these kind of product.

                          Hardwares and gadgets used by hackers

                          Lets start with a computer, most of cybersecurity experts prefer laptops, not desktops because laptops are portable. We had wrote an entire article about best laptops for Kali Linux, Moving forward ethical hackers uses some other hardware devices that is our main topic for today.

                          1. Raspberry Pi 4

                          Raspberry Pi dominating the market of single board computers (SBC). This device used by almost every security personals.

                          Raspberry pi

                          This is very useful we can install entire Kali Linux on this credit card sized computer. Raspberry Pi also can be used in many other projects. Cybersecurity experts use it on various way. We can see in Mr. Robot Season 1 Episode 5, how Elliot hacked the climate control network to destroy magnetic tapes.

                          There are unlimited uses of raspberry pi for an ethical hacker. This device is a must have for everyone on infosec field.

                          buy Raspberry Pi on amazon

                          2. Raspberry Pi Zero W

                          This is a small handheld computer, ideal for carrying the best penetration testing software tools, and to handle all the external hardware hacking tools. The most known Cybersecurity distro for it is P0wnP1 A.L.O.A. and Kali Linux. P4wnP1 is a highly customizable USB attack platform, based on a low cost Raspberry Pi Zero or Raspberry Pi Zero W. The successor of P4wnP1 is called P4wnP1 A.L.O.A. We recommend the USB type-A pongo-pin adapter shown in the above picture.

                          We also can use it a headless system (without monitor). This device connected with a power bank in our bag and we can control it from our mobile device on our hand(using VNC).

                          buy from amazon

                          3. USB Rubber Ducky

                          usb rubber ducky

                          USB Rubber ducky is created and developed by Hak5. Nearly every computing devices accepts human input from keyboards, hence the ubiquitous HID specification – or Human Interface Device. Keyboards announce themselves to computers as HID devices and are in turn automatically recognized and accepted.

                          The USB Rubber Ducky delivers powerful payloads in seconds by taking advantage of the target computers inherent trust all while deceiving humans by posing as an ordinary USB drive.

                          In simple words, if we plug it on a computer, the computer think it is a keyboard and it will inject (type, save and execute) our preset payload on the computer. There are lots of payload available for this device. Also we can easily write our own code.

                          This is one of the bast way to compromise a system having physical access.

                          buy from amazon

                          4. WiFi Pineapple

                          The Wi-Fi pineapple is the original Wi-Fi attack tool developed by Hak5. There are three different models available from Hak5. They all are good, here we choose Mark VII model for it’s value for money.

                          Wifi pineeapple

                          This will automate the auditing of WiFi networks and saves the results. We can control it with awesome web based interface. This is really a very good product for security testing o wireless networks.

                          buy from amazon

                          5. HackRF One

                          HackRF One from Great Scott Gadgets is a Software Defined Radio peripheral capable of transmission or reception of radio signals from 1 MHz to 6 GHz. Designed to enable test and development of modern and next generation radio technologies. We can read and manipulate radio frequencies using this device.

                          hackrf one

                          HackRF One is an open-source hardware platform that can be used as a USB peripheral or programmed for stand- alone operation. This SDR offers one important improvement compared to other cheap alternatives. But the Radio Frequency (RF) quality isn’t good as expected.

                          buy from amazon

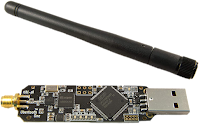
                          6. Ubertooth One

                          Ubertooth One is the most famous Bluetooth hacking tool we can find on the market. It is an open source 2.4 GHz wireless development platform suitable for Bluetooth hacking. Commercial Bluetooth monitoring equipment can easily be priced at over $10,000 , so the Ubertooth was designed to be an affordable alternative platform for monitoring and development of new BT, BLE and similar wireless technologies.

                          ubertooth

                          Ubertooth One is designed primarily as an advanced Bluetooth receiver, offering capabilities beyond that of traditional adapters, which allow for it to be used as a BT signal sniffing and monitoring platform. Although the device hardware will accommodate signal broadcasting, the firmware currently only supports receiving and minimal advertising channel transmission features.

                          buy from amazon

                          7. WiFi Deauther Watch

                          As the name said it’s a deauther, it de-authenticate the WiFi users and they got disconnected. It’s not a jammer. It uses ESP8266 WiFi development board to do so. Here it’s watch version is looks super cool gadget for every hacker.

                          wifi deauther

                          While a jammer just creates noise on a specific frequency range (i.e. 2.4 GHz), a deauthentication attack is only possible due to a vulnerability in the Wi-Fi (802.11) standard. The deauther does not interfere with any frequencies, it is just sending a few Wi-Fi packets that let certain devices disconnect. That enables us to specifically select every target. A jammer just blocks everything within a radius and is therefore highly illegal to use.

                          buy from amazon

                          8. USB Killer

                          Computers doesn’t check the current flowing through USB, because it uses computers own power and can’t transmit more voltage. But what if we took an advantage of this to burn our (using on others is totally illegal) entire system.

                          USB Killer

                          When plugged into a device, the USB Killer rapidly charges its capacitors from the USB power lines. When the device is charged, -200VDC is discharged over the data lines of the host device. This charge/discharge cycle is repeated many times per second, until the USB Killer is removed. As the result target device becomes burned and unrepairable.

                          Its compact size and flash-drive style housing makes it an important device in every pen-tester’s toolkit. It can be used multiple times as we want.

                          buy from amazon

                          9. Bad USB

                          This is a super alternative of USB Rubber Ducky. This device contains customized HW based on Atmega32u4 and ESP-12S. This device allows keystrokes to be sent via Wi-Fi to a target machine. The target recognizes the Ducky as both a standard HID keyboard and a serial port, allows interactive commands and scripts to be executed on the target remotely.

                          bad usb with wifi

                          Attacker can easily carry it as a thumb drive and plug into any PC to inject payload, running own command on it, it also can be controlled over WiFi. It looks like innocent USB thumb drive, which is a great advantage. But this is doesn’t have faster speed like USB Rubber Ducky.

                          buy from amazon

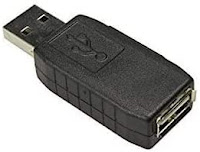
                          10. Hardware Keylogger

                          A hardware keylogger can be inserted between USB keyboard and computer. It captures all the keystrokes made from the keyboard, must have thing for every cybersecurity expert.

                          hardware keylogger

                          This is a basic hardware keylogger. It has 16 MB storage. Which is sufficient to capture keystrokes for a year generally. Later we can remove it and plug on our computer to read the keystrokes. Some keyloggers comes with WiFi controlling and SMS controlling functionality. No software can detect it’s there.

                          buy from amazon

                          11. Adafruit Bluefruit LE Sniffer

                          Adafruit luefruit LE Friend is programmed with a special firmware image thatturns it into an easy to use Bluetooth Low Energy sniffer. We can passively capture data exchanges between two Bluetooth Low Energy (BLE) devices, pushing the data into Wireshark, the open source network analysis tool, where you can visualize things on a packet level, with useful descriptors to help us make sense of the values without having to crack open the 2000 page Bluetooth 4.0 Core Specification every time.

                          ble sniffer

                          Note: We can only use this device to listen on Bluetooth Low Energy devices! It will not work on Bluetooth (classic) devices. Firmware V2 is an improved firmware from Nordic now has better Wireshark-streaming sniffer software that works with all OS for live-streamed BLE sniffing. The sniffer firmware cannot be used with the Nordic DFU bootloader firmware, which means that if we want to reprogram this device you must use a J-Link (and a SWD programmer board). We cannot over-the-air (OTA) reprogram it.

                          buy from amazon

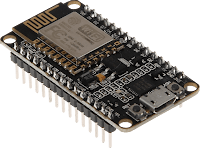
                          12. Micro-controllers

                          There are lots of micro-controllers used by ethical hackers. Some of them are must have in a ethical hackers backpack.

                          NodeMCU ESP8266

                          nodemcu esp8266

                          ESP8266 is a $6 WiFi development board and it can be used in various way, we can make WiFi deauther by our own. It also can be used to create phishing pages over WiFi.

                          buy from amazon

                          Arduino Pro Micro

                          This tiny micro-controller is one of the best choice for ethical hackers. We can make our own DIY USB Rubber Ducky.

                          Arduio pro micro

                          Arduino Pro Micro is really good thing at a very low price. But if we want to change the script then we need to reset and upload new script on it from our computer.

                          buy from amazon

                          13. RTL-SDR

                          RTL-SDR is a very cheap software defined radio that uses a DVB-T TV tuner dongle based on the RTL2832U chip-set.

                          rtl sdr devices

                          It can be used to intercept radio frequencies. We can use it for listening others conversations. It is also able to intercept GSM mobile calls and SMS. It is very useful for cybersecurity experts.

                          buy from amazon

                          14. Proxmark3 NFC RFID Card Reader

                          Owning a Promark3 means owing the most powerful and most complete device RFID/NFC (LF & HF) testing in the frequencies of 125KHz / 134KHz / 13.56MHz.

                          promark 3

                          This devices can make read the data of RFID and NFC cards and then make a copy of it. We can write the new copies on blank cards provided with this package. We we need more we can buy more blank cards on Amazon.

                          Therefore, investing some more bucks in upgrading it, it’s not a bad idea. To improve its range we need the extended range antennas for LF and HF.

                          Another new and nice upgrade for it, is the Blue Shark Bluetooth 2.0 upgrade, that permits controlling the proxmark3 wirelessly plus adding an external battery to create an autonomous proxmark3 that can be connected and controlled from your computer or smartphone. The Walrus NFC application has been updated to permit control by Bluetooth. It also fixes the high temperature concerns adding a metal cooler.

                          buy from amazon

                          WiFi Adapters (Monitor Mode & Packet Injection)

                          wifi adapter for kali linux

                          WiFi adapter specially which supports monitor mode and packet injection is essential for WiFi penetration testing. So most of the hackers uses it. We had noticed that Alfa makes awesome adapters for cyber-security personals. We already discussed it on our Best WiFi adapter for Kali Linux article. Please check out that article before buying an WiFi adapter.

                          Wifi adapter price on amazon

                          Something Extra

                          This is the gadgets for hackers we can directly buy from Amazon and help us on our ethical hacking journey. There are some more gadgets used by hackers but talking about them will be not ethical here. Most of them manufactured from china and available on some online stores. There are some cool stores like Hak5, but in this article we discussed about some gadgets which are openly available on Amazon.

                          Warning:- Using the above devices is not illegal. They are selling publicly on Amazon. But using these devices to harm anyone is totally illegal. We listed them for educational purpose and to safe ourselves from these kind of devices. If anyone uses this devices to harm anyone then we are not responsible for that, Amazon also not responsible. So use this devices responsibly, always remember:

                          Spiderman is also Anonymous

                          That’s for today. Love our articles? Make sure to follow us on Twitter and GitHub, we post article updates there. To join our KaliLinuxIn family, join our Telegram Group. We are trying to build a community for Linux and Cybersecurity. For anything we always happy to help everyone on the comment section. As we know our comment section is always open to everyone. We read each and every comment and we always reply.

                          Best USB WiFi Adapter For Kali Linux 2021 [Updated July]

                          Best USB WiFi Adapter For Kali Linux 2021 [Updated July]

                          Best Kali Linux WiFi Adapter

                          The all new Kali Linux 2021.1 was rolling out and we can simply use it as our primary operating system because of the non-root user. The main benefit of using Kali Linux as primary OS is we got the hardware support. Yes, we can do our all penetration testing jobs with this Kali Linux 2021, but to play with wireless networks or WiFi we need some special USB WiFi adapters in Kali.
                          Best WiFi Adapter for Kali Linux

                          Here we have listed some best USB Wireless adapters Kali Linux in 2021. These WiFi adapters are 100% compatible with Kali Linux and supports monitor mode and packet injection, which will help a lot in WiFi penetration testing.

                          Best WiFi Adapter for Kali Linux

                          Sl No.
                          WiFi Adapter
                          Chipset
                          Best for
                          Buy
                          1
                          AR9271
                          Good Old Friend
                          2
                          RT 3070
                          Best in it’s Price Range
                          3
                          RT 3070
                          Compact and Portable
                          4
                          RT 5572
                          Stylish for the Beginners
                          5
                          RTL8812AU
                          Smart Look & Advanced
                          6
                          RTL8814AU
                          Powerful & Premium
                          7
                          RT5372
                          Chip, Single Band

                          Alfa AWUS036NH

                          We are using this USB WiFi adapter from the BackTrack days (before releasing Kali Linux) and still we consider it as one of the best. For it’s long range signals we can do our penetration testing jobs from a long distance.

                          Alfa AWUS036NHA Kali Linux WiFi Adapter 2020

                          Alfa AWUS036NH is plug and play and compatible with any brand 802.11g or 802.11n router using 2.4 GHz wavelength and supports multi-stream & MIMO (multiple input multiple output) with high speed transfer TX data rate up to 150 MBPS. It also comes with a clip which can be used to attach this adapter on a laptop lid.

                            1. Chipset: Atheros AR 9271.
                            2. Compatible with any brand 802.11b, 802.11g or 802.11n router using 2.4 Ghz wave-length.
                            3. Includes a 5 dBi omni directional antenna as well as a 7 dbi panel antenna.
                            4. Supports security protocols: 64/128-bit WEP, WPA, WPA2, TKIP, AES.
                            5. Compatible with Kali Linux RPi with monitor mode and packet injection.
                            6. High transmitter power of 28 dBm – for long-rang and high gain WiFi.
                              https://www.amazon.com/Alfa-AWUS036NH-802-11g-Wireless-Long-Range/dp/B003YIFHJY/ref=as_li_ss_tl?dchild=1&keywords=Alfa+AWUS036NHA&qid=1594882122&sr=8-6&linkCode=ll1&tag=adaptercart-20&linkId=2f09cf7cc9b84fcd2be61c590af1d25c&language=en_US

                              Alfa AWUS036NHA

                              Alfa again. Alfa provides the best WiFi adapters for Kali Linux. This adapter is the older version of Alfa AWUS036NH with Ralink RT3070 chipset. AWUS036NHA is the IEEE 802.11b/g/n Wireless USB adapter with 150 Mbps speed This is also compatible with IEEE 802.11b/g wireless devices at 54 Mbps.

                              Alfa AWUS036NH Kali Linux WiFi Adapter 2020

                              This plug and play WiFi adapter supports monitor mode and packet injection in any Linux distribution and Kali Linux. Alfa AWUS036NHA comes with a 4 inch 5 dBi screw-on swivel rubber antenna that can be removed and upgrade up to 9 dBi.

                                1. Chipset: Ralink RT 3070.
                                2. Comes with a 5 dBi omni directional antenna as well as a 7 dBi panel antenna.
                                3. Supports security protocols: 64/128-bit wep, wpa, wpa2, tkip, aes
                                4. Compatible with Kali Linux (Also in Raspberry Pi) with monitor mode and packet injection.
                                  https://www.amazon.com/Alfa-AWUS036NH-802-11g-Wireless-Long-Range/dp/B003YIFHJY/ref=as_li_ss_tl?dchild=1&keywords=Alfa+AWUS036NH&qid=1594870855&s=amazon-devices&sr=8-1&linkCode=ll1&tag=adaptercart-20&linkId=4c49c0097d6157190cf04122e27714ed&language=en_US

                                  Alfa AWUS036NEH

                                  This Alfa WiFi Adapter is compact and tiny, but it has a good range. It supports plug and play so connect it with Kali Linux machine and start playing with WiFi security. The antenna is detachable and makes it very portable. We have used this to build our portable hacking machine with Raspberry Pi and Kali Linux.

                                  Alfa AWUS036NEH Kali Linux WiFi Adpater 2020

                                  Alfa AWUS036NEH is the ultimate solution for going out and red teaming attacks. The long high gain WiFi antenna will give us enough range to capture even low signal wireless networks. This adapter is slim and doesn’t require a USB cable to use.

                                    1. Chipset: Ralink RT 3070.
                                    2. Supports monitor mode and packet injection on Kali Linux and Parrot Security on RPi.
                                    3. Compact and portable.
                                      https://www.amazon.com/AWUS036NEH-Range-WIRELESS-802-11b-USBAdapter/dp/B0035OCVO6/ref=as_li_ss_tl?dchild=1&keywords=Alfa+AWUS036NEH&qid=1594870918&sr=8-3&linkCode=ll1&tag=adaptercart-20&linkId=c6578f6fb090f86f9ee8917afba3199a&language=en_US

                                      Panda PAU09 N600

                                      Besides Alfa, Panda is also a good brand for WiFi adapters with monitor mode. Panda PAU09 is a good WiFi adapter to buy in 2020. This dual-band plug & play adapter is able to attack both 2.4 GHz as well as 5 GHz 802.11 ac/b/g/n WiFi networks.

                                      Panda PAU09 WiFi adapter for monitor mode

                                      This adapter comes with a USB docker and dual antennas, which looks really cool. It is also detachable into smaller parts. This adapter is reliable even on USB 3 and works great and fully supports both monitor mode and injection which is rare on a dual band wireless card out of the box.

                                        1. Chipset: Ralink RT5572.
                                        2. Supports monitor mode and packet injection on Kali Linux, Parrot Security even in RPi.
                                        3. 2 x 5dBi antenna.
                                        4. It comes with a USB stand with a 5 feet cable.
                                        5. Little bit of heating issue (not so much).
                                          https://www.amazon.com/Panda-Wireless-PAU09-Adapter-Antennas/dp/B01LY35HGO/ref=as_li_ss_tl?dchild=1&keywords=Panda+PAU09&qid=1594870963&sr=8-1-spons&psc=1&spLa=ZW5jcnlwdGVkUXVhbGlmaWVyPUEzRUUwQjNVSkNGMEFIJmVuY3J5cHRlZElkPUEwODkwNzI3MkZHWUFNUTBRMlRTQSZlbmNyeXB0ZWRBZElkPUEwNzkxNzgzMTBaUEdDS05IUzdDTSZ3aWRnZXROYW1lPXNwX2F0ZiZhY3Rpb249Y2xpY2tSZWRpcmVjdCZkb05vdExvZ0NsaWNrPXRydWU=&linkCode=ll1&tag=adaptercart-20&linkId=d9d43db491c7cf14863cc99c1b8b7797&language=en_US

                                          Alfa AWUS036ACH / AC1200

                                          In Kali Linux 2017.1 update Kali Linux was released a significant update – support for RTL8812AU wireless chipset. Now Alfa AWUS036ACH is a BEAST. This is a premium WiFi adapter used by hackers and penetration testers. It comes with dual antennas and dual band technology (2.4 GHz 300 Mbps/5 GHz 867 Mbps) supports 802.11ac and a, b, g, n.

                                          Alfa AWUS036ACH WiFi adapter for Kali Linux

                                          These antennas are removable and if we require higher range, then we can connect an antenna with greater dbi value and use it as a long range WiFi link which makes this one of the best WiFi adapters. Also this adapter has an awesome look.

                                          If budget is not an issue then this adapter is highly recommended.

                                            1. Chipset: RealTek RTL8812AU.
                                            2. Dual-band: 2.4 GHz and 5 GHz.
                                            3. Supports both monitor mode & packet injection on dual band.
                                            4. Premium quality with high price tag.
                                              https://www.amazon.com/Alfa-Long-Range-Dual-Band-Wireless-External/dp/B00VEEBOPG/ref=as_li_ss_tl?dchild=1&keywords=Alfa+AWUS036ACH&qid=1594871102&sr=8-3&linkCode=ll1&tag=adaptercart-20&linkId=928256b6b245a63277f865d406f44c02&language=en_US

                                              Alfa AWUS1900 / AC1900

                                              Now this is the beast, then why is it at last? It is last because of its high price range. But the price is totally worth it for this USB WiFi adapter. If the previous adapter was a beast then it is a monster. Alfa AWUS1900 has high-gain quad antenna that covers a really long range (500 ft in an open area).

                                              This is a dual band WiFi adapter with high speed capability 2.4GHz [up to 600Mbps] & 5GHz [up to 1300Mbps]. It also has a USB 3.0 interface.

                                              Alfa AWUS036ACH The best wifi adapter for hacking in Kali Linux

                                              Monitor mode and packet injection supported with both bands and it will be very useful for serious penetration testers. We also can attach this on our laptop display with it’s screen clip provided with the box.

                                              What we got in the box?

                                              • 1 x AWUS1900 Wi-Fi Adapter
                                              • 4 x Dual-band antennas
                                              • 1 x USB 3.0 cable
                                              • 1 x Screen clip
                                              • 1 x Installation DVD-Rom (doesn’t require on Kali Linux. Plug&Play)
                                              • A consistent solution for network congestion!
                                                1. Chipset: RealTek RTL8814AU.
                                                2. Dual-band: 2.4 GHz and 5 GHz.
                                                3. Supports both monitor mode & packet injection on dual band.
                                                4. Premium quality with high price tag.
                                                5. Very long range.
                                                  https://www.amazon.com/Alfa-AC1900-WiFi-Adapter-Long-Range/dp/B01MZD7Z76/ref=as_li_ss_tl?dchild=1&keywords=Alfa+AWUS036ACH&qid=1594871169&sr=8-4&linkCode=ll1&tag=adaptercart-20&linkId=d62c81825eace1b0f09d0762e84881c4&language=en_US

                                                  Panda PAU 06

                                                  Yes, This low cost Panda PAU 06 WiFi adapter supports Monitor Mode and Packet Injections. But we really don’t suggest to buy this adapter if budget is not an issue.
                                                  panda pau 06 wifi adapter for Kali Linux
                                                  The main reason is this WiFi adapter doesn’t supports dual-band frequency (only supports 2.4GHz), it doesn’t supports 5GHz frequency.
                                                  This WiFi adapter comes with Ralink RT5372 chipset inside it. 802.11n standards supports 300MB per second maximum speed.
                                                  This adapter takes less power from computer, but other adapters doesn’t took too much power from system (this point is negligible).
                                                  panda pau 06 order on amazon

                                                  Extras

                                                  There are some more WiFi adapters that we did not cover because we didn’t test them on our hands. These WiFi adapters were owned by us and some of our friends so we got a chance to test these products. We didn’t listed some WiFi adapters like following:

                                                  Be Careful to choose from these, because we don’t know that they surely support monitor mode & packet injection or not. As per our own experience Alfa cards are the best in the case of WiFi Hacking.

                                                  How to Choose Best Wireless Adapter for Kali Linux 2020

                                                  Before going through WiFi adapter brands let’s talk something about what kind of WiFi adapter is best for Kali Linux. There are some requirements to be a WiFi penetration testing wireless adapter.

                                                  • Should support Monitor mode.
                                                  • The ability to inject packets and capture packets simultaneously.

                                                  Here are the list of WiFi motherboards supports Monitor mode and Packet injection.

                                                  • Atheros AR9271 (only supports 2.4 GHz).
                                                  • Ralink RT3070.
                                                  • Ralink RT3572.
                                                  • Ralink RT5370N
                                                  • Ralink RT5372.
                                                  • Ralink RT5572.
                                                  • RealTek 8187L.
                                                  • RealTek RTL8812AU (RTL8812BU & Realtek8811AU doesn’t support monitor mode).
                                                  • RealTek RTL8814AU

                                                  So we need to choose WiFi Adapter for Kali Linux carefully. For an Example, on the Internet lots of old and misleading articles that describe TP Link N150 TL-WN722N is good for WiFi security testing. But it is not true. Actually it was.

                                                  TP Link N150 TL-WN722N newer models don't support Monitor Mode
                                                  TP Link N150 TL-WN722N newer models doesn’t work

                                                  The TP Link N150 TL-WN722N’s previous versions support monitor mode. The version 1 comes with Atheros AR9002U chipset and supports monitor mode. Version 2 has the Realtek RTL8188EUS chipset and doesn’t support monitor mode or packet injection. TP Link N150 TL-WN722N version 1 is not available in the market right now. So clear these things and don’t get trapped.

                                                  Which WiFi adapter is the best? Vote Please

                                                   
                                                  pollcode.com free polls

                                                  WiFi Hacking in Kali Linux

                                                  Kali Linux is the most widely used penetration testing operating system of all time. It comes with lots of tools pre-installed for cyber security experts and ethical hackers. We can perform web application penetration testing, network attack as well as wireless auditing or WiFi hacking. We have already posted some lots of tutorials on our website and some good WiFi auditing tutorials like AirCrack-Ng.

                                                  Why Do We Use External USB WiFi Adapters in Kali Linux?

                                                  A WiFi adapter is a device that can be connected to our system and allows us to communicate with other devices over a wireless network. It is the WiFi chipset that allows our mobile phone laptop or other devices which allows us to connect to our WiFi network and access the internet or nearby devices.

                                                  But most of the Laptops and mobile phones come with inbuilt WiFi chipset so why do we need to connect an external WiFi adapter on our system ? Well the simple answer is our in-built WiFi hardware is not much capable to perform security testing in WiFi networks.Usually inbuilt WiFi adapters are low budget and not made for WiFi hacking, they don’t support monitor mode or packet injection.

                                                  If we are running Kali Linux on Virtual Machine then also the inbuilt WiFi Adapter doesn’t work for us. Not even in bridge mode. In that case we also need an external WiFi adapter to play with WiFi networks. A good external WiFi adapter is a must have tool for everyone who has interest in the cyber security field.

                                                   
                                                  WSL2 installation of Kali Linux will not support any kind (Inbuilt or External) of Wi-Fi adapters.

                                                  Kali Linux Supported WiFi Adapters

                                                  Technically almost every WiFi adapter supports Kali Linux, but those are useless on WiFi hacking if they don’t support monitor mode and packet injection. Suppose, we buy a cheap WiFi adapter under $15 and use it to connect WiFi on Kali Linux. That will work for connecting to wireless networks but we can’t play with networks.

                                                  It doesn’t make sense, when we are using Kali Linux then we are penetration testers so a basic WiFi adapter can’t fulfill our requirements. That’s why we should have a special WiFi adapter that supports monitor mode and packet injection. So in this tutorial Kali Linux supported means not only supported it means the chipset has ability to support monitor mode and packet injection.

                                                  What is Monitor Mode

                                                  Network adapters, whether it is wired or wireless, are designed to only capture and process packets that are sent to them. When we want to sniff a wired connection and pick up all packets going over the wire, we put our wired network card in “promiscuous” mode.

                                                  In wireless technology, the equivalent is monitor mode. This enables us to see and manipulate all wireless traffic passing through the air around us. Without this ability, we are limited to using our WiFi adapter to only connect to wireless Access Points (APs) that accept and authenticate us. That is not what we are willing to settle for.
                                                  In the Aircrack-ng suite, we need to be able to use airodump-ng to collect or sniff data packets.

                                                  What is Packet Injection

                                                  Most WiFi attacks require that we are able to inject packets into the AP while, at the same time, capturing packets going over the air. Only a few WiFi adapters are capable of doing this.

                                                  WiFi adapter manufacturers are not looking to add extra features to their standard wireless adapters to suit penetration testers needs. Most wireless adapters built into your laptop are designed so that people can connect to WiFi and browse the web and send mails. We need something much more powerful and versatile than that.

                                                  If we can’t inject packets into the Access Point (in Aircrack-ng, this is the function of Aireplay-ng), then it really limits what we do.

                                                  If we are using Kali Linux and want to be a security tester or ethical hacker then a special WiFi adapter is a must have tool in our backpack. As per our own experience listed Alfa cards in this list are best USB wireless adapter for Kali Linux, going with them may be costly but they are really worth it. For more assistance comment below we reply each and every comment.

                                                  We are also in Twitter join us there. Our Telegram group also can help to choose the best WiFi adapter for hacking and Kali Linux.
                                                  Open Whatsapp chat
                                                  Whatsapp Us
                                                  Chat with us for faster replies.