CyberSecurity Updates

Computer security, cybersecurity or information technology security is the protection of computer systems and networks from information disclosure, theft of or damage to their hardware, software, or electronic data, as well as from the disruption or misdirection of the services they provide.

How To Decode VIN Numbers For Vehicle Identification

VIN number is a significant number that helps you know a lot of information about any vehicle. There are a number of VIN decoders available online. You can use any decoder, but the Mercedes VIN decoder is the best option to go for.

What is a VIN Number?

VIN is the short form to Vehicle Identification Number. It is an identifying code that is unique to each and every vehicle. VIN number defines a lot of details about the particular vehicle.

The code is 17 characters long which involves numerical digits and letters. What if the code is not 17 characters long? You can cross-check it several times from several places. If the correct code is, then definitely the vehicle has been manufactured before 1981 and has limited information.

VIN is termed the DNA of vehicles. As DNA tells the traits of a human, VIN reveals essential information about the car.

How To Decode The VIN?

Analysing the VIN Number itself is sufficient to know a number of details about the vehicle. This 17 character code is a combination of codes that represents many different things about the vehicle.

How Can You Identify or Decode the VIN Number?

Each character of VIN represents something or the other. You can understand what each character means.

  • The 1st character specifies where the vehicle is manufactured. It is the country code where the manufacturing unit is located.
  • 2nd character tells about the manufacturer of the vehicle.
  • 3rd character represents the vehicle type or division.
  • The 4th to 8th characters represents the portrait of the vehicles that is vehicle’s brand, body style, engine size and type, model, series, etc.
  • The 9th character is a security code that identifies the VIN as being authorised by the manufacturer.
  • The 10th character is a representation of the model year of the car.
  • The 11th character indicates which plant assembled the vehicle.
  • The last six characters are the serial number or production number of the vehicle.

How is VIN Decoder Useful?

A VIN number decoder is straightforward yet effective. It uses enormous data culled from sources just like the National Highway Traffic Safety Administration (NHTSA) to extract vehicle info stored within the VIN.

mercedes-vin-decoder

A VIN decoder will provide accurate information related to a vehicle. It will help you verify the information provided manually to you. The VIN has in it several details about your car. And you might need that information while you are trying to purchase a car or get a spare for your vehicle.

How to Decode VIN Numbers for Identification of Vehicle?

Now that you know you can get a big piece of information about the vehicle through its VIN, the question arises of how anyone can decode it. VIN decoders are available to ease out your process.

Here are some quick, simple steps through which you can decode any VIN

1. Get VIN Number

The foremost step is to get the VIN number. You can get this on different locations of the car, insurance card or vehicle title.

2. Go to the Mercedes VIN Decoder

Once you get the VIN number, now you look for a VIN decoder. You will get an ample amount of options to choose from. Or a simpler and much convenient option is to go for Mercedes VIN Decoder. This is the best VIN decoder you can have.

Search Your VIN Number

3. Search Your VIN Number

On the homepage, you will see a tab named ‘VIN Decoder ’. Click on that tab to get the VIN decoder search bar.

Now next step is to type the VIN number and press search. You will get all the desired results within a couple of seconds.

The VIN number has now been successfully decoded for the identification of the vehicle.

VIN Decoder Results

Now that you have searched the VIN number and got your desired results. You should know beforehand that what can you expect from a VIN decoder.

You can run a VIN decoder to figure the full vehicle history report in one go.

Theft history

With the help of a VIN decoder, you will get to know if the car has ever been stolen or there has been a theft record of this car.

Accident history

Nobody’s going to tell you that the car had met an accident ever in past. This reduces the value of the vehicle. There may be some hidden damages to the vehicle that you are unable to identify.

VIN number helps you with the full accidental history of the vehicle.

Year of production

You will be able to know in which year the vehicle was manufactured.

Safety information related

Mercedes VIN decoder provides you with all the safety-related information associated with the vehicle.

Location of vehicle registration

The registration details of the vehicle, along with the location of registration, can also be obtained through the VIN decoder.

Other Vital information

VIN decoder lets you know all other vital information about the car.

With these search results, you will get to know all the above-mentioned information that you use and how you need it.

End Notes

VIN number is truly an identification code of any vehicle. You can decode a large piece of information through the VIN. Mercedes VIN decoder is a really useful tool that helps to decode the VIN numbers for vehicle identification.

You will not just be able to identify the vehicle but also get in-depth knowledge about the minute details of any vehicle.

There are many VIN decoders in the market. You can try those decoders by yourself. Although, the Mercedes VIN decoder is the most recommended VIN decoder ever. It has been highly reviewed and liked by users across different countries. When you have an option, why not go for the best.

Try the Mercedes VIN decoder now, use all its features, and you will definitely like it. All the information provided is very useful and must be known. You can use the features and results of the tool to your utmost benefit.

How students can cope with paper on a cybersecurity topic

Today students have to deal with written assignments regularly. Writing papers for college starts when you complete an admission essay or a personal statement and finish after getting the desired degree. Moreover, people proceed with writing emails, work documents, and other professional papers after college too. That is why learning how to write papers on different topics is essential when you are a student. Choosing the correct topic for any paper is significant.

How students can cope with paper on a cybersecurity topic

For example, if you are studying subjects in cybersecurity, you have to concentrate on the topic and research to create a meaningful paper. However, writing about cybersecurity has many other aspects, and the teacher’s impression of your work would depend on various criteria. There are many vital elements to consider in terms of writing, and not all students can meet the requirements for papers. Thanks to writing services, there is an ability to purchase affordable essays, speeches, and reviews. At a reliable homework help website, you could find cheap term papers and get help with other types of tasks.

What is cybersecurity?

The area of cybersecurity learns the processes and innovations in PC systems and projects to ensure and protect them from assaults and cybercrimes. Many fields involve cybersecurity: from healthcare and sales to finances and banking.

How to write a paper on a cybersecurity topic?

There are many aspects in the cybersecurity field, so following the advice would help you navigate through the process.

Define the subject

Choosing a subject is significant for any type of paper on cybersecurity. If you are interested in some areas of cybersecurity or liked the topic you discussed in class, ask your professor about the possibility of dedicating your research to this area. If the subject inspired you, the motivation to create a meaningful paper would be high, and your teacher would appreciate your efforts. If you are new to an area of cybersecurity, then choose one of the topics suggested in the manuals for your paper.

Read the requirements

Before you proceed with writing, you need to define the type of paper, word count, style of formatting, grading criteria, and other vital aspects of your future paper. The main thing to define is the aim of writing a paper on cybersecurity, as the structure of a paper would depend on it. For example, if you need to write an argumentative essay, you have to state your opinion and prove it right. If you are assigned to write a research paper, you need to collect information from various sources and expose the results properly.
Research the topic

Now it is time to collect all the information you may find on a chosen topic. You need to consider the list of sources suggested by your teacher first and add some materials you find relevant. Depending on the type of paper, you would require to use online materials, websites, blogs, science literature, and books. Note that if you use quotations from sources, you have to put references in the text.

Outline your paper

Dedicate enough time to outline your paper properly and make sure you included all vital sections in its structure. The number of sections would depend on the type of assignment. For example, for a standard 5-paragraph essay, you would require an introduction, the main body, and a conclusion. Each section must be added by description and quotations. The detailed outline would result in the first draft of your paper on cybersecurity and save your time.

Format your paper

Depending on the type of paper, you would require applying the correct formatting style and make your work correctly arranged. Usually, the requirements on formatting are in the manuals from the teacher. There are three main types of formatting for college papers: APA, MLA, and Chicago/Turabian. Each of these formatting styles has its peculiarities and elements to consider.

Edit properly

When your paper on cybersecurity is ready, you need to proofread it. Check the relevance of dates, numbers, and facts to make sure you used reliable sources. Proceed with checking on grammar, spelling, style, and punctuation, reduce repeated words and mistypes. For professional proofreading, you can involve some online tools that help effectively check words and sentences in the process. For example, you might use Grammarly or other similar tools.

Wrap up

Now you know how to cope with a paper on a cybersecurity topic. The main pieces of advice are choosing the correct topic and reading instructions from your professor correctly. Do not forget to collect enough relevant materials if you are about to write a meaningful paper. Outlining is a key to success if you want to save your precious time and make the paper structures, correct formatting would bring you high grades. The editing stage is vital and allows polishing your paper effectively.

How To Secure Our Kali Linux System To Ensure Our Protection

Kali Linux is an open-source Debian based Linux distribution which mostly used for offensive security. Previously known as Backtrack Linux this Linux distribution is a symbol of security itself. Kali Linux used by penetration testers around the world. It also used by cybersecurity students to practicing penetration testing and stuff. But to run Kali Linux with the default settings may be a bad idea.

Why? Because default settings are easy to crack and Kali Linux is not a privacy focused distribution (like Tails OS), Kali is created for attacking not for defending. Security is a huge concept. Most people use Kali to test security, but it’s also very important to secure the Kali itself. Because it is based on Debian we got good security. But what if we need more security?

How To Secure Our Kali Linux System

In this article we are going to discuss how we can improve the security of our Kali Linux system. Running Kali Linux with the default settings is not be a good idea.

Change the Default Password

If we are using older Kali Linux versions (older then 2020.1) then our default credential is “root” “toor“. If we have newer Kali Linux versions then the default credential is “Kali” “Kali“. We need to change it ASAP. It’s easy. We need to run following command on our Kali Linux terminal:

passwd

This simple command will ask us the current user’s password (default if we don’t change it already). Then it will prompt for a new password and again it will verify it. A good password should contain both uppercase and lowercase letters with scrambles of symbols and numbers. After verifying the password our password will be changed. We can see it on the following screenshot:

password change in Kali

We need to remember that our typed password will not displayed for security reasons.

Unprivileged User Account

Previously root user was Kali’s default user. Now things are changed after Kali Linux 2020.1 update. Now Kali’s default user is non-root user account.

An unprivileged user stands directly below the main admin user which have all the root permissions. Similarly to family and parental accounts.

We can even use a root user directly on our system, but it will not good for security reasons. We must not use root user always.

Updating Kali Linux Frequently

There are lots of versions of Kali Linux. Kali Developers releases a new version in every quarter. Updated versions of Kali comes with upgraded kernels. For being a rolling distro Kali Linux doesn’t need to be download ISO image and again install it during update. We just need to apply some commands to install the update. Follow us to get notified when the update comes.

Also we must update and upgrade our Kali Linux after some days by using following command:

sudo apt update -y && sudo apt upgrade -y

The conclusion is we need to update & upgrade Kali Linux frequently and update the distribution whenever it release.

Changing the Default SSH Keys

Secure Shell or SSH is a network protocol. It uses to communicate computers securely. As we’re on this page via web, we are already using some kind of SSH. There are no way around it but to fix present or upcoming security issues. Even for distros we use, there are SSH keys that let us verify authentic files from a source.

It may looks everything is fine and cool but the problem is for everyone there are the same keys. Let’s understand it on this way. If we download a software from a website, it is the same distribution copy that everyone downloads it. Later we use our accounts with the software for a personalized way, and the service provider gives adequate power according to the subscription under those accounts. SSH keys have quite same fundamentals but those are used to verify files.

If a bad guy did a Man-in-the-middle (MITM) attack or a social engineering campaign it may drain our security.

SSH gives us capability to authenticate without inputting passwords every single time. There are two types of SSH keys. One is public and the other one is private. We need to change the our public SSH keys, because every distro have the same, and generate a private key will make sure only authenticated users can access it.

SSH keys are located in /etc/ssh directory by default. This list view will shows all the keys inside. Instead of deleting them from the database, we are going to store them some secure place. We use following commands to do this:

cd /etc/ssh
sudo mkdir old_keys
sudo mv ssh_host_* old_keys

Now our all old SSH keys moved to a directory named old_keys.

backup of ssh keys on old_keys directory

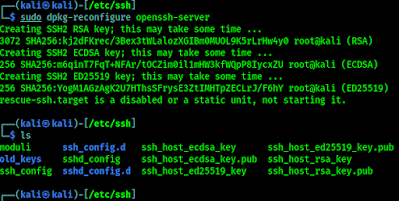
 Now we generate new keys by using following command:

sudo dpkg-reconfigure openssh-server

This command will generate new SSH keys for us. As we can see in the following screenshot.

New SSH keys are generated

If we faced any problem then we can use our backed up SSH keys.

Save our Identity

During surfing the internet with a Kali Linux machine, we can use the “NIPE” or “kalitorify” tools to browse safely and anonymously. Even though “macchanger” is recommended to spoof our Mac address. We also advice to change our hostname from Kali to a nameserver, and add a host similar to 8.8.8.8.

Monitoring Logs

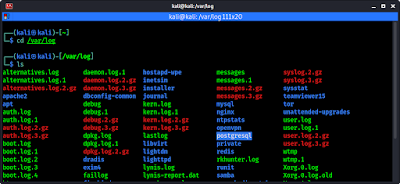
Analyzing the logcheck program can be a real life saver. It can send logged messages directly to admin’s email. Log files are locally stored inside “/var/log” by default.

logs in Kali Linux

Using top (built right into the system) or htop (sudo apt install htop) tool shows us real-time monitoring activity. Even the xfce4-taskmanager graphical tool can perform similar actions.

htop on Kali Linux

Scanning for Malware and Rootkits

We also need to scan our system frequently for malwares and rootkits. We can run the scan by using “Chkrootkit” or “Rkhunter” tool kits. We have discussed about this topic some days ago in details (Find & remove rootkits from Linux). So we don’t think we have to repeat it. These tools are like anti-malwares for Linux systems.

Extra Talks

Although Kali Linux is created for attacking purpose it is quite secure environment itself. But advanced users goes above and beyond for daily tasks and it is necessary to follow proper procedures. New users coming from other operating systems like Windows may think just running Kali Linux inside VMWare or VirtualBox is the safest process. It is quite true but certain steps must be taken.

Hope this article helps our fellow Kali Linux users. Love our articles? Make sure to follow us on Twitter and GitHub, we post article updates there. To join our KaliLinuxIn family, join our Telegram Group. We are trying to build a community for Linux and Cybersecurity. For anything we always happy to help everyone on the comment section. As we know our comment section is always open to everyone. We read each and every comment and we always reply.

How to change Lock Screen Background on Kali Linux XFCE

Linux is powerful and open-source and build for customization. It means we can change everything on Linux as per our need. In this article we are going to change our Kali Linux (XFCE4) lock screen background and give it a personal touch. This will be very interesting so stay with us to the end.

Change login screen of Kali Linux

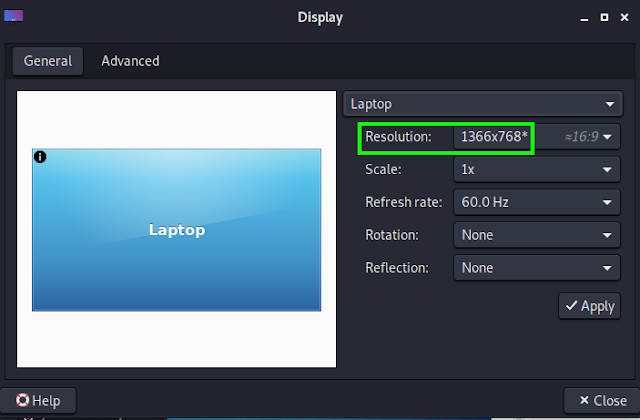
First we need to know what is our display resolution. Various PC have various resolutions. We can easily find ours by navigating in the App Menu > Settings > Display.

Display Settings on Kali Linux Menu

After opening the display settings we can easily see resolution of our display. As we can see in the following screenshot:

Display resolution on settings

We can see that our display resolution is 1366×768 pixels. So our background screen also need to be in the same resolution.

Here we need to create an image with 1366×768 size. Or We can find it on Google, or other websites.

1366x768 images on Google

We can choose one from them as our lock screen background. We always check the property of image by right clicking on it and check it’s resolution.

image properties

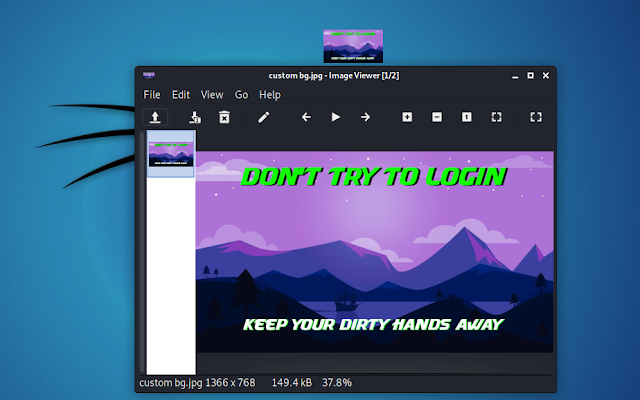
For making it more attractive and personalized we added a text on the image by using GIMP image editor (Photoshop alternative for Linux, sudo apt install gimp), Shown in the following screenshot:

customized image for lock screen background

All set now we need to set this 1366×768 image as our Kali Linux background. Here we need to know the location of this image, means the full path of the image. We can see it on image properties again.

path of the image

We can see the location of the image is /home/kali/Desktop (We stored it on Desktop for example we can choose any location to save it). So the images full path will be /home/kali/Desktop/custom-bg.jpg . Now we need to open our terminal window and type following command to save our previous background image in a different name:

sudo mv /usr/share/desktop-base/kali-theme/login/background /usr/share/desktop-base/kali-theme/login/backgroundcopy

This command will rename our current lock screen background. Then we can set our customized image as a lock screen image by applying following command:

sudo ln -s <image_full_path> /usr/share/desktop-base/kali-theme/login/background

In our case our <image_full_path> is /home/kali/Desktop/custom-bg.jpg, so we use this on our terminal, as we can see in the following screenshot:

Kali Linux Lockscreen background changed

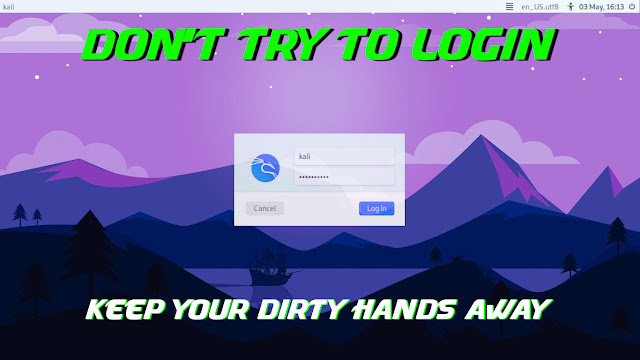
That’s it ?. We had successfully changed our lockscreen image or locj screen background on our Kali Linux system, we can do the same for any XFCE based Linux distro. To see the effect we just need a reboot or log out. In the lock screen we can see our edited and customized login screen image in the background.

Kali Linux customized Login Screen

Here we got our customized login screen. We can do anything if we have a little image editing knowledge, we just need to keep in mind that our background screen must need to be in our Display Size (1366×768 in our case).

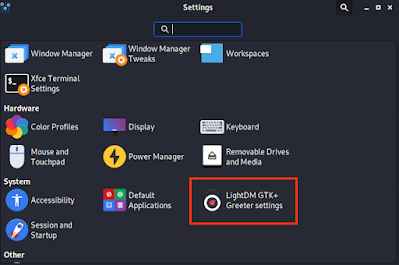
Here if we want then we can change the user image (Kali Linux logo on above screenshot). To do this we need to go to Kali Linux settings.

Kali Linux settings

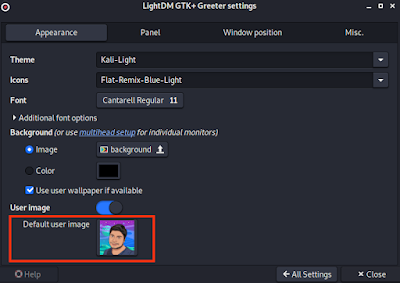
Then we need to navigate into LightDM GTK+ Greeter Settings options (marked in above screenshot). Then in the next window we can change our user image, shown in the following screenshot:

Changing User Image
For better results we should use a square PNG image

This is how we can change the login screen background on our Kali Linux or any other XFCE based Linux Distro.

This article is written by Koushik Pal.

Love our articles? Make sure to follow us on Twitter and GitHub, we post article updates there. To join our KaliLinuxIn family, join our Telegram Group. We are trying to build a community for Linux and Cybersecurity. For anything we always happy to help everyone on the comment section. As we know our comment section is always open to everyone. We read each and every comment and we always reply.

Rootkits

Searching for Rootkits on Kali Linux using Chrootkit & Rkhunter

What is Rootkit ?

Rootkit is a malicious software that allows an unauthorized user (read attacker) to get access to a system and to its restricted software. Basically, rootkits are a type of malware that designed to be hidden on our computer. We didn’t notice it, but it will be active. Rootkits give the ability to remotely control our computer to cyber criminals.

Rootkits may contain a number of tools, malicious programs that allow attackers to steal our passwords to modules that make it easy for them to get our credit card information or online banking information or even our secretly stored data. It also contain keyloggers, credential stealers etc.

remove rootkits using rkhunter and chkrootkit on Kali Linux

“Rootkit” is combined from of two words – “root” and “kit”. Here “root” refers to the administrative account with full privileges on the computer system and “kit” refers to the program/code that allows the attacker to obtain unauthorized access.

In our Kali Linux, we can install various open-source tools to avert our systems from rootkits. Here we talk about two most famous open-source software “chkrootkit” and “rkhunter”. We can install them our our Kali Linux or any other Linux distro and checks for rootkits on our computer (If we are working on Virtual environment on Linux then it only can detect rootkits only in the virtual system).

Chkrootkit

Chkrootkit can be run on Linux systems to determine if rootkits exist on the system, based on signatures and processes. Think of it as antivirus or anti-malware for Linux systems.

Chkrootkit is a simple program that can ensure our Kali Linux has not been infected. We can also run chkrootkit on other Linux distributions by installing it on those systems, it usually comes with almost every Linux distributions including Kali Linux. On our Kali Linux system we need to run following command to start the chkrootkit and scan for rootkits.

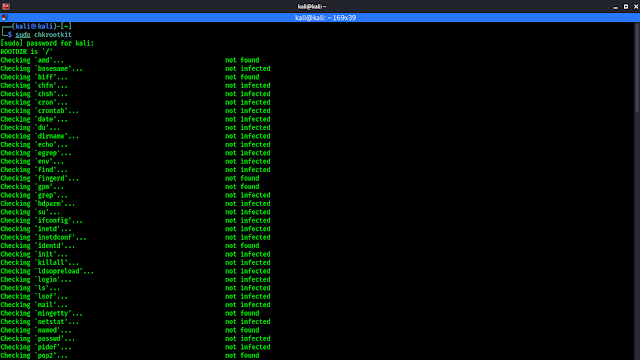
sudo chkrootkit

It will prompt for our sudo password then will start scan on our system, as we can see in the following screenshot:

chkrootkit

We can see it scans permissions of programs (most specifically third party programs), and we can see the infection status on the left table.

Rkhunter (Rootkit Hunter)

Rkhunter (Rootkit Hunter) is a Linux/Unix based tool to scan possible rootkits, backdoors and local exploits.

It does this by comparing SHA-1 hashes of important files with known good ones in online databases, searching for default directories (of rootkits), wrong permissions, hidden files, suspicious strings in kernel modules, and special tests for Linux. (Wikipedia).

According to our team members “rkhunter” is the best open-source rootkit checker for Linux, because of it’s additional functionality and also the other tools like chkrootkit is an old tool so there are many known exploits for that.

It doesn’t comes pre-installed with Kali Linux but we can install it by applying simple following command:

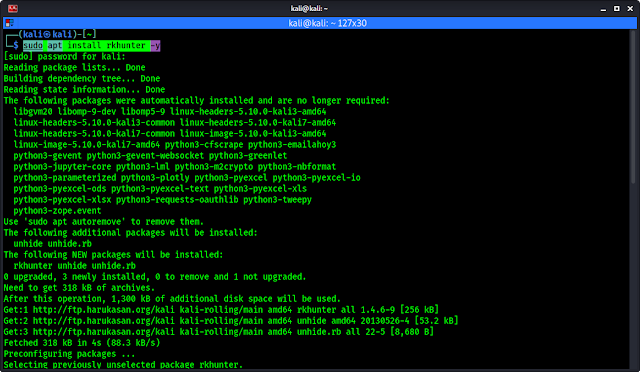
sudo apt install rkhunter -y

The following screenshot shows the output of the above command;

installing rkhunter on kali linux

After the installation process is complete we can run it to scan our entire system by using following command:

sudo rkhunter -c

After this it will scan our entire system in some categories, like various malware scan, known rootkit scan, suspicious port scans etc. Also, it will go through all the system files as well as third party programs in order to look for the rootkits, we can see following screenshot:

rkhunter scan on Kali Linux

We need to type “Enter”⤶ to scan next category. It will also summarize the report at the end of scanning. Also saves the output log file in /var/log/rkhunter.log.

We can see the log file by entering following command:

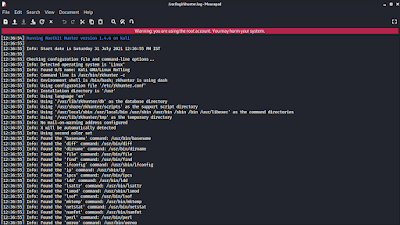
sudo mousepad /var/log/rkhunter.log

In the following screenshot we can see the log file on mousepad text editor (we can use cat, nano, vim also to view/edit this file).

rkhunter log file on Kali Linux

This is how we can check for rootkits on our Linux system. It is very easier to scan for it.

How to Remove Rootkits / Security Warings from Linux

Well, we know that how we can check for rootkits on our Linux (Kali Linux) system. But what if we got a rootkit inside our system? How we can remove it?

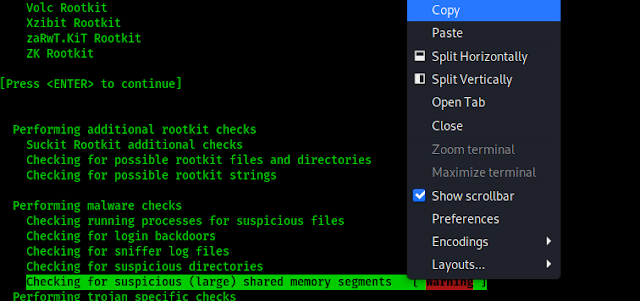
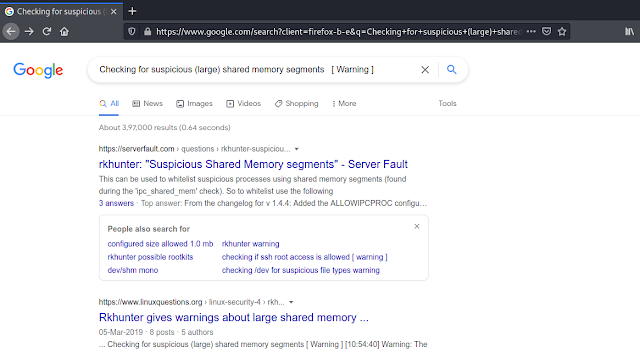
There are different methods to fix different warnings. So it is impossible cover all in one place. Here search engines can easily help us. In the following screenshot we got an warning we had copied the line.

warning on rkhunter

We just select the line and copy it. Then just press it on search engine and search it. In the following screenshot we can see that we need got some articles and forums we got about our warning. This will help us to improve our security on Linux system.

rkhunter warning remove

That’s it for today. Hope our Linux system will be more stronger now.

Love our articles? Make sure to follow us on Twitter and GitHub, we post article updates there. To join our KaliLinuxIn family, join our Telegram Group. We are trying to build a community for Linux and Cybersecurity. For anything we always happy to help everyone on the comment section. As we know our comment section is always open to everyone. We read each and every comment and we always reply.

Profil3r — Search Anyone on the Internet

We are living in digital era. We are penetration testers, we need to protect the world. We need to be digital Sherlock Holmes. For that we need to find a criminal from a small clue. If we get a bad guy’s username or mail then we don’t need to manually search it on the internet. There are some OSINT (Open-Source Intelligence) tools to reduce our effort. Today we are going to talk about a tool called Profil3r on our Kali Linux. Not only for security experts even govt and law enforcement also can use the OSINT tools to gather information about some individuals or organizations from the ocean of internet.

Profil3r -- Search Anyone on the Internet Kali Linux

Previously we already talked about Sherlock and Trape, we can use them to find someone on internet with some basic details, in our this article we are going to do the same using Profil3r in a very effective way.

Install Profil3r on Kali Linux

Profil3r is an OSINT tool that allows us to find potential profiles of a person on social networks, as well as their email addresses. This program also alerts us to the presence of a data leak for the found emails.

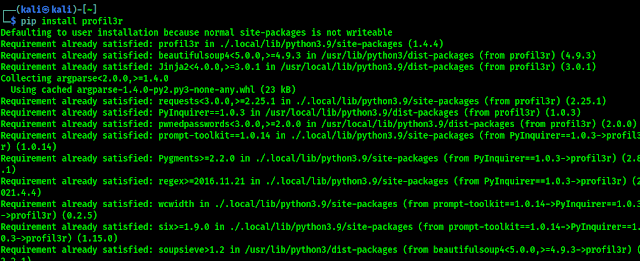
Installing is very easy, we need to just apply following command on our Kali Linux terminal to install Profil3r on our updated (latest python3 and pip3) system:

pip3 install profil3r

In the following screenshot we can see that Profil3r installation is started on our system, it will install the script and some dependencies to run it:

profil3r installation

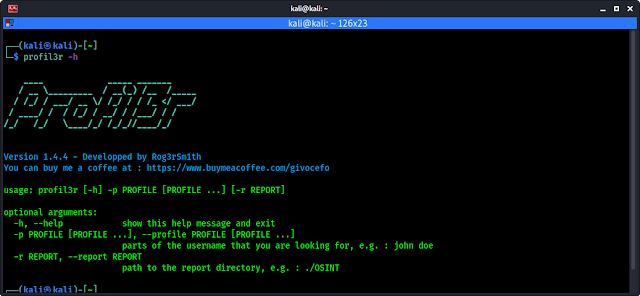
Now we can check it’s help by applying following command:

profil3r -h

In the following screenshot we can see the help options of this profil3r tool.

profil3r help options

We can see there are nothing much here, we can use -p flag to set the username or name of we are looking for. We can save the report output in HTML, JSON and CSV format using -r flag followed by directory location.

Running Profil3r on Kali Linux

For an example we are looking for Jhon Doe, so we use following command on our terminal:

profil3r -p john doe -r /home/kali

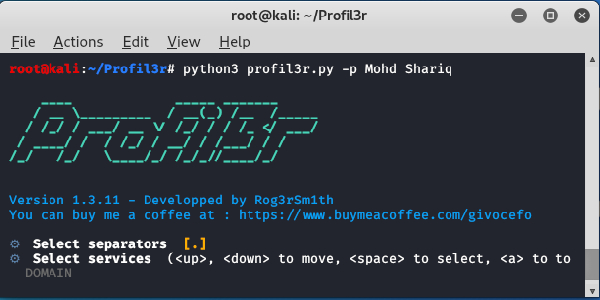
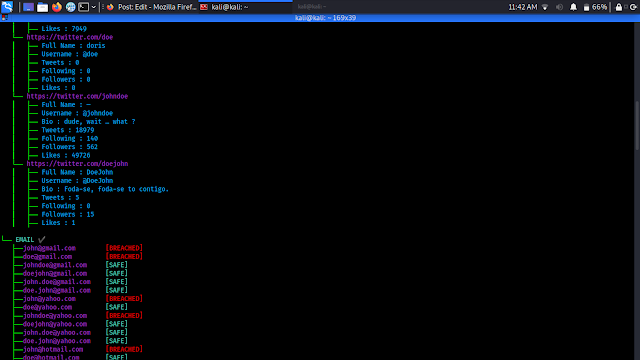
After pressing Enter ↲ , Profil3r will prompt suggesting some possible usernames, as we can see in the following screenshot:

profil3r on kali linux

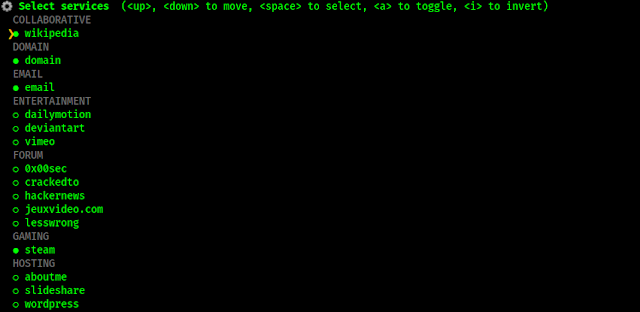
Here in the above screenshot we can see the suggested usernames, we can use UP⬆ and DOWN⬇ key to move our cursor, to select we need to use SPACE button (we can select multiple), also we can invert them by using I key, and toogle using A key. We need to press ENTER after our selection to continue.

For an example we are going with john.doe username, Then we got a list of various type of sites, as we can see in the following screenshot:

profil3r services list

Here also we need to select things we need to search (shown in following screenshot), because we are showing an example here so we are going with just few things. For a better search we need to select everythinng, but that is really time consuming.

profil3r places to search

After the selection we need to press Enter, it will take some time to complete the scans. In the following screenshot we can see how profil3r is working:

Profil3r works

We can see that if founds some mail ids in data leak which may related to our target. After the scanning is complete is will generate a full report on our given path  as we can see in the following screenshot:

profil3r saved output results

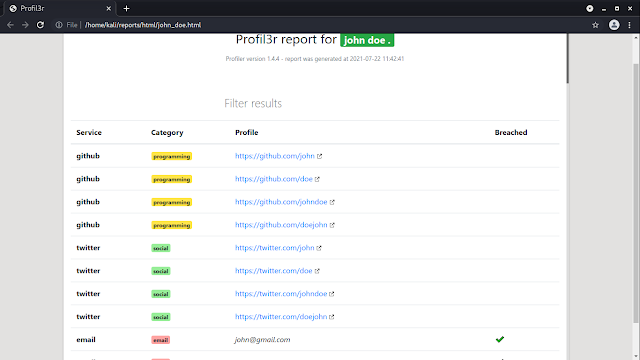
We can open this reports to see everything in a very organized way. In the following screenshot we have opened the HTML report output on browser.

profil3r report html open

This is how we can use Profil3r tool on our Kali Linux and easily get information about a human or organizations using the usernames. This OSINT tool is very important for finding someone on the internet.

Love our articles? Make sure to follow us on Twitter and GitHub, we post updates there. To join our KaliLinuxIn family, join our Telegram Group. We are trying to build a community for Linux and Cybersecurity. For anything we always happy to help everyone on the comment section. As we know our comment section is always open to everyone. We read each and every comment and we always reply.

Metagoofil — Extract Information using Google

Metagoofil is an awesome Information gathering tool that can be used for extracting lots of information from Word Documents, Presentation files, PDF’s, Excel Sheets, .jpg images and lots of other formats. Metagoofil also can provide a lots of constructive information during the penetration testing just by scanning the gathered files. Lets learn how to extract information from documents, images using Metagoofil on our Kali Linux.

metagoofil collect information from google metadata on kali linux

Metagoofil utilizes the Google search engine to get metadata from the documents available in the target domain. Currently, it supports the following document types:

  1. Word documents (.docx , .doc)
  2. Spreadsheet documents (.xlsx , .xls , .ods)
  3. Presentation files (.pptx , .ppt , .odp)
  4. PDF files (.pdf)

Metagoofil works by executing following actions:

  • It searches for all of the preceding file types in the target domain using the Google search engine.
  • Then it downloads all of the documents found and saving them to the local disk.
  • It extracts the metadata from the downloaded documents.

The metadata that can be found includes the following:

  • Usernames
  • Server or machine names
  • Software versions

This information may be valuable and used later during the penetration testing phase. Metagoofil comes pre-installed with the full version of Kali Linux, if not then we can easily install it from the repository by using sudo apt-get install metagoofil command.

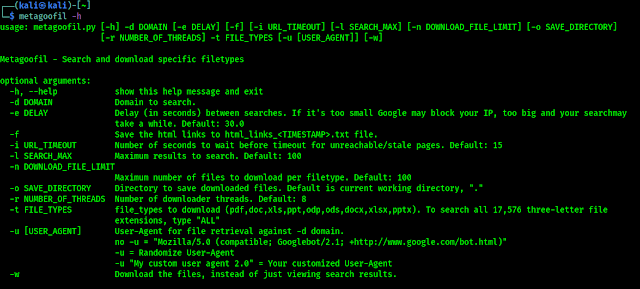
We can see the help (options) of Metagoofil by using following command on our terminal:

metagoofil -h

Then we can see the help options as in the following screenshot:

metagoofil help

Let’s use it and know how to use Metagoofil. First of all we need a target, we took the domain example.com as our target and runs Metagoofil aginst it by using following command:

metagoofil -d example.com -l 20 -t doc,pdf -n 5

Here we specify our domain using -d flag, and uses -t flag to specify file types we are looking for, -l to limit the search for every file types (20 in our case), using -n flag we specified that we want to download only 5 files. We can changes the values used in this command as per our requirement.

Now we run the command on our terminal and after sometime (Metagoofil take some time to scan) it will show us the results, as we can see in the following screenshot:

metagoofil results

Here our target website is a blank website, so it can’t find anything on this website. But if we provide a healthy target then it can gather a lot of information.

metagoofil results

This is how we can gather information using metadata from Google search engine using Metagoofil on our Kali Linux. We should always remember that information gathering is the most crucial part of penetration testing.

Love our articles? Make sure to follow us on Twitter and GitHub, we post updates there. To join our KaliLinuxIn family, join our Telegram Group. We are trying to build a community for Linux and Cybersecurity. For anything we always happy to help everyone on the comment section. As we know our comment section is always open to everyone. We read each and every comment and we always reply.

Everything about Cross-Site Scripting (XSS)

During surfing the web sometimes we welcomed with a pop-up, after entering a web page. Even on our website now have a pop-up for the very first time. Suppose our system can be attacked by these pop-ups, may be malicious payloads comes in to our system or our sensitive data is stolen.

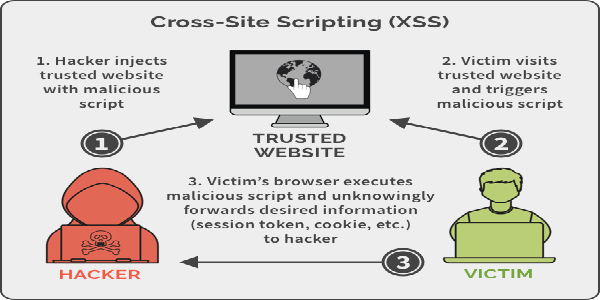
xss cross site scripting kali linux thumbnail

Today in our this article we will going to cover the Cross-Site Scripting and we also learn how an attacker executes malicious JavaScript codes over at the input field and generates pop-us to deface the web-application or hijack user’s session.

Pop-up JavaScript’s relation to XSS

JavaScript is one of the most popular programming language of the web, more than 93% websites uses JavaScript. It is very flexible and easily mixes with the HTML codes.

A HTML webpage embedded with JavaScript shows it magic after the webpage loaded on the browser. JavaScript uses some functions to load an object over on a webpage. Functions like Onload, Onmouseover, Onclick etc. Then it prompts the alert as it coded. That’s why basically XSS payloads uses JavaScript codes.

Basics of Cross-Site Scripting (XSS)

Cross-Site Scripting aka XSS is a client side code injection attack where attacker is able to execute malicious scripts into trusted websites. All the websites are not vulnerable to XSS, only those websites or web-applications are effected where the input-parameters are not properly validated. From there attacker can send malicious JavaScript codes, and the user of the web-application has no way to know that it is loading attacker scripts. That’s why XSS is too much dangerous.

Confused with what we are talking about? Don’t like too much theory? Let we come to practical examples. Before that we should know that XSS are mainly three types, those are following:

  1. Stored XSS
  2. Reflected XSS
  3. DOM-based XSS

Stored XSS

“Stored XSS” is also known as “Persistence XSS” or “Type I”, as we can know from the name that it will be stored, that means attacker’s malicious JavaScript codes will be “stored” on the web-applications database, and the server further drops it out back, when the client visits the perticular website.

Because this happens in a very legitimate way, like when the client/user clicks or hovers a particular infected section, the injected malicious JavaScript code will get executed by the browser as it was already saved into the web-application’s database. For that being reason this attack doesn’t requires any phishing technique to trap the user.

The most common example of “Stored XSS” is the comment section of the websites, which allow any user to write his comment as in the form for comments. Now lets have a look with an example:

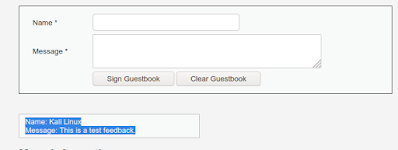
A web-application is asking to users to submit their feedback, in the following screenshot we can see the two fields one is for name and another is for the comment.

storage based XSS example

Now when we fill the form and hit “Sign Guestbook” button to leave our feedback, our entry gets stored into the database. We can see the database section highlighted in the following screenshot:

xss stored testing

In this case the developer trusts us and hadn’t put any validator in the fields, or may be he forget to add validators. So this if this loophole found by an attacker, the attacker can take advantage of it. Without typing the comment in the Message section attacker may run any malicious script. The following script is given for an example:

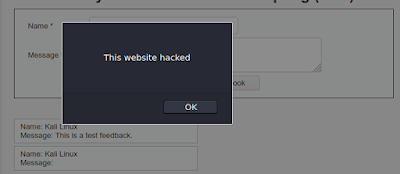
<script>alert("This website is hacked")</script>

When we put the JavaScript code into the “Message” section, we can see the web-application reflects with an alert poop-up.

stored based xss

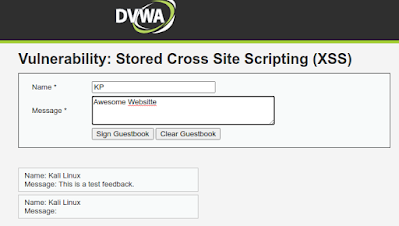
In the database section we can see that the database has been updated with name, but the message section is empty.

xss stored database

This is a clear indication that our/attacker’s script is successfully injected.

Now let’s check if it really submitted on the database or not? We open another browser (Chrome) and try to submit a genuine feedback.

xss stored comment

Here when we hit the “Sign Guestbook” button our this browser will execute the injected script, as we can see in the following screenshot:

We can see this also reflects our injected script, because it stored our input in the database. This is the stored based XSS.

Reflected XSS

Reflected XSS is also known as “Non-Persistence XSS” or “Type II”. When the web-application responds immediately on client’s input without validating what the client entered, this can lead an attacker to inject malicious browser executable code inside the single HTML response. This is also called “non-persistence”, because the malicious script doesn’t get stored inside the web-application’s database. That’s why the attacker needs to send the malicious link through phishing in order to trap the client.

Reflected XSS is the most common and it can be easily found on the “website’s search fields” where the attacker injects some malicious JavaScript codes in the text box/search box and, if the website is vulnerable, the web-page returns up the event described into the script.

Reflected XSS are mainly two types:

  • Reflected XSS GET
  • Reflected XSS POST

Lets check the concept of reflected XSS, we need to check the following scenario:

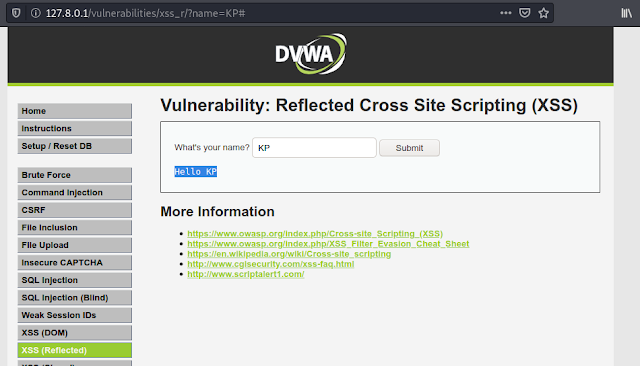
Here we have a webpage where we can enter our name and submit it. So, when we enter our name and submit it. A message prompts back over the screen, and say hello to us.

reflected xss reflecting name

If we look at the URL then we can see the “name” parameter in the URL shows up that, that means the data has been requested over through the GET method.

Now we are going to try to generate some pop-ups by injecting JavaScript codes over into this “name” parameter as:

<script>alert("This is reflected XSS, and you got hacked")</script>

We need to put this script on the URL where our name was,

example of reflected XSS

Now we can see that our JavaScript code is executed as an alert in the following screenshot:

reflected XSS

Actually the developer didn’t set up any input validation over the function, and our input simply get “echo“.

This is an example of reflected XSS using GET method, for reflected XSS POST method we can’t see the request on the URL, in that case we need to use Burpsuite or WebScarab like tools to change the request and inject our JavaScript codes.

DOM-Based XSS

DOM-Based XSS is the vulnerability which appears up in a Document Object Model rather than in the HTML pages. But before that we need to know what is Document Object Model.

DOM or Document Object Model describes up the different web-page segments like – title, headings, forms, tables etc, and even the hierarchical structure of an HTML page. That because this API increases the skill of the developers to produce and change HTML and XML documents as programming objects.

When an HTML document is loaded into a web browser, it becomes a “Document Object”.

DOM-based XSS vulnerabilities normally arise when JavaScript takes data from an attacker-controllable source, such as the URL, and passes it to a sink (a dangerous JavaScript function or DOM object as eval()) that supports dynamic code execution.

This attack is different from stored and reflected XSS attacks because over in this attack developer can’t find the dangerous script in the HTML source code as well as in the HTML response, it only can be observed during the execution time. Didn’t understand well, let’s check out a DOM-based XSS example.

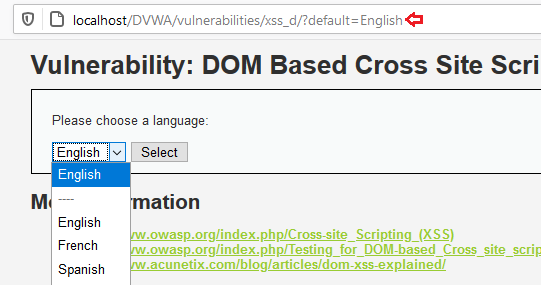
The following application permits us to opt a language shown in the following screenshot:

Dom-based XSS

If we choose our language then we can see it on the URL. like previous (Reflected XSS GET) we can manipulate the URL to get the alert.

#<script>alert("This is DOM XSS, and you got hacked")</script>

Then if we try to change the language we can see following:

alert for dom-based XSS

After the language we put a ‘#’, this is the major diffrence between DOM-BAsed XSS and Reflected or Stored XSS is that it can’t be stopped by server-side filters because anything written after the ‘#’ (hash) will never forward to the server.

XSS Exploitation

Haha ?, what the hell if we get an alert by doing these kind of stuffs, just this? nothing else? We click on the OK button and the pop-up alert is vanishing.

Wait, the pop-up speaks about a lot words. Let’s go back to the the first place, “We’ve come a long way from where we began”. Back to the Stored XSS section.

Here, in the stored XSS section, we know that our input is stored on the database of the web-application. In our previous example we created just an alert but we can do much more then it. For an example if we put any name in the name field and put the following JavaScript code on the message field.

<script>alert(document.cookie)</script>

And we captured the cookie as we can see in the following screenshot:

xss stored exploit coockie capture

Now, if we navigate away from this page, from another browser, then return to the XSS stored page, our code should run again and present a pop-up with the cookie for the current session. This can be expanded upon greatly, and with a bit more knowledge of JavaScript, an attacker can do a lot of damage.

To know more about exploitation of XSS we can go though this official PortSwigger documentation, this is well written.

Preventing XSS Attacks

As a cybersecurity expert we try to find bugs on various services, not only that fixing them or giving an idea to fix them is also our duty. Forestalling Cross-Site scripting or XSS is trivial some times however can be a lot harder relying upon the intricacy of the application and the manners in which it handles client controllable information.

Normally we can stop XSS by using following guide:

  • Validate input from user. At the point where user input is received, filter as strictly as possible based on what is expected or valid inputs.
  • Encode data on output from server. Where user-controllable data is output in HTTP responses, we should encode the output to prevent it from being interpreted as active content. Depending on the output context, this might require applying combinations of HTML, URL, JavaScript, and CSS encoding.
  • Using appropriate response headers. To stop XSS in HTTP responses that are not intended to contain any HTML or JavaScript, we can use the Content-Type and X-Content-Type-Options headers to ensure that browsers interpret the responses in the way we intend.
  • Content Security Policy. As the last line of our defense, we can use Content Security Policy (CSP) to reduce the severity of any XSS vulnerabilities that still come.

There are tons of more article on this we can get from the internet. We found a very detailed article on preventing XSS attacks.

Love our articles? Make sure to follow us on Twitter and GitHub, we post article updates there. To join our KaliLinuxIn family, join our Telegram Group. We are trying to build a community for Linux and Cybersecurity. For anything we always happy to help everyone on the comment section. As we know our comment section is always open to everyone. We read each and every comment and we always reply.

Right way to record and share our Terminal sessions

The Terminal, also known as the command line or a Terminal emulator, is an crusial component of any useful operating system. It is by far one of the most important applications on MacOS and Linux. The Terminal provides an efficient interface to access the true power of a computer better than any graphical user interface.

Sometimes we need to share our terminal or terminal commands to others to show or solve some issue. In that case we use screenshots which are not so satisfying. If we use a screen recorder apps but recording a screen and send the video file is annoying, here steps in asciinema.

Asciinema record and share terminal on Linux

Asciinema is a free and open source solution for recording terminal sessions and sharing them on the web in a easy way. Now this seems very interesting, lets try asciinema on our Kali Linux system. It also can be installed on various systems like MacOS, Linux, BSD even from source and pip.

To install it on our Kali Linux system we can run following command:

sudo apt install asciinema

After giving sudo password the installation process will start. In the following screenshot we can see that asciinema is installing.

asciinema installing on Kali Linux

This is very little tool should be installed on some seconds. After the installation process is complete we can run this tool and start record our terminal.

To start the recording we need to use the following command on our terminal.

asciinema rec

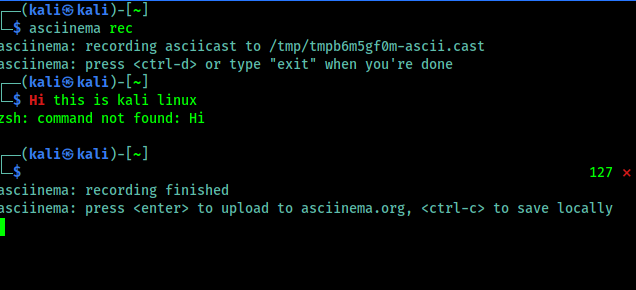
In the following screenshot we can see that it is started and we can see in the following screenshot:

asciinema started

Now we can type any command and it will be recorded. Now we need to remember one thing that it records only the terminal, not other apps or the whole screen. When we feel that our recording is complete we can press CTRL+D or run exit command, shown in the following screenshot:

asciinema save options

Here it is clearly written that if we want to upload it on asciinema.org then we need to just press Enter⤶ and to save it on just our system we need to use CTRL+C.

We press Enter⤶ to upload it on asciinema.org and in the following screenshot we got the link of the recording.

asciinema uploaded

Now we can open this on our browser, here we might need an asciinema.org account. If it requires then we can easily create it by using mail id. Asciinema doesn’t requires any password they verify the mail address (?We can use temp-mail for a temporary mail id?), and we are ready to rock. We can see various options there as shown in the following screenshot.

asciinema website options

We can share it in various way. We can directly send someone the link. Asciinema also supports oEmbed/Open Graph/Twitter Card protocols, displaying a nice thumbnail where possible. We can also easily embedded an asciicast on any HTML page. If we want to put a recording in a blog post, project’s documentation or in a conference talk slides. As we embedded a asciinema terminal record, please check below:

We also can play our locally saved asciinema records (with *.cast file extension), by using following command:

asciinema play filename.cast

This is about record and share our terminal in a very easy way. Forget screen recording apps and blurry video. Enjoy a lightweight, purely text-based approach to terminal recording on our Kali Linus system.

Love our articles? Make sure to follow us on Twitter and GitHub, we post article updates there. To join our KaliLinuxIn family, join our Telegram Group. We are trying to build a community for Linux and Cybersecurity. For anything we always happy to help everyone on the comment section. As we know our comment section is always open to everyone. We read each and every comment and we always reply.

Basics of Digital Forensics

Forensics is the work of investigating the evidence and establishing the facts of interest that links to an incident. In this article we just discuss something about Digital Forensics. Here we try to give an introduction to digital forensics as we believe it is necessary to have a reaction plan when one of our assets, such as a server or web application, is compromised. We also recommend researching other sources for a more thorough training as this topic extends beyond the tools available in Kali Linux. Digital forensics is a faster growing area of interest in cyber security with very few people that know it well.

Basics of Digital Forensics Kali Linux

Before stepping into the world of Digital James Bond, we need to remember some rules. Not much, we believe these three rules must be followed by a digital forensics expert. If we failed to follow these rules then we may have failed to solve the case.

1. Never touch the evidence

Now it is not like the physical evidence touch. It means “never work on original data”,  always use a copy of evidence for forensics testing. We also need to ensure that we didn’t modify the data while creating a copy. The moment we touch or modify original data, our case becomes worthless. Tampered evidence can never be used in any legal proceeding regardless of what is found. The reason is once an original is modified, there is a possibility of identifying false evidence that can misrepresent the real incident. An example is making a change that adjusts the timestamp in the system logs. There would be no way to distinguish this change from an noob analyst’s mistake or attacker trying to cover his traces.
Most digital forensic analysts will use specialized devices to copy data bit for bit. There are also very reputable softwares that will do the same thing. It is important that our process be very well documented. Most digital copies in legal proceedings that have been thrown out were removed due to a hash of a storage medium, such as a hard drive, not matching copied data. The hash of a hard drive will not match a contaminated copy, even if only a single bit is modified. A hash match means it is extremely likely the original data including filesystem access logs, deleted data disk information, and metadata is an exact copy of the original data source.

2. Look for everything

The second vital rule for digital forensics is anything that can store data should be examined. In famous cases involving digital media, critical evidence has been found on a camera, DVR recorders, video game consoles, phones, iPods, and other random digital devices. If the device has any capability of storing user data, then it is possible that device could be used in a forensics investigation. Do not dismiss a device just because it is unlikely. A car navigation system that stores maps and music on SD cards could be used by culprits to hide data, as well provide evidence for Internet usage based on download music tags.

3. Well Documentation

This is the last crucial rule of digital forensics. Most of newcomers ignore it, but we MUST ensure documenting our findings. All evidence and steps used to reach a conclusion must be easy to understand for it to be credible. More importantly, our findings must be re-creatable. Independent investigators must arrive at the same conclusion as we using our documentation and techniques. It is also important that our documentation establishes a timeline  of events on when specifics occurred and how they occurred. All timeline conclusions must be documented.
A forensic investigation is all about the perception of being a security expert validating evidence linked to an incident. It is easy to get caught up looking for bad guys and drawing conclusions on what may have happened based on opinion. This is one of the fastest ways to discredit our work.

As a forensics specialist, we must only state the facts. Did the person Tony steal Steve’s files, or did the account that was logged on as the username Tony initiate a copy from the user account  Steve’s home directory to a USB drive with serial number XXX at the timestamp XXX on date XXX? See the difference? The real bad guy could have stolen Tony’s login credentials (using methods covered in this book) and steal Steve’s data while posing as Tony. The moment you jump to a conclusion is the moment your case becomes inconclusive based on personal interference. Remember, as a forensics specialist, we could be asked under oath to give testimony on exactly what happened. When anything outside of facts enters the record, our credibility will be questioned.

Extra Talks

These are the basic rules of digital forensics that we need to remember and follow all the time. Digital forensics is not so easy and it is very potential as a career option. As the basics we need to collect the information carefully and painstakingly analyzed with a view to extract evidence relating to the incident to help answer questions, as shown in the following diagram:

This is for today, if we follow the basics and use our brain and eyes then we can solve cases and become a digital James Bond. The world needs a hero.

Love our articles? Make sure to follow us on Twitter and GitHub, we post article updates there. To join our KaliLinuxIn family, join our Telegram Group. We are trying to build a community for Linux and Cybersecurity. For anything we always happy to help everyone on the comment section. As we know our comment section is always open to everyone. We read each and every comment and we always reply.

Open Whatsapp chat
Whatsapp Us
Chat with us for faster replies.