During surfing the web sometimes we welcomed with a pop-up, after entering a web page. Even on our website now have a pop-up for the very first time. Suppose our system can be attacked by these pop-ups, may be malicious payloads comes in to our system or our sensitive data is stolen.
Today in our this article we will going to cover the Cross-Site Scripting and we also learn how an attacker executes malicious JavaScript codes over at the input field and generates pop-us to deface the web-application or hijack user’s session.
Pop-up JavaScript’s relation to XSS
JavaScript is one of the most popular programming language of the web, more than 93% websites uses JavaScript. It is very flexible and easily mixes with the HTML codes.
A HTML webpage embedded with JavaScript shows it magic after the webpage loaded on the browser. JavaScript uses some functions to load an object over on a webpage. Functions like Onload, Onmouseover, Onclick etc. Then it prompts the alert as it coded. That’s why basically XSS payloads uses JavaScript codes.
Basics of Cross-Site Scripting (XSS)
Cross-Site Scripting aka XSS is a client side code injection attack where attacker is able to execute malicious scripts into trusted websites. All the websites are not vulnerable to XSS, only those websites or web-applications are effected where the input-parameters are not properly validated. From there attacker can send malicious JavaScript codes, and the user of the web-application has no way to know that it is loading attacker scripts. That’s why XSS is too much dangerous.
Confused with what we are talking about? Don’t like too much theory? Let we come to practical examples. Before that we should know that XSS are mainly three types, those are following:
- Stored XSS
- Reflected XSS
- DOM-based XSS
Stored XSS
“Stored XSS” is also known as “Persistence XSS” or “Type I”, as we can know from the name that it will be stored, that means attacker’s malicious JavaScript codes will be “stored” on the web-applications database, and the server further drops it out back, when the client visits the perticular website.
Because this happens in a very legitimate way, like when the client/user clicks or hovers a particular infected section, the injected malicious JavaScript code will get executed by the browser as it was already saved into the web-application’s database. For that being reason this attack doesn’t requires any phishing technique to trap the user.
The most common example of “Stored XSS” is the comment section of the websites, which allow any user to write his comment as in the form for comments. Now lets have a look with an example:
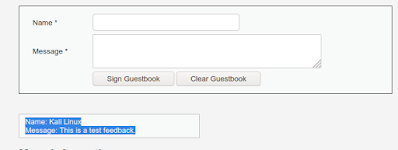
A web-application is asking to users to submit their feedback, in the following screenshot we can see the two fields one is for name and another is for the comment.
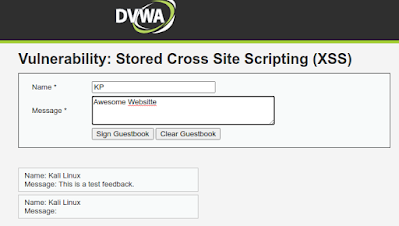
Now when we fill the form and hit “Sign Guestbook” button to leave our feedback, our entry gets stored into the database. We can see the database section highlighted in the following screenshot:
In this case the developer trusts us and hadn’t put any validator in the fields, or may be he forget to add validators. So this if this loophole found by an attacker, the attacker can take advantage of it. Without typing the comment in the Message section attacker may run any malicious script. The following script is given for an example:
<script>alert("This website is hacked")</script>
When we put the JavaScript code into the “Message” section, we can see the web-application reflects with an alert poop-up.
In the database section we can see that the database has been updated with name, but the message section is empty.
This is a clear indication that our/attacker’s script is successfully injected.
Now let’s check if it really submitted on the database or not? We open another browser (Chrome) and try to submit a genuine feedback.
Here when we hit the “Sign Guestbook” button our this browser will execute the injected script, as we can see in the following screenshot:
We can see this also reflects our injected script, because it stored our input in the database. This is the stored based XSS.
Reflected XSS
Reflected XSS is also known as “Non-Persistence XSS” or “Type II”. When the web-application responds immediately on client’s input without validating what the client entered, this can lead an attacker to inject malicious browser executable code inside the single HTML response. This is also called “non-persistence”, because the malicious script doesn’t get stored inside the web-application’s database. That’s why the attacker needs to send the malicious link through phishing in order to trap the client.
Reflected XSS is the most common and it can be easily found on the “website’s search fields” where the attacker injects some malicious JavaScript codes in the text box/search box and, if the website is vulnerable, the web-page returns up the event described into the script.
Reflected XSS are mainly two types:
- Reflected XSS GET
- Reflected XSS POST
Lets check the concept of reflected XSS, we need to check the following scenario:
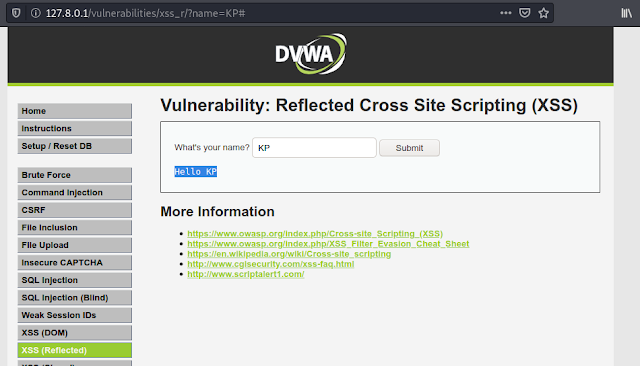
Here we have a webpage where we can enter our name and submit it. So, when we enter our name and submit it. A message prompts back over the screen, and say hello to us.
If we look at the URL then we can see the “name” parameter in the URL shows up that, that means the data has been requested over through the GET method.
Now we are going to try to generate some pop-ups by injecting JavaScript codes over into this “name” parameter as:
<script>alert("This is reflected XSS, and you got hacked")</script>
We need to put this script on the URL where our name was,
Now we can see that our JavaScript code is executed as an alert in the following screenshot:
Actually the developer didn’t set up any input validation over the function, and our input simply get “echo“.
This is an example of reflected XSS using GET method, for reflected XSS POST method we can’t see the request on the URL, in that case we need to use Burpsuite or WebScarab like tools to change the request and inject our JavaScript codes.
DOM-Based XSS
DOM-Based XSS is the vulnerability which appears up in a Document Object Model rather than in the HTML pages. But before that we need to know what is Document Object Model.
DOM or Document Object Model describes up the different web-page segments like – title, headings, forms, tables etc, and even the hierarchical structure of an HTML page. That because this API increases the skill of the developers to produce and change HTML and XML documents as programming objects.
When an HTML document is loaded into a web browser, it becomes a “Document Object”.
DOM-based XSS vulnerabilities normally arise when JavaScript takes data from an attacker-controllable source, such as the URL, and passes it to a sink (a dangerous JavaScript function or DOM object as eval()) that supports dynamic code execution.
This attack is different from stored and reflected XSS attacks because over in this attack developer can’t find the dangerous script in the HTML source code as well as in the HTML response, it only can be observed during the execution time. Didn’t understand well, let’s check out a DOM-based XSS example.
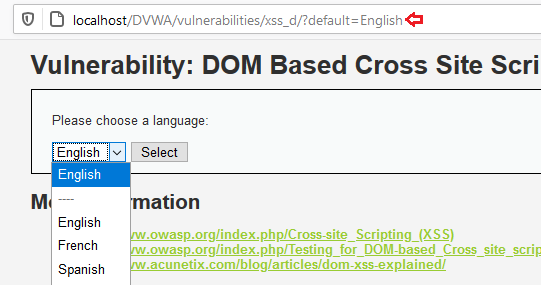
The following application permits us to opt a language shown in the following screenshot:
If we choose our language then we can see it on the URL. like previous (Reflected XSS GET) we can manipulate the URL to get the alert.
#<script>alert("This is DOM XSS, and you got hacked")</script>
Then if we try to change the language we can see following:
After the language we put a ‘#’, this is the major diffrence between DOM-BAsed XSS and Reflected or Stored XSS is that it can’t be stopped by server-side filters because anything written after the ‘#’ (hash) will never forward to the server.
XSS Exploitation
Haha ?, what the hell if we get an alert by doing these kind of stuffs, just this? nothing else? We click on the OK button and the pop-up alert is vanishing.
Wait, the pop-up speaks about a lot words. Let’s go back to the the first place, “We’ve come a long way from where we began”. Back to the Stored XSS section.
Here, in the stored XSS section, we know that our input is stored on the database of the web-application. In our previous example we created just an alert but we can do much more then it. For an example if we put any name in the name field and put the following JavaScript code on the message field.
<script>alert(document.cookie)</script>
And we captured the cookie as we can see in the following screenshot:
Now, if we navigate away from this page, from another browser, then return to the XSS stored page, our code should run again and present a pop-up with the cookie for the current session. This can be expanded upon greatly, and with a bit more knowledge of JavaScript, an attacker can do a lot of damage.
To know more about exploitation of XSS we can go though this official PortSwigger documentation, this is well written.
Preventing XSS Attacks
As a cybersecurity expert we try to find bugs on various services, not only that fixing them or giving an idea to fix them is also our duty. Forestalling Cross-Site scripting or XSS is trivial some times however can be a lot harder relying upon the intricacy of the application and the manners in which it handles client controllable information.
Normally we can stop XSS by using following guide:
- Validate input from user. At the point where user input is received, filter as strictly as possible based on what is expected or valid inputs.
- Encode data on output from server. Where user-controllable data is output in HTTP responses, we should encode the output to prevent it from being interpreted as active content. Depending on the output context, this might require applying combinations of HTML, URL, JavaScript, and CSS encoding.
- Using appropriate response headers. To stop XSS in HTTP responses that are not intended to contain any HTML or JavaScript, we can use the Content-Type and X-Content-Type-Options headers to ensure that browsers interpret the responses in the way we intend.
- Content Security Policy. As the last line of our defense, we can use Content Security Policy (CSP) to reduce the severity of any XSS vulnerabilities that still come.
There are tons of more article on this we can get from the internet. We found a very detailed article on preventing XSS attacks.
Love our articles? Make sure to follow us on Twitter and GitHub, we post article updates there. To join our KaliLinuxIn family, join our Telegram Group. We are trying to build a community for Linux and Cybersecurity. For anything we always happy to help everyone on the comment section. As we know our comment section is always open to everyone. We read each and every comment and we always reply.

