Search Results for: SYN packets

Basic Networking Part 2 — What Is Data Packets?

Introduction

It turns out that packets are involved in everything you do on the Internet. Packet is a basic unit of communication over Computer Network. Every Web page you receive, every e-mail you write is also made up of packets. Packet switched networks are networks that transport data in small packets.

what is data packets

What is a Packet?

On the Internet, an e-mail message is broken down into bytes of a specified size. These are the individual packages. Each packet contains information that will assist it in reaching its destination, such as the sender’s IP address, the intended receiver’s IP address, and a number that tells the network how many packets this e-mail message has been broken into. The data is carried in packets by the Internet’s protocols, Transmission Control Protocol/Internet Protocol (TCP/IP). Each packet contains a portion of your message’s body. Typically, a packet has 1,000 to 1,500 bytes.

Each packet is subsequently sent to its destination through the best available route, which may or may not be shared by all other packets in the message. This improves the network’s efficiency. First, the network can millisecond-by-millisecond balance the load across several pieces of equipment. Second, if a piece of network equipment fails while a message is being sent, packets can be routed around the fault, ensuring that the complete message is delivered.

Data Packet Structure

Most network packets are split into three parts:

Header – The header contains information about the data that the packet will carry. These instructions may contain the following:

  • The length of the packet (some networks have fixed-length packets, while others rely on the header to contain this information).
  • Synchronization (a few bits that help the packet match up to the network).
  • Packet number (which packet this is in a sequence of packets).
  • Protocol (on networks that carry multiple types of information, the protocol defines what type of packet is being transmitted: e-mail, Web page, streaming video etc.)
  • Destination address (where the packet is going).
  • Originating address (where the packet came from).
  • Other technical data.

Payload – Also known as a packet’s body or data. This is the data that the packet is sending to its intended destination. If the payload of a packet is fixed-length, it may be padded with blank data to make it the proper size.

Trailer – The trailer, also known as the footer, usually contains a handful of bits that inform the receiving device that the packet has ended. It may also include some form of error detection. Cyclic Redundancy Check is the most prevalent type of error checking employed in packets (CRC).

CRC is a really cool program. In some computer networks, this is how it works: It puts together the sum of all the 1s in the payload. The result is saved in the trailer as a hexadecimal value. The receiving device adds up the 1s in the payload and compares the result to the trailer’s value. The packet is valid if the values match. However, if the values do not match, the receiving party will be notified.

Conclusion

Consider how an e-mail message might be divided into packets as an example. Assume you’re sending an e-mail to a friend. The size of the e-mail is approximately 3,500 bits (3.5 kilobits). You’re sending it across a network that employs 1,024-bit fixed-length packets (1 kilobit). Each packet contains a 96-bit header and a 32-bit trailer, leaving 896 bits for the content. Four packets are required to separate the 3,500 bits of message into packets (divide 3,500 by 896). The payload will be 896 bits in three packets and 812 bits in the fourth. The contents of one of the four packages would be as follows:

The proper protocols, as well as the originating address, will be included in the header of each packet.

Hping3 — Network Auditing, DOS and DDOS

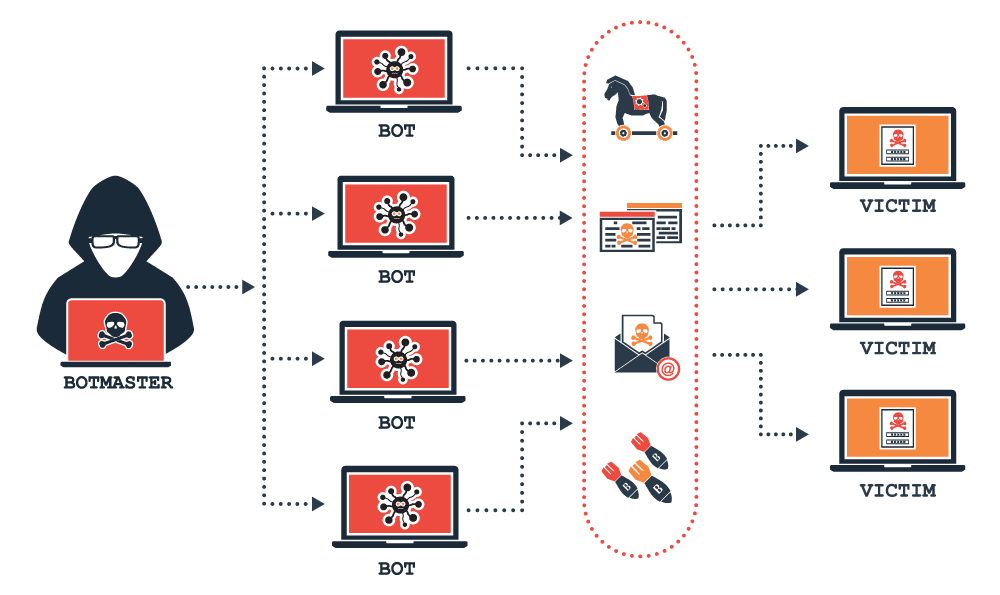
Hping3 is a command-line tool that allow us to analyze TCP/IP messages on a network. Also Hping3 can assemble network packets, which can be very useful for pentesters in performing device and service discovery and illegal actions like performing a Denial-Of-Service (DoS) attack.

hping3 kali linux dos and ddos

Hping3 comes pre-installed with Kali Linux. It is very useful for testing a network.

Key Features of Hping3

  1. Host discovery on a network.
  2. Fingerprinting host devices to determine services.
  3. Sniffing network traffic.
  4. Denial of Service (DoS).
  5. File Transfer.

Host Discovery on a Network

In the real world there are many servers and devices that have ICMP responses disabled for security reasons. We can useHping3 to probe a port on a target system to force an ICMP response back.

First we use the ping utility to send ping request on our localhost server.

ping with no response

On the above screenshot we can see that we don’t receive any responses from the target. Novice guys may assume that target is offline and would probably move on.

If we use Hping3 to probe a specific port by sending SYN packets will force the target to reveal itself.

sudo hping3 -S 192.168.225.48 -p 80 -c 2

Here we have specified SYN packets using -S flag, and specify the port 80 using -p 80. After applying the above command we got following response shown in the screenshot:

hping3 response

From the above screenshot we can see that we have received successful responses from our target. This means our target is open.

Sending Files using Hping3

We can also send files using hping3. For an example we just send a text file from our Linux Mint virtual machine to our host Kali Linux machine. First we start listener on our machine where we want to download our file by using following command:

sudo hping3 -1 192.168.225.29 -9 signature -I wlan0

Here the -1 flag used for ICMP and the IP address is the sender’s IP. -9 flag is used to start the listener and -I is used to choose the network interface. Then the listener will start as we can see in the following screenshot:

Hping3 listener mode

After starting the listener mode here we can send the file from another machine by using following command:

sudo hping3 -1 192.168.225.29 -e signature -E hping3.txt -d 2000

Here -e flag is used to give a signature and -E flag is used for sending file data, -d flag used for size of data.

The following screen recording shows how it works.

Sniffing Network Traffic using Hping3

We also can use hping3 as a network packet sniffer. Here also we can use hping3’s listener mode and intercept and save all traffic going through our machine’s network interface.

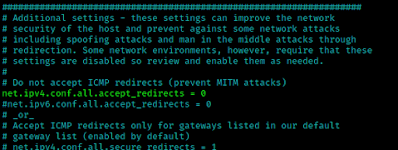
First we need to allow this (uncomment)

net.ipv4.conf.all.accept_redirects = 0

in /etc/sysctl.conf file. Shows in the following screenshot:

allow in the configuration

For an example, to intercept all traffic containing HTTP signature we can apply the following command:

sudo hping3 -9 HTTP -I wlan0

In the following screenshot we can see the output.

hping3 packet capturing

On the above screenshot we can see that hping3 is capturing packets on the wlan0 network interface.

Denial of Service (DOS) using Hping3

We can do denial of service of DoS attack (SYN flood) using hping3. Simple command will be like following:

sudo hping3 -S --flood -V www.examplesite.com

Here -S indicates that we are using SYN packets, –flood is for sending packets as soon as possible. 

Also we can do this batter by using some advanced features.

sudo hping3 -c 20000 -d 120 -S -w 64 -p TARGET_PORT --flood --rand-source TARGET_SITE

Here -c flag is used for packet count (we can raise or decrees it as per our requirements) -d flag is for size of data, -w is to set window size, -p flag is used to specify the destination port, –rand-source flag is used to randomize the source.

This is how we can use hping3 on our Kali Linux system. We can read more about hping3 here. Hping3 is great utility for testing a network, it also very popular.

Disclaimer: This tutorial is for educational propose. Attacking others devices considered as criminal offense. We don’t support that. This is for spreading cybersecurity awareness. If anyone do any illegal stuffs then only that person will be responsible for it.

Love our articles? Make sure to follow us on Twitter and GitHub, we post article updates there. To join our KaliLinuxIn family, join our Telegram Group. We are trying to build a community for Linux and Cybersecurity. For anything we always happy to help everyone on the comment section. As we know our comment section is always open to everyone. We read each and every comment and we always reply.

What is a DOS Attack Denial of Service

After a short period of decline in incidences, denial of service (DoS), and Distributed denial of service attacks (DDoS) have become rampant once more. Whenever there is a major internet security incident, it mostly means that a DDoS attack occurred. These cybercriminals often target websites, personal accounts, servers, and other services to overload its internet…

The post What is a DOS Attack Denial of Service appeared first on Cybersecurity Exchange.

What is Network Security

What Is Network Security? Network security covers many technologies, devices, and processes. It refers to a set of rules and configurations designed to protect the integrity, confidentiality, and accessibility of computer networks and data. Sound network security controls are recommended for organizations to reduce the risk of an attack or data breach. These measures also…

The post What is Network Security appeared first on Cybersecurity Exchange.

What is Penetration Testing

Is your organization equipped to defend against the increasing number of cyberattacks? Penetration testing is one of the best ways to evaluate your organization’s IT and security infrastructure as it identifies vulnerabilities in networks and systems. Unpatched vulnerabilities are an open invitation to cybercriminals. The National Institute of Standards and Technology discovered 4,068 high-risk vulnerabilities…

The post What is Penetration Testing appeared first on Cybersecurity Exchange.

Enhancing Network Security: How IDS Systems Can Protect Against Cyber Attacks.

| Priyanka Kulkarni Joshi | Network Security Intrusion Detection Systems (IDS) are an emerging solution used for protecting data and safeguard enterprises from a variety of cyberattacks. Modern IDS systems have serious privacy issues and trigger a large volume of noise, false positive alerts, and do not do enough to track suspicious activities in networks. The…

The post Enhancing Network Security: How IDS Systems Can Protect Against Cyber Attacks. appeared first on Cybersecurity Exchange.

CertMaster Real Exam LPI 701–100 (124 QA)

August 7, 2023 Buy CertMaster Real Exam LPI 701–100 (124 QA) : $ 69 VCE + Test Engine : $ 69 Contact [email protected] Cert Master Real Exam LPI 701–100: The Ultimate Document to Ace DevOps Tools Engineer Certification Aspiring professionals seeking to excel in the DevOps domain can now rely on Cert Master Real Exam LPI 701–100 as the …

CertMaster Real Exam LPI 701–100 (124 QA) Read More »

100 Top Hacking Tools and Ethical Hacking Tools | Download Them Here!

Ethical hacking (also called white-hat hacking) is a type of hacking in which the hacker has good intentions and the full permission of the target of their attacks. Ethical hacking can help organizations find and fix security vulnerabilities before real attackers can exploit them.

The post 100 Top Hacking Tools and Ethical Hacking Tools | Download Them Here! appeared first on Cybersecurity Exchange.

Unicornscan — Total Guide for Beginner

There are lots of scanning tools used by cybersecurity professionals. Not arguably Nmap is the most famous scanning tool, but it is very slow. There are lots of more useful scanners. Masscan is the fastest port scanner in the world, but masscan is not so accurate.

If we need a enough fast scanner that gives us much reliable result we can choose Unicornscan. Unicornscan comes pre-installed with Kali Linux.

Unicornscan is a asynchronous based scanner (unlike nmap is synchronous based). That’s why it is faster.

Unicornscan Kali Linux

Unicornscan was designed to provide an engine that is Scalable, Accurate, Flexible, and Efficient. It is released for the community to use under the terms of the GPL license.

Key-Features of Unicornscan

Unicornscan is an attempt at a User-land Distributed TCP/IP stack. It is intended to provide a researcher a superior interface for introducing a stimulus into and measuring a response from a TCP/IP enabled device or network. Although it currently has hundreds of individual features, a main set of abilities include:

  • Asynchronous stateless TCP scanning with all variations of TCP Flags.
  • Asynchronous stateless TCP banner grabbing
  • Asynchronous protocol specific UDP Scanning (sending enough of a signature to elicit a response).
  • Active and Passive remote OS, application, and component identification by analyzing responses.
  • PCAP file logging and filtering.
  • Relational database output.
  • Custom module support.
  • Customized data-set views.
  • Has its TCP/IP stack, a distinguishing feature that sets it apart from other port scannersHas its TCP/IP stack, a distinguishing feature that sets it apart from other port scanners.

Scanning With Unicornscan

While Unicornscan comes built into Kali Linux we don’t need to install it. If if we need to install it we can use following command:

sudo apt-get install unicornscan

First we start with basic scan. To perform a basic scan we can use following command:

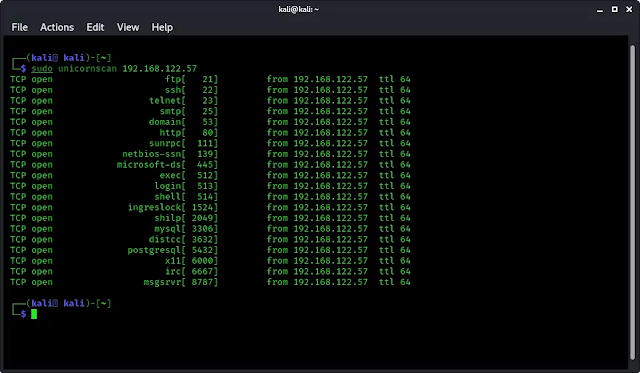
sudo unicornscan 192.168.112.57

The output of the command shows in the following screenshot:

unicornscan normal scan

Here we have run unicoenscan on a Metspliotable2 machine and we can see that the normal scan has listed all the opened TCP ports of host machine. It’s kind of similar to -Ss scan in NMap.

If we need to run basic scan using unicornscan on multiple hosts then we can run following command:

sudo unicornscan 192.168.112.57 192.168.102.100

In this case we run the scan cammand and put 2 hosts divided with ‘space’.

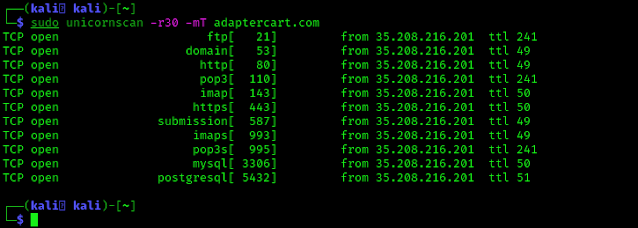
We also can run it against live websites, here we want that unicornscan send 30 packets per second, so we use -r30 flag. We also look for TCP ports so we can run the scan using -mT scan (T is for TCP). So the command will be following:

sudo unicornscan -r30 -mT adaptercart.com

And we got the result as we want. As we can see in the following screenshot:

unicornscan on live website

In the above screenshot we can see that unicornscan scans the website’s TCP ports.

We have seen that unicornscan scans the TCP ports using -mT flag, but if we want to scan UDP ports then we can try with -mU flag. Mind the similarities then it will be easy to remember. The command will be as following:

sudo unicornscan -r300 -mU 192.168.112.57

The screenshot is following:

unicornscan UDP ports

In the above screenshot we can see that we got UDP ports only from the hosts.

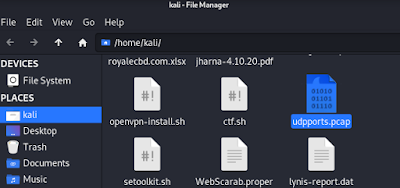
We can save the scan result in a PCAP file using following command:

sudo unicornscan -r300 -mU 192.168.112.57 -w udpports.pcap

Using the above command (-w flag) we can save the scan result in a PCAP file. We can choose any name, for an example we have chosen “udpports”. The file will be saved on our home/user directory, as we can see in the following screenshot:

unicornscan saved PCAP file

This the the basic uses of Unicornscan. If we want to learn more advanced scans then we can see the help menu of Unicornscan by applying following command:

sudo unicornscan -h

This is how we can scan a host or a website using Unicornscan on our Kali Linux system.

Love our super easy articles ? Don’t wanna miss new articles? We post updates of our articles on GitHub and Twitter. Make sure to follow us there to read and learn about cybersecurity.

Have any problem or any question? Please don’t hesitate to ask us in the comment section. We read every comments and we always reply.

Masscan — 1000 Times Faster Than NMAP

Masscan is the fastest network port scanner. It can scan the whole internet under 6 minutes with 25 millions per second data transmitting speed. Is it faster than flash?

Masscan kali linux

This fastest port scanner gives the output like nmap but masscan works like unicornscann, Zenmap internally(asynchronous scan). It is faster because of flexibility allowing arbitrary ranges and port ranges.

Masscan uses it’s own custom TCP/IP stack. Anything other than a simple port scan may cause conflict with the local TCP/IP stack.

We will discuss later the differences between masscan and nmap, now let’s check how to install and use masscan in our system.

Installing Masscan

Masscan comes pre-installed with the Kali Linux full version. We can check the basic uses by simply enter following command:

masscan

If our system doesn’t have masscan then we need to install it. Before installing it we need to install it’s dependencies by using following command:

sudo apt-get install clang git gcc make libpcap-dev

Then we can install it by applying following command:

sudo apt-get install masscan

Dependencies doesn’t require to install it, these dependencies help masscan to work perfectly. We also can install it from it’s GitHub repository. The following commands will be useful to install it from Git repository.

git clone https://github.com/robertdavidgraham/masscan
cd masscan 
sudo make

Uses of Masscan

Masscan is used for scan a network, if we want to scan a single port then we can perform it by applying following command:

sudo masscan 172.217.167.46 -p443

This will scan for a single port 443.

We also can use this tool to scan multiple ports separated by comma(,). The example is following:

sudo masscan 172.217.167.46 -p443,80,4444
masscan mutiple port scan

To scan a range of ports we can use following command:

sudo masscan 172.217.167.46 -p12-443

The above command will scan for port 12 to port 443 on our given IP address.

So in case we need to find all the ports then we can use following command;

sudo masscan 172.217.167.46 -p0-65535

There are a limited number of ports, that is 65535. The above command will check for every port.

Lightning Speed!

We said that masscan is the fastest scanner but after using previous commands we didn’t feel that it is faster.

The reason is masscan scans at the rate of 100 packets/sec, which is slow. To increase it we need to use –rate flag with it.

sudo masscan 172.217.167.46 -p0-65535 --rate 25000000

Using the above command we can achieve the fastest speed (25 million packets/sec).

One more thing, we can’t achieve the max speed on Mac, Windows or Virtual Linux systems. Masscan works best on primary installed Linux systems. On other systems we can get only 300,000 packets/sec. That is really fast but with the Linux system we can get the maximum speed.

To scan faster we must need to have a very good internet connection. Usually it happens that masscan can achieve the highest speed but our internet connection can’t send 25 million packets per second. Although the speed we got was faster than any other port scanner.

To see the fastest effect we should choose a bigger network to scan. On small networks or in single IP we can’t see the faster speed in our eyes. Because scanning small networks is work of some seconds so we can’t feel the speed. Let’s talk about it.

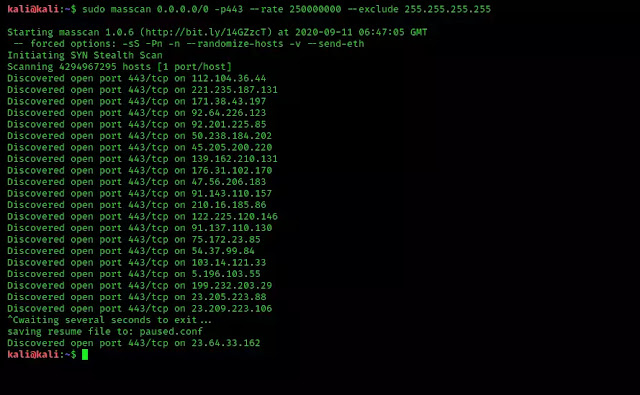
Masscan can scan the entire internet in 6 minutes according to it’s author Robert Graham. If we want to scan the whole internet for a specific port (443 port for example) we can use following command:

sudo masscan 0.0.0.0/0 -p443 --rate 250000000 --exclude 255.255.255.255

This command will scan the whole internet for 443 ports, and show us the result as fast as possible. Here we have stopped the scanning. We can see the screenshot.

scanning the whole internet

This is how we can find a specific or vulnerable port all over the internet.

Some More Uses

To save the output result in a file we can use following command:

sudo masscan 172.217.167.46 -p0-65535 > example.txt

Not only txt format we also can save the results in XML (-oX), Grepable (-oG) and JSON (-oJ) formats. We like the Grepable format because we can use the output on other tools.

We also can scan a network for the top ports. So if we give it ‐‐top-ports 100. It’ll scan the top 100 most common ports discovered according to nmap. We can choose our top ports numbers, an example of this is following (Scans for top 10 ports):

sudo masscan 172.217.167.46 --top-ports 100 --rate 100000

There is a pause function in masscan, Yes we can pause the scanning process and resume it when we need. Scanning on a large network we found it useful. During the scanning process we can press CTRL+C then after some seconds it will pause it and save a paused.conf file. This file has all the settings and progresses from the scan. We can resume the scanning process again by using following command:

sudo masscan --resume paused.conf

Nmap vs Masscan

In this article we have learned that masscan has very good features, the output looks like nmap but there are lot’s of differences between. Those are following:

  • Nmap uses synchronous mode scanning which is very slow but accurate but masscan uses asynchronous mode scan which is very fast but not so much accurate.
  • Masscan doesn’t check if the host is up or not, it always treats the host as online but nmap always checks if the host is up or down.
  • Masscan never converts domain names to IP addresses. We manually need to find the IP address and provide it to masscan. But nmap works finely with IP and domain names.
  • We always need to specify ports on masscan.

To know more about nmap vs masscan we can check this article.

There are also some similarities in nmap and masscan. Masscan have some nmap compatible settings/ flags. To check them we can use masscan -nmap command.

Masscan Web UI

The Offensive Security team has created a web interface for masscan. Using that process we can use masscan on a easy web based GUI. Here is the full guide from Offensive security.

masscan web based interface
Image copyright Offensive Security.

That’s all about masscan. Love our articles? Make sure to follow us on Twitter and GitHub, we post article updates there. To join our KaliLinuxInfamily, join our Telegram Group. We are trying to build a community for Linux and Cybersecurity. For anything we always happy to help everyone on the comment section. As we know our comment section is always open to everyone. We read each and every comment and we always reply.

Open Whatsapp chat
Whatsapp Us
Chat with us for faster replies.