Search Results for: Kali Linux

Passhunt on Kali Linux — Exposes the Nightmare of Default Passwords

Hope you are all doing awesome. As always, today we’re agin going to learn something from the basics of cybersecurity world, where a seemingly harmless string of characters can become our nightmare. Yes, you guessed it—we’re talking about default passwords. Not only that We also learn how we can use a tool called Passhunt on our Kali Linux system and find loopholes on various devices.

Why Default Passwords Are So Dangerous?

Now, imagine we’re working on our own home or office. We’ve got all these trusty devices—like routers, webcams, printers—keeping our connection the world and running our work smoothly. But here’s the catch: many of these devices come with default usernames and passwords straight out of the box.

At first glance, default passwords might seem like a easy shortcut. After all, who wants to spend time to set up a new password when we can just use the one that’s already there, right? Wrong! Default passwords are like leaving the front door of our system wide open for bad characters. Devices with default credentials aren’t just in danger—they are the danger. Anybody can enter the system without knocking the door.

meme on devices with default credentials

Let we have a look how default passwords can lead to some serious cyber attacks on us.

  • Network Nets: Imagine that—we’ve got our brand new router up and running, blissfully unaware that it’s still using the default password. Along comes a crafty bad attacker who sniffs out our router’s vulnerability faster than we can type “password123.” With access to our router, the attacker can wreak havoc on our entire network—slowing down our internet, eavesdropping on our data, or even launching full-blown cyber attacks. It’s like handing over the keys to our system on a silver platter!
  • Web Woes: Next up, we’ve got webcams. These little things might seem innocent enough, but with default passwords, they’re serious trouble makers. Imagine a attacker gaining access to our webcam without we even knowing it. They could spy on our every move, invade our privacy, or even use the footage for blackmail. It’s like having an unwanted guest lurking in the shadows of our home, and nobody wants that!
  • Printer Predicaments: Last but not least, let’s talk about printers. Yes, even these humble machines aren’t safe from the perils of default passwords. With access to our printer, a attacker could intercept sensitive documents, manipulate print jobs, or even launch a good old-fashioned printer hack (yes, that’s a thing!), gaining unauthorized access to sensitive documents stored on the printer’s memory. It’s like turning your trusty printer into a cyber tool, ready to strike at a moment’s notice.

So, what’s the moral of the story? It’s simple: always, always, always change default passwords. Whether it’s for our router, our webcam, our printer, or any other device in our supervision, we shouldn’t take shortcuts when it comes to security. Humans are the most weakest point in any security system. Humans are normally stupid, not really, a better word would ignorant, they don’t aware how stuff works. We just want that our router runs perfectly for Netflix and chill.

Hunting down default passwords using Passhunt

Enough talking about layman’s who ever reading this considers as a cyber security expert and we cyber security experts didn’t came here to learn those above things. We wanna test these kind of vulnerabilities due to human errors. Passhunt is a Python script which is going to help us on this matter.

This Passhunt tool originally created by Viral Maniar which can search through 523 vendors and their 2084 default passwords. It works like a database. Passhunt was giving some issues on newer Python and Kali Linux version. We have updated this script and removed some unwanted lines to run it on our Kali Linux system.

Let’s fire up our Kali Linux Terminal and type following command to clone Passhunt from Github:

git clone https://github.com/jaykali/Passhunt

After pressing Enter ↲ button on our keyboard Passhunt will be downloaded on our system as we can see in the following screenshot.

Passhunt clonning from Github

Now we are going to use cd command to go to the Passhunt directory. The command will be following:

cd Passhunt

Now we need to install required dependencies to run Passhunt and the command will be following:

pip3 install -r requirements.txt

It may take some seconds depending on our internet speed and system configuration. In the following screenshot we can see the output of above commands.

preparing Passhunt on Kali Linux

Now we are going to run Passhunt by using following command:

python passhunt.py

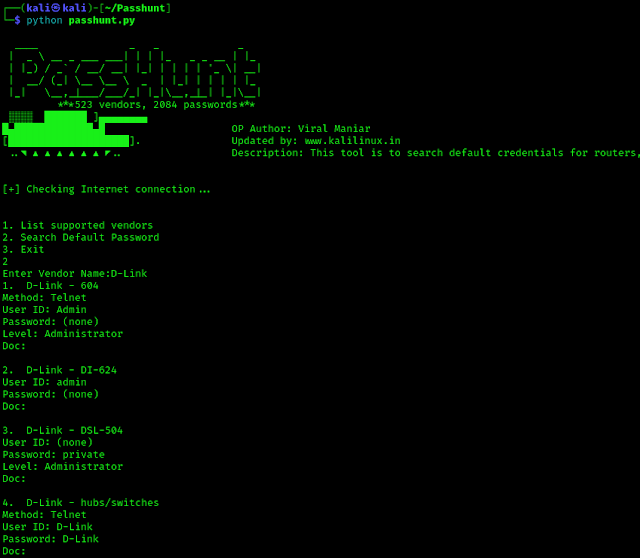
Now our password hunter Passhunt is ready and running as we can see in the following screenshot.

Passhunt running on Kali Linux

In the above screenshot we can see that there are 3 options only on the main menu.

  1. List supported vendors: By pressing 1 and Enter we can see all the supported vendors (brands) names list.
  2. Search Default Password: We can Hit 2 and Enter to search for a Vendor’s default credentials.
  3. Exit: To quit this tool we just need to type 3 and hit Enter.

Now assume we have encountered with a D-Link device, and we are thinking to try default passwords login on this then we can search for it on Passhunt by pressing 2 and hit Enter ⤶.

Then it will prompt for vendor’s name we can use D-Link in our case. After that we are able to see the list of D-Link devices and their default credentials. Here we can choose our target device as we can see in the following screenshot:

passhunt is hunting for default credentials

This is how we can search for default password database using Passhunt on our Kali Linux system. Nowadays default password devices are rare every device have it’s own default password written on somewhere in the packets. But there are some web services which are old and not updated for a while even offices, universities, households use very old model routers for saving some bucks. Humans are 

Humans are ignorant they really don’t care about these online security. They uses same passwords on internet banking, social media even in shopping sites also. They don’t change the default passwords of devices. Those things are really scary.

One more thing, If our target device is a router and it have a WPS button (ultra modern routers usually don’t have WPS button, others may have) then we can also try Pixie Dust Attack to crack it.

That is it for today. We already knows that default passwords are very risky and learn something new i.e using Passhunt on our Kali Linux system and search for default passwords and credentials.

Love our article? Make sure to follow us on Twitter and GitHub, we post article updates there. To join our KaliLinuxIn family, join our Telegram Group & Whatsapp Channel We are trying to build a community for Linux and Cybersecurity. For anything we always happy to help everyone on the comment section. As we know our comment section is always open to everyone. We read each and every comment and we always reply.

Best USB WiFi Adapter For Kali Linux 2024 [Updated February]


Best WiFi Adapter for Kali Linux

Nowadays using Kali Linux becomes very simple as our primary operating system because of the non-root user. The main benefit of using Kali Linux as primary OS is we got the hardware support. Yes, we can do our all penetration testing jobs with this Kali Linux 2024, but to play with wireless networks or WiFi we need some special USB WiFi adapters in Kali.
Best WiFi Adapter for Kali Linux

Here we have listed some best USB Wireless adapters Kali Linux in 2024. These WiFi adapters are 100% compatible with Kali Linux and supports monitor mode and packet injection, which will help a lot in WiFi penetration testing.

Best WiFi Adapter for Kali Linux

Sl
No.
WiFi
Adapter
Chipset
Best
for
Buy
1
AR9271
Good Old Friend
2
AR9002U/RTL8188EUS
Single Band for Beginners
3
RTL8821AU
Best in Budget
4
RT
3070
Best
in it’s Price Range
5
RT
3070
Compact
and Portable
6
RT
5572
Stylish
for the Beginners
5
RTL8812AU
Smart
Look & Advanced
6
RTL8814AU
Powerful & Premium
7
RT5372
Chip, Single Band

Alfa AWUS036NH

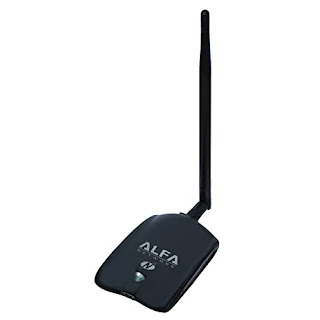
We are using this USB WiFi adapter from the BackTrack days (before releasing Kali Linux) and still we consider it as one of the best. For it’s long range signals we can do our penetration testing jobs from a long distance.

Alfa AWUS036NHA Kali Linux WiFi Adapter 2020

Alfa AWUS036NH is plug and play and compatible with any brand 802.11g or 802.11n router using 2.4 GHz wavelength and supports multi-stream & MIMO (multiple input multiple output) with high speed transfer TX data rate up to 150 MBPS. It also comes with a clip which can be used to attach this adapter on a laptop lid.

  1. Chipset: Atheros AR 9271.
  2. Compatible with any brand 802.11b, 802.11g or 802.11n router using 2.4 Ghz wave-length.
  3. Includes a 5 dBi omni directional antenna as well as a 7 dbi panel antenna.
  4. Supports security protocols: 64/128-bit WEP, WPA, WPA2, TKIP, AES.
  5. Compatible with Kali Linux RPi with monitor mode and packet injection.
  6. High transmitter power of 28 dBm – for long-rang and high gain WiFi.
https://www.amazon.com/Alfa-AWUS036NH-802-11g-Wireless-Long-Range/dp/B003YIFHJY/ref=as_li_ss_tl?dchild=1&keywords=Alfa+AWUS036NHA&qid=1594882122&sr=8-6&linkCode=ll1&tag=adaptercart-20&linkId=2f09cf7cc9b84fcd2be61c590af1d25c&language=en_US
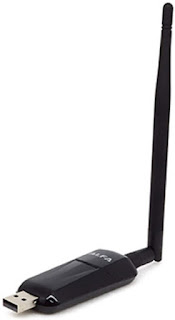
TP-Link WN722N was very popular WiFi adapter for cybersecurity students. But after relesing the version 2 and 3, it is not so popular now, because it doesn’t support monitor mode and packet injection directly. But in it’s price range it is easy buy. This WiFi adapter have a detachable antenna which makes it very portable.
tp link wn722n wifi adapter

TP-LinkWN722N have AR9002U chipset on it’s version 1 and RTL8188EUS chipset on version 2/3 We have an article to use TP-Link WN722N Version 2 and 3 for monitor mode and packet injection on Kali Linux.

  1. Chipset: AR9002U/RTL8188EUS.
  2. Compatible with 2.4 Ghz band only.
  3. 3 dBi onmi directional & detachable antenna.

We need to remember one thing that this adapter’s version 2 and 3 didn’t support Monitor Mode and Packet Injection directly we need a tweaking on it as we discussed on this article.

https://www.amazon.com/Alfa-AWUS036NH-802-11g-Wireless-Long-Range/dp/B003YIFHJY/ref=as_li_ss_tl?dchild=1&keywords=Alfa+AWUS036NHA&qid=1594882122&sr=8-6&linkCode=ll1&tag=adaptercart-20&linkId=2f09cf7cc9b84fcd2be61c590af1d25c&language=en_US

TP-Link AC600/T2U Plus

Here comes the real budget king. This TP-Link AC600 or T2U Plus has really proven itself with monitor mode, packet injection and soft AP support. This WiFi adapter is not plug and play on Kali Linux. We just need to set the driver for TP-Lnik AC600 on Kali Linux.

tplink ac 600tplink t2u plus wifi adapter on kali linux

It comes with a fixed 5dBi antenna which can be 180° rotatable. In this price segment it supports monitor mode on both 2.4 Ghz and 5 Ghz networks. It can be the best choice for ethical hacking students. It has lots of features in this budget.

  1. Chipset: RTL8821AU.
  2. Dual band monitor mode support.
  3. Fixed Antenna

It also require a very little bit of tweaking to make it work on Kali Linux. All about it we had already discussed on our previous article. In our opinion go with this WiFi adapter when have a tight budget, because it’s build quality is not like the Alfa Cards.

https://www.amazon.com/Alfa-AWUS036NH-802-11g-Wireless-Long-Range/dp/B003YIFHJY/ref=as_li_ss_tl?dchild=1&keywords=Alfa+AWUS036NHA&qid=1594882122&sr=8-6&linkCode=ll1&tag=adaptercart-20&linkId=2f09cf7cc9b84fcd2be61c590af1d25c&language=en_US

Alfa AWUS036NHA

Alfa again. Alfa provides the best WiFi adapters for Kali Linux. This adapter is the older version of Alfa AWUS036NH with Ralink RT3070 chipset. AWUS036NHA is the IEEE 802.11b/g/n Wireless USB adapter with 150 Mbps speed This is also compatible with IEEE 802.11b/g wireless devices at 54 Mbps.

Alfa AWUS036NH Kali Linux WiFi Adapter 2020

This plug and play WiFi adapter supports monitor mode and packet injection in any Linux distribution and Kali Linux. Alfa AWUS036NHA comes with a 4 inch 5 dBi screw-on swivel rubber antenna that can be removed and upgrade up to 9 dBi.

  1. Chipset: Ralink RT 3070.
  2. Comes with a 5 dBi omni directional antenna as well as a 7 dBi panel antenna.
  3. Supports security protocols: 64/128-bit wep, wpa, wpa2, tkip, aes
  4. Compatible with Kali Linux (Also in Raspberry Pi) with monitor mode and packet injection.
https://www.amazon.com/Alfa-AWUS036NH-802-11g-Wireless-Long-Range/dp/B003YIFHJY/ref=as_li_ss_tl?dchild=1&keywords=Alfa+AWUS036NH&qid=1594870855&s=amazon-devices&sr=8-1&linkCode=ll1&tag=adaptercart-20&linkId=4c49c0097d6157190cf04122e27714ed&language=en_US

Alfa AWUS036NEH

This Alfa WiFi Adapter is compact and tiny, but it has a good range. It supports plug and play so connect it with Kali Linux machine and start playing with WiFi security. The antenna is detachable and makes it very portable. We have used this to build our portable hacking machine with Raspberry Pi and Kali Linux.

Alfa AWUS036NEH Kali Linux WiFi Adpater 2020

Alfa AWUS036NEH is the ultimate solution for going out and red teaming attacks. The long high gain WiFi antenna will give us enough range to capture even low signal wireless networks. This adapter is slim and doesn’t require a USB cable to use.

  1. Chipset: Ralink RT 3070.
  2. Supports monitor mode and packet injection on Kali Linux and Parrot Security on RPi.
  3. Compact and portable.
https://www.amazon.com/AWUS036NEH-Range-WIRELESS-802-11b-USBAdapter/dp/B0035OCVO6/ref=as_li_ss_tl?dchild=1&keywords=Alfa+AWUS036NEH&qid=1594870918&sr=8-3&linkCode=ll1&tag=adaptercart-20&linkId=c6578f6fb090f86f9ee8917afba3199a&language=en_US

Panda PAU09 N600

Besides Alfa, Panda is also a good brand for WiFi adapters with monitor mode. Panda PAU09 is a good WiFi adapter to buy in 2024. This dual-band plug & play adapter is able to attack both 2.4 GHz as well as 5 GHz 802.11 ac/b/g/n WiFi networks.

Panda PAU09 WiFi adapter for monitor mode

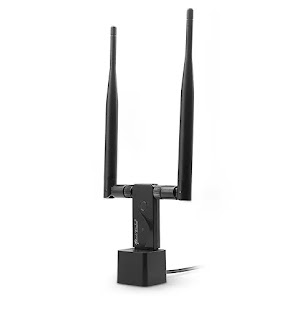
This adapter comes with a USB docker and dual antennas, which looks really cool. It is also detachable into smaller parts. This adapter is reliable even on USB 3 and works great and fully supports both monitor mode and injection which is rare on a dual band wireless card out of the box.

  1. Chipset: Ralink RT5572.
  2. Supports monitor mode and packet injection on Kali Linux, Parrot Security even in RPi.
  3. 2 x 5dBi antenna.
  4. It comes with a USB stand with a 5 feet cable.
  5. Little bit of heating issue (not so much).
https://www.amazon.com/Panda-Wireless-PAU09-Adapter-Antennas/dp/B01LY35HGO/ref=as_li_ss_tl?dchild=1&keywords=Panda+PAU09&qid=1594870963&sr=8-1-spons&psc=1&spLa=ZW5jcnlwdGVkUXVhbGlmaWVyPUEzRUUwQjNVSkNGMEFIJmVuY3J5cHRlZElkPUEwODkwNzI3MkZHWUFNUTBRMlRTQSZlbmNyeXB0ZWRBZElkPUEwNzkxNzgzMTBaUEdDS05IUzdDTSZ3aWRnZXROYW1lPXNwX2F0ZiZhY3Rpb249Y2xpY2tSZWRpcmVjdCZkb05vdExvZ0NsaWNrPXRydWU=&linkCode=ll1&tag=adaptercart-20&linkId=d9d43db491c7cf14863cc99c1b8b7797&language=en_US

Alfa AWUS036ACH / AC1200

In Kali Linux 2017.1 update Kali Linux was released a significant update – support for RTL8812AU wireless chipset. Now Alfa AWUS036ACH is a BEAST. This is a premium WiFi adapter used by hackers and penetration testers. It comes with dual antennas and dual band technology (2.4 GHz 300 Mbps/5 GHz 867 Mbps) supports 802.11ac and a, b, g, n.

Alfa AWUS036ACH WiFi adapter for Kali Linux

These antennas are removable and if we require higher range, then we can connect an antenna with greater dbi value and use it as a long range WiFi link which makes this one of the best WiFi adapters. Also this adapter has an awesome look.
If budget is not an issue then this adapter is highly recommended.

  1. Chipset: RealTek RTL8812AU.
  2. Dual-band: 2.4 GHz and 5 GHz.
  3. Supports both monitor mode & packet injection on dual band.
  4. Premium quality with high price tag.
https://www.amazon.com/Alfa-Long-Range-Dual-Band-Wireless-External/dp/B00VEEBOPG/ref=as_li_ss_tl?dchild=1&keywords=Alfa+AWUS036ACH&qid=1594871102&sr=8-3&linkCode=ll1&tag=adaptercart-20&linkId=928256b6b245a63277f865d406f44c02&language=en_US

Alfa AWUS1900 / AC1900

Now this is the beast, then why is it at last? It is last because of its high price range. But the price is totally worth it for this USB WiFi adapter. If the previous adapter was a beast then it is a monster. Alfa AWUS1900 has high-gain quad antenna that covers a really long range (500 ft in an open area).

This is a dual band WiFi adapter with high speed capability 2.4GHz [up to 600Mbps] & 5GHz [up to 1300Mbps]. It also has a USB 3.0 interface.

Alfa AWUS036ACH The best wifi adapter for hacking in Kali Linux

Monitor mode and packet injection supported with both bands and it will be very useful for serious penetration testers. We also can attach this on our laptop display with it’s screen clip provided with the box.


What we got in the box?

  • 1 x AWUS1900 Wi-Fi Adapter
  • 4 x Dual-band antennas
  • 1 x USB 3.0 cable
  • 1 x Screen clip
  • 1 x Installation DVD-Rom (doesn’t require on Kali Linux. Plug&Play)
  • A consistent solution for network congestion!
  1. Chipset: RealTek RTL8814AU.
  2. Dual-band: 2.4 GHz and 5 GHz.
  3. Supports both monitor mode & packet injection on dual band.
  4. Premium quality with high price tag.
  5. Very long range.
https://www.amazon.com/Alfa-AC1900-WiFi-Adapter-Long-Range/dp/B01MZD7Z76/ref=as_li_ss_tl?dchild=1&keywords=Alfa+AWUS036ACH&qid=1594871169&sr=8-4&linkCode=ll1&tag=adaptercart-20&linkId=d62c81825eace1b0f09d0762e84881c4&language=en_US


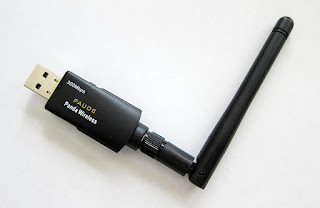
Panda PAU 06

Yes, This low cost Panda PAU 06 WiFi adapter supports Monitor Mode and Packet Injections. But we really don’t suggest to buy this adapter if budget is not an issue.
panda pau 06 wifi adapter for Kali Linux
The main reason is this WiFi adapter doesn’t supports dual-band frequency (only supports 2.4GHz), it doesn’t supports 5GHz frequency.
This WiFi adapter comes with Ralink RT5372 chipset inside it. 802.11n standards supports 300MB per second maximum speed.
This adapter takes less power from computer, but other adapters doesn’t took too much power from system (this point is negligible).
panda pau 06 order on amazon

Extras

There are some more WiFi adapters that we did not cover because we didn’t test them on our hands. These WiFi adapters were owned by us and some of our friends so we got a chance to test these products.Be Careful to choose from unofficial sellers, because sometimes they sell exactly same model with a cheaper chipset which surely not support monitor mode neighter packet injection. As per our own experience Alfa cards are the best in the case of WiFi Hacking.

How to Choose Best Wireless Adapter for Kali Linux 2024

Before
going through WiFi adapter brands let’s talk something about what kind
of WiFi adapter is best for Kali Linux. There are some requirements to
be a WiFi penetration testing wireless adapter.

  • Should support Monitor mode.

  • The ability to inject packets and capture packets simultaneously.

Here are the list of WiFi motherboards supports Monitor mode and Packet injection.

  • Atheros AR9271 (only supports 2.4 GHz).
  • Ralink RT3070.
  • Ralink RT3572.
  • Ralink RT5370N
  • Ralink RT5372.
  • Ralink RT5572.
  • RealTek 8187L.
  • RealTek RTL8812AU (RTL8812BU & Realtek8811AU doesn’t support monitor mode).
  • RealTek RTL8814AU
  • RTL8188EUS (requires modified driver)
  • RTL8821AU (require some installations)

So
we need to choose WiFi Adapter for Kali Linux carefully. For an
Example, on the Internet lots of old and misleading articles that
describe TP Link N150 TL-WN722N is good for WiFi security testing. But it is not totally true. Actually it was.The
TP Link N150 TL-WN722N’s previous versions support monitor mode. The
version 1 comes with Atheros AR9002U chipset and supports monitor mode.
Version 2 and 3 has the Realtek RTL8188EUS chipset and requires some modification on it’s driver then we can use it. TP Link N150 TL-WN722N version 1 is not
available in the market right now. So clear these things and don’t get
trapped.

Which WiFi adapter you like the most for Kali Linux?


WiFi Hacking in Kali Linux

Kali Linux is the most widely used penetration testing operating system of all time. It comes with lots of tools pre-installed for cyber security experts and ethical hackers. We can perform web application penetration testing, network attack as well as wireless auditing or WiFi hacking. We have already posted some lots of tutorials on our website and some good WiFi auditing tutorials like AirCrack-Ng.

Why Do We Use External USB WiFi Adapters in Kali Linux?

A WiFi adapter is a device that can be connected to our system and allows us to communicate with other devices over a wireless network. It is the WiFi chipset that allows our mobile phone laptop or other devices which allows us to connect to our WiFi network and access the internet or nearby devices.

But most of the Laptops and mobile phones come with inbuilt WiFi chipset so why do we need to connect an external WiFi adapter on our system ? Well the simple answer is our in-built WiFi hardware is not much capable to perform security testing in WiFi networks.Usually inbuilt WiFi adapters are low budget and not made for WiFi hacking, they don’t support monitor mode or packet injection.

If we are running Kali Linux on Virtual Machine then also the inbuilt WiFi Adapter doesn’t work for us. Not even in bridge mode. In that case we also need an external WiFi adapter to play with WiFi networks. A good external WiFi adapter is a must have tool for everyone who has interest in the cyber security field.

 
WSL2 installation of Kali Linux will not support any kind (Inbuilt or External) of Wi-Fi adapters.

Kali Linux Supported WiFi Adapters

Technically almost every WiFi adapter supports Kali Linux, but those are useless on WiFi hacking if they don’t support monitor mode and packet injection. Suppose, we buy a cheap WiFi adapter under $15 and use it to connect WiFi on Kali Linux. That will work for connecting to wireless networks but we can’t play with networks.

It doesn’t make sense, when we are using Kali Linux then we are penetration testers so a basic WiFi adapter can’t fulfill our requirements. That’s why we should have a special WiFi adapter that supports monitor mode and packet injection. So in this tutorial Kali Linux supported means not only supported it means the chipset has ability to support monitor mode and packet injection.

What is Monitor Mode

Network adapters, whether it is wired or wireless, are designed to only capture and process packets that are sent to them. When we want to sniff a wired connection and pick up all packets going over the wire, we put our wired network card in “promiscuous” mode.

In wireless technology, the equivalent is monitor mode. This enables us to see and manipulate all wireless traffic passing through the air around us. Without this ability, we are limited to using our WiFi adapter to only connect to wireless Access Points (APs) that accept and authenticate us. That is not what we are willing to settle for.
In the Aircrack-ng suite, we need to be able to use airodump-ng to collect or sniff data packets.

What is Packet Injection

Most WiFi attacks require that we are able to inject packets into the AP while, at the same time, capturing packets going over the air. Only a few WiFi adapters are capable of doing this.

WiFi adapter manufacturers are not looking to add extra features to their standard wireless adapters to suit penetration testers needs. Most wireless adapters built into your laptop are designed so that people can connect to WiFi and browse the web and send mails. We need something much more powerful and versatile than that.

If we can’t inject packets into the Access Point (in Aircrack-ng, this is the function of Aireplay-ng), then it really limits what we do.

If we are using Kali Linux and want to be a security tester or ethical hacker then a special WiFi adapter is a must have tool in our backpack. As per our own experience listed Alfa cards in this list are best USB wireless adapter for Kali Linux, going with them may be costly but they are really worth it. For more assistance comment below we reply each and every comment.

We are also in Twitter join us there. Our Telegram group and our Whatsapp channel also can help to choose the best WiFi adapter for hacking and Kali Linux.

NIPE — Fully Anonymize Total Kali Linux System

Becoming anonymous is a very good way to hide ourself form all kind of surveillance. But we get only few option because VPN is really bad, specially those free one. Free VPN’s keeps logs and we can be traced.

We can use TOR network, not the browser only. Tor can’t be traced easily it is very hard (practically close to impossible). Read our detailed article on Tor network.

We can use Tor as a default gateway for our network. Then all the traffic on our PC will transfer via Tor network and it’s not possible to trace us. We can do this manually with a server but manual configuration of this will consume a lot of time and hard work. Automated tools will help us.

Kali LInux anonymous total system with NIPE

This is not the first, previously we made an article on AnonSurf, but that tool is not updated in last 3 years and we got a lot of issues.

In today’s article we gonna talking about Nipe. This perl script enables us to directly route all our traffic from our computer to the Tor network through which we can use the internet anonymously without having to worry about tracked or traced back.

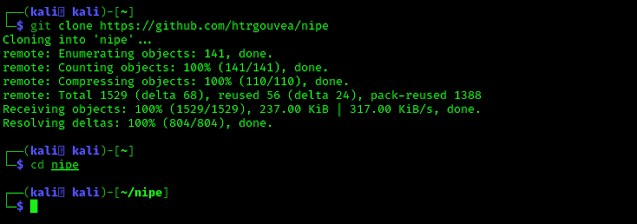
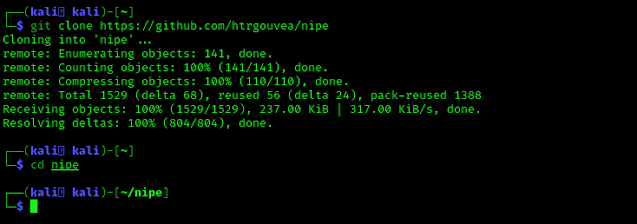
First of all we need to clone this repository from GitHub by using following command:

git clone https://github.com/htrgouvea/nipe

Then it will copied to our system we can go inside the directory using cd command:

cd nipe

The screenshot of the above commands is following:

clonning nipe from github to kali linux

Now we need to install libraries and dependencies by using following command:

sudo cpan install Try::Tiny Config::Simple JSON

Now for new comers cpan might be a strange command, cpan helps to install packages or modules for Perl. In simple words we can say ‘Python have pip‘ & ‘Perl have cpan‘.

After this we can install this Perl script using following command:

sudo perl nipe.pl install

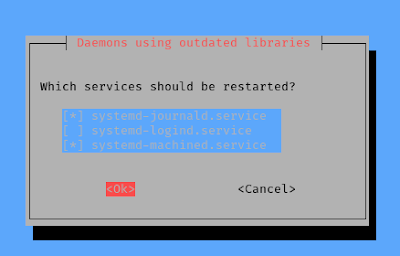
Then the installation process will start. After the installation we got a notification that some services need to restart, here we press “TAB” button and select OK by pressing ENTER, as we can see in the following screenshot:

services restart for NIPE

After this we can say that our installation process is done. Now we are ready to ROCK.

First of all we check the status of NIPE tool by applying following command:

sudo perl nipe.pl status

The screenshot of the command is following:

nipe status on Kali Linux

In the above screenshot we can see that NIPE is disabled here but we can start it using following command:

sudo perl nipe.pl start

After applying these command NIPE services will be started, now again if we can check the status by applying sudo perl nipe.pl status command then, we can see the output as the following screenshot:

anonymous services has been started on Kali Linux

Now we need to test our IP by opening dnsleaktest website to make sure that our original IP address is hided. Checking this will be a good test for NIPE tool beneficial for everyone.

When we are done we can off this Tor gateway and get back to our original IP address by applying following command:

sudo perl nipe.pl stop

After applying the above command NIPE will stop and we get back our original IP. We can check the status, as we did in the following screenshot:

nipe service stopped on Kali Linux

NIPE makes Tor network our default gateway. This is how we can anonymise our total Kali Linux system. This process is enough secure. Practically cracking Tor is close to impossible but as we know theoretically everything is possible.

Love our articles? Make sure to follow us on Twitter and GitHub, we post article updates there. To join our KaliLinuxInfamily, join our Whatsapp Channel & Telegram Group. We are trying to build a community for Linux and Cybersecurity. For anything we always happy to help everyone on the comment section. As we know our comment section is always open to everyone. We read each and every comment and we always reply.

How to run C and C++ programs in Kali Linux

In our today’s article we discuss about how we can run C and C++ programs in Kali Linux system.

How to run C and C++ Programs in Kali Linux

Sometimes we counter with C and C++ programs, now we are using Kali Linux as primary installation then how to run them?

Well this is very easy. This tutorial is also going to be useful for other Debian based distributions like Ubuntu, Mint etc.

Without wasting valuable time let’s get started.

Running C Programs in Kali Linux

First we need to have a C program in our Kali Linux system. Let’s write it.

To write a C program we choose notepad++ in our Kali Linux system. Oh it’s not comes with Kali Linux (Notepad++ supports Windows only) but we shows how we have installed Windows programs in Kali Linux.

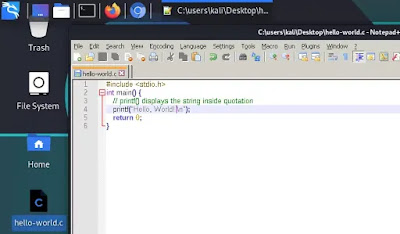
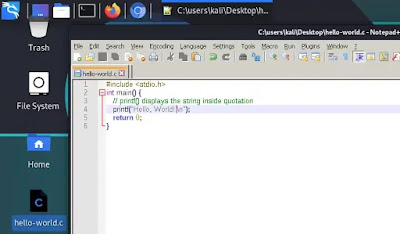
After opening Notepad++ we wrote a simple ‘hello world’ script on C and save it with hello-world.c name on our desktop, as we can see in the following screenshot:

writing c programs in Kali Linux

Now we just need to open our Terminal window in Kali Linux system and navigate to our Desktop directory by using cd command:

cd Desktop

To run any C programs we need to have GCC in our Linux system. GCC is a C compiler for Linux or UNIX based system. It’s comes pre-installed with Kali Linux but if we need to install or update gcc we can run following command in our terminal:

sudo apt-get install gcc

The screenshot of the command is following:

Installing GCC in Kali Linux

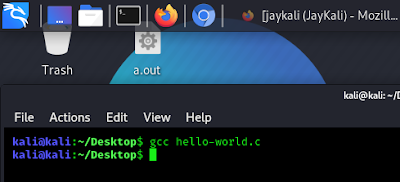
Let we are going to run our C program by using following command:

gcc hello-world.c

It will run as we can see in the following screenshot:

gcc running on Kali

After running this command we can’t see nothing output. No worry, it is not given any output now but created a a.out file in our current directory. We can see it by using ls command:

ls
a.out in our directory

In the above screenshot we can see the a.out file. This is an executable file for Mac or Linux. If we use GCC in Windows system then it will create a exe file.

Now as we know this a.out file is executable we can execute this by using following command:

./a.out

The screenshot is following. Here we successfully run our C program.

running C program in Kali Linux

If we need we can do with another name using -o flag. If we need the output called ‘hello’ in the place of ‘a.out’ then we can use following command:

gcc -o hello hello-world.c

Then we got a file called hello and we run it using ./hello command.

Here we learned how we can run C programs in Kali Linux system.

Running C++ Programs in Kali Linux

Running C++ programming in Kali Linux is very similar to run C programs. Here in the place of GCC we need to use G++ compiler. To install/update G++ in our Kali Linux we ca use following command:

sudo apt-get install g++

Then we can compile a C++ program. We have a C++ program (“Hello World!” file named hello.cpp for example).

Using G++ is very similar to GCC we can use -o flag to create another named file instead ‘a.out’.

g++ -o hello-world hello.cpp

Then we can use following command to run our compiled file and get the output.

./hello-world

As we can see in the following screenshot:

running C++ in our Kali Linux system

This is how we can run C++ program in our Kali Linux system. In this article we learned how we can run C and C++ programs in our Kali Linux or any other Linux distributationHope this article helps our fellow Kali Linux users. Really love our articles? Make sure to follow us to get all our articles directly on notification. We are also available on Twitter and GitHub, we post article updates there. To join our KaliLinuxIn family, join our Whatsapp Channel & Telegram Group. We are trying to build a community for Linux and Cybersecurity. For anything we always happy to help everyone on the comment section. As we know our comment section is always open to everyone. We read each and every comment and we always reply

Fixing Font and Language Problems in Kali Linux

In our installation of Kali Linux 2023.3 (also in older version) we can see that if we see other language in browser then it is not readable easily. 

kali linux font promlem fixed

The occurrence of this issue is attributed to the absence of fonts for other languages in our Kali Linux system. In this tutorial, we will address the language and font problem in Kali Linux. Resolving this matter is a simple process – all that is required is downloading the fonts for the relevant languages and placing them in the correct location. That’s it.

First of all we need to download the language and fonts from the internet. We can copy the fonts from other Operating systems (Ubuntu and even from Windows).

We just uploaded the files as a zip file. It can be downloaded from this Google Drive link.

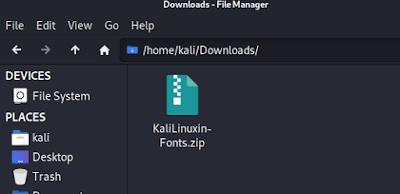
We have downloaded the file file as we can see in the following screenshot:

Kali Linux fonts zip file downloaded

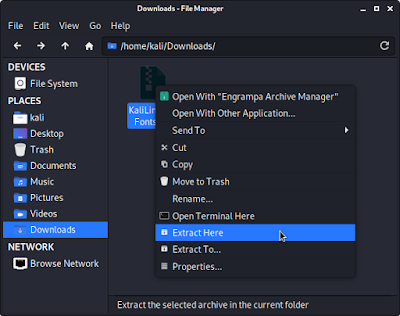
Now we unzip this by using right click and choose “Extract Here“.

Extract Here

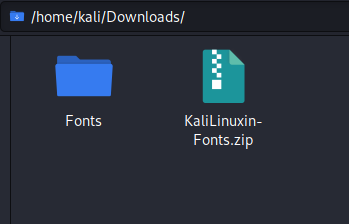
After finishing we can see that a folder called “Fonts” in our directory.

fonts directory

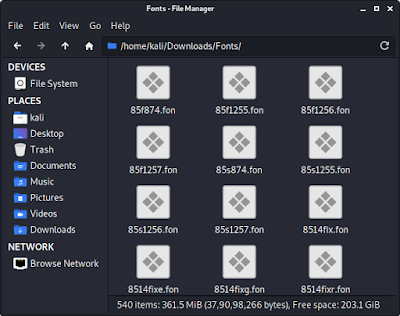
Now we just need to open the folder called “Fonts”, and we got all the files into the directory as we can see in the following screenshot:

Font files into the directory

We need to copy and paste these all files into /usr/share/fonts directory. For becoming a non-root user we can’t paste these files directly on the directory. We need to open the file manager with root permission.

So we need to close everything, and open a terminal. We need to type following command to open our file manager with root permission:

sudo thunar

After giving our sudo password we can see that our Thunar file manager opens with root permission.

Then we just need to go into the “Fonts” directory and select all and copy everything. We can use keyboard shortcuts CTRL+A and CTRL+C for this. 

all fonts for Kali Linux

Then we need to go to the /usr/share/fonts directory, and paste everything here by using CTRL+V (or anyway). That’s all.

Pasted fonts in required directory

We are done. Now we can open again Google’s homepage and see if it works or not?

Kali Linux fonts problem fixed
We can see that font problem is fixed now

It worked.

We also can copy these font files from a Windows computer. Those font files will be located on C:/Windows/Fonts directory. We can copy them on a USB drive and paste on Kali Linux it also will work.

we did it

Love our articles? Make sure to follow us to get all our articles directly on notification. We are also available on Twitter and GitHub, we post article updates there. To join our KaliLinuxIn family, join our Whatsapp Channel & Telegram Group. We are trying to build a community for Linux and Cybersecurity. For anything we always happy to help everyone on the comment section. As we know our comment section is always open to everyone. We read each and every comment and we always reply.

How to Install Telegram and Signal on Kali Linux

WhatsApp is the most widely used messenger in the world. It has more than two billion active user base which is great. We have adopted WhatsApp in our life and we use this for our very personal works, like personal media shearing and chats. But there is a catch.

Why we can’t trust Whatsapp?

While WhatsApp is a popular messaging platform known for its end-to-end encryption, which theoretically provides a high level of security for private chats, there are still some reasons why individuals might have concerns about trusting the platform completely. Here are a few factors to consider:

Ownership by Facebook: WhatsApp is owned by Facebook, and there have been concerns about how user data is shared between the two platforms. While WhatsApp messages are end-to-end encrypted and Facebook claims not to have access to them, there have been changes to the privacy policy that allow for some data sharing between WhatsApp and Facebook.

Privacy Policy Changes: WhatsApp has updated its privacy policy in the past, leading to controversy and concerns about how user data is handled. While the end-to-end encryption remains intact, other data such as metadata, contacts, and account information may be collected and shared for various purposes.

Government Access: In some cases, governments may request access to user data for legal or security reasons. While WhatsApp claims not to have a backdoor for such access, the legal landscape can vary, and there have been instances of government requests for data.

So that’s pretty much clear that we need another platform from for our private message. Telegram and Signal is good alternative of Whatsapp. In this detailed article we are going to discuss how we can install Signal and Telegram on our Linux System, we are using Kali Linux here. But we can use the same method on any Debian based Linux distribution (Ubuntu, Mint, Elementary etc).

How to install telegram and signal on linux

Signal

Signal is an open-source privacy focused software for private/group messaging and calls. It can be the perfect alternative to WhatsApp. Signal has almost the same interface like WhatsApp. It has encryption and a lot of more privacy than WhatsApp. Even Edward Snowden and Elon Musk recommended using Signal.

Signal is available on various platforms. It is available for mobile devices Android and iOS. It also has desktop applications for Windows, Mac and Linux. We don’t give any link for Linux Download. We will show the process here.

How to install Signal on Linux

To install Signal on Linux we can use the following method.

First of all we need to Install Signal’s official public software signing key by using following commands one by one:

wget -O- https://updates.signal.org/desktop/apt/keys.asc |
sudo apt-key add -

The screenshot of the command is following:

Signal public software signing key

This might take some time and ask for the root password.

After this we need to add Signal’s repository to our list of repositories by using following command:

echo "deb [arch=amd64] https://updates.signal.org/desktop/apt xenial main" |
sudo tee -a /etc/apt/sources.list.d/signal-xenial.list

We can copy and paste this command to our terminal to add the repository.

Then we just need to update our system by using following command:

sudo apt-get update

After the updating process complete we can install Signal desktop app by using following command:

sudo apt install signal-desktop

This will take some time to download (111 MB) and install.

installing signal on linux

After finishing the process we can find Signal desktop applications on our application list.

Signal on our Linux system

Now we just need to link our phone’s Signal app with our PC by scanning the QR code. It’s not like the WhatsApp Web, because in WhatsApp Web our both devices need to connect to the internet. Here after scanning we can use our PC as a primary device.

Our chats are saved on our device not in their server (like WhatsApp) so we can’t see the mobile chats on the PC.

Telegram

Telegram is already a very popular messaging and media sharing platform. We don’t think it needs any special introduction. It also supports cross platform. It also has mobile and desktop versions.

It is also available for mobiles on Play store and app store. Also it is available for Windows, Mac and Linux (64bit and 32bit).

It is also open-source and the source code is available on their GitHub repository.

How to install Telegram on Linux

To download it on our Linux system we just need to download it from the official website. Then we can download it’s Linux version (we are in 64 bit).

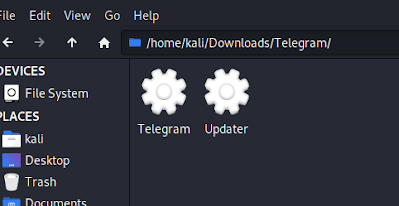
It will download a tar.xz compressed file. After downloading it we can find it on our Downloads folder. We need to extract the compressed file and we got two binary files as we can see in the following screenshot:

Telegram binary files

Here, we just need to double click on the “Telegram” file and it will be started. We can use it as a separate Telegram account or we can link our mobile devices via QR code. It will show us desktop notification of new chats.

Telegram dektop on linux

Note: This installation of Telegram does not “install” the app on our system, but it will add a ‘Telegram’ app shortcut to our system app launcher/app menu. Just remember to not delete the binary file it links to!

There are some more privacy messengers on the market (Wikr, Utopia), but these are the most wanted. So we discussed these and their installation on Linux. We usually prefer Signal more than Telegram. Tell us about personal choice in the comment section.

Love our articles? Make sure to follow us to get all our articles directly on notification. We are also available on Twitter and GitHub, we post article updates there. To join our KaliLinuxIn family, join our Whatsapp Channel & Telegram Group. We are trying to build a community for Linux and Cybersecurity. For anything we always happy to help everyone on the comment section. As we know our comment section is always open to everyone. We read each and every comment and we always reply.

Volatolity — Digial Forensic Testing of RAM on Kali Linux

In our some previous articles (Scalpel, Foremost etc) we have discussed how to can run digital forensics on hard disk drives. But data is not only stores there this included RAM and the swap partition, or paging, file, which is an area of the hard disk drive.

Now the issue is RAM’s data is very volatile, means the data in the RAM easily lost, when there are no electrical charge or current in the RAM chip. With the data on RAM being the most volatile, it ranks high in the order of volatility and must be forensically acquired and preserved as a matter of high priority.

volatility tutorial kali linux forensics testing of ram

Many types of data & forensics artifacts reside in Random Access Memory (RAM) and the paging file. They are might be login passwords, user information, running and hidden processes or even encrypted passwords are just some of the many types of interesting data that can be found when we run digital forensics test of RAM.

In our this article we use Volatility Framework to perform memory forensics on our Kali Linux system.

Volatility Framework is an open-source, cross-platform framework that comes with many useful plugins that provide us very good information from the snapshot of memory. This also known as memory dump.

The concept of Volatility is very old but it’s works like magic. Not only analyzing running and hidden processes, is also a very popular choice for malware analysis.

As we said Volatility Framework is a cross platform framework. It can be run on any OS (32 and 64 bit) that supports Python including:

  • Windows XP, 7, 8,8.1, and Windows 10.
  • Windows Server 2003, 2008, 2012/R2, and 2016.
  • Linux 2.6.11 – 4.2.3 (including Kali, Debian, Ubuntu, CentOS, and more).
  • macOS Leopard (10.5.x) and Snow Leopard (10.12.x) and newer.

Volatility supports several memory dump formats (both 32- and 64-bit), including:

  • Windows crash and hibernation dumps (even Windows 7 and earlier).
  • VirtualBox.
  • VMWare .vmem dump.
  • VMware saved state and suspended dumps—.vmss/.vmsn.
  • Raw physical memory—.dd.
  • Direct physical memory dump over IEEE 1394 FireWire.
  • Expert Witness Format (EWF)—.E01.
  • QEMU (Quick Emulator).

Even we can convert between these formats and boosts of being able use Volatility with other tools.

Before use Volatility Framework we need to create a memory dump for testing. We can use several tools such as FTK imager, Helix, LiME can be used to acquire the memory image or memory dump. Then it can be investigated and analyzed by the Volatility Framework.

For this tutorial we are going to use a Windows XP image (named cridex.vmem) which is downloaded from here. Volatility have uploaded lots of memory samples publicly available for testing there. We can use them for our practice with the Volatility Framework and enhance our skills. We can download as many as we like and we can use various plugins available in Volatility. In the following screenshot we can see that our dump image is saved on our Desktop for easy access.

memory dump file

Using Volatility in Kali Linux

Volatility Framework comes pre-installed with full Kali Linux image. We can see the help menu of this by running following command:

volatility -h

Then we got the help of Volatility Framework as we can see in the following screenshot:

volatility help menu on Kali Linux

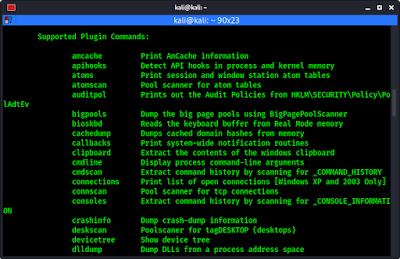
If we scroll down a little bit on the help menu we can find the list of all plugins within Volatility Framework.

Volatility plugins list

This list comes in handy when performing analysis as each plugin comes with it’s own short description. In the following screenshot we can see a plugin with it’s description.

imageinfo plugin's description volatility

Gaining Information using Volatility

This imageinfo plugin will tell us about the image. The format for using plugins in Volatility is:

volatility -f [filename] [plugin] [options_if_required]

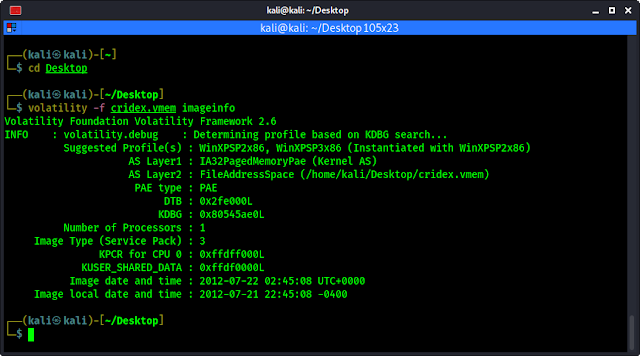
Now we have stored our image file on Desktop so first we change our working directory by using cd Desktop command. Then we run imageinfo plugin to check information of the image by applying following command:

volatility -f cridex.vmem imageinfo

In the following screenshot we can see the information about our image file.

volatility plugin imageinfo

In the above screenshot we can see some information about the image used, including the suggested operating system and Image Type (Service Pack), the Numbers of Processor used and the date and time of the image. Some valuable information we got from this image is listed:

  • WinXP: Windows XP.
  • SP3: Service Pack 3.
  • x86: 32 bit architecture.

We also can see the suggested profiles WinXPSP2x86 (Windows XP Service Pack 2×86), WinXPSP3x86 (Windows XP Service Pack 3×86) but in the image type section we can see that service pack is 3 so we can use “WinXPSP3x86” profile for our analysis.

Process Analysis using Volatility on Kali

To identify & link connected processes, their ID’s, running time and offset locations within the RAM image, we need these four plugins to get started:

  1. pslist
  2. pstree
  3. psscan
  4. psxview

1. Pslist Plugin on Volatility

This plugin or tool shows a list of all running processes, also it gives very crucial information like, Process ID (PID) and the Parent PID (PPID). Not only that it also shows the time when the processes started.

Let we run the pslist first then we explain the things. We use following command:

volatility --profile=WinXPSP3x86 -f cridex.vmem pslist

The following screenshot shows the output of the preceding command:
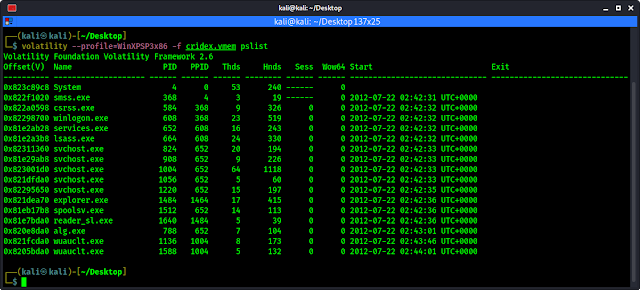
volatility pslist command kali linux
The Finding are discussed following

In the above screenshot we can see the System, winlogon.exe, services.exe, svchost.exe, and explorer.exe services are all started first and then followed by reader_sl.exe, alg.exe, and finally wuauclt.exe.

The PID identifies the process and the PPID identifies the parent of the process. Looking at the pslist output, we can see that the winlogon.exe process has a PID of 608 and a PPID of 368. The PPID’s of the services.exe and the lsass.exe processes (directly after the winlogon.exe process) are both 608, indicating that winlogon.exe is in fact the PPID for both services.exe and lsass.exe.

For those new to process IDs and processes themselves, a quick Google search can assist with identification and description information. It is also useful to become familiar with many of the startup processes in order to readily point out processes that may be unusual or suspect.

The timing and order of the processes should also be noted as these may assist us in investigations. In the above screenshot, we can see that several processes, including explorer.exe, spoolsv.exe, and reader_sl.exe, all started at the same time of 02:42:36 UTC+0000. We can also tell that explorer.exe is the PPID of reader_sl.exe.

In this analysis, we can see that there are two instance of wuauclt.exe with svchost.exe as the PPID.

2. Pstree Plugin on Voltility

pstree is another process identification command that can be used to list processes. pstree shows output the same list of processes as the pslist command did in previous, but identification is also used to know which one child process and which one is parent process.

To run pstree we use following command:

volatility --profile=WinXPSP3x86 -f cridex.vmem pstree

Following screenshot shows the output of the preceding command:

volatility pstree command on Kali Linux

In the above screenshot, the last two processor listed are explorer.exe and reader_sl.exe. The explorer.exe is not indented, while reader_sl is indented, indicating that sl_reader is the child process and explorer.exe is the parent process. This is how we can identify the parent process and child process.

3. Psscan Plugin on Volatility

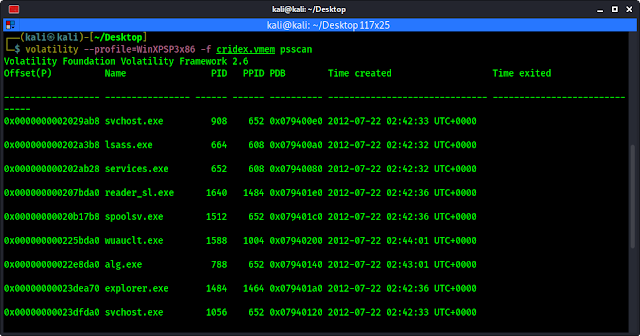
With the help of pslist and pstree we have checked the running processes, now it’s time look for inactive and even hidden processes using psscan. Now this hidden processes may be caused by malwares (like rootkits), and they are well known for doing just that to evade discovery by users & antivirus programs.

To check the inactive process using psscan we can use following command:

volatility --profile=WinXPSP3x86 -f cridex.vmem psscan

The output of the command shows in the following screenshot:

psscan command in volatility

Now we can compare the outputs of both paslist and psscan to find any anomalies.

3. Psxview Plugin on Volatility

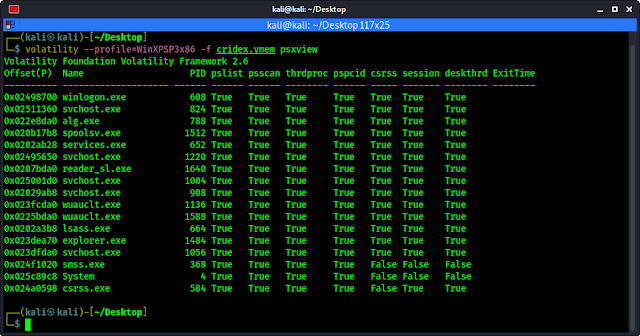
As with psscan, the psxview plugin is used to find and list hidden processes. With psxview however, a variety of scans are run, including pslist and psscan.

To run the psxview we apply following command:

volatility --profile=WinXPSP3x86 -f cridex.vmem psxview

The output of the command shows in the following screenshot:

psxview command in volatility

Analyzing Network Services & Connections using Volatility

Volatility can be used to find and analyze active, terminated, and hidden connections along with ports and processes. All the protocols are supported and Volatility also reveals details of ports used by the processes including the times the processes were started.

To do this we are going to use the following three commands:

  1. connections
  2. connscan
  3. sockets

1. Connection Plugin on Volatility

The connections command lists active connections at that time. It also displays local and remote IP with the ports and PID. The connection command can be used only for Windows XP and Microsoft 2003 server (both 32 bit and 64 bit).

To use the connections command in Volatility we can use following command:

volatility --profile=WinXPSP3x86 -f cridex.vmem connections

The following screenshot shows the output of the connections command and we can see the IP address (both local and remote) along with the port numbers and PID.

connections in volatility

2. Connscan Plugin on Volatility

The connections command displayed only on connection as active at that time. To see a list of connections that have been terminated, we can use the connscan command. This connscan command is also only for Windows XP and 2003 Server (both 32 bit and 64 bit) systems.

To use connscan we run the following command:

volatility --profile=WinXPSP3x86 -f cridex.vmem connscan

The screenshot of this command is following:

connscan on volatility

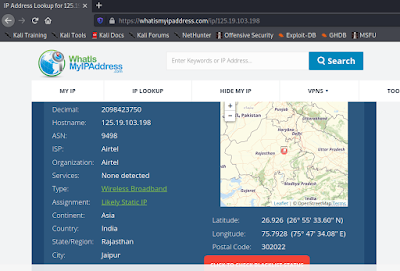
In the above screenshot we can see that same local address was previously connected to another Remote Address with the IP address 125.19.103.198 on port 8080. The PID of 1484 is proof that connection was made by the explorer.exe (tested on pslist earlier).

Here we got the Remote IP address. Now for more information we can search the IP address on some IP Look up web services like https://whatismyipaddress.com/ip-lookup or https://www.ip2location.com/demo. We got some additional information from there as we can see in the following screenshot.

searching for IP address

We can get IP details like, ISP (Internet Service Provider) name, Continent, Country and City. We also got a map co-ordinate of the city.

3. Sockets Plugin on Volatility

We use the sockets plugin to give additional connectivity information listening sockets.

To use sockets plugin we can use following command:

volatility --profile=WinXPSP3x86 -f cridex.vmem sockets

We can see the output of the command in the following screenshot:

Sokects plugin in volatility

We can see in the above that only UDP and TCP protocols are showing in this case. But sockets plugin supports all types of protocols.

Dynamic Link Libraries Analysis using Volatility

DDL a.k.a. Dynamic Link Libraries are only for Microfost (Windows & Servers). It contains code that can be used by multiple programs simultaneously.

Inspection of a process’s running DDLs and the version information of files and products may assist in correlating processes. Processes and DLL information should also be analyzed as they relate to the user accounts. For these tests we can use the following plugins:

  1. verinfo
  2. dlllist
  3. getsids

1. Verinfo plugin on Volatility

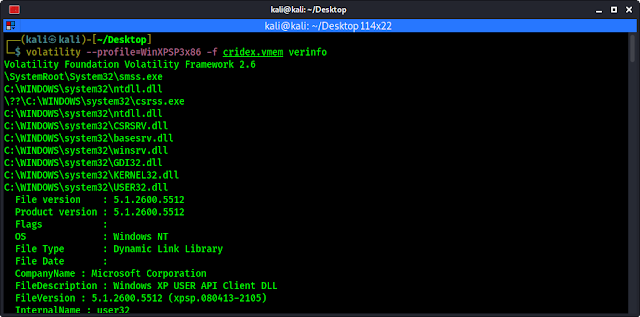
This plugin lists version information as we can see in the plugin name (verinfo) about PE (portable executable) files. The output of this file is usually quite lengthy and so can be run in a separate terminal, if we not wish to continuously scrool through the current terminal to review past plugin command lists and output.

We can use verinfo plugin by running following command:

volatility --profile=WinXPSP3x86 -f cridex.vmem verinfo

The screenshot of the command is following:

verinfo plugin in volatility

2. Dlllist plugin on Volatility

This dlllist plugin lists all running DLLs at that time in memory. DLLs are composed of code that can be used by multiple programs concurrently.

We can use the dlllist plugin by running the following command:

volatility --profile=WinXPSP3x86 -f cridex.vmem dlllist

The following screenshot shows the output of the command:

dlllist on volatility kali linux

3. Getsids plugin on Volatility

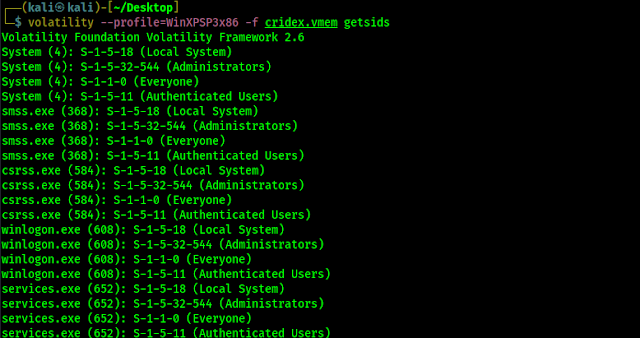
To identify all users we can use Security Identifier (SID). The getsids command has four very useful items in the order in which the processes were started (refer to pslist and pstree command screenshots).

To run the getsids we can use following command:

volatility --profile=WinXPSP3x86 -f cridex.vmem getsids

The screenshot of the command is following:

getsids on volatility

The format for the getsids plugin output is like following:

[Process] (PID) [SID] (User)

On the first line of the output we can see follwoing:

System (4): S-1-5-18 (Local System)

Here we explained in following bullets:

  • Process : System
  • PID : 4
  • SID : S-1-5-18
  • User : Local System

If the last number if SID is in a range of 500, that indicates the user with adminstratative privileges. For an example:

S-1-5-32-544 (Administrators)

Here we got something when we are scrolling down the getsids output, we can see that a user called Robert with an SID of S-1-5-21-789336058 (non-admin) has used started or accessed explorer.exe PID 1484.

Resgistry Analysis

Information about every users, settings, programs and the Windows operating system itself can be found within the registry. Even encrypted passwords can be found in the registry.

In the Windows registry analysis, we will be using the following two plugins.

  1. hivescan
  2. hivelist

1. Hivescan plugin on Volatility

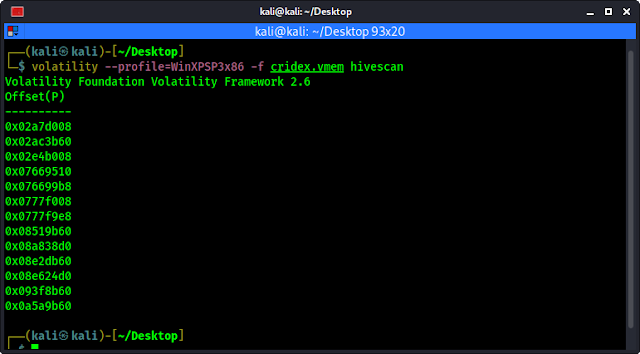
This hivesan plugin display the physical locations of available registry hives.

To use this plugin we need to run following command:

volatility --profile=WinXPSP3x86 -f cridex.vmem hivescan

We can see the physical locations of available registry hives in the following screenshot:

hivescan on volatility

2. Hivelist plugin on Volatility

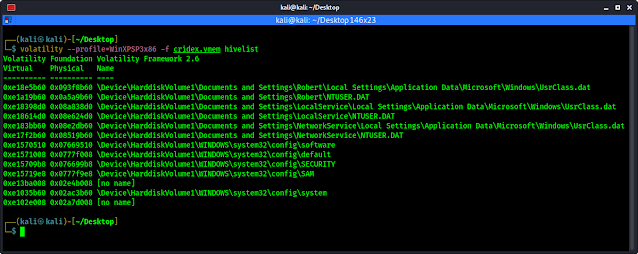
Hivelist plugin is used for more details (and helpful) information on registry hives and locations with RAM. This plugin shows the details of Virtual and Physical address along with the easier readable plaintext names and locations.

We use following command to run hivelist plugin on Volatility

volatility --profile=WinXPSP3x86 -f cridex.vmem hivelist

The output shows in the following screenshot:

hivelist on Volatility

In the above screenshot we can see information about vitual and physical address.

Password Dumping using Volatility

We know that Windows password stored on the SAM (Security Accounts Manager) file on Windows. This SAM file stores hashd passwords for usernames in Windows system. This file can’t be accessed by any user when the Windows system is on.

When we have used the hivelist command (previous screenshot) we have seen the SAM file if we carefully checked the output.

sam file on volatility
We can see the SAM file during using hivelist plugin

Timeline Investigation using Volatility

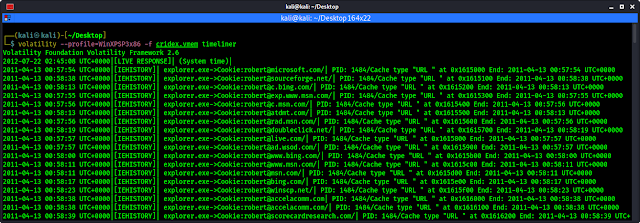
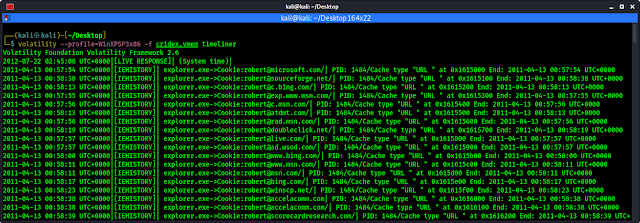
We can check timeline of all the events that took place when the image was acquired by using timeliner plugin on Volatility.

Although we have an idea of what took place within this scenario, many other dumps may be quite large and far more detailed and complex. The timeliner plugin will groups details by time and includes process, PID, process offser, DDLs used, registry details and other useful information.

To run timeliner command, we type the following command:

volatility --profile=WinXPSP3x86 -f cridex.vmem timeliner

The output shows in the following screenshot:

timeliner plugin on Volatility

This may produce long ouput and we need to scrool to see the full output.

Malware analysis

One of most important feature of Voatility is malfind plugin. This plugin is used to find, or at least direct us toward hints of malware that may have been injected into various processes.

The output of malfind plugin may be very lenghty so we should be run it in a separate terminal to avoid constant scrolling when reviewing the other plugin’s output.

The command used to run malfind pluin will be following:

volatility --profile=WinXPSP3x86 -f cridex.vmem malfind

We can see the output on the following screenshot:

malware analysis using volatility

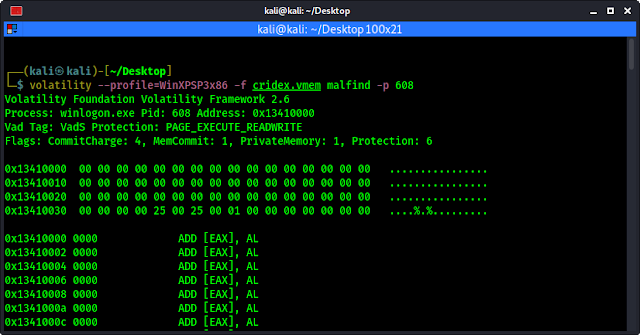
We can see a very long output here. To be more specific we can use -p flag to analyse a specific PID. As we have discovered previously (pslist plugin), winlogon.exe is assigned to PID 608. To analyze this specific PID in malfind we use following command:

volatility --profile=WinXPSP3x86 -f cridex.vmem malfind -p 608

The output of the command shown in the following screenshot:

malfind on a specific PID

Final Thoughts

In this article, we looked at memory forensics and analysis using some of the many plugins available within the Volatility Framework on our Kali Linux system.

One of the first, and most important, steps in working with Volatility is choosing the profile that Volatility will use throughout the analysis. This profile tells Volatility Framework what type of operating system is being used. Once the profile was chosen, we were able to successfully perform process, network, registry, DLL, and even malware analysis using this versatile framework.

As we’ve seen, Volatility can perform several important functions in digital forensics and should be used together with other tools we’ve used previously to perform in-depth and detailed forensic analysis and investigations.

Be sure to download more publicly available memory images and samples to test our skills in this area. Experiment with as many plugins as we can and of course, be sure to document our findings and consider sharing them online.

This is how we can perform Digital forensics on RAM and the swap partition etc using our Kali Linux system with the help of Volatility Framework.

Love our articles? Make sure to follow us on Twitter and GitHub, we post article updates there. To join our KaliLinuxInfamily, join our Telegram Group & Whatsapp Channel. We are trying to build a community for Linux and Cybersecurity. For anything we always happy to help everyone on the comment section. As we know our comment section is always open to everyone. We read each and every comment and we always reply.

Best USB WiFi Adapter For Kali Linux 2023 [Updated August]


Best WiFi Adapter for Kali Linux

The all new Kali Linux 2022.2 was rolling out and we can simply use it as our primary operating system because of the non-root user. The main benefit of using Kali Linux as primary OS is we got the hardware support. Yes, we can do our all penetration testing jobs with this Kali Linux 2022, but to play with wireless networks or WiFi we need some special USB WiFi adapters in Kali.
Best WiFi Adapter for Kali Linux

Here we have listed some best USB Wireless adapters Kali Linux in 2021. These WiFi adapters are 100% compatible with Kali Linux and supports monitor mode and packet injection, which will help a lot in WiFi penetration testing.

Best WiFi Adapter for Kali Linux

Sl
No.
WiFi
Adapter
Chipset
Best
for
Buy
1
AR9271
Good Old Friend
2
AR9002U/RTL8188EUS
Single Band for Beginners
3
RTL8821AU
Best in Budget
4
RT
3070
Best
in it’s Price Range
5
RT
3070
Compact
and Portable
6
RT
5572
Stylish
for the Beginners
5
RTL8812AU
Smart
Look & Advanced
6
RTL8814AU
Powerful & Premium
7
RT5372
Chip, Single Band

Alfa AWUS036NH

We are using this USB WiFi adapter from the BackTrack days (before releasing Kali Linux) and still we consider it as one of the best. For it’s long range signals we can do our penetration testing jobs from a long distance.

Alfa AWUS036NHA Kali Linux WiFi Adapter 2020

Alfa AWUS036NH is plug and play and compatible with any brand 802.11g or 802.11n router using 2.4 GHz wavelength and supports multi-stream & MIMO (multiple input multiple output) with high speed transfer TX data rate up to 150 MBPS. It also comes with a clip which can be used to attach this adapter on a laptop lid.

  1. Chipset: Atheros AR 9271.
  2. Compatible with any brand 802.11b, 802.11g or 802.11n router using 2.4 Ghz wave-length.
  3. Includes a 5 dBi omni directional antenna as well as a 7 dbi panel antenna.
  4. Supports security protocols: 64/128-bit WEP, WPA, WPA2, TKIP, AES.
  5. Compatible with Kali Linux RPi with monitor mode and packet injection.
  6. High transmitter power of 28 dBm – for long-rang and high gain WiFi.
https://www.amazon.com/Alfa-AWUS036NH-802-11g-Wireless-Long-Range/dp/B003YIFHJY/ref=as_li_ss_tl?dchild=1&keywords=Alfa+AWUS036NHA&qid=1594882122&sr=8-6&linkCode=ll1&tag=adaptercart-20&linkId=2f09cf7cc9b84fcd2be61c590af1d25c&language=en_US
TP-Link WN722N was very popular WiFi adapter for cybersecurity students. But after relesing the version 2 and 3, it is not so popular now, because it doesn’t support monitor mode and packet injection directly. But in it’s price range it is easy buy. This WiFi adapter have a detachable antenna which makes it very portable.
tp link wn722n wifi adapter

TP-LinkWN722N have AR9002U chipset on it’s version 1 and RTL8188EUS chipset on version 2/3 We have an article to use TP-Link WN722N Version 2 and 3 for monitor mode and packet injection on Kali Linux.

  1. Chipset: AR9002U/RTL8188EUS.
  2. Compatible with 2.4 Ghz band only.
  3. 3 dBi onmi directional & detachable antenna.

We need to remember one thing that this adapter’s version 2 and 3 didn’t support Monitor Mode and Packet Injection directly we need a tweaking on it as we discussed on this article.

https://www.amazon.com/Alfa-AWUS036NH-802-11g-Wireless-Long-Range/dp/B003YIFHJY/ref=as_li_ss_tl?dchild=1&keywords=Alfa+AWUS036NHA&qid=1594882122&sr=8-6&linkCode=ll1&tag=adaptercart-20&linkId=2f09cf7cc9b84fcd2be61c590af1d25c&language=en_US

TP-Link AC600/T2U Plus

Here comes the real budget king. This TP-Link AC600 or T2U Plus has really proven itself with monitor mode, packet injection and soft AP support. This WiFi adapter is not plug and play on Kali Linux. We just need to set the driver for TP-Lnik AC600 on Kali Linux.

tplink ac 600tplink t2u plus wifi adapter on kali linux

It comes with a fixed 5dBi antenna which can be 180° rotatable. In this price segment it supports monitor mode on both 2.4 Ghz and 5 Ghz networks. It can be the best choice for ethical hacking students. It has lots of features in this budget.

  1. Chipset: RTL8821AU.
  2. Dual band monitor mode support.
  3. Fixed Antenna

It also require a very little bit of tweaking to make it work on Kali Linux. All about it we had already discussed on our previous article. In our opinion go with this WiFi adapter when have a tight budget, because it’s build quality is not like the Alfa Cards.

https://www.amazon.com/Alfa-AWUS036NH-802-11g-Wireless-Long-Range/dp/B003YIFHJY/ref=as_li_ss_tl?dchild=1&keywords=Alfa+AWUS036NHA&qid=1594882122&sr=8-6&linkCode=ll1&tag=adaptercart-20&linkId=2f09cf7cc9b84fcd2be61c590af1d25c&language=en_US

Alfa AWUS036NHA

Alfa again. Alfa provides the best WiFi adapters for Kali Linux. This adapter is the older version of Alfa AWUS036NH with Ralink RT3070 chipset. AWUS036NHA is the IEEE 802.11b/g/n Wireless USB adapter with 150 Mbps speed This is also compatible with IEEE 802.11b/g wireless devices at 54 Mbps.

Alfa AWUS036NH Kali Linux WiFi Adapter 2020

This plug and play WiFi adapter supports monitor mode and packet injection in any Linux distribution and Kali Linux. Alfa AWUS036NHA comes with a 4 inch 5 dBi screw-on swivel rubber antenna that can be removed and upgrade up to 9 dBi.

  1. Chipset: Ralink RT 3070.
  2. Comes with a 5 dBi omni directional antenna as well as a 7 dBi panel antenna.
  3. Supports security protocols: 64/128-bit wep, wpa, wpa2, tkip, aes
  4. Compatible with Kali Linux (Also in Raspberry Pi) with monitor mode and packet injection.
https://www.amazon.com/Alfa-AWUS036NH-802-11g-Wireless-Long-Range/dp/B003YIFHJY/ref=as_li_ss_tl?dchild=1&keywords=Alfa+AWUS036NH&qid=1594870855&s=amazon-devices&sr=8-1&linkCode=ll1&tag=adaptercart-20&linkId=4c49c0097d6157190cf04122e27714ed&language=en_US

Alfa AWUS036NEH

This Alfa WiFi Adapter is compact and tiny, but it has a good range. It supports plug and play so connect it with Kali Linux machine and start playing with WiFi security. The antenna is detachable and makes it very portable. We have used this to build our portable hacking machine with Raspberry Pi and Kali Linux.

Alfa AWUS036NEH Kali Linux WiFi Adpater 2020

Alfa AWUS036NEH is the ultimate solution for going out and red teaming attacks. The long high gain WiFi antenna will give us enough range to capture even low signal wireless networks. This adapter is slim and doesn’t require a USB cable to use.

  1. Chipset: Ralink RT 3070.
  2. Supports monitor mode and packet injection on Kali Linux and Parrot Security on RPi.
  3. Compact and portable.
https://www.amazon.com/AWUS036NEH-Range-WIRELESS-802-11b-USBAdapter/dp/B0035OCVO6/ref=as_li_ss_tl?dchild=1&keywords=Alfa+AWUS036NEH&qid=1594870918&sr=8-3&linkCode=ll1&tag=adaptercart-20&linkId=c6578f6fb090f86f9ee8917afba3199a&language=en_US

Panda PAU09 N600

Besides Alfa, Panda is also a good brand for WiFi adapters with monitor mode. Panda PAU09 is a good WiFi adapter to buy in 2020. This dual-band plug & play adapter is able to attack both 2.4 GHz as well as 5 GHz 802.11 ac/b/g/n WiFi networks.

Panda PAU09 WiFi adapter for monitor mode

This adapter comes with a USB docker and dual antennas, which looks really cool. It is also detachable into smaller parts. This adapter is reliable even on USB 3 and works great and fully supports both monitor mode and injection which is rare on a dual band wireless card out of the box.

  1. Chipset: Ralink RT5572.
  2. Supports monitor mode and packet injection on Kali Linux, Parrot Security even in RPi.
  3. 2 x 5dBi antenna.
  4. It comes with a USB stand with a 5 feet cable.
  5. Little bit of heating issue (not so much).
https://www.amazon.com/Panda-Wireless-PAU09-Adapter-Antennas/dp/B01LY35HGO/ref=as_li_ss_tl?dchild=1&keywords=Panda+PAU09&qid=1594870963&sr=8-1-spons&psc=1&spLa=ZW5jcnlwdGVkUXVhbGlmaWVyPUEzRUUwQjNVSkNGMEFIJmVuY3J5cHRlZElkPUEwODkwNzI3MkZHWUFNUTBRMlRTQSZlbmNyeXB0ZWRBZElkPUEwNzkxNzgzMTBaUEdDS05IUzdDTSZ3aWRnZXROYW1lPXNwX2F0ZiZhY3Rpb249Y2xpY2tSZWRpcmVjdCZkb05vdExvZ0NsaWNrPXRydWU=&linkCode=ll1&tag=adaptercart-20&linkId=d9d43db491c7cf14863cc99c1b8b7797&language=en_US

Alfa AWUS036ACH / AC1200

In Kali Linux 2017.1 update Kali Linux was released a significant update – support for RTL8812AU wireless chipset. Now Alfa AWUS036ACH is a BEAST. This is a premium WiFi adapter used by hackers and penetration testers. It comes with dual antennas and dual band technology (2.4 GHz 300 Mbps/5 GHz 867 Mbps) supports 802.11ac and a, b, g, n.

Alfa AWUS036ACH WiFi adapter for Kali Linux

These antennas are removable and if we require higher range, then we can connect an antenna with greater dbi value and use it as a long range WiFi link which makes this one of the best WiFi adapters. Also this adapter has an awesome look.
If budget is not an issue then this adapter is highly recommended.

  1. Chipset: RealTek RTL8812AU.
  2. Dual-band: 2.4 GHz and 5 GHz.
  3. Supports both monitor mode & packet injection on dual band.
  4. Premium quality with high price tag.
https://www.amazon.com/Alfa-Long-Range-Dual-Band-Wireless-External/dp/B00VEEBOPG/ref=as_li_ss_tl?dchild=1&keywords=Alfa+AWUS036ACH&qid=1594871102&sr=8-3&linkCode=ll1&tag=adaptercart-20&linkId=928256b6b245a63277f865d406f44c02&language=en_US

Alfa AWUS1900 / AC1900

Now this is the beast, then why is it at last? It is last because of its high price range. But the price is totally worth it for this USB WiFi adapter. If the previous adapter was a beast then it is a monster. Alfa AWUS1900 has high-gain quad antenna that covers a really long range (500 ft in an open area).

This is a dual band WiFi adapter with high speed capability 2.4GHz [up to 600Mbps] & 5GHz [up to 1300Mbps]. It also has a USB 3.0 interface.

Alfa AWUS036ACH The best wifi adapter for hacking in Kali Linux

Monitor mode and packet injection supported with both bands and it will be very useful for serious penetration testers. We also can attach this on our laptop display with it’s screen clip provided with the box.


What we got in the box?

  • 1 x AWUS1900 Wi-Fi Adapter
  • 4 x Dual-band antennas
  • 1 x USB 3.0 cable
  • 1 x Screen clip
  • 1 x Installation DVD-Rom (doesn’t require on Kali Linux. Plug&Play)
  • A consistent solution for network congestion!
  1. Chipset: RealTek RTL8814AU.
  2. Dual-band: 2.4 GHz and 5 GHz.
  3. Supports both monitor mode & packet injection on dual band.
  4. Premium quality with high price tag.
  5. Very long range.
https://www.amazon.com/Alfa-AC1900-WiFi-Adapter-Long-Range/dp/B01MZD7Z76/ref=as_li_ss_tl?dchild=1&keywords=Alfa+AWUS036ACH&qid=1594871169&sr=8-4&linkCode=ll1&tag=adaptercart-20&linkId=d62c81825eace1b0f09d0762e84881c4&language=en_US


Panda PAU 06

Yes, This low cost Panda PAU 06 WiFi adapter supports Monitor Mode and Packet Injections. But we really don’t suggest to buy this adapter if budget is not an issue.
panda pau 06 wifi adapter for Kali Linux
The main reason is this WiFi adapter doesn’t supports dual-band frequency (only supports 2.4GHz), it doesn’t supports 5GHz frequency.
This WiFi adapter comes with Ralink RT5372 chipset inside it. 802.11n standards supports 300MB per second maximum speed.
This adapter takes less power from computer, but other adapters doesn’t took too much power from system (this point is negligible).
panda pau 06 order on amazon

Extras

There are some more WiFi adapters that we did not cover because we didn’t test them on our hands. These WiFi adapters were owned by us and some of our friends so we got a chance to test these products.Be Careful to choose from unofficial sellers, because sometimes they sell exactly same model with a cheaper chipset which surely not support monitor mode neighter packet injection. As per our own experience Alfa cards are the best in the case of WiFi Hacking.

How to Choose Best Wireless Adapter for Kali Linux 2020

Before
going through WiFi adapter brands let’s talk something about what kind
of WiFi adapter is best for Kali Linux. There are some requirements to
be a WiFi penetration testing wireless adapter.

  • Should support Monitor mode.

  • The ability to inject packets and capture packets simultaneously.

Here are the list of WiFi motherboards supports Monitor mode and Packet injection.

  • Atheros AR9271 (only supports 2.4 GHz).
  • Ralink RT3070.
  • Ralink RT3572.
  • Ralink RT5370N
  • Ralink RT5372.
  • Ralink RT5572.
  • RealTek 8187L.
  • RealTek RTL8812AU (RTL8812BU & Realtek8811AU doesn’t support monitor mode).
  • RealTek RTL8814AU
  • RTL8188EUS (requires modified driver)
  • RTL8821AU (require some installations)

So
we need to choose WiFi Adapter for Kali Linux carefully. For an
Example, on the Internet lots of old and misleading articles that
describe TP Link N150 TL-WN722N is good for WiFi security testing. But it is not totally true. Actually it was.The
TP Link N150 TL-WN722N’s previous versions support monitor mode. The
version 1 comes with Atheros AR9002U chipset and supports monitor mode.
Version 2 and 3 has the Realtek RTL8188EUS chipset and requires some modification on it’s driver then we can use it. TP Link N150 TL-WN722N version 1 is not
available in the market right now. So clear these things and don’t get
trapped.

Which WiFi adapter you like the most for Kali Linux?


WiFi Hacking in Kali Linux

Kali Linux is the most widely used penetration testing operating system of all time. It comes with lots of tools pre-installed for cyber security experts and ethical hackers. We can perform web application penetration testing, network attack as well as wireless auditing or WiFi hacking. We have already posted some lots of tutorials on our website and some good WiFi auditing tutorials like AirCrack-Ng.

Why Do We Use External USB WiFi Adapters in Kali Linux?

A WiFi adapter is a device that can be connected to our system and allows us to communicate with other devices over a wireless network. It is the WiFi chipset that allows our mobile phone laptop or other devices which allows us to connect to our WiFi network and access the internet or nearby devices.

But most of the Laptops and mobile phones come with inbuilt WiFi chipset so why do we need to connect an external WiFi adapter on our system ? Well the simple answer is our in-built WiFi hardware is not much capable to perform security testing in WiFi networks.Usually inbuilt WiFi adapters are low budget and not made for WiFi hacking, they don’t support monitor mode or packet injection.

If we are running Kali Linux on Virtual Machine then also the inbuilt WiFi Adapter doesn’t work for us. Not even in bridge mode. In that case we also need an external WiFi adapter to play with WiFi networks. A good external WiFi adapter is a must have tool for everyone who has interest in the cyber security field.

 
WSL2 installation of Kali Linux will not support any kind (Inbuilt or External) of Wi-Fi adapters.

Kali Linux Supported WiFi Adapters

Technically almost every WiFi adapter supports Kali Linux, but those are useless on WiFi hacking if they don’t support monitor mode and packet injection. Suppose, we buy a cheap WiFi adapter under $15 and use it to connect WiFi on Kali Linux. That will work for connecting to wireless networks but we can’t play with networks.

It doesn’t make sense, when we are using Kali Linux then we are penetration testers so a basic WiFi adapter can’t fulfill our requirements. That’s why we should have a special WiFi adapter that supports monitor mode and packet injection. So in this tutorial Kali Linux supported means not only supported it means the chipset has ability to support monitor mode and packet injection.

What is Monitor Mode

Network adapters, whether it is wired or wireless, are designed to only capture and process packets that are sent to them. When we want to sniff a wired connection and pick up all packets going over the wire, we put our wired network card in “promiscuous” mode.

In wireless technology, the equivalent is monitor mode. This enables us to see and manipulate all wireless traffic passing through the air around us. Without this ability, we are limited to using our WiFi adapter to only connect to wireless Access Points (APs) that accept and authenticate us. That is not what we are willing to settle for.
In the Aircrack-ng suite, we need to be able to use airodump-ng to collect or sniff data packets.

What is Packet Injection

Most WiFi attacks require that we are able to inject packets into the AP while, at the same time, capturing packets going over the air. Only a few WiFi adapters are capable of doing this.

WiFi adapter manufacturers are not looking to add extra features to their standard wireless adapters to suit penetration testers needs. Most wireless adapters built into your laptop are designed so that people can connect to WiFi and browse the web and send mails. We need something much more powerful and versatile than that.

If we can’t inject packets into the Access Point (in Aircrack-ng, this is the function of Aireplay-ng), then it really limits what we do.

If we are using Kali Linux and want to be a security tester or ethical hacker then a special WiFi adapter is a must have tool in our backpack. As per our own experience listed Alfa cards in this list are best USB wireless adapter for Kali Linux, going with them may be costly but they are really worth it. For more assistance comment below we reply each and every comment.

We are also in Twitter join us there. Our Telegram group also can help to choose the best WiFi adapter for hacking and Kali Linux.

Best USB WiFi Adapter For Kali Linux 2023 [Updated September]


Best WiFi Adapter for Kali Linux

The all new Kali Linux 2021.1 was rolling out and we can simply use it as our primary operating system because of the non-root user. The main benefit of using Kali Linux as primary OS is we got the hardware support. Yes, we can do our all penetration testing jobs with this Kali Linux 2021, but to play with wireless networks or WiFi we need some special USB WiFi adapters in Kali.
Best WiFi Adapter for Kali Linux

Here we have listed some best USB Wireless adapters Kali Linux in 2021. These WiFi adapters are 100% compatible with Kali Linux and supports monitor mode and packet injection, which will help a lot in WiFi penetration testing.

Best WiFi Adapter for Kali Linux

Sl
No.
WiFi
Adapter
Chipset
Best
for
Buy
1
AR9271
Good Old Friend
2
RT
3070
Best
in it’s Price Range
3
RT
3070
Compact
and Portable
4
RT
5572
Stylish
for the Beginners
5
RTL8812AU
Smart
Look & Advanced
6
RTL8814AU
Powerful & Premium
7
RT5372
Chip, Single Band

Alfa AWUS036NH

We are using this USB WiFi adapter from the BackTrack days (before releasing Kali Linux) and still we consider it as one of the best. For it’s long range signals we can do our penetration testing jobs from a long distance.

Alfa AWUS036NHA Kali Linux WiFi Adapter 2020

Alfa AWUS036NH is plug and play and compatible with any brand 802.11g or 802.11n router using 2.4 GHz wavelength and supports multi-stream & MIMO (multiple input multiple output) with high speed transfer TX data rate up to 150 MBPS. It also comes with a clip which can be used to attach this adapter on a laptop lid.

  1. Chipset: Atheros AR 9271.
  2. Compatible with any brand 802.11b, 802.11g or 802.11n router using 2.4 Ghz wave-length.
  3. Includes a 5 dBi omni directional antenna as well as a 7 dbi panel antenna.
  4. Supports security protocols: 64/128-bit WEP, WPA, WPA2, TKIP, AES.
  5. Compatible with Kali Linux RPi with monitor mode and packet injection.
  6. High transmitter power of 28 dBm – for long-rang and high gain WiFi.
https://www.amazon.com/Alfa-AWUS036NH-802-11g-Wireless-Long-Range/dp/B003YIFHJY/ref=as_li_ss_tl?dchild=1&keywords=Alfa+AWUS036NHA&qid=1594882122&sr=8-6&linkCode=ll1&tag=adaptercart-20&linkId=2f09cf7cc9b84fcd2be61c590af1d25c&language=en_US

Alfa AWUS036NHA

Alfa again. Alfa provides the best WiFi adapters for Kali Linux. This adapter is the older version of Alfa AWUS036NH with Ralink RT3070 chipset. AWUS036NHA is the IEEE 802.11b/g/n Wireless USB adapter with 150 Mbps speed This is also compatible with IEEE 802.11b/g wireless devices at 54 Mbps.

Alfa AWUS036NH Kali Linux WiFi Adapter 2020

This plug and play WiFi adapter supports monitor mode and packet injection in any Linux distribution and Kali Linux. Alfa AWUS036NHA comes with a 4 inch 5 dBi screw-on swivel rubber antenna that can be removed and upgrade up to 9 dBi.

  1. Chipset: Ralink RT 3070.
  2. Comes with a 5 dBi omni directional antenna as well as a 7 dBi panel antenna.
  3. Supports security protocols: 64/128-bit wep, wpa, wpa2, tkip, aes
  4. Compatible with Kali Linux (Also in Raspberry Pi) with monitor mode and packet injection.
https://www.amazon.com/Alfa-AWUS036NH-802-11g-Wireless-Long-Range/dp/B003YIFHJY/ref=as_li_ss_tl?dchild=1&keywords=Alfa+AWUS036NH&qid=1594870855&s=amazon-devices&sr=8-1&linkCode=ll1&tag=adaptercart-20&linkId=4c49c0097d6157190cf04122e27714ed&language=en_US

Alfa AWUS036NEH

This Alfa WiFi Adapter is compact and tiny, but it has a good range. It supports plug and play so connect it with Kali Linux machine and start playing with WiFi security. The antenna is detachable and makes it very portable. We have used this to build our portable hacking machine with Raspberry Pi and Kali Linux.

Alfa AWUS036NEH Kali Linux WiFi Adpater 2020

Alfa AWUS036NEH is the ultimate solution for going out and red teaming attacks. The long high gain WiFi antenna will give us enough range to capture even low signal wireless networks. This adapter is slim and doesn’t require a USB cable to use.

  1. Chipset: Ralink RT 3070.
  2. Supports monitor mode and packet injection on Kali Linux and Parrot Security on RPi.
  3. Compact and portable.
https://www.amazon.com/AWUS036NEH-Range-WIRELESS-802-11b-USBAdapter/dp/B0035OCVO6/ref=as_li_ss_tl?dchild=1&keywords=Alfa+AWUS036NEH&qid=1594870918&sr=8-3&linkCode=ll1&tag=adaptercart-20&linkId=c6578f6fb090f86f9ee8917afba3199a&language=en_US

Panda PAU09 N600

Besides Alfa, Panda is also a good brand for WiFi adapters with monitor mode. Panda PAU09 is a good WiFi adapter to buy in 2020. This dual-band plug & play adapter is able to attack both 2.4 GHz as well as 5 GHz 802.11 ac/b/g/n WiFi networks.

Panda PAU09 WiFi adapter for monitor mode

This adapter comes with a USB docker and dual antennas, which looks really cool. It is also detachable into smaller parts. This adapter is reliable even on USB 3 and works great and fully supports both monitor mode and injection which is rare on a dual band wireless card out of the box.

  1. Chipset: Ralink RT5572.
  2. Supports monitor mode and packet injection on Kali Linux, Parrot Security even in RPi.
  3. 2 x 5dBi antenna.
  4. It comes with a USB stand with a 5 feet cable.
  5. Little bit of heating issue (not so much).
https://www.amazon.com/Panda-Wireless-PAU09-Adapter-Antennas/dp/B01LY35HGO/ref=as_li_ss_tl?dchild=1&keywords=Panda+PAU09&qid=1594870963&sr=8-1-spons&psc=1&spLa=ZW5jcnlwdGVkUXVhbGlmaWVyPUEzRUUwQjNVSkNGMEFIJmVuY3J5cHRlZElkPUEwODkwNzI3MkZHWUFNUTBRMlRTQSZlbmNyeXB0ZWRBZElkPUEwNzkxNzgzMTBaUEdDS05IUzdDTSZ3aWRnZXROYW1lPXNwX2F0ZiZhY3Rpb249Y2xpY2tSZWRpcmVjdCZkb05vdExvZ0NsaWNrPXRydWU=&linkCode=ll1&tag=adaptercart-20&linkId=d9d43db491c7cf14863cc99c1b8b7797&language=en_US

Alfa AWUS036ACH / AC1200

In Kali Linux 2017.1 update Kali Linux was released a significant update – support for RTL8812AU wireless chipset. Now Alfa AWUS036ACH is a BEAST. This is a premium WiFi adapter used by hackers and penetration testers. It comes with dual antennas and dual band technology (2.4 GHz 300 Mbps/5 GHz 867 Mbps) supports 802.11ac and a, b, g, n.

Alfa AWUS036ACH WiFi adapter for Kali Linux

These antennas are removable and if we require higher range, then we can connect an antenna with greater dbi value and use it as a long range WiFi link which makes this one of the best WiFi adapters. Also this adapter has an awesome look.

If budget is not an issue then this adapter is highly recommended.

  1. Chipset: RealTek RTL8812AU.
  2. Dual-band: 2.4 GHz and 5 GHz.
  3. Supports both monitor mode & packet injection on dual band.
  4. Premium quality with high price tag.
https://www.amazon.com/Alfa-Long-Range-Dual-Band-Wireless-External/dp/B00VEEBOPG/ref=as_li_ss_tl?dchild=1&keywords=Alfa+AWUS036ACH&qid=1594871102&sr=8-3&linkCode=ll1&tag=adaptercart-20&linkId=928256b6b245a63277f865d406f44c02&language=en_US

Alfa AWUS1900 / AC1900

Now this is the beast, then why is it at last? It is last because of its high price range. But the price is totally worth it for this USB WiFi adapter. If the previous adapter was a beast then it is a monster. Alfa AWUS1900 has high-gain quad antenna that covers a really long range (500 ft in an open area).

This is a dual band WiFi adapter with high speed capability 2.4GHz [up to 600Mbps] & 5GHz [up to 1300Mbps]. It also has a USB 3.0 interface.

Alfa AWUS036ACH The best wifi adapter for hacking in Kali Linux

Monitor mode and packet injection supported with both bands and it will be very useful for serious penetration testers. We also can attach this on our laptop display with it’s screen clip provided with the box.


What we got in the box?

  • 1 x AWUS1900 Wi-Fi Adapter
  • 4 x Dual-band antennas
  • 1 x USB 3.0 cable
  • 1 x Screen clip
  • 1 x Installation DVD-Rom (doesn’t require on Kali Linux. Plug&Play)
  • A consistent solution for network congestion!
  1. Chipset: RealTek RTL8814AU.
  2. Dual-band: 2.4 GHz and 5 GHz.
  3. Supports both monitor mode & packet injection on dual band.
  4. Premium quality with high price tag.
  5. Very long range.
https://www.amazon.com/Alfa-AC1900-WiFi-Adapter-Long-Range/dp/B01MZD7Z76/ref=as_li_ss_tl?dchild=1&keywords=Alfa+AWUS036ACH&qid=1594871169&sr=8-4&linkCode=ll1&tag=adaptercart-20&linkId=d62c81825eace1b0f09d0762e84881c4&language=en_US


Panda PAU 06

Yes, This low cost Panda PAU 06 WiFi adapter supports Monitor Mode and Packet Injections. But we really don’t suggest to buy this adapter if budget is not an issue.
panda pau 06 wifi adapter for Kali Linux
The main reason is this WiFi adapter doesn’t supports dual-band frequency (only supports 2.4GHz), it doesn’t supports 5GHz frequency.
This WiFi adapter comes with Ralink RT5372 chipset inside it. 802.11n standards supports 300MB per second maximum speed.
This adapter takes less power from computer, but other adapters doesn’t took too much power from system (this point is negligible).
panda pau 06 order on amazon

Extras

There are some more WiFi adapters that we did not cover because we didn’t test them on our hands. These WiFi adapters were owned by us and some of our friends so we got a chance to test these products. We didn’t listed some WiFi adapters like following:

Be Careful to choose from these, because we don’t know that they surely support monitor mode & packet injection or not. As per our own experience Alfa cards are the best in the case of WiFi Hacking.

How to Choose Best Wireless Adapter for Kali Linux 2020

Before
going through WiFi adapter brands let’s talk something about what kind
of WiFi adapter is best for Kali Linux. There are some requirements to
be a WiFi penetration testing wireless adapter.

  • Should support Monitor mode.

  • The ability to inject packets and capture packets simultaneously.

Here are the list of WiFi motherboards supports Monitor mode and Packet injection.

  • Atheros AR9271 (only supports 2.4 GHz).
  • Ralink RT3070.
  • Ralink RT3572.
  • Ralink RT5370N
  • Ralink RT5372.
  • Ralink RT5572.
  • RealTek 8187L.
  • RealTek RTL8812AU (RTL8812BU & Realtek8811AU doesn’t support monitor mode).
  • RealTek RTL8814AU

So
we need to choose WiFi Adapter for Kali Linux carefully. For an
Example, on the Internet lots of old and misleading articles that
describe TP Link N150 TL-WN722N is good for WiFi security testing. But it is not true. Actually it was.

TP Link N150 TL-WN722N newer models don't support Monitor Mode
TP Link N150 TL-WN722N newer models doesn’t work

The
TP Link N150 TL-WN722N’s previous versions support monitor mode. The
version 1 comes with Atheros AR9002U chipset and supports monitor mode.
Version 2 has the Realtek RTL8188EUS chipset and doesn’t support monitor
mode or packet injection. TP Link N150 TL-WN722N version 1 is not
available in the market right now. So clear these things and don’t get
trapped.

Which WiFi adapter is the best? Vote Please

 
pollcode.com free polls

WiFi Hacking in Kali Linux

Kali Linux is the most widely used penetration testing operating system of all time. It comes with lots of tools pre-installed for cyber security experts and ethical hackers. We can perform web application penetration testing, network attack as well as wireless auditing or WiFi hacking. We have already posted some lots of tutorials on our website and some good WiFi auditing tutorials like AirCrack-Ng.

Why Do We Use External USB WiFi Adapters in Kali Linux?

A WiFi adapter is a device that can be connected to our system and allows us to communicate with other devices over a wireless network. It is the WiFi chipset that allows our mobile phone laptop or other devices which allows us to connect to our WiFi network and access the internet or nearby devices.

But most of the Laptops and mobile phones come with inbuilt WiFi chipset so why do we need to connect an external WiFi adapter on our system ? Well the simple answer is our in-built WiFi hardware is not much capable to perform security testing in WiFi networks.Usually inbuilt WiFi adapters are low budget and not made for WiFi hacking, they don’t support monitor mode or packet injection.

If we are running Kali Linux on Virtual Machine then also the inbuilt WiFi Adapter doesn’t work for us. Not even in bridge mode. In that case we also need an external WiFi adapter to play with WiFi networks. A good external WiFi adapter is a must have tool for everyone who has interest in the cyber security field.

 
WSL2 installation of Kali Linux will not support any kind (Inbuilt or External) of Wi-Fi adapters.

Kali Linux Supported WiFi Adapters

Technically almost every WiFi adapter supports Kali Linux, but those are useless on WiFi hacking if they don’t support monitor mode and packet injection. Suppose, we buy a cheap WiFi adapter under $15 and use it to connect WiFi on Kali Linux. That will work for connecting to wireless networks but we can’t play with networks.

It doesn’t make sense, when we are using Kali Linux then we are penetration testers so a basic WiFi adapter can’t fulfill our requirements. That’s why we should have a special WiFi adapter that supports monitor mode and packet injection. So in this tutorial Kali Linux supported means not only supported it means the chipset has ability to support monitor mode and packet injection.

What is Monitor Mode

Network adapters, whether it is wired or wireless, are designed to only capture and process packets that are sent to them. When we want to sniff a wired connection and pick up all packets going over the wire, we put our wired network card in “promiscuous” mode.

In wireless technology, the equivalent is monitor mode. This enables us to see and manipulate all wireless traffic passing through the air around us. Without this ability, we are limited to using our WiFi adapter to only connect to wireless Access Points (APs) that accept and authenticate us. That is not what we are willing to settle for.
In the Aircrack-ng suite, we need to be able to use airodump-ng to collect or sniff data packets.

What is Packet Injection

Most WiFi attacks require that we are able to inject packets into the AP while, at the same time, capturing packets going over the air. Only a few WiFi adapters are capable of doing this.

WiFi adapter manufacturers are not looking to add extra features to their standard wireless adapters to suit penetration testers needs. Most wireless adapters built into your laptop are designed so that people can connect to WiFi and browse the web and send mails. We need something much more powerful and versatile than that.

If we can’t inject packets into the Access Point (in Aircrack-ng, this is the function of Aireplay-ng), then it really limits what we do.

If we are using Kali Linux and want to be a security tester or ethical hacker then a special WiFi adapter is a must have tool in our backpack. As per our own experience listed Alfa cards in this list are best USB wireless adapter for Kali Linux, going with them may be costly but they are really worth it. For more assistance comment below we reply each and every comment.

We are also in Twitter join us there. Our Telegram group also can help to choose the best WiFi adapter for hacking and Kali Linux.

Basics of Bash Scripting on Kali Linux

When we are talking about Linux and Terminal, we can’t left Bash scripting. Bash scripting will be very helpful to become a cybersecurity expert, we can automate payloads and other tasks. On our this article we are gonna talk about ‘Bash Scripting‘ and how to write accurate scripts on Linux.

Bash Scripting on Kali Linux

The GNU Bourne-Again Shell (Bash) is a powerful tool and scripting engine. We can do automate many tasks on command-line. In our this guide we are learning Bash scripting and know some practical use case. Here we assume that we know about the Linux files, which discussed on previous article.

Introduction to Bash Scripting

A Bash script is a plain-text file that contains a series of commands that are executed as if they had been typed on terminal window. In general, Bash scripts have an optional extension of .sh for identification (but it can be run without extension name), begin wit #!/bin/bash and must have executable permission set before the script can be executed. Let’s write a simple “Hello World” Bash script on a new file using any text editor, named it hello-world.sh and write the following contains inside it:

#!/bin/bash

# Hello World on Bash Script.

echo “Hello World!”

Then save and close it. In the above script we used some components which we need to explain:

  • Line 1: #! is known as shebang, and it is ignored by the Bash interpreter. The second part, /bin/bash, is absolute path to the interpreter, which is used to run the script. For this we can identify that, this a “Bash script”. There are various types of shell scripts like “zsh” and “C Shell script” etc.
  • Line 2: # is used to add a comment. Hashed (#) tests will be ignored by interpreter. This comments will help us to take special notes for the scripts.
  • Line 3: echo “Hello World!” uses the echo Linux command utility to print a given string to the terminal, which in this case is “Hello World!”.

Now we need to make this script executable by running following command:

chmod +x hello-world.sh

In the following screenshot we can see the output of the above command:

granting permission on bash script

Now we can run the script by using following command:

bash hello-world.sh

We can see that our script shows output of “Hello World!” on our terminal as we can see in the following screenshot:

hello world output on bash

The chmod command, with +x flag is used to make the bash script executable and bash along with scriptname.sh we can run it. We can ./scriptname.sh to run the script. This was our first Bash script. Let’s explore Bash in a bit more detail.

Variables

Variables are used for temporarily store data. We c an declare a variable to assign a value inside it, or read a variable, which will “”expand” or “resolve” it to its store value.

We can declare variable values in various ways. The easiest method is to set the value directly with a simple name=value declaration. We should remember that there are no spaces between or after the “=” sign.

On our terminal we can run following command:

name=Kali

Then we again run another command:

surname=Linux

Variable declaring is pointless unless we can use/reference it. To do this, we precede the variable with $ character. Whenever Bash see this ($) syntax in a command, it replaces the variable name with it’s value before executing the command. For an example we can echo both this variable by using following command:

echo $name $surname

In the following screenshot we can the output shows the values of the variables:

using varriables in bash

Variables names might be uppercase, lowercase or a mixture of both. Bash is case sensitive, so we must be consistent when declaring and expending variables. The good practice to use descriptive variable names, which make our script much easier for others to understand and maintain.

Bash interprets certain characters in specific ways. For example, the following declaration demonstrates an improper multi-value variable declaration:

hello=Hello World

In the following screenshot, we can see the output.

not an example of variable

This was not necessarily what we expected. To fix this type of error we can use single quote (‘) or double quote (“) to enclose our text. Here we need to know that Bash treats single quotes and double quotes differently. When Bash meets the single quotes, Bash interprets every enclosed character literally. When enclosed in double quotes, all characters are viewed literally expect “$” and “” meaning variables will be expended in an initial substitution pass on the enclosed text.

In the case of above scenario we the following will help to clarify:

hello='Hello World'

Now we can print this variable using echo, shown in following screenshot:

right use of variables

In the above example, we had used the single quote (‘) to use the variable. But when we use the hello variable with something other then we need to use double quote (“), we can see following for better understanding:

hello2="Hi, $hello"

Now we can see the print (echo) of new $hello2 variable on the following screenshot:

varibales using double quote

We can also set the value of the variable to the result of a command or script. This is also known as command substitution, which allows us to take the output of  a command (what would normally be printed to the screen) and have it saved as the value of a variable.

To do this, place the variable name in parentheses “()“, preceded by a “$” character:

user=$(whoami)
echo $user

Here we assigned the output of the whoami command the user variable. We then displayed it’s value by echo. In the following screenshot we can see the output of the above command:

take a variable as another variable in bash

An alternative syntax for command substitution using backtick (`), as we can see in the following commands:

user2=`whoami`
echo $user2

This backtick method is older and typically discouraged as there are differences in how the two methods of command substitution behave. It is also important to note that command substitution happens in a subshell and changes to variables in the subshell will not alter variables from the master process.

Arguments

Not all Bash scripts require arguments. However, it is extremely important to understand how they are interpreted by bash and how to use them. We have already executed Linux commands with arguments. For example, when we run command ls -l /var/log, both -l and /var/log are arguments to the ls command.

Bash scripts are not different, we can supply command-line arguments and use them in our scripts. For an example we can see following screenshot:

supplying arguments to bash script

In the above screenshot, we have created a simple Bash script, set executable permissions on it, and then ran it with two arguments. The $1 and $2 variables represents the first and second arguments passed to the script. Let’s explore a few special Bash variables:

Variable Name Description
$0 The name of the Bash script
$1 – $9 The first 9 arguments to the Bash script
$# Number of arguments passed to the Bash script
$@ All arguments passed to the Bash script
$? The exit status of the most recently run process
$$ The process id of the current script
$USER The username of the user running the script
$HOSTNME The hostname of the machine
$RANDOM A random number
$LINENO The current line number in the script

Some of these special variable can be useful when debugging a script. For example, we might be able to obtain the exit status of a command to determine whether it was successfully executed or not.

Reading User Input

Command-line arguments are a form of user input, but we can also capture interactive user input during a script is running with the read command. We are going to use read to capture user input and assign it to a variable, as we did in the following screenshot:

read user input on Bash Script

We can alter the behavior of the read command with various command line options. Two of the most commonly flags include -p, which allows us to specify a prompt, and -s, which makes the user input silent/invisible (might be helpful for credentials). We can see an example in the following screenshot:

read user input silently on bash

If, Else, Elif

If, Else, Elif are considered as most common conditional statements, which allow us to show different actions based on different conditions.

The if statement is quite simple. This checks to see if a condition is true, but it requires a very specific syntax. We need to be careful to attention to this syntax, especially the use of required spaces.

if statement on bash

In the above screenshot if “some statement” is true the script will “do some action“, these action can be any command between then and fi. Lets look at an actual example.

if statement showing example

On the above example, we used an if statement to check the age inputted by a user. If the user’s age was less than (-lt) 12, the script would output a warning message.

Here the square brackets ([ &]) in the if statement above are originally reference to the test command. This simply means we can use all of the operators that are allowed by the test command. Some of the widely used operators include:

  • -n VAR – True if the length of VAR is greater than zero.
  • -z VAR – True if the VAR is empty.
  • STRING1 = STRING2 – True if STRING1 and STRING2 are equal.
  • STRING1 != STRING2 – True if STRING1 and STRING2 are not equal.
  • INTEGER1 -eq INTEGER2 – True if INTEGER1 and INTEGER2 are equal.
  • INTEGER1 -gt INTEGER2 – True if INTEGER1 is greater than INTEGER2.
  • INTEGER1 -lt INTEGER2 – True if INTEGER1 is less than INTEGER2.
  • INTEGER1 -ge INTEGER2 – True if INTEGER1 is equal or greater than INTEGER2.
  • INTEGER1 -le INTEGER2 – True if INTEGER1 is equal or less than INTEGER2.
  • -h FILE – True if the FILE exists and is a symbolic link.
  • -r FILE – True if the FILE exists and is readable.
  • -w FILE – True if the FILE exists and is writable.
  • -x FILE – True if the FILE exists and is executable.
  • -d FILE – True if the FILE exists and is a directory.
  • -e FILE – True if the FILE exists and is a file, regardless of type (node, directory, socket, etc.).
  • -f FILE – True if the FILE exists and is a regular file (not a directory or device).

We had applied these things to the above if statement example and we remove the square brackets using test string. But we think that the square bracket makes the code more readable.

We also can perform a particular set of actions if a statement is true and other statement is false. To do this, we can use the else statement, which has the following syntax:

else statement in bash

Now for an example we expand our previous age example including our else statement, as shown in the following screenshot:

using of else statement in bash example

We can easily notice that the else statement was executed when the inputted age was not less than 12.

We can add more arguments to the statements with the help of elif statement. The example will be following:

elif statement on bash

Let’s extend our age example with elif statement in the following screenshot:

using of elif statement on bash

On the above example we can see that the code is little bit complex compared to if and else. Here when the user inputs the age grater than 60 elif statement will be executed and output the “Salute …” message.

These are the basic uses of bash. Here we learn some simple bash scripts. There are lots of more topic to cover but we don’t want to make the article longer. If you want next part please Tweet us.

In today’s article we learned Basics of Bash scripting on our Kali Linux. Not only Kali Linux this tutorial will work on any Debian based Linux distro like Ubuntu, Linux Mint etc.

Love our articles? Make sure to follow us on Twitter and GitHub, we post article updates there. To join our KaliLinuxIn family, join our Telegram Group. We are trying to build a community for Linux and Cybersecurity. For anything we always happy to help everyone on the comment section. As we know our comment section is always open to everyone. We read each and every comment and we always reply.

Open Whatsapp chat
Whatsapp Us
Chat with us for faster replies.