DNS Management
However you registered your site name, until you find some way to connect your domain with the resources it’s supposed to represent, it won’t do you a lot of good. On Route 53, it’s the way you create and configure a hosted zone that determines what your users will be shown when they invoke your domain name in a browser, email client, or programmatically. Within Route 53, rather than importing a preconfigured zone file (which is certainly an option), you’ll usually configure your hosted zones directly via the console or AWS CLI. When you create a new hosted zone and enter your domain name, you’ll need to tell
Route 53 whether you’d like this zone to be publicly or privately hosted. Routing for a privately hosted zone will be available only within the AWS VPCs that you specify. If you want your resources to be accessible to external users (which is true of most domains), then you’ll create a publicly hosted zone. Route 53 will automatically create an SOA record and provide four name server addresses. From there, it’ll be your job to create new record sets defining the relationships
between your domain and any subdomains you choose to create, and the resources you want made available. Exercise 8.1 guides you through the process of setting up a functioning hosted zone.

Availability Monitoring
You should always be aware of the status of the resources you have running: closing your eyes and just hoping everything is fine has never been a winning strategy. Route 53 offers tools to monitor the health of the resources it’s managing and ways to work around problems. When you create a new record set, you’re given the option of choosing a routing policy (which we’ll discuss at length a bit later in this chapter). Selecting any policy besides Simple will make it possible to associate your policy with a health check. A health check, which you create, configure, and name separately, will regularly test the resource that’s
represented by your record set to confirm it’s healthy. If everything’s OK, Route 53 will continue routing traffic to that resource. But if a preset number of tests pass without an acceptable response, Route 53 will assume the resource is offline and can be set to redirect traffic to a backup resource.
Routing Policies
In a world where your users all happily access a single, reliable server instance hosting your application, complicated routing policies make little sense. But since that’s not the way things usually work in the real world, you’ll generally want to apply flexible protocols to ensure that you’re always providing the most reliable and low-latency service possible. Route 53 routing policies provide this kind of functionality at the domain level that can be applied globally across all AWS regions. To make the most of their power, you’ll need to understand what choices are available and how they work. The simplest of the policies is, predictably, called simple. It routes all requests to the IP address or domain name you assign it. Simple is the default routing policy for new record sets.
Weighted Routing
A weighted policy will route traffic among multiple resources according to the ratio you set. To explain that better, imagine you have three servers (or load balancers representing three groups of servers) all hosting instances of the same web application. One of the servers (or server groups) has greater unused compute and memory capacity and can therefore handle far more traffic. It would be inefficient to send equal numbers of users to each of the servers. Instead, you can assign the larger server a numeric weight of, say, 50 and then 25 to the other two. That would result in half of all requests being sent to the larger server and 25 percent to each of the others. To configure a weighted policy in Route 53, you would create a separate record set for each of your servers, give the same value for the set ID of each of the record sets, and then enter an instance-appropriate numeric value for the weight. The matching set IDs tell Route
53 that those record sets are meant to work together.
Latency Routing
Latency-based routing lets you leverage resources running in multiple AWS regions to provide service to clients from the instances that will deliver the best experience. Practically this means that, for an application used by clients in both Asia and Europe, you could place parallel resources in, say, the ap-southeast-1 and eu-west-1 regions. You then create a record set for each resource using latency-based policies in Route 53, with one pointing to your ap-southeast-1 resource and the other to eu-west-1. Assuming you gave both record sets the same value for Set ID, Route 53 will know to direct requests for those resources to the instance that will provide the lowest latency for each client.
Also read this topic: Introduction to Cloud Computing and AWS -1
Failover Routing
A failover routing policy will direct traffic to the resource you identify as primary as long as health checks confirm that the resource is running properly. Should the primary resource go offline, subsequent traffic will be sent to the resource defined within a second record set and designated as secondary. As with other policies, the desired relationship between record sets is established by using matching set ID values for each set.
Geolocation Routing
Unlike latency policies that route traffic to answer data requests as quickly as possible, geolocation uses the continent, country, or U.S. state where the request originated to decide what resource to send. This can help you focus your content delivery, allowing you to deliver web pages in customer-appropriate languages, restrict content to regions where it’s legally permitted, or generate parallel sales campaigns. You should be aware that Route 53 will sometimes fail to identify the origin of a requesting IP address. You might want to configure a default record to cover those cases.
Multivalue Answer Routing
It’s possible to combine a health check configuration with multivalue routing to make a deployment more highly available. Each multivalue-based record set points to a single resource and can be associated with a health check. As many as eight records can be pointed to parallel resources and connected to each
other through matching set ID values. Route 53 will use the health checks to monitor resource status and randomly route traffic among the healthy resources.
Traffic Flow
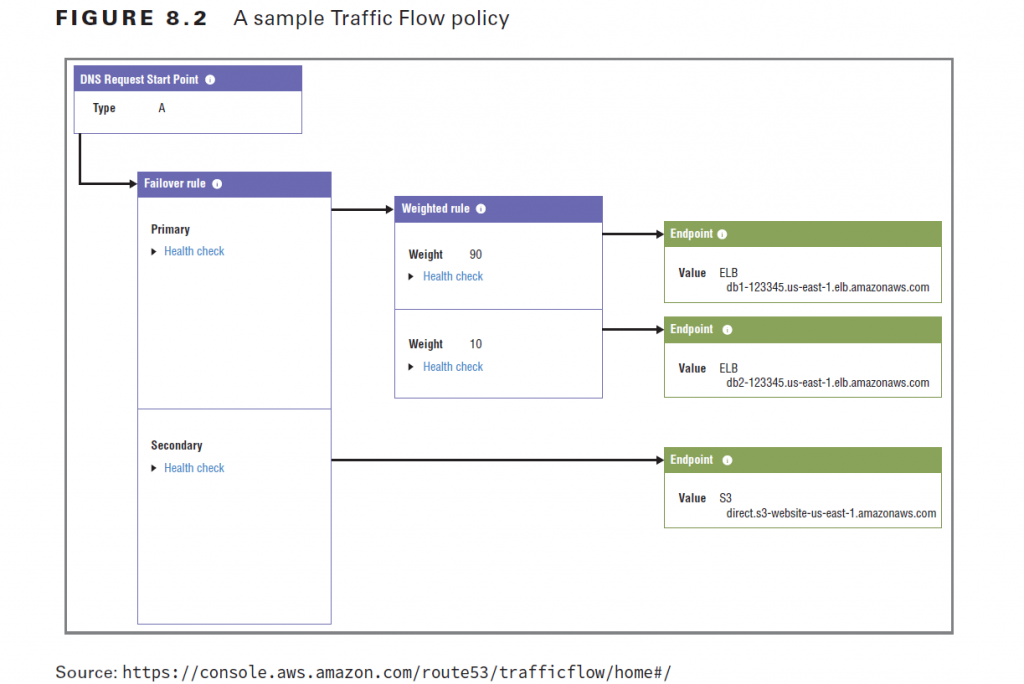
Route 53 Traffic Flow is a console-based graphic interface that allows you to visualize complex combinations of routing policies as you build them. Figure 8.2 shows what a Traffic Flow configuration can look like.

Because it so seamlessly integrates routing policies with all the possible resource endpoints associated with your AWS account, Traffic Flow can make it simpler to quickly build a sophisticated routing structure. You can also use and customize routing templates. Traffic Flow offers a routing policy that, as of the time of writing, is not available as a regular Route 53 policy: Geoproximity Routing. Geoproximity gives you the precision of geolocation routing but at a far finer level. Geoproximity routing rules can specify geographic areas by their relationship to either a particular longitude and latitude or to an AWS region. In both cases, setting a bias score will define how widely beyond your endpoint you want to apply your rule.
Amazon CloudFront
As you’ve seen, Route 53 can be used to optimize the way DNS requests are processed. But Amazon’s global content delivery network (CDN) CloudFront can also help solve one of the primary problems addressed by Route 53: getting your content into the hands of your
users as quickly as possible.
A CDN maintains a network of physical edge locations placed geographically close to the end users who are likely to request content. When you configure the way you want your content delivered—as part of what AWS calls a CloudFront distribution—you define how you want your content distributed through that network and how it should then be delivered to your users.
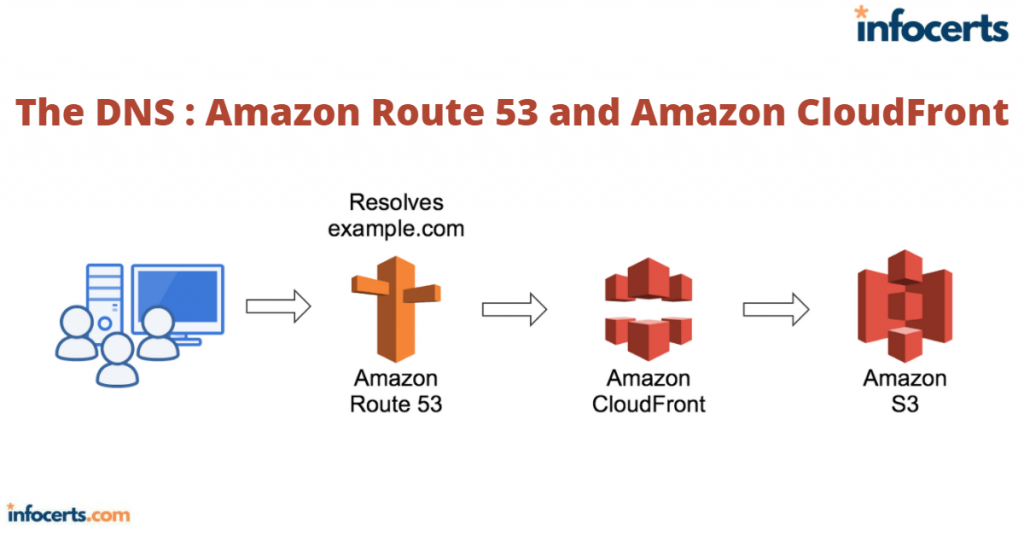
How do your users “know” to address their requests to your CloudFront endpoint address rather than getting it directly from your resources? Normally, they don’t. But when you use Route 53 to configure your domain to direct incoming DNS requests to the CloudFront distribution, users will be automatically routed appropriately.
When a request is made, CloudFront assesses the user’s location and calculates which endpoint will be available to deliver the content with the lowest latency. If this is the first time this content has been requested through the endpoint, the content will be copied from the origin server (an EC2 web server instance, perhaps, or the contents of an S3 bucket). Delivery of subsequent requests will—because the cached copy is still stored at the endpoint—be much faster.
The kind of CloudFront distribution you create will depend on the kind of media you’re providing. For web pages and graphic content, you’ll select a Web distribution. For video content that’s stored in S3 buckets that can use Adobe’s Real-Time Messaging Protocol (RTMP), CloudFront’s RTMP distribution makes the most sense. As you briefly saw in Chapter 3, when you configure your distribution, you’ll have the option of adding a free AWS Certificate Manager (ACM) SSL/TLS encryption certificate to your distribution. This will protect your content as it moves between CloudFront and your users’ devices from network sniffers and man-in-the-middle attacks.
AWS CLI Example
The following command will list all the hosted zones in Route 53 within your AWS account. Among the data that will be returned is an Id for each zone. You can take the value of Id and pass it to the get-hosted-zone command to return record set details for that zone.
$ aws route53 list-hosted-zones
$ aws route53 get-hosted-zone –id /hostedzone/Z38LGIZCB3CSZ3
People also ask this Questions
- What is a defense in depth security strategy how is it implemented?
- What is AWS Solution Architect?
- What is the role of AWS Solution Architect?
- Is AWS Solution Architect easy?
- What is AWS associate solutions architect?
- Is AWS Solutions Architect Associate exam hard?
Infocerts, 5B 306 Riverside Greens, Panvel, Raigad 410206 Maharashtra, India
Contact us – https://www.infocerts.com


